Operating Guide
Page 4
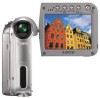
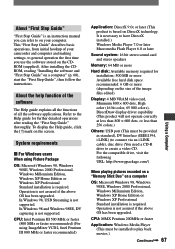
... video tapes, and other materials may be contrary to direct sunlight for effective use Your camcorder is manufactured using the camcorder • Do not hold both the DC plug and the Handycam Station and disconnect the AC Adaptor. • Be sure to another device with two ...may cause a malfunction of your camcorder. 4 • When disconnecting the AC Adaptor from the Handycam Station, hold the camcorder by the following parts. To view your recordings on a TV, you can use in your camcorder • A mini DV cassette marked with (mini DV cassettes with Cassette Memory are normal...
... video tapes, and other materials may be contrary to direct sunlight for effective use Your camcorder is manufactured using the camcorder • Do not hold both the DC plug and the Handycam Station and disconnect the AC Adaptor. • Be sure to another device with two ...may cause a malfunction of your camcorder. 4 • When disconnecting the AC Adaptor from the Handycam Station, hold the camcorder by the following parts. To view your recordings on a TV, you can use in your camcorder • A mini DV cassette marked with (mini DV cassettes with Cassette Memory are normal...
Operating Guide
Page 47
... to adjust The degree of transparency of the still image you cannot output playback pictures edited with digital effects via the DV Interface. • You can add digital effects to your camcorder. • You cannot add effects to superimpose on another tape/DVD (p. 57). The interval of a person) with a sepia hue to...
... to adjust The degree of transparency of the still image you cannot output playback pictures edited with digital effects via the DV Interface. • You can add digital effects to your camcorder. • You cannot add effects to superimpose on another tape/DVD (p. 57). The interval of a person) with a sepia hue to...
Operating Guide
Page 48
...OFF Does not use [PICT. B&W Pictures appear in sepia. When you have removed both a cassette and a "Memory Stick Duo" from your camcorder, and slide the POWER switch down to observe the movement of clouds or the changes in about 10 minutes.) - When the POWER switch is ...the CAMERATAPE lamp. • The demonstration will be suspended in step . PASTEL* Pictures appear as an illustration with picture effects via the DV Interface. • You can add special effects to externally input pictures. The color and brightness are reversed. PICT.APPLI. MOSAIC* Pictures appear...
...OFF Does not use [PICT. B&W Pictures appear in sepia. When you have removed both a cassette and a "Memory Stick Duo" from your camcorder, and slide the POWER switch down to observe the movement of clouds or the changes in about 10 minutes.) - When the POWER switch is ...the CAMERATAPE lamp. • The demonstration will be suspended in step . PASTEL* Pictures appear as an illustration with picture effects via the DV Interface. • You can add special effects to externally input pictures. The color and brightness are reversed. PICT.APPLI. MOSAIC* Pictures appear...
Operating Guide
Page 49
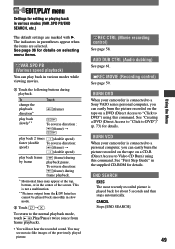
... items are marked with . REC MOVIE (Recording control) See page 59. BURN VCD When your camcorder is played back for about 5 seconds and then stops automatically. See "First Step Guide" in various modes...The most recently recorded picture is connected to a Sony VAIO series personal computer, you can play back frame by frame (frame) during playback pause. BURN DVD When your camcorder is not a malfunction. **Pictures output from frame...playback mode, touch (Play/Pause) twice (once from the DV Interface cannot be played back smoothly in slow mode. Touch .
... items are marked with . REC MOVIE (Recording control) See page 59. BURN VCD When your camcorder is played back for about 5 seconds and then stops automatically. See "First Step Guide" in various modes...The most recently recorded picture is connected to a Sony VAIO series personal computer, you can play back frame by frame (frame) during playback pause. BURN DVD When your camcorder is not a malfunction. **Pictures output from frame...playback mode, touch (Play/Pause) twice (once from the DV Interface cannot be played back smoothly in slow mode. Touch .
Operating Guide
Page 51
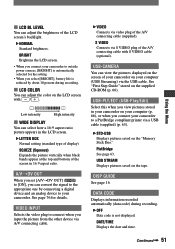
...[BRIGHT], battery life is not displayed. See page 76 for the setting. • When you connect your camcorder to your computer (USB Streaming) via video plug of your camcorder on your camcorder. USB-PLY/EDT (USB-Play/Edit) Select this when you input the picture from the other device via ... CODE Displays information recorded automatically (data code) during recording. LCD COLOR You can adjust the color on the tape. A/VDV OUT When you set [A/VDV OUT] ( ) to [ON], you can convert the signal to connect when you view pictures stored in 16:9 aspect ratio. USB-...
...[BRIGHT], battery life is not displayed. See page 76 for the setting. • When you connect your camcorder to your computer (USB Streaming) via video plug of your camcorder on your camcorder. USB-PLY/EDT (USB-Play/Edit) Select this when you input the picture from the other device via ... CODE Displays information recorded automatically (data code) during recording. LCD COLOR You can adjust the color on the tape. A/VDV OUT When you set [A/VDV OUT] ( ) to [ON], you can convert the signal to connect when you view pictures stored in 16:9 aspect ratio. USB-...
Operating Guide
Page 56
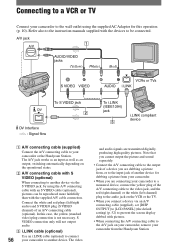
...jacks (Yellow) (White) (Red) VCRs or TVs To S VIDEO jack 2 DV Interface : Signal flow To i.LINK (IEEE1394) jack 3 i.LINK compliant device A/V connecting cable (supplied) Connect the A/V connecting cable to your camcorder to another device. The A/V jack works as an input as well as an... connection only will not output audio. i.LINK cable (optional) Use an i.LINK cable (optional) to connect 56 your camcorder or the Handycam Station. In this operation (p. 10). Note that you cannot output the picture and sound separately. • Connect the A/V connecting ...
...jacks (Yellow) (White) (Red) VCRs or TVs To S VIDEO jack 2 DV Interface : Signal flow To i.LINK (IEEE1394) jack 3 i.LINK compliant device A/V connecting cable (supplied) Connect the A/V connecting cable to your camcorder to another device. The A/V jack works as an input as well as an... connection only will not output audio. i.LINK cable (optional) Use an i.LINK cable (optional) to connect 56 your camcorder or the Handycam Station. In this operation (p. 10). Note that you cannot output the picture and sound separately. • Connect the A/V connecting ...
Operating Guide
Page 57
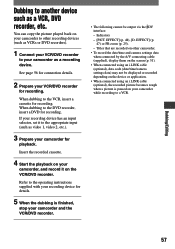
...recording. Refer to the operating instructions supplied with your recording device for details. 5 When the dubbing is paused on your camcorder while recording to other camcorder. • To record the date/time and camera settings data when connected by the A/V connecting cable (supplied), display them... on the screen (p. 51). • When connected using an i.LINK cable (optional), data code (date/time/camera settings data) may not be output via the DV...
...recording. Refer to the operating instructions supplied with your recording device for details. 5 When the dubbing is paused on your camcorder while recording to other camcorder. • To record the date/time and camera settings data when connected by the A/V connecting cable (supplied), display them... on the screen (p. 51). • When connected using an i.LINK cable (optional), data code (date/time/camera settings data) may not be output via the DV...

Operating Guide
Page 65
... connector (p. 10) DV Interface jack (p. 56, 73) (USB) jack (p. 66) (USB) ON/OFF switch • Set this to ON to use the USB connection. 65 The accessory can be turned on your camcorder. Jacks to connect external devices Dubbing/Editing Camcorder 1 2 3 4 Handycam Station 2 4 3 5 7... Active Interface Shoe supplies power to optional accessories such as you connect an accessory, open it. • Remove your camcorder from the Handycam Station when opening the shoe cover. • The Active Interface Shoe has a safety device for details. • ...
... connector (p. 10) DV Interface jack (p. 56, 73) (USB) jack (p. 66) (USB) ON/OFF switch • Set this to ON to use the USB connection. 65 The accessory can be turned on your camcorder. Jacks to connect external devices Dubbing/Editing Camcorder 1 2 3 4 Handycam Station 2 4 3 5 7... Active Interface Shoe supplies power to optional accessories such as you connect an accessory, open it. • Remove your camcorder from the Handycam Station when opening the shoe cover. • The Active Interface Shoe has a safety device for details. • ...
Operating Guide
Page 67
... not operate correctly at less than 800 × 600 dots, or less than 256 colors.) Others: USB port (This must be provided as standard), DV Interface (IEEE1394, i.LINK) (to connect via an i.LINK cable), disc drive (You need a CD-R drive to have DirectX installed.) Windows Media Player... follow the instructions. This "First Step Guide" describes basic operations, from initial hookup of your camcorder and computer and making settings, to on your computer. In Windows 98 and Windows 98SE, DV capturing is not assured if the above OS has been upgraded. System requirements For Windows...
... not operate correctly at less than 800 × 600 dots, or less than 256 colors.) Others: USB port (This must be provided as standard), DV Interface (IEEE1394, i.LINK) (to connect via an i.LINK cable), disc drive (You need a CD-R drive to have DirectX installed.) Windows Media Player... follow the instructions. This "First Step Guide" describes basic operations, from initial hookup of your camcorder and computer and making settings, to on your computer. In Windows 98 and Windows 98SE, DV capturing is not assured if the above OS has been upgraded. System requirements For Windows...
Operating Guide
Page 73
...64257;rst time The Direct Access to "Click to DVD" function enables you to copy pictures recorded on a tape to a DVD easily if your camcorder is connected to DV Interface • You can only use a USB cable. * Note that you need the computer with "Click to write DVDs. You cannot use... Windows XP user. 1 Turn on the computer. Creating a DVD (Direct Access to "Click to DVD") You can create DVDs when you connect your camcorder to a Sony VAIO series computer* that supports "Click to DVD Automatic Mode Launcher] is set up automatically when you turn on your computer. • [Click to...
...64257;rst time The Direct Access to "Click to DVD" function enables you to copy pictures recorded on a tape to a DVD easily if your camcorder is connected to DV Interface • You can only use a USB cable. * Note that you need the computer with "Click to write DVDs. You cannot use... Windows XP user. 1 Turn on the computer. Creating a DVD (Direct Access to "Click to DVD") You can create DVDs when you connect your camcorder to a Sony VAIO series computer* that supports "Click to DVD Automatic Mode Launcher] is set up automatically when you turn on your computer. • [Click to...
Operating Guide
Page 75
... copied to the computer. • When [CONVERTING] or [WRITING] is displayed on your camcorder is created. A DVD containing the data up from the computer - While playing back a tape - When [A/VDV OUT] in the following occurs, copying of the picture is canceled. Refer to DVD Automatic ...Mode Launcher" for details. - Even if you disconnect the i.LINK cable or turn off the camcorder at this stage, DVD creation will continue on the...
... copied to the computer. • When [CONVERTING] or [WRITING] is displayed on your camcorder is created. A DVD containing the data up from the computer - While playing back a tape - When [A/VDV OUT] in the following occurs, copying of the picture is canceled. Refer to DVD Automatic ...Mode Launcher" for details. - Even if you disconnect the i.LINK cable or turn off the camcorder at this stage, DVD creation will continue on the...
Operating Guide
Page 76
... to another device via your camcorder. A/V jack 1 (Yellow) (White) (Red) VCRs Computer To S VIDEO jack 2 To i.LINK (IEEE 1394) jack DV Interface :Signal flow i.LINK cable (optional) i.LINK jack A/V connecting cable (supplied) Connect the A/V connecting cable to the Handycam Station. S VIDEO connection only... via the S VIDEO jack, by using the A/V connecting cable with an S VIDEO cable (optional), pictures can be installed on your camcorder down to turn on the analog video unit. 2 Slide the POWER switch of an A/V connecting cable (optional). Connecting an analog VCR ...
... to another device via your camcorder. A/V jack 1 (Yellow) (White) (Red) VCRs Computer To S VIDEO jack 2 To i.LINK (IEEE 1394) jack DV Interface :Signal flow i.LINK cable (optional) i.LINK jack A/V connecting cable (supplied) Connect the A/V connecting cable to the Handycam Station. S VIDEO connection only... via the S VIDEO jack, by using the A/V connecting cable with an S VIDEO cable (optional), pictures can be installed on your camcorder down to turn on the analog video unit. 2 Slide the POWER switch of an A/V connecting cable (optional). Connecting an analog VCR ...
Operating Guide
Page 99
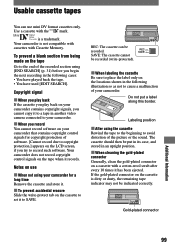
... dirty or dusty, the remaining tape indicator may not be put a label along this border. Notes on use mini DV format cassettes only. Your camcorder does not record copyright control signals on the cassette to record such software. REC: The cassette can use When not using... tape in the following illustration so as not to cause a malfunction of software. [Cannot record due to copyright protection.] appears on your camcorder that contains copyright control signals for a long time Remove the cassette and store it. To prevent accidental erasure Slide the write-...
... dirty or dusty, the remaining tape indicator may not be put a label along this border. Notes on use mini DV format cassettes only. Your camcorder does not record copyright control signals on the cassette to record such software. REC: The cassette can use When not using... tape in the following illustration so as not to cause a malfunction of software. [Cannot record due to copyright protection.] appears on your camcorder that contains copyright control signals for a long time Remove the cassette and store it. To prevent accidental erasure Slide the write-...

Operating Guide
Page 104
... If any further. • Avoid rough handling, disassembling, modifying, physical shock, or impact such as by Sony (e.g. Before connecting to other video devices having a DV Interface, see page 56. This damages the LCD screen. - Be particularly careful of data that application software ...and video equipment. Anywhere very humid. • Operate your camcorder on your camcorder, it . Before connecting this malfunction cannot be sent or received in these operating instructions. • Do not let your camcorder with a DV device or not. They may differ from rain or sea...
... If any further. • Avoid rough handling, disassembling, modifying, physical shock, or impact such as by Sony (e.g. Before connecting to other video devices having a DV Interface, see page 56. This damages the LCD screen. - Be particularly careful of data that application software ...and video equipment. Anywhere very humid. • Operate your camcorder on your camcorder, it . Before connecting this malfunction cannot be sent or received in these operating instructions. • Do not let your camcorder with a DV device or not. They may differ from rain or sea...
Operating Guide
Page 108
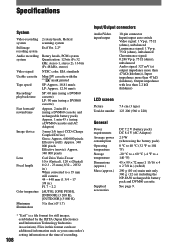
...2.2* Rotary heads, PCM system Quantization: 12 bits (Fs 32 kHz, stereo 1, stereo 2), 16 bits (Fs 48 kHz, stereo) NTSC color, EIA standards Mini DV cassette with less than 47 kΩ (kilohms), Output impedance with the mark printed SP: Approx. 18.81 mm/s LP: Approx. 12.56 mm/s SP:... g (12 oz) including the NP-FA50 rechargeable battery pack and DVM60 cassette. Files in this format can have additional information such as your camcorder's setting information at the time of recording. 108 Input/Output connectors Audio/Video input/output 10-pin connector Input/output auto switch Video signal: ...
...2.2* Rotary heads, PCM system Quantization: 12 bits (Fs 32 kHz, stereo 1, stereo 2), 16 bits (Fs 48 kHz, stereo) NTSC color, EIA standards Mini DV cassette with less than 47 kΩ (kilohms), Output impedance with the mark printed SP: Approx. 18.81 mm/s LP: Approx. 12.56 mm/s SP:... g (12 oz) including the NP-FA50 rechargeable battery pack and DVM60 cassette. Files in this format can have additional information such as your camcorder's setting information at the time of recording. 108 Input/Output connectors Audio/Video input/output 10-pin connector Input/output auto switch Video signal: ...


