
Operating Guide
Page 2
This symbol is subject to the following two conditions: (1) This device may not cause harmful interference, and (2) this manual thoroughly, and retain it for future reference. Notice If static electricity or electromagnetism causes data transfer to the collection and recycling location nearest you. "Memory ...
This symbol is subject to the following two conditions: (1) This device may not cause harmful interference, and (2) this manual thoroughly, and retain it for future reference. Notice If static electricity or electromagnetism causes data transfer to the collection and recycling location nearest you. "Memory ...
Operating Guide
Page 3
... interference that to the following measures: - Refer to provide reasonable protection against harmful interference in this manual could void your Sony dealer regarding this product, you may cause undesired operation. DCR-PC55 Serial No. Note This equipment has been tested and found to comply with Part 15 of the FCC... to correct the interference by turning the equipment off and on the bottom. Record the serial number in order to comply with the Handycam Station Model DCRA-C131 and AC Adaptor Model AC-L200. Model No. However, there is to be used with the equipment in the...
... interference that to the following measures: - Refer to provide reasonable protection against harmful interference in this manual could void your Sony dealer regarding this product, you may cause undesired operation. DCR-PC55 Serial No. Note This equipment has been tested and found to comply with Part 15 of the FCC... to correct the interference by turning the equipment off and on the bottom. Record the serial number in order to comply with the Handycam Station Model DCRA-C131 and AC Adaptor Model AC-L200. Model No. However, there is to be used with the equipment in the...
Operating Guide
Page 4
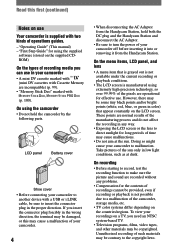
... incompatible) (p. 99). • "Memory Stick Duo" marked with , (p. 100). To view your camcorder off before inserting it into or removing it from the Handycam Station, hold the camcorder by the following parts. However, there may be provided, even if recording or playback is not possible ... contrary to insert the connector plug in the proper direction. "Operating Guide" (This manual) - "First Step Guide" for using the camcorder • Do not hold both the DC plug and the Handycam Station and disconnect the AC Adaptor. • Be sure to malfunction. Take pictures ...
... incompatible) (p. 99). • "Memory Stick Duo" marked with , (p. 100). To view your camcorder off before inserting it into or removing it from the Handycam Station, hold the camcorder by the following parts. However, there may be provided, even if recording or playback is not possible ... contrary to insert the connector plug in the proper direction. "Operating Guide" (This manual) - "First Step Guide" for using the camcorder • Do not hold both the DC plug and the Handycam Station and disconnect the AC Adaptor. • Be sure to malfunction. Take pictures ...
Operating Guide
Page 5
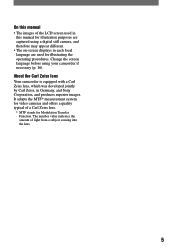
... equipped with a Carl Zeiss lens, which was developed jointly by Carl Zeiss, in each local language are captured using your camcorder if necessary (p. 16). It adopts the MTF* measurement system for video cameras and offers a quality typical of a Carl Zeiss lens. *... screen language before using a digital still camera, and therefore may appear different. • The on-screen displays in Germany, and Sony Corporation, and produces superior images. On this manual • The images of the LCD screen used in this manual for illustration purposes are used for Modulation Transfer Function.
... equipped with a Carl Zeiss lens, which was developed jointly by Carl Zeiss, in each local language are captured using your camcorder if necessary (p. 16). It adopts the MTF* measurement system for video cameras and offers a quality typical of a Carl Zeiss lens. *... screen language before using a digital still camera, and therefore may appear different. • The on-screen displays in Germany, and Sony Corporation, and produces superior images. On this manual • The images of the LCD screen used in this manual for illustration purposes are used for Modulation Transfer Function.
Operating Guide
Page 6
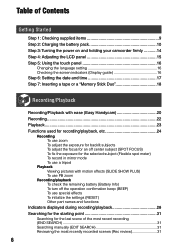
... supplied items 9 Step 2: Charging the battery pack 10 Step 3: Turning the power on and holding your camcorder firmly ...........14 Step 4: Adjusting the LCD panel 15 Step 5: Using the touch panel 16 Changing the...17 Step 7: Inserting a tape or a "Memory Stick Duo 18 Recording/Playback Recording/Playback with ease (Easy Handycam 20 Recording 22 Playback 23 Functions used for recording/playback, etc 24 Recording To use zoom To adjust the ...of the most recent recording (END SEARCH 31 Searching manually (EDIT SEARCH 31 Reviewing the most recently recorded scenes (Rec review 31 6
... supplied items 9 Step 2: Charging the battery pack 10 Step 3: Turning the power on and holding your camcorder firmly ...........14 Step 4: Adjusting the LCD panel 15 Step 5: Using the touch panel 16 Changing the...17 Step 7: Inserting a tape or a "Memory Stick Duo 18 Recording/Playback Recording/Playback with ease (Easy Handycam 20 Recording 22 Playback 23 Functions used for recording/playback, etc 24 Recording To use zoom To adjust the ...of the most recent recording (END SEARCH 31 Searching manually (EDIT SEARCH 31 Reviewing the most recently recorded scenes (Rec review 31 6
Operating Guide
Page 9
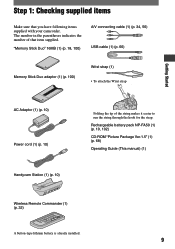
Rechargeable battery pack NP-FA50 (1) (p. 10, 102) CD-ROM "Picture Package Ver.1.5" (1) (p. 68) Operating Guide (This manual) (1) Wireless Remote Commander (1) (p. 32) A button-type lithium battery is already installed. 9 Step 1: Checking supplied items Make sure that item supplied. ...8226; To attach the Wrist strap Getting Started AC Adaptor (1) (p. 10) Power cord (1) (p. 10) Handycam Station (1) (p. 10) Folding the tip of that you have following items supplied with your camcorder. The number in the parentheses indicates the number of the string makes it easier to run the string...
Rechargeable battery pack NP-FA50 (1) (p. 10, 102) CD-ROM "Picture Package Ver.1.5" (1) (p. 68) Operating Guide (This manual) (1) Wireless Remote Commander (1) (p. 32) A button-type lithium battery is already installed. 9 Step 1: Checking supplied items Make sure that item supplied. ...8226; To attach the Wrist strap Getting Started AC Adaptor (1) (p. 10) Power cord (1) (p. 10) Handycam Station (1) (p. 10) Folding the tip of that you have following items supplied with your camcorder. The number in the parentheses indicates the number of the string makes it easier to run the string...
Operating Guide
Page 16
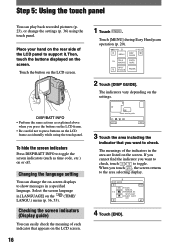
... the area selecting display. When you want to press buttons on the LCD frame accidentally while using the touch panel. Touch [MENU] during Easy Handycam operation (p. 20). 60min MENU 0:00:00 DISP GUIDE 1/3 TELE MACRO EXPOSURE SPOT FOCUS FADER 2 Touch [DISP GUIDE]. Changing the language setting... touch panel. Place your hand on the rear side of the indicators in the area are listed on the screen. DISP GUIDE END FOCUS: MANUAL 1/2 PROGRAM AE: SPOTLIGHT STEADY SHOT: OFF 4 Touch [END]. DISP GUIDE END 3 Touch the area including the indicator that appears on the...
... the area selecting display. When you want to press buttons on the LCD frame accidentally while using the touch panel. Touch [MENU] during Easy Handycam operation (p. 20). 60min MENU 0:00:00 DISP GUIDE 1/3 TELE MACRO EXPOSURE SPOT FOCUS FADER 2 Touch [DISP GUIDE]. Changing the language setting... touch panel. Place your hand on the rear side of the indicators in the area are listed on the screen. DISP GUIDE END FOCUS: MANUAL 1/2 PROGRAM AE: SPOTLIGHT STEADY SHOT: OFF 4 Touch [END]. DISP GUIDE END 3 Touch the area including the indicator that appears on the...
Operating Guide
Page 30
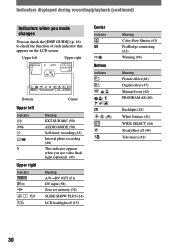
... (24) LCD backlight off (15) Meaning Color Slow Shutter (43) PictBridge connecting (63) Warning (94) Meaning Picture effect (48) Digital effect (47) Manual focus (42) PROGRAM AE (40) Backlight (24) White balance (41) WIDE SELECT (44) SteadyShot off (44) Tele macro (42) 30 Upper left Upper right Center...
... (24) LCD backlight off (15) Meaning Color Slow Shutter (43) PictBridge connecting (63) Warning (94) Meaning Picture effect (48) Digital effect (47) Manual focus (42) PROGRAM AE (40) Backlight (24) White balance (41) WIDE SELECT (44) SteadyShot off (44) Tele macro (42) 30 Upper left Upper right Center...
Operating Guide
Page 31
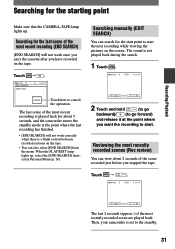
... screen. STBY 0:00:00 EDIT The last 2 seconds (approx.) of the scene recorded just before you stopped the tape. Searching manually (EDIT SEARCH) You can view about 5 seconds, and the camcorder enters the standby mode at the point where you have recorded on the tape. The last scene of the most recently...
... screen. STBY 0:00:00 EDIT The last 2 seconds (approx.) of the scene recorded just before you stopped the tape. Searching manually (EDIT SEARCH) You can view about 5 seconds, and the camcorder enters the standby mode at the point where you have recorded on the tape. The last scene of the most recently...
Operating Guide
Page 34
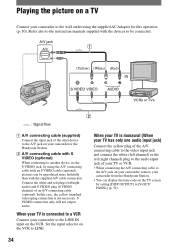
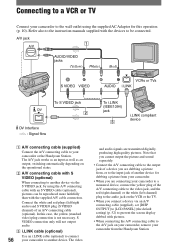
...TVs 2 : Signal flow A/V connecting cable (supplied) Connect the input jack of the other device to the A/V jack on your camcorder or the Handycam Station. A/V connecting cable with the supplied A/V cable connection. When your TV is connected to a VCR Connect your...device via the S VIDEO jack, by setting [DISP OUTPUT] to the A/V jack on your camcorder, remove your camcorder from the Handycam Station. • You can be connected. Refer also to the instruction manuals supplied with an S VIDEO cable (optional), pictures can display the time code on the TV ...
...TVs 2 : Signal flow A/V connecting cable (supplied) Connect the input jack of the other device to the A/V jack on your camcorder or the Handycam Station. A/V connecting cable with the supplied A/V cable connection. When your TV is connected to a VCR Connect your...device via the S VIDEO jack, by setting [DISP OUTPUT] to the A/V jack on your camcorder, remove your camcorder from the Handycam Station. • You can be connected. Refer also to the instruction manuals supplied with an S VIDEO cable (optional), pictures can display the time code on the TV ...
Operating Guide
Page 41
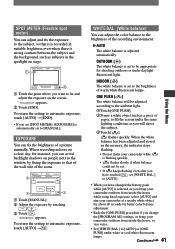
...10 seconds for better color balance adjustment. • Redo the [ONE PUSH] procedure if you change the [PROGRAM AE] settings, or bring your camcorder outdoors from inside the house, or vice versa. • Set [WHITE BAL.] to fix and adjust the exposure on a clear day, ... exposure to the brightness of the recording environment. AUTO The white balance is adjusted automatically. EXPOSURE You can fix the brightness of a picture manually. appears. To return the setting to automatic exposure, touch [AUTO] [END]. • If you want to [AUTO] or [ONE PUSH...
...10 seconds for better color balance adjustment. • Redo the [ONE PUSH] procedure if you change the [PROGRAM AE] settings, or bring your camcorder outdoors from inside the house, or vice versa. • Set [WHITE BAL.] to fix and adjust the exposure on a clear day, ... exposure to the brightness of the recording environment. AUTO The white balance is adjusted automatically. EXPOSURE You can fix the brightness of a picture manually. appears. To return the setting to automatic exposure, touch [AUTO] [END]. • If you want to [AUTO] or [ONE PUSH...
Operating Guide
Page 42
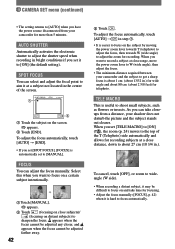
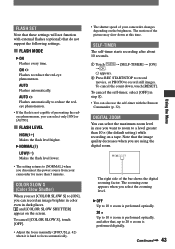
CAMERA SET menu (continued) • The setting returns to [AUTO] when you have the power source disconnected from a distance, your camcorder and the subject to get a sharp focus is about 1 cm (about 27 cm (10 3/4 in step . • It is easier to focus on ...electronic shutter to adjust the shutter speed when recording in .) for wide angle and about 80 cm (about 2 5/8 feet) for focusing. • Adjust the focus manually ([FOCUS], p. 42) when it at a subject not located in the center of the T (Telephoto) side automatically and allows for recording subjects at close range, move...
CAMERA SET menu (continued) • The setting returns to [AUTO] when you have the power source disconnected from a distance, your camcorder and the subject to get a sharp focus is about 1 cm (about 27 cm (10 3/4 in step . • It is easier to focus on ...electronic shutter to adjust the shutter speed when recording in .) for wide angle and about 80 cm (about 2 5/8 feet) for focusing. • Adjust the focus manually ([FOCUS], p. 42) when it at a subject not located in the center of the T (Telephoto) side automatically and allows for recording subjects at close range, move...
Operating Guide
Page 43
...also use the self-timer with external flashes (optional) that the image quality decreases when you disconnect the power source from your camcorder changes depending on the brightness. The zooming zone appears when you want to zoom to focus automatically. • The shutter speed of... more than 10 × (the default setting) while recording on the screen. To cancel [COLOR SLOW S], touch [OFF]. • Adjust the focus manually ([FOCUS], p. 42) when it is performed optically, and after about 10 seconds. Touch . [SELF-TIMER] [ON] ...
...also use the self-timer with external flashes (optional) that the image quality decreases when you disconnect the power source from your camcorder changes depending on the brightness. The zooming zone appears when you want to zoom to focus automatically. • The shutter speed of... more than 10 × (the default setting) while recording on the screen. To cancel [COLOR SLOW S], touch [OFF]. • Adjust the focus manually ([FOCUS], p. 42) when it is performed optically, and after about 10 seconds. Touch . [SELF-TIMER] [ON] ...
Operating Guide
Page 44
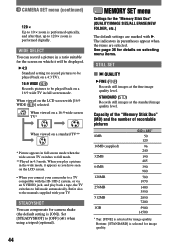
CAMERA SET menu (continued) 120 × Up to 10 × zoom is performed optically, and after that, up to the manuals supplied with [16:9 WIDE ( )] selected. WIDE SELECT You can compensate for the screen on which it will be displayed. 4:3 Standard setting (... in full screen mode. See page 36 for image quality. When viewed on a 16:9 wide screen TV* When viewed on the LCD screen with your camcorder to [OFF] ( ) when using a tripod (optional). 44 MEMORY SET menu Settings for image quality. Set [STEADYSHOT] to a TV compatible with . Bottom: [STANDARD...
CAMERA SET menu (continued) 120 × Up to 10 × zoom is performed optically, and after that, up to the manuals supplied with [16:9 WIDE ( )] selected. WIDE SELECT You can compensate for the screen on which it will be displayed. 4:3 Standard setting (... in full screen mode. See page 36 for image quality. When viewed on a 16:9 wide screen TV* When viewed on the LCD screen with your camcorder to [OFF] ( ) when using a tripod (optional). 44 MEMORY SET menu Settings for image quality. Set [STEADYSHOT] to a TV compatible with . Bottom: [STANDARD...
Operating Guide
Page 47
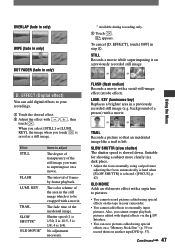
...(fade in only) WIPE (fade in only) DOT FADER (fade in a previously recorded still image (e.g. appears. To cancel [D. EFFECT], touch [OFF] in your camcorder. • You cannot add effects to your recordings. Touch the desired effect. Adjust the effect with touch . / , then When you cannot... TRAIL SLOW SHUTTR* OLD MOVIE* Items to adjust The degree of transparency of the area in a dark place. • Adjust the focus manually using a tripod since adjusting the focus automatically is hard when [SLOW SHUTTR] is saved as a still image. The color scheme of the still...
...(fade in only) WIPE (fade in only) DOT FADER (fade in a previously recorded still image (e.g. appears. To cancel [D. EFFECT], touch [OFF] in your camcorder. • You cannot add effects to your recordings. Touch the desired effect. Adjust the effect with touch . / , then When you cannot... TRAIL SLOW SHUTTR* OLD MOVIE* Items to adjust The degree of transparency of the area in a dark place. • Adjust the focus manually using a tripod since adjusting the focus automatically is hard when [SLOW SHUTTR] is saved as a still image. The color scheme of the still...
Operating Guide
Page 56
... or to the input jack of an A/V connecting cable (optional). Connect the white and red plugs (left channel) plug to connect 56 your camcorder or the Handycam Station. A/V jack 1 AUDIO/VIDEO jacks (Yellow) (White) (Red) VCRs or TVs To S VIDEO jack 2 DV Interface : Signal fl... connecting cable to your camcorder to another device via an A/V connecting cable (supplied), set [DISP OUTPUT] to [LCD PANEL] (the default setting) (p. 52) to prevent the screen display dubbed with the devices to another device. Refer also to the instruction manuals supplied with pictures. &#...
... or to the input jack of an A/V connecting cable (optional). Connect the white and red plugs (left channel) plug to connect 56 your camcorder or the Handycam Station. A/V jack 1 AUDIO/VIDEO jacks (Yellow) (White) (Red) VCRs or TVs To S VIDEO jack 2 DV Interface : Signal fl... connecting cable to your camcorder to another device via an A/V connecting cable (supplied), set [DISP OUTPUT] to [LCD PANEL] (the default setting) (p. 52) to prevent the screen display dubbed with the devices to another device. Refer also to the instruction manuals supplied with pictures. &#...
Operating Guide
Page 67
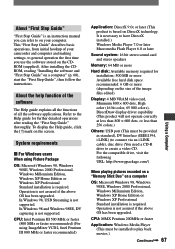
About "First Step Guide" "First Step Guide" is an instruction manual you can refer to general operation the first time you use the software stored on the CDROM (supplied). System requirements For Windows users ... 7.0 or later Macromedia Flash Player 6.0 or later Sound system: 16 bit stereo sound card and stereo speakers Memory: 64 MB or more (depending on your camcorder and computer and making settings, to on the size of all the functions of the image files edited) Display: 4 MB VRAM video card, Minimum...
About "First Step Guide" "First Step Guide" is an instruction manual you can refer to general operation the first time you use the software stored on the CDROM (supplied). System requirements For Windows users ... 7.0 or later Macromedia Flash Player 6.0 or later Sound system: 16 bit stereo sound card and stereo speakers Memory: 64 MB or more (depending on your camcorder and computer and making settings, to on the size of all the functions of the image files edited) Display: 4 MB VRAM video card, Minimum...
Operating Guide
Page 69
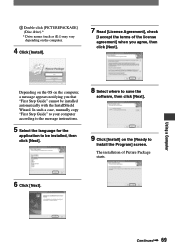
... the [Ready to save the software, then click [Next]. 9 Click [Install] on the computer, a message appears notifying you agree, then click [Next]. In such a case, manually copy "First Step Guide" to your computer according to the message instructions. 5 Select the language for the application to be installed, then click [Next]. 8 Select...
... the [Ready to save the software, then click [Next]. 9 Click [Install] on the computer, a message appears notifying you agree, then click [Next]. In such a case, manually copy "First Step Guide" to your computer according to the message instructions. 5 Select the language for the application to be installed, then click [Next]. 8 Select...
Operating Guide
Page 83
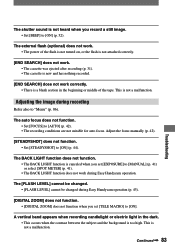
... ZOOM] does not function. • [DIGITAL ZOOM] does not function when you set [EXPOSURE] to [MANUAL] (p. 41) or select [SPOT METER] (p. 41). • The BACK LIGHT function does not work during Easy Handycam operation. Adjust the focus manually (p. 42). [STEADYSHOT] does not function. • Set [STEADYSHOT] to [AUTO] (p. 42). • The recording conditions...
... ZOOM] does not function. • [DIGITAL ZOOM] does not function when you set [EXPOSURE] to [MANUAL] (p. 41) or select [SPOT METER] (p. 41). • The BACK LIGHT function does not work during Easy Handycam operation. Adjust the focus manually (p. 42). [STEADYSHOT] does not function. • Set [STEADYSHOT] to [AUTO] (p. 42). • The recording conditions...
Operating Guide
Page 115
...," " ," "MagicGate," " ," "MagicGate Memory Stick" and "MagicGate Memory Stick Duo" are trademarks or registered trademarks of Sony Corporation. • "InfoLITHIUM" is a trademark of Sony Corporation. • i.LINK and are trademarks of Sony Corporation. • Picture Package is a trademark of Sony Corporation. • is a trademark. • Microsoft, Windows, and Windows Media are not mentioned in each...
...," " ," "MagicGate," " ," "MagicGate Memory Stick" and "MagicGate Memory Stick Duo" are trademarks or registered trademarks of Sony Corporation. • "InfoLITHIUM" is a trademark of Sony Corporation. • i.LINK and are trademarks of Sony Corporation. • Picture Package is a trademark of Sony Corporation. • is a trademark. • Microsoft, Windows, and Windows Media are not mentioned in each...


