Camera Operations Guide
Page 3
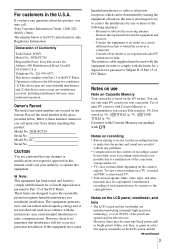
... to record, test the recording function to make sure the picture and sound are recorded without any questions about this product, you may be determined by one or more of recordings cannot be copyrighted. Telephone No.: 201-930-6972 This device complies with Cassette Memory are operational for effective use Title search (p. 54), Date search (p. 55), [ TITLE] (p. 74), [ TAPE TITLE] (p. 76). Record the serial number in a residential installation...
... to record, test the recording function to make sure the picture and sound are recorded without any questions about this product, you may be determined by one or more of recordings cannot be copyrighted. Telephone No.: 201-930-6972 This device complies with Cassette Memory are operational for effective use Title search (p. 54), Date search (p. 55), [ TITLE] (p. 74), [ TAPE TITLE] (p. 76). Record the serial number in a residential installation...

Camera Operations Guide
Page 7
... (MEMORY SET) menu - TITLE/TAPE TITLE/SEARCH, etc 73 Using the (STANDARD SET) menu - REC MODE/MULTI-SOUND/ AUDIO MIX/USB-CAMERA, etc. ..77 Using the (TIME/LANGU.) menu - Digital program editing 91 Dubbing sound to other operating instructions supplied with your camcorder: • Editing images with specific information - Image protection/ Print mark 101 Troubleshooting Troubleshooting 103 Warning indicators and messages ...111 Additional Information Using your camcorder abroad ..........115 Usable cassette tapes 116 About the "Memory Stick 117 About the "InfoLITHIUM" battery pack...
... (MEMORY SET) menu - TITLE/TAPE TITLE/SEARCH, etc 73 Using the (STANDARD SET) menu - REC MODE/MULTI-SOUND/ AUDIO MIX/USB-CAMERA, etc. ..77 Using the (TIME/LANGU.) menu - Digital program editing 91 Dubbing sound to other operating instructions supplied with your camcorder: • Editing images with specific information - Image protection/ Print mark 101 Troubleshooting Troubleshooting 103 Warning indicators and messages ...111 Additional Information Using your camcorder abroad ..........115 Usable cassette tapes 116 About the "Memory Stick 117 About the "InfoLITHIUM" battery pack...
Camera Operations Guide
Page 30
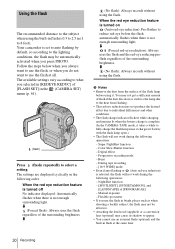
... the CAMERA-TAPE mode, it takes a while to fully charge the flash lamp since it . Color Slow Shutter function - NightShot function - [SPOTLIGHT], [SUNSET&MOON], and [LANDSCAPE] of the surrounding brightness. Manual exposure - m (Forced flash): Always uses the flash regardless of [PROGRAM AE] - m (No flash): Always records without using the flash. You may cause its battery with the flash lamp open.) • The flash will not work during the following operations: - When the red eye reduction...
... the CAMERA-TAPE mode, it takes a while to fully charge the flash lamp since it . Color Slow Shutter function - NightShot function - [SPOTLIGHT], [SUNSET&MOON], and [LANDSCAPE] of the surrounding brightness. Manual exposure - m (Forced flash): Always uses the flash regardless of [PROGRAM AE] - m (No flash): Always records without using the flash. You may cause its battery with the flash lamp open.) • The flash will not work during the following operations: - When the red eye reduction...

Camera Operations Guide
Page 51
Displaying the screen indicators Playback "Memory Stick" playback select button Memory playback button Tape playback select button 5 Play back the still picture or movie, and touch the screen at the point you press the button. To cancel the operation Touch [END]. b Note • You cannot magnify externally input pictures. APPLI.), then [PB ZOOM] by pressing PHOTO. Also, you touched becomes the center. 6 Adjust the zoom ratio using the power zoom lever. You can choose to display the time code, tape counter, and other information...
Displaying the screen indicators Playback "Memory Stick" playback select button Memory playback button Tape playback select button 5 Play back the still picture or movie, and touch the screen at the point you press the button. To cancel the operation Touch [END]. b Note • You cannot magnify externally input pictures. APPLI.), then [PB ZOOM] by pressing PHOTO. Also, you touched becomes the center. 6 Adjust the zoom ratio using the power zoom lever. You can choose to display the time code, tape counter, and other information...

Camera Operations Guide
Page 64
... SPEED]. • [EXP. BURST/QUALITY/IMAGE SIZE/ALL ERASE/NEW FOLDER, etc. The indicators in [EXP. To select items, see the difference between the images recorded in parentheses appear when the setting is hard to see "Selecting menu items" (p. 56). b Notes • The flash will not function while you are recording images continuously. • The maximum number of images are recorded as long as you are displayed...
... SPEED]. • [EXP. BURST/QUALITY/IMAGE SIZE/ALL ERASE/NEW FOLDER, etc. The indicators in [EXP. To select items, see the difference between the images recorded in parentheses appear when the setting is hard to see "Selecting menu items" (p. 56). b Notes • The flash will not function while you are recording images continuously. • The maximum number of images are recorded as long as you are displayed...

Camera Operations Guide
Page 72
... interval recording. stops flashing and the Interval photo recording starts. When you can view the demonstration only when the NIGHTSHOT/NIGHTFRAMING switch is useful to z (green). To record still images on the battery pack, the power will be suspended in situations such as when you do not intend to [5 min] when the camcorder is inserted. - DEMO MODE When you remove a cassette or "Memory Stick" from your camcorder, and select the CAMERA-TAPE mode...
... interval recording. stops flashing and the Interval photo recording starts. When you can view the demonstration only when the NIGHTSHOT/NIGHTFRAMING switch is useful to z (green). To record still images on the battery pack, the power will be suspended in situations such as when you do not intend to [5 min] when the camcorder is inserted. - DEMO MODE When you remove a cassette or "Memory Stick" from your camcorder, and select the CAMERA-TAPE mode...

Camera Operations Guide
Page 87
... them displayed on screen (p. 51). • Pictures edited with your VCR for recording in your camcorder while recording to a VCR. Insert a cassette or a "Memory Stick" for details. 5 When the dubbing is finished, stop your camcorder and the VCR. EFFECT] p. 68), Digital effect (p. 40, 47), or Playback zoom (p. 50) cannot be recorded on the tape. • To record the date/time and camera settings data, have connected the A/V connecting cable, select the input signal in [VIDEO INPUT] in the (STANDARD SET) menu (p. 77). Recording pictures from a VCR...
... them displayed on screen (p. 51). • Pictures edited with your VCR for recording in your camcorder while recording to a VCR. Insert a cassette or a "Memory Stick" for details. 5 When the dubbing is finished, stop your camcorder and the VCR. EFFECT] p. 68), Digital effect (p. 40, 47), or Playback zoom (p. 50) cannot be recorded on the tape. • To record the date/time and camera settings data, have connected the A/V connecting cable, select the input signal in [VIDEO INPUT] in the (STANDARD SET) menu (p. 77). Recording pictures from a VCR...
Camera Operations Guide
Page 95
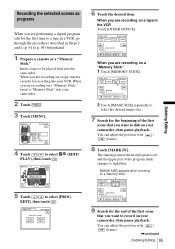
... DEVICE]. Insert a tape to light blue. [IMAGE SIZE] appears when recording on a "Memory Stick." When you are recording on a "Memory Stick" 1 Touch [MEMORY STICK]. 2 Touch [IMAGE SIZE] repeatedly to select the desired image size. 7 Search for recording into your VCR. Recording the selected scenes as programs When you are recording on a "Memory Stick," insert a "Memory Stick" into your camcorder. 2 Touch . 3 Touch [MENU]. 4 Touch / to select PLAY), then touch . (EDIT/ 6 Touch the desired item. When you are recording on a tape, insert a cassette...
... DEVICE]. Insert a tape to light blue. [IMAGE SIZE] appears when recording on a "Memory Stick." When you are recording on a "Memory Stick" 1 Touch [MEMORY STICK]. 2 Touch [IMAGE SIZE] repeatedly to select the desired image size. 7 Search for recording into your VCR. Recording the selected scenes as programs When you are recording on a "Memory Stick," insert a "Memory Stick" into your camcorder. 2 Touch . 3 Touch [MENU]. 4 Touch / to select PLAY), then touch . (EDIT/ 6 Touch the desired item. When you are recording on a tape, insert a cassette...

Camera Operations Guide
Page 107
... head using an S VIDEO plug, make sure the red and white plugs of the A/V connecting cable are playing back the pictures stored on the tape is not a malfunction. "---" is displayed on the screen. • The tape you are using the cleaning cassette (optional). (p. 123) Cannot perform the Date search with Cassette Memory. (p. 116) cSet [ SEARCH] to [STEREO] in the look jagged. Noises appear and on the picture. This is being played. • The data code...
... head using an S VIDEO plug, make sure the red and white plugs of the A/V connecting cable are playing back the pictures stored on the tape is not a malfunction. "---" is displayed on the screen. • The tape you are using the cleaning cassette (optional). (p. 123) Cannot perform the Date search with Cassette Memory. (p. 116) cSet [ SEARCH] to [STEREO] in the look jagged. Noises appear and on the picture. This is being played. • The data code...

Camera Operations Guide
Page 109
... SET) menu, adjust [AUDIO MIX] from connected devices are not displayed on the LCD screen or the viewfinder. New sound added to [LCD PANEL] in the (STANDARD SET) menu. (p. 81) Pictures from the is not heard. [ST1] (original sound) side until the sound is heard appropriately. (p. 78) A title is not recorded/A cassette label is not recorded. The title cannot be recorded in the (p. 75) (EDIT/PLAY) menu. The tape has been used repeatedly for recording. - Input...
... SET) menu, adjust [AUDIO MIX] from connected devices are not displayed on the LCD screen or the viewfinder. New sound added to [LCD PANEL] in the (STANDARD SET) menu. (p. 81) Pictures from the is not heard. [ST1] (original sound) side until the sound is heard appropriately. (p. 78) A title is not recorded/A cassette label is not recorded. The title cannot be recorded in the (p. 75) (EDIT/PLAY) menu. The tape has been used repeatedly for recording. - Input...

Camera Operations Guide
Page 118
... "Memory Stick" and "Memory Stick" compliant product you eject the "Memory Stick," turn the power off on the "Memory Stick" (while the access lamp is lit or flashing). - You may damage the "Memory Stick Duo" or the "Memory Stick" slot on your camcorder is reading or writing image files on your camcorder, or remove the battery pack for use Do not use the "Memory Stick" near magnets or magnetic fields. If you take a back-up of important data on use Image data...
... "Memory Stick" and "Memory Stick" compliant product you eject the "Memory Stick," turn the power off on the "Memory Stick" (while the access lamp is lit or flashing). - You may damage the "Memory Stick Duo" or the "Memory Stick" slot on your camcorder is reading or writing image files on your camcorder, or remove the battery pack for use Do not use the "Memory Stick" near magnets or magnetic fields. If you take a back-up of important data on use Image data...

Camera Operations Guide
Page 123
... obtain a clear image even after about 5 seconds. 4 Touch the "×" displayed on the screen during the operation. 1 Slide the POWER switch up . Video head • When the video head becomes dirty, you using a cleaning cassette, it tightly. On adjustment of the LCD screen may appear on your camcorder. 3 Slide the POWER switch repeatedly to clean it is recommended you cannot record pictures normally, or distorted picture or sound is worn. To clean the LCD screen • If...
... obtain a clear image even after about 5 seconds. 4 Touch the "×" displayed on the screen during the operation. 1 Slide the POWER switch up . Video head • When the video head becomes dirty, you using a cleaning cassette, it tightly. On adjustment of the LCD screen may appear on your camcorder. 3 Slide the POWER switch repeatedly to clean it is recommended you cannot record pictures normally, or distorted picture or sound is worn. To clean the LCD screen • If...

Camera Operations Guide
Page 125
... Tape speed SP: Approx. 18.81 mm/s LP: Approx. 12.56 mm/s Recording/playback time (using a DVM60 cassette) SP: 60 min LP: 90 min Fast forward/rewind time (using a DVM60 cassette) Approx. 2 min 40 s Viewfinder Electric viewfinder (color) Image device 5.9 mm (1/3 type) CCD (Charge Coupled Device) Gross: Approx. 3 310 000 pixels Effective (still): Approx. 3 050 000 pixels Effective (movie): Approx. 2 050 000 pixels Lens Carl Zeiss Vario-Sonnar T* Combined power zoom lens...
... Tape speed SP: Approx. 18.81 mm/s LP: Approx. 12.56 mm/s Recording/playback time (using a DVM60 cassette) SP: 60 min LP: 90 min Fast forward/rewind time (using a DVM60 cassette) Approx. 2 min 40 s Viewfinder Electric viewfinder (color) Image device 5.9 mm (1/3 type) CCD (Charge Coupled Device) Gross: Approx. 3 310 000 pixels Effective (still): Approx. 3 050 000 pixels Effective (movie): Approx. 2 050 000 pixels Lens Carl Zeiss Vario-Sonnar T* Combined power zoom lens...

Camera Operations Guide
Page 134
..., 64 Button-type battery Camcorder 124 Remote Commander . 131 C CALIBRATION 123 Camera Chroma key (CAM T M CHROMA 41 Camera settings data display 51 Cassette 20 Cassette Memory......... 3, 116 Cassette Memory Search (SEARCH) 43, 54, 55, 74 Charging the battery Battery pack 13 Pre-installed button-type battery 124 Clock set (CLOCK SET) 18, 82 Color Slow Shutter (COLOR SLOW S 35 Customizing Personal Menu 83 D Data code (DATA CODE 51, 80 Date search 55 Date/time 51 Delete Deleting pictures .........99 DEMO MODE 72 Digital convert function (A/V c DV OUT 79 Digital effect (D.EFFECT...
..., 64 Button-type battery Camcorder 124 Remote Commander . 131 C CALIBRATION 123 Camera Chroma key (CAM T M CHROMA 41 Camera settings data display 51 Cassette 20 Cassette Memory......... 3, 116 Cassette Memory Search (SEARCH) 43, 54, 55, 74 Charging the battery Battery pack 13 Pre-installed button-type battery 124 Clock set (CLOCK SET) 18, 82 Color Slow Shutter (COLOR SLOW S 35 Customizing Personal Menu 83 D Data code (DATA CODE 51, 80 Date search 55 Date/time 51 Delete Deleting pictures .........99 DEMO MODE 72 Digital convert function (A/V c DV OUT 79 Digital effect (D.EFFECT...

Camera Operations Guide
Page 135
... (LCD BRIGHT 17 LCD COLOR 78 LCD screen 3 LCD/VF SET 78 LP (Long Play) See Recording mode (REC MODE) Luminance key (LUMI. REC 70 Smooth transition See END SEARCH SP (Standard Play) See Recording mode (REC MODE) SPOT FOCUS 35 Standard (STANDARD) See Image quality (QUALITY) STEADYSHOT 63 Stereo/monaural 77 STILL 40 Still image format 117 STILL SET 64 Sub sound See MULTI-SOUND Super NightShot 34 T Tape counter 24 Telephoto See Zoom Time code 24 Title (Cassette Memory) TAPE...
... (LCD BRIGHT 17 LCD COLOR 78 LCD screen 3 LCD/VF SET 78 LP (Long Play) See Recording mode (REC MODE) Luminance key (LUMI. REC 70 Smooth transition See END SEARCH SP (Standard Play) See Recording mode (REC MODE) SPOT FOCUS 35 Standard (STANDARD) See Image quality (QUALITY) STEADYSHOT 63 Stereo/monaural 77 STILL 40 Still image format 117 STILL SET 64 Sub sound See MULTI-SOUND Super NightShot 34 T Tape counter 24 Telephoto See Zoom Time code 24 Title (Cassette Memory) TAPE...
Computer Applications Guide
Page 2
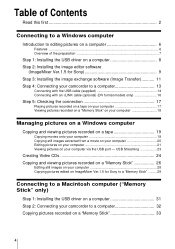
... cable, DV format models only), disc drive (you cannot view pictures recorded on a tape on a "Memory Stick": ImageMixer 1) 2) 1) for Windows computer 2) for installation: 250 MB or more Available free hard disk space recommended: 1 GB or more • Hard disk: Available memory required for Macintosh computer * Use Image Transfer to copy still pictures from your camcorder is a MICROMV format model, refer to the separate MovieShaker Application Guide supplied with ImageMixer and Image Transfer*. System requirements for using ImageMixer Ver.1.5 for Sony When viewing pictures recorded...
... cable, DV format models only), disc drive (you cannot view pictures recorded on a tape on a "Memory Stick": ImageMixer 1) 2) 1) for Windows computer 2) for installation: 250 MB or more Available free hard disk space recommended: 1 GB or more • Hard disk: Available memory required for Macintosh computer * Use Image Transfer to copy still pictures from your camcorder is a MICROMV format model, refer to the separate MovieShaker Application Guide supplied with ImageMixer and Image Transfer*. System requirements for using ImageMixer Ver.1.5 for Sony When viewing pictures recorded...
Computer Applications Guide
Page 4
... Ver.1.5 for Sony 9 Step 3: Installing the image exchange software (Image Transfer 11 Step 4: Connecting your camcorder to a computer 13 Connecting with the USB cable (supplied 14 Connecting with an i.LINK cable (optional) (DV format models only 16 Step 5: Checking the connection 17 Playing pictures recorded on a tape on your computer 17 Viewing pictures recorded on a "Memory Stick" on your computer 18 Managing pictures on a Windows computer Copying and viewing pictures recorded on a tape 19 Copying movies onto your computer 19 Copying still images extracted from a movie on your...
... Ver.1.5 for Sony 9 Step 3: Installing the image exchange software (Image Transfer 11 Step 4: Connecting your camcorder to a computer 13 Connecting with the USB cable (supplied 14 Connecting with an i.LINK cable (optional) (DV format models only 16 Step 5: Checking the connection 17 Playing pictures recorded on a tape on your computer 17 Viewing pictures recorded on a "Memory Stick" on your computer 18 Managing pictures on a Windows computer Copying and viewing pictures recorded on a tape 19 Copying movies onto your computer 19 Copying still images extracted from a movie on your...
Computer Applications Guide
Page 8
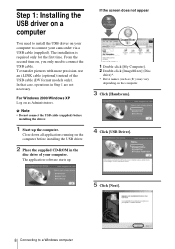
... camcorder via a USB cable (supplied). b Note • Do not connect the USB cable (supplied) before installing the USB driver. 2 Place the supplied CD-ROM in Step 1 are not necessary. The application software starts up the computer. The installation is required only for the first time. Step 1: Installing the USB driver on a computer You need to a Windows computer In that case, operations in the disc drive of the USB cable (DV format models only). For Windows 2000/Windows...
... camcorder via a USB cable (supplied). b Note • Do not connect the USB cable (supplied) before installing the USB driver. 2 Place the supplied CD-ROM in Step 1 are not necessary. The application software starts up the computer. The installation is required only for the first time. Step 1: Installing the USB driver on a computer You need to a Windows computer In that case, operations in the disc drive of the USB cable (DV format models only). For Windows 2000/Windows...

Computer Applications Guide
Page 19
... a Windows computer Copying and viewing pictures recorded on a tape You can also edit the pictures with your tape to the computer. For Windows 2000/Windows XP Log on a Windows computer 19 The maximum length of movies you are connecting via an i.LINK cable (DV format models only). click [ImageMixer Ver.1.5 for Sony on your camcorder is a MICROMV format model, you have installed ImageMixer Ver.1.5 for Sony] on the desktop. 3 Click (Capture Environment). 4 Click (USB Device Capture Mode...
... a Windows computer Copying and viewing pictures recorded on a tape You can also edit the pictures with your tape to the computer. For Windows 2000/Windows XP Log on a Windows computer 19 The maximum length of movies you are connecting via an i.LINK cable (DV format models only). click [ImageMixer Ver.1.5 for Sony on your camcorder is a MICROMV format model, you have installed ImageMixer Ver.1.5 for Sony] on the desktop. 3 Click (Capture Environment). 4 Click (USB Device Capture Mode...

Computer Applications Guide
Page 27
... pictures. A B DE C C F A Click the [Auto Play] tab. Repeat step 3. When the image transfer is complete, ImageMixer starts up at the default setting. Click [Apply]. For Windows XP The automatic playback wizard starts up automatically and displays a list of the procedure.) 1 Make sure you have connected your camcorder to a computer via the USB cable (supplied) (p. 14). B Select [Pictures] for a content type. To change [Basic], [Copy], and [Delete]. Then, select [Open settings...
... pictures. A B DE C C F A Click the [Auto Play] tab. Repeat step 3. When the image transfer is complete, ImageMixer starts up at the default setting. Click [Apply]. For Windows XP The automatic playback wizard starts up automatically and displays a list of the procedure.) 1 Make sure you have connected your camcorder to a computer via the USB cable (supplied) (p. 14). B Select [Pictures] for a content type. To change [Basic], [Copy], and [Delete]. Then, select [Open settings...


