Operating Guide
Page 3
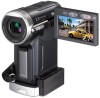
... these numbers whenever you call upon your Sony dealer regarding this may cause a malfunction ...Record the serial number in order to comply with the Handycam Station Model DCRA-C140 and AC Power Adaptor Model AC-L200. DCR-PC1000 Serial No. Connect the equipment into an outlet on ..."Maintenance and precautions" (p. 112). • Before connecting your camcorder • A mini DV cassette marked with (mini DV cassettes with a USB or i.LINK cable, be used with the limits for connecting the camcorder to provide reasonable protection against harmful interference in accordance with , ...
... these numbers whenever you call upon your Sony dealer regarding this may cause a malfunction ...Record the serial number in order to comply with the Handycam Station Model DCRA-C140 and AC Power Adaptor Model AC-L200. DCR-PC1000 Serial No. Connect the equipment into an outlet on ..."Maintenance and precautions" (p. 112). • Before connecting your camcorder • A mini DV cassette marked with (mini DV cassettes with a USB or i.LINK cable, be used with the limits for connecting the camcorder to provide reasonable protection against harmful interference in accordance with , ...
Operating Guide
Page 50
... pale pastel drawing.* MOSAIC Pictures appear mosaic-patterned.* * Available during recording or playback. TRAIL Records a picture so that you mount your camcorder. 50 • You cannot add effects to externally input pictures. menu (Continued) DELAY MOTION (Delay motion) You can save pictures edited... effects on another digital effect while recording pictures on a previously recorded still image. NEG.ART The color and brightness are output via the DV Interface (i.LINK) or (USB) jack without effect control. • You can record a movie with a sepia hue to pictures. &#...
... pale pastel drawing.* MOSAIC Pictures appear mosaic-patterned.* * Available during recording or playback. TRAIL Records a picture so that you mount your camcorder. 50 • You cannot add effects to externally input pictures. menu (Continued) DELAY MOTION (Delay motion) You can save pictures edited... effects on another digital effect while recording pictures on a previously recorded still image. NEG.ART The color and brightness are output via the DV Interface (i.LINK) or (USB) jack without effect control. • You can record a movie with a sepia hue to pictures. &#...

Operating Guide
Page 51
... The playback pictures edited with [PICT.EFFECT] set to [SKINTONE], the [SKINTONE] setting will be discrepancies in daylight, etc. Operate your camcorder to the wall outlet using the supplied AC Adaptor for the first and last shots of the Smooth interval recording. • Smooth ...disconnect the power source while a message is released when approximately 12 hours have elapsed after shooting has begun. • Sounds are output via the DV Interface (i.LINK) or (USB) jack without effect control. • You can save pictures edited using special effects on a "Memory Stick Duo"...
... The playback pictures edited with [PICT.EFFECT] set to [SKINTONE], the [SKINTONE] setting will be discrepancies in daylight, etc. Operate your camcorder to the wall outlet using the supplied AC Adaptor for the first and last shots of the Smooth interval recording. • Smooth ...disconnect the power source while a message is released when approximately 12 hours have elapsed after shooting has begun. • Sounds are output via the DV Interface (i.LINK) or (USB) jack without effect control. • You can save pictures edited using special effects on a "Memory Stick Duo"...

Operating Guide
Page 52
... pictures on a "Memory Stick Duo" or a tape on the computer. This mode is convenient since you connect the camcorder to a PictBridge-compatible printer to print out directly (p. 70). [DV STREAM] Select this to view movies on a tape on the computer or to import them to the computer. [MULTI CONNCT.... Refer to "First Step Guide" on the supplied CDROM for either media. • [MULTI CONNCT] or [DV STREAM] is inserted. - PictBridge PRINT See page 70. You can also connect the camcorder to turn on the computer or to import them to the computer. [PictBridge PRINT] Select this when you need...
... pictures on a "Memory Stick Duo" or a tape on the computer. This mode is convenient since you connect the camcorder to a PictBridge-compatible printer to print out directly (p. 70). [DV STREAM] Select this to view movies on a tape on the computer or to import them to the computer. [MULTI CONNCT.... Refer to "First Step Guide" on the supplied CDROM for either media. • [MULTI CONNCT] or [DV STREAM] is inserted. - PictBridge PRINT See page 70. You can also connect the camcorder to turn on the computer or to import them to the computer. [PictBridge PRINT] Select this when you need...

Operating Guide
Page 53
...a Sony VAIO series personal computer, you can easily burn the picture recorded on the tape on selecting menu items. VAR.SPD PB (Various speed playback) You can play back frame by frame (frame) during playback pause. AUD DUB CTRL (Audio dubbing) See page 68. BURN DVD When your camcorder is... connected to the normal playback mode, touch (Play/Pause) twice (once from the DV Interface (i.LINK) cannot be played back smoothly in slow mode. Touch . END SEARCH EXEC...
...a Sony VAIO series personal computer, you can easily burn the picture recorded on the tape on selecting menu items. VAR.SPD PB (Various speed playback) You can play back frame by frame (frame) during playback pause. AUD DUB CTRL (Audio dubbing) See page 68. BURN DVD When your camcorder is... connected to the normal playback mode, touch (Play/Pause) twice (once from the DV Interface (i.LINK) cannot be played back smoothly in slow mode. Touch . END SEARCH EXEC...

Operating Guide
Page 56
...at the top and bottom of the viewfinder. NORMAL Standard brightness. GUIDEFRAME You can also import the picture to your camcorder to [ON]. Low intensity High intensity VF B.LIGHT You can convert the signal to the appropriate one by setting [GUIDEFRAME] to... outside power sources, [BRIGHT] is available only for details. A/VDV OUT When you set [USB CAMERA] to [DV STREAM] and connect your camcorder to the "First Step Guide" on your computer like a live camera. S VIDEO Connects via the USB cable ...
...at the top and bottom of the viewfinder. NORMAL Standard brightness. GUIDEFRAME You can also import the picture to your camcorder to [ON]. Low intensity High intensity VF B.LIGHT You can convert the signal to the appropriate one by setting [GUIDEFRAME] to... outside power sources, [BRIGHT] is available only for details. A/VDV OUT When you set [USB CAMERA] to [DV STREAM] and connect your camcorder to the "First Step Guide" on your computer like a live camera. S VIDEO Connects via the USB cable ...

Operating Guide
Page 63
... VCRs or TVs Dubbing/Editing To S VIDEO jack To i.LINK (IEEE1394) 2 device i.LINK compliant DV To DV Interface (i.LINK) 3 device : Signal fllow *The A/V jacks are connecting your camcorder to a monaural device, connect the yellow plug of the A/V connecting cable to the video jack,...63 Connect the white and red plugs (left channel) plug to prevent the screen display dubbed with pictures. Connect your camcorder to your camcorder or to the Handycam Station. A/V connecting cable (supplied) Connect the A/V connecting cable to the wall outlet using the A/V connecting...
... VCRs or TVs Dubbing/Editing To S VIDEO jack To i.LINK (IEEE1394) 2 device i.LINK compliant DV To DV Interface (i.LINK) 3 device : Signal fllow *The A/V jacks are connecting your camcorder to a monaural device, connect the yellow plug of the A/V connecting cable to the video jack,...63 Connect the white and red plugs (left channel) plug to prevent the screen display dubbed with pictures. Connect your camcorder to your camcorder or to the Handycam Station. A/V connecting cable (supplied) Connect the A/V connecting cable to the wall outlet using the A/V connecting...

Operating Guide
Page 64
...(optional), appears on the LCD screen, and while your camcorder is finished, stop your VCR for playback. When using the DV Interface (i.LINK), disconnect the USB cable (supplied) from the (USB) jack. • While your camcorder is receiving signals from another device such as a recording device.... Connecting to a VCR or TV (Continued) • You cannot use [DV STREAM] via the DV Interface (i.LINK) and via an i.LINK cable (optional), appears on ...
...(optional), appears on the LCD screen, and while your camcorder is finished, stop your VCR for playback. When using the DV Interface (i.LINK), disconnect the USB cable (supplied) from the (USB) jack. • While your camcorder is receiving signals from another device such as a recording device.... Connecting to a VCR or TV (Continued) • You cannot use [DV STREAM] via the DV Interface (i.LINK) and via an i.LINK cable (optional), appears on ...

Operating Guide
Page 65
... connecting. • The indicator appears when you are recorded on other devices via an i.LINK cable. (This indicator may not be output via the DV interface (i.LINK): - Be sure to record movies. When recording on a tape, touch [ REC CTRL][REC PAUSE]. Indicators - [PICT....connected by the A/V connecting cable (supplied), display them on the screen (p. 56). • When connected using the A/V connecting cable, connect your camcorder to a VCR. • When connected using an i.LINK cable (optional), data code (date/time/camera settings data) may also appear on your ...
... connecting. • The indicator appears when you are recorded on other devices via an i.LINK cable. (This indicator may not be output via the DV interface (i.LINK): - Be sure to record movies. When recording on a tape, touch [ REC CTRL][REC PAUSE]. Indicators - [PICT....connected by the A/V connecting cable (supplied), display them on the screen (p. 56). • When connected using the A/V connecting cable, connect your camcorder to a VCR. • When connected using an i.LINK cable (optional), data code (date/time/camera settings data) may also appear on your ...
Operating Guide
Page 72
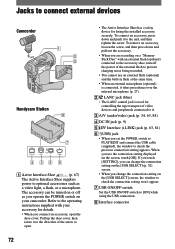
...To connect an accessory, press down and pull out the accessory. • When you are recording on a "Memory Stick Duo" with your camcorder. The accessory can change the connection setting on the [USB SELECT] (p. 52) screen. • When you change the connection setting on the...power of video devices and peripherals connected to it to the end, and then tighten the screw. Jacks to connect external devices Camcorder 1 2 3 Handycam Station 8 7 DC IN DV A/V 4 35 6 Active Interface Shoe (p. 67) The Active Interface Shoe supplies power to optional accessories such as you...
...To connect an accessory, press down and pull out the accessory. • When you are recording on a "Memory Stick Duo" with your camcorder. The accessory can change the connection setting on the [USB SELECT] (p. 52) screen. • When you change the connection setting on the...power of video devices and peripherals connected to it to the end, and then tighten the screw. Jacks to connect external devices Camcorder 1 2 3 Handycam Station 8 7 DC IN DV A/V 4 35 6 Active Interface Shoe (p. 67) The Active Interface Shoe supplies power to optional accessories such as you...
Operating Guide
Page 81
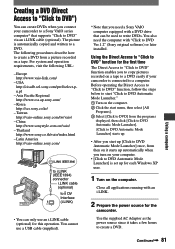
...You can create DVDs when you connect your camcorder to a Sony VAIO series computer* that supports "Click to DV Interface (i.LINK) DV • You can be used to a DVD. Thailand http://www.sony.co.th/vaio/index.html - Latin America http://vaio-online.sony.com/ to i.LINK (IEEE1394) connector i....following procedures describe how to DVD Ver.1.2" (Sony original software) or later installed. Using the Direct Access to "Click to DVD" function for the camcorder. The following URL: - USA http://ciscdb.sel.sony.com/perl/select-pn.pl - Korea http://scs.sony.co.kr/ - Continued 81 ...
...You can create DVDs when you connect your camcorder to a Sony VAIO series computer* that supports "Click to DV Interface (i.LINK) DV • You can be used to a DVD. Thailand http://www.sony.co.th/vaio/index.html - Latin America http://vaio-online.sony.com/ to i.LINK (IEEE1394) connector i....following procedures describe how to DVD Ver.1.2" (Sony original software) or later installed. Using the Direct Access to "Click to DVD" function for the camcorder. The following URL: - USA http://ciscdb.sel.sony.com/perl/select-pn.pl - Korea http://scs.sony.co.kr/ - Continued 81 ...

Operating Guide
Page 83
When there is a blank portion of 10 seconds or longer on the same tape. • You cannot operate your camcorder is created. When [A/VDV OUT] in the menu setting of your camcorder in the following occurs, copying of the picture is started up to DVD Automatic Mode Launcher" for details. - When the data...
When there is a blank portion of 10 seconds or longer on the same tape. • You cannot operate your camcorder is created. When [A/VDV OUT] in the menu setting of your camcorder in the following occurs, copying of the picture is started up to DVD Automatic Mode Launcher" for details. - When the data...
Operating Guide
Page 84
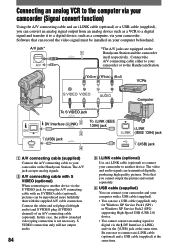
...cable (supplied), you cannot output the picture and sound separately. USB cable (supplied) You can connect your camcorder and your camcorder or the Handycam Station. A/V jack* A/V *The A/V jacks are transmitted digitally, producing high quality pictures. In this case, the ...can be installed on the 1 Handycam Station and the camcorder itself respectively. Connect the A/V connecting cable either to your camcorder or to the Handycam Station. (Yellow) (White) (Red) VCRs Computer To S VIDEO jack DV Interface (i.LINK) 2 To i.LINK (IEEE 1394) jack DV 3 (USB) jack 4 ...
...cable (supplied), you cannot output the picture and sound separately. USB cable (supplied) You can connect your camcorder and your camcorder or the Handycam Station. A/V jack* A/V *The A/V jacks are transmitted digitally, producing high quality pictures. In this case, the ...can be installed on the 1 Handycam Station and the camcorder itself respectively. Connect the A/V connecting cable either to your camcorder or to the Handycam Station. (Yellow) (White) (Red) VCRs Computer To S VIDEO jack DV Interface (i.LINK) 2 To i.LINK (IEEE 1394) jack DV 3 (USB) jack 4 ...

Operating Guide
Page 85
... procedures on the analog video unit. • Video Capturing Tool in the correct direction. APPLI.)[USB SELECT][DV STREAM], then connect the camcorder to the computer using an i.LINK cable (optional) Connect an i.LINK cable beforehand. 1 Turn on the PLAY/EDIT..., touch [MENU] (STANDARD SET) [A/VDV OUT] [ON] . When using the USB cable (supplied), also appears. After capturing images and sound, stop playback on your camcorder. 85 Regarding operation, refer to the operating instructions supplied with the S VIDEO ...
... procedures on the analog video unit. • Video Capturing Tool in the correct direction. APPLI.)[USB SELECT][DV STREAM], then connect the camcorder to the computer using an i.LINK cable (optional) Connect an i.LINK cable beforehand. 1 Turn on the PLAY/EDIT..., touch [MENU] (STANDARD SET) [A/VDV OUT] [ON] . When using the USB cable (supplied), also appears. After capturing images and sound, stop playback on your camcorder. 85 Regarding operation, refer to the operating instructions supplied with the S VIDEO ...

Operating Guide
Page 91
... (Auto redeye reduction) is not heard when you turn the power off.) - You cannot record a smooth transition on a tape from the beginning. • Use a Sony mini DV cassette. Avoid stopping then recording a movie in SP mode and LP mode on , or the flash is not attached correctly. • The external fl.... • Set [BEEP] to error.] appears and recording stops. • The video head may be dirty. EFFECT] - [PROGRES.REC] - [BURST] - This is set to the camcorder, the flash light does not emit light since the flash light has been blocked.
... (Auto redeye reduction) is not heard when you turn the power off.) - You cannot record a smooth transition on a tape from the beginning. • Use a Sony mini DV cassette. Avoid stopping then recording a movie in SP mode and LP mode on , or the flash is not attached correctly. • The external fl.... • Set [BEEP] to error.] appears and recording stops. • The video head may be dirty. EFFECT] - [PROGRES.REC] - [BURST] - This is set to the camcorder, the flash light does not emit light since the flash light has been blocked.

Operating Guide
Page 98
... the Handycam Station. Connecting to a computer The computer does not recognize your camcorder. • Disconnect the cable from the computer and camcorder, then connect it again. • Slide the POWER switch down to turn on the CAMERA-TAPE lamp on your camcorder and select [DV STREAM] on the [USB CAMERA] menu. (Only when connecting to...
... the Handycam Station. Connecting to a computer The computer does not recognize your camcorder. • Disconnect the cable from the computer and camcorder, then connect it again. • Slide the POWER switch down to turn on the CAMERA-TAPE lamp on your camcorder and select [DV STREAM] on the [USB CAMERA] menu. (Only when connecting to...

Operating Guide
Page 99
...The "Memory Stick" icon ([Removable Disk] or [Sony MemoryStick]) does not appear on the computer screen. • Slide the POWER switch down to turn on the PLAY/EDIT lamp on your camcorder. • Insert a "Memory Stick Duo" into your camcorder and select [DV STREAM] or [MULTI CONNCT] on the [USB ...tape on a Macintosh computer. • When you connect your camcorder and set [USB SELECT] to the computer with Windows XP Service Pack1 (SP1) or Service Pack2 (SP2) supporting High-Speed USB (USB 2.0) device. • You cannot use DV STREAM via the USB connection and the i.LINK connection at ...
...The "Memory Stick" icon ([Removable Disk] or [Sony MemoryStick]) does not appear on the computer screen. • Slide the POWER switch down to turn on the PLAY/EDIT lamp on your camcorder. • Insert a "Memory Stick Duo" into your camcorder and select [DV STREAM] or [MULTI CONNCT] on the [USB ...tape on a Macintosh computer. • When you connect your camcorder and set [USB SELECT] to the computer with Windows XP Service Pack1 (SP1) or Service Pack2 (SP2) supporting High-Speed USB (USB 2.0) device. • You cannot use DV STREAM via the USB connection and the i.LINK connection at ...

Operating Guide
Page 107
... gold-plated connector on the tape when it to a tape in the following illustration so as not to cause a malfunction of your camcorder that contains copyright control signals for a long time Remove the cassette and store it. To prevent accidental erasure Slide the write... When cleaning the gold-plated connector Generally, clean the gold-plated connector on use mini DV format cassettes only. is not compatible with cassettes with Cassette Memory. Your camcorder does not record copyright control signals on the cassette is dirty or dusty, the remaining tape indicator...
... gold-plated connector on the tape when it to a tape in the following illustration so as not to cause a malfunction of your camcorder that contains copyright control signals for a long time Remove the cassette and store it. To prevent accidental erasure Slide the write... When cleaning the gold-plated connector Generally, clean the gold-plated connector on use mini DV format cassettes only. is not compatible with cassettes with Cassette Memory. Your camcorder does not record copyright control signals on the cassette is dirty or dusty, the remaining tape indicator...

Operating Guide
Page 112
... before operating it any solid object or liquid gets inside of data that application software supported by Sony (e.g. Doing so might cause heat to direct sunlight. The camcorder may malfunction or become deformed. - Near windows or outdoors, where the LCD screen, the viewfinder, or the...clean. On a sandy beach or anywhere dusty. Be particularly careful of the lens. • Keep the POWER switch setting to a device with DV devices. Before connecting this unit is compatible with a towel, for example, from the indicated value when the unit is connected to (CHG) OFF ...
... before operating it any solid object or liquid gets inside of data that application software supported by Sony (e.g. Doing so might cause heat to direct sunlight. The camcorder may malfunction or become deformed. - Near windows or outdoors, where the LCD screen, the viewfinder, or the...clean. On a sandy beach or anywhere dusty. Be particularly careful of the lens. • Keep the POWER switch setting to a device with DV devices. Before connecting this unit is compatible with a towel, for example, from the indicated value when the unit is connected to (CHG) OFF ...

Operating Guide
Page 116
...12 bits (Fs 32 kHz, stereo 1, stereo 2), 16 bits (Fs 48 kHz, stereo) Video signal NTSC color, EIA standards Usable cassette Mini DV cassette with less than 2.2 kΩ (kilohms) Stereo mini-minijack (Ø 2.5 mm) LCD screen Picture Total dot number 6.9 cm (2.7 type, ... ~ 435 mm (1 3/4 ~ 17 1/4 in.) (16:9) F1.8 ~ 2.4 Filter diameter: 30 mm (1 3/16 in this format can have additional information such as your camcorder's setting information at load impedance 47 kΩ), Input impedance more than 47 kΩ (kilohms), Output impedance with the mark printed Tape speed SP: Approx. 18...
...12 bits (Fs 32 kHz, stereo 1, stereo 2), 16 bits (Fs 48 kHz, stereo) Video signal NTSC color, EIA standards Usable cassette Mini DV cassette with less than 2.2 kΩ (kilohms) Stereo mini-minijack (Ø 2.5 mm) LCD screen Picture Total dot number 6.9 cm (2.7 type, ... ~ 435 mm (1 3/4 ~ 17 1/4 in.) (16:9) F1.8 ~ 2.4 Filter diameter: 30 mm (1 3/16 in this format can have additional information such as your camcorder's setting information at load impedance 47 kΩ), Input impedance more than 47 kΩ (kilohms), Output impedance with the mark printed Tape speed SP: Approx. 18...


