Operating Guide
Page 6
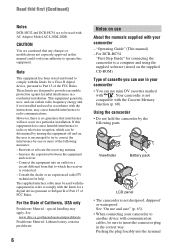
... radio or television reception, which the receiver is connected. - The supplied interface cable must be used with AC Adaptor Model AC-L200/L200B. Your camcorder is not dustproof, dripproof or waterproof. See "On use mini DV cassettes marked with . For the State of cassette you can be determined by ...turning the equipment off and on, the user is no guarantee that to which can use About the manuals supplied with your camcorder to another device with communication cables, be sure to ...
... radio or television reception, which the receiver is connected. - The supplied interface cable must be used with AC Adaptor Model AC-L200/L200B. Your camcorder is not dustproof, dripproof or waterproof. See "On use mini DV cassettes marked with . For the State of cassette you can be determined by ...turning the equipment off and on, the user is no guarantee that to which can use About the manuals supplied with your camcorder to another device with communication cables, be sure to ...
Operating Guide
Page 35
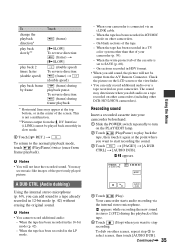
...internal stereo microphone. The sound may deteriorate when you dub audio on a tape recorded on other DCR-HC52/HC54 camcorders). Your camcorder starts audio recording via an i.LINK cable. - b Notes • You cannot record additional audio: - When the tape has been recorded in the ...) t (double speed) (frame) during frame playback. * Horizontal lines may see mosaic-like images of your camcorder is not a malfunction. **Pictures output from the DV Interface (i.LINK) cannot be output from frame playback). Check the picture on other than that of the previously played...
...internal stereo microphone. The sound may deteriorate when you dub audio on a tape recorded on other DCR-HC52/HC54 camcorders). Your camcorder starts audio recording via an i.LINK cable. - b Notes • You cannot record additional audio: - When the tape has been recorded in the ...) t (double speed) (frame) during frame playback. * Horizontal lines may see mosaic-like images of your camcorder is not a malfunction. **Pictures output from the DV Interface (i.LINK) cannot be output from frame playback). Check the picture on other than that of the previously played...
Operating Guide
Page 44
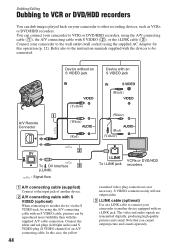
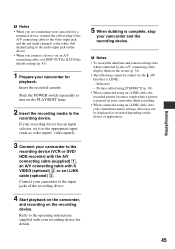
...and red plugs (left/right audio) and S VIDEO plug (S VIDEO channel) of another device equipped with the supplied A/V cable connection. Connect your camcorder to other recording devices, such as VCRs or DVD/HDD recorders. Note that you cannot output picture and sound separately. ... (Red) (White) (Red) (Yellow) 2 DV To DV Interface 3 (i.LINK) : Signal flow A A/V connecting cable (supplied) Connect to the input jack of an A/V connecting cable. Dubbing/Editing Dubbing to VCR or DVD/HDD recorders You can dub images played back on your camcorder to the wall outlet (wall socket) using the ...
...and red plugs (left/right audio) and S VIDEO plug (S VIDEO channel) of another device equipped with the supplied A/V cable connection. Connect your camcorder to other recording devices, such as VCRs or DVD/HDD recorders. Note that you cannot output picture and sound separately. ... (Red) (White) (Red) (Yellow) 2 DV To DV Interface 3 (i.LINK) : Signal flow A A/V connecting cable (supplied) Connect to the input jack of an A/V connecting cable. Dubbing/Editing Dubbing to VCR or DVD/HDD recorders You can dub images played back on your camcorder to the wall outlet (wall socket) using the ...
Operating Guide
Page 45
...If your recording device has an input selector, set [DISP OUT] to [LCD] (the default setting) (p. 43). 1 Prepare your camcorder to the input jacks of the A/V connecting cable to the video input jack, and the red (right channel) or the white (left channel) plug to the audio input jack on... the device. • When you connect a device via the DV Interface (i.LINK): - b Notes • To record the date/time and camera settings data when connected by the A/V connecting cable, display them on the screen (p. 34). • The following cannot be displayed or recorded ...
...If your recording device has an input selector, set [DISP OUT] to [LCD] (the default setting) (p. 43). 1 Prepare your camcorder to the input jacks of the A/V connecting cable to the video input jack, and the red (right channel) or the white (left channel) plug to the audio input jack on... the device. • When you connect a device via the DV Interface (i.LINK): - b Notes • To record the date/time and camera settings data when connected by the A/V connecting cable, display them on the screen (p. 34). • The following cannot be displayed or recorded ...
Operating Guide
Page 46
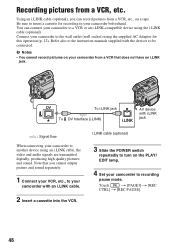
... cassette for this operation (p. 12). DV To i.LINK jack AV device with i.LINK To DV Interface (i.LINK) jack i.LINK : Signal flow When connecting your camcorder beforehand. i.LINK cable (optional) 3 Slide the POWER switch repeatedly to another device using an i.LINK cable, the video and audio signals are ...pictures from a VCR that does not have an i.LINK jack. Using an i.LINK cable (optional), you cannot output picture and sound separately. 1 Connect your VCR, etc., to your camcorder to a VCR or an i.LINK-compatible device using the supplied AC Adaptor for recording ...
... cassette for this operation (p. 12). DV To i.LINK jack AV device with i.LINK To DV Interface (i.LINK) jack i.LINK : Signal flow When connecting your camcorder beforehand. i.LINK cable (optional) 3 Slide the POWER switch repeatedly to another device using an i.LINK cable, the video and audio signals are ...pictures from a VCR that does not have an i.LINK jack. Using an i.LINK cable (optional), you cannot output picture and sound separately. 1 Connect your VCR, etc., to your camcorder to a VCR or an i.LINK-compatible device using the supplied AC Adaptor for recording ...
Operating Guide
Page 49
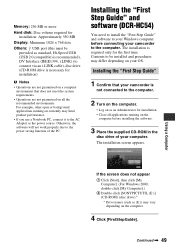
... before installing the software. 3 Place the supplied CD-ROM in the disc drive of the PC. Contents to connect via an i.LINK cable), disc drive (CD-ROM drive is necessary for installation) b Notes • Operations are not guaranteed on all applications running on currently ...(this must be provided as standard, Hi-Speed USB (USB 2.0 compatible) is recommended), DV Interface (IEEE1394, i.LINK) (to be installed and procedures may vary depending on the computer before connecting your camcorder to the power saving function of your computer. Using a Computer If the screen does not ...
... before installing the software. 3 Place the supplied CD-ROM in the disc drive of the PC. Contents to connect via an i.LINK cable), disc drive (CD-ROM drive is necessary for installation) b Notes • Operations are not guaranteed on all applications running on currently ...(this must be provided as standard, Hi-Speed USB (USB 2.0 compatible) is recommended), DV Interface (IEEE1394, i.LINK) (to be installed and procedures may vary depending on the computer before connecting your camcorder to the power saving function of your computer. Using a Computer If the screen does not ...
Operating Guide
Page 62
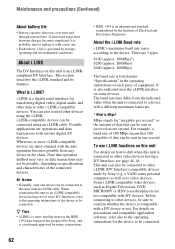
...unit, operation becomes possible from the indicated value when the unit is an i.LINKcompliant DV Interface. Some i.LINK compatible video devices, such as to other devices using an i.LINK cable. About the i.LINK Baud rate i.LINK's maximum baud rate varies according to replace... it with DV devices. There are daisy-chained with various digital AV devices. It is an international standard standardized by Sony (e.g. Maintenance and precautions (Continued) ...
...unit, operation becomes possible from the indicated value when the unit is an i.LINKcompliant DV Interface. Some i.LINK compatible video devices, such as to other devices using an i.LINK cable. About the i.LINK Baud rate i.LINK's maximum baud rate varies according to replace... it with DV devices. There are daisy-chained with various digital AV devices. It is an international standard standardized by Sony (e.g. Maintenance and precautions (Continued) ...
Operating Guide
Page 63
...storing it may malfunction. wash off any liquid that may malfunction. - In this state, the tape may stick to -4-pin cable (during DV dubbing). The indicator will work. Anywhere extremely hot, cold or humid. Never leave them exposed to temperatures above 60 °...by a Sony dealer before connecting or disconnecting the i.LINK cable. Eject the cassette, turn on the product. The camcorder may not be exposed to record properly. - Moisture condensation If your camcorder is moisture inside the casing, unplug your camcorder and have contacted your local authorized Sony service ...
...storing it may malfunction. wash off any liquid that may malfunction. - In this state, the tape may stick to -4-pin cable (during DV dubbing). The indicator will work. Anywhere extremely hot, cold or humid. Never leave them exposed to temperatures above 60 °...by a Sony dealer before connecting or disconnecting the i.LINK cable. Eject the cassette, turn on the product. The camcorder may not be exposed to record properly. - Moisture condensation If your camcorder is moisture inside the casing, unplug your camcorder and have contacted your local authorized Sony service ...


