
Operating Instructions
Page 52
... MENU to display the menu. (3) Turn the SEL/PUSH EXEC dial to select , then press the dial. (4) Turn the SEL/PUSH EXEC dial to select MIC LEVEL, then press the dial. (5) Turn the SEL/PUSH EXEC dial to select MANUAL, then press the dial. (6) Press MENU to monitor the sound when...
... MENU to display the menu. (3) Turn the SEL/PUSH EXEC dial to select , then press the dial. (4) Turn the SEL/PUSH EXEC dial to select MIC LEVEL, then press the dial. (5) Turn the SEL/PUSH EXEC dial to select MANUAL, then press the dial. (6) Press MENU to monitor the sound when...

Operating Instructions
Page 53
When MIC LEVEL is set to AUTO You cannot adjust the recording level, however, the recording level adjustment display is retained for about five minutes after removing the battery. •The recording level indicator appears at the lower-right on the manual adjustment •The recording level setting is displayed. 53 Sound recording level Notes on the LCD screen or in the viewfinder. The sound input through the AUDIO L/R jacks or DV Interface You cannot adjust the recording level. Advanced Recording Operations Adjusting recording level manually -
When MIC LEVEL is set to AUTO You cannot adjust the recording level, however, the recording level adjustment display is retained for about five minutes after removing the battery. •The recording level indicator appears at the lower-right on the manual adjustment •The recording level setting is displayed. 53 Sound recording level Notes on the LCD screen or in the viewfinder. The sound input through the AUDIO L/R jacks or DV Interface You cannot adjust the recording level. Advanced Recording Operations Adjusting recording level manually -

Operating Instructions
Page 95
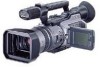
... tape by specifying the starting and ending points. Use the headphone jack. Audio equipment (optional) MIC (PLUG IN POWER) LINE OUT L R : Signal flow 95 Connecting the microphone with the MIC jack MIC LINE Set the MIC/LINE switch to MIC. : Signal flow Microphone (optional) You can also use the Remote Commander for this operation. You...
... tape by specifying the starting and ending points. Use the headphone jack. Audio equipment (optional) MIC (PLUG IN POWER) LINE OUT L R : Signal flow 95 Connecting the microphone with the MIC jack MIC LINE Set the MIC/LINE switch to MIC. : Signal flow Microphone (optional) You can also use the Remote Commander for this operation. You...
Operating Instructions
Page 98
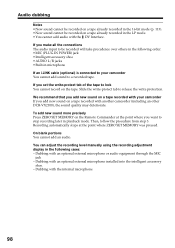
...MIC jack - Then, follow the procedure from step 3. On blank portions You cannot add an audio. Dubbing with the internal microphone 98 Slide the write-protect tab to a recorded tape. If you want to be recorded on the tape. Dubbing with another camcorder (including an other DCR-VX2100...), the sound quality may deteriorate. You can adjust the recording level manually using the recording adjustment display in microphone If an i.LINK cable (optional) is connected to your camcorder If you set the write-...
...MIC jack - Then, follow the procedure from step 3. On blank portions You cannot add an audio. Dubbing with the internal microphone 98 Slide the write-protect tab to a recorded tape. If you want to be recorded on the tape. Dubbing with another camcorder (including an other DCR-VX2100...), the sound quality may deteriorate. You can adjust the recording level manually using the recording adjustment display in microphone If an i.LINK cable (optional) is connected to your camcorder If you set the write-...
Operating Instructions
Page 114
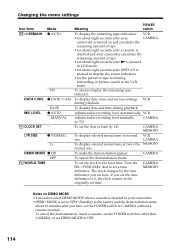
...or set the clock to the originally set here. Changing the menu settings Icon/item Mode qREMAIN z AUTO ON DATA CODE z DATE/CAM MIC LEVEL DATE z AUTO MANUAL CLOCK SET - To display selected menu items at the factory and the demonstration starts about eight seconds after you...215; DEMO MODE z ON OFF WORLD TIME Meaning POWER switch To display the remaining tape indication: VCR • for about eight seconds after your camcorder calculates the remaining amount of tape • for about eight seconds after N is pressed in VCR mode • for the period of tape &#...
...or set the clock to the originally set here. Changing the menu settings Icon/item Mode qREMAIN z AUTO ON DATA CODE z DATE/CAM MIC LEVEL DATE z AUTO MANUAL CLOCK SET - To display selected menu items at the factory and the demonstration starts about eight seconds after you...215; DEMO MODE z ON OFF WORLD TIME Meaning POWER switch To display the remaining tape indication: VCR • for about eight seconds after your camcorder calculates the remaining amount of tape • for about eight seconds after N is pressed in VCR mode • for the period of tape &#...

Operating Instructions
Page 115
... display the color bar. VCR EDIT SET To adjust and set REC LAMP to OFF. VCR Note If you press DISPLAY with your camcorder. SCAN," "HiFi SOUND," "AUDIO MIX," "MIC LEVEL," and "COMMANDER" items are held in the following situations: MEMORY When you set the synchronization of your... camcorder. OFF To cancel the melody, beep, and shutter click sound. MEMORY OFF To turn on the TV or VCR (except using an i.LINK ...
... display the color bar. VCR EDIT SET To adjust and set REC LAMP to OFF. VCR Note If you press DISPLAY with your camcorder. SCAN," "HiFi SOUND," "AUDIO MIX," "MIC LEVEL," and "COMMANDER" items are held in the following situations: MEMORY When you set the synchronization of your... camcorder. OFF To cancel the melody, beep, and shutter click sound. MEMORY OFF To turn on the TV or VCR (except using an i.LINK ...
Operating Instructions
Page 163
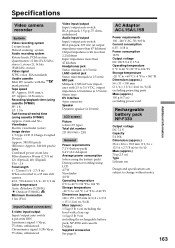
...-forward/rewind time (using cassette DVM60) Approx. 2 min and 30 s Viewfinder Electric viewfinder (color) Image device 1/3 type CCD (3 Charge Coupled Device) Approx. 380 000 pixels (Effective: Approx. 340 000 pixels) Lens Combined power zoom lens Filter diameter 58 mm (2 3/8 in) 12× (Optical), 48× (Digital... kilohms Input impedance more than 47 kilohms Headphones jack Stereo minijack (ø 3.5 mm) LANC control jack Stereo mini-minijack (ø 2.5 mm) MIC jack Minijack, 0.388 mV low impedance with 2.5 to 3.0 V DC, output impedance 6.8 kilohms (ø 3.5 mm) Stereo type DV Interface ...
...-forward/rewind time (using cassette DVM60) Approx. 2 min and 30 s Viewfinder Electric viewfinder (color) Image device 1/3 type CCD (3 Charge Coupled Device) Approx. 380 000 pixels (Effective: Approx. 340 000 pixels) Lens Combined power zoom lens Filter diameter 58 mm (2 3/8 in) 12× (Optical), 48× (Digital... kilohms Input impedance more than 47 kilohms Headphones jack Stereo minijack (ø 3.5 mm) LANC control jack Stereo mini-minijack (ø 2.5 mm) MIC jack Minijack, 0.388 mV low impedance with 2.5 to 3.0 V DC, output impedance 6.8 kilohms (ø 3.5 mm) Stereo type DV Interface ...

Operating Instructions
Page 169
... uf MIC/LINE switch (p. 95) ug MIC jack (PLUG IN POWER) (p. 95) The MIC jack is silent. 169 Quick Reference The DV Interface is used as CONTROL L or REMOTE. is i (headphones) jack When you cannot attach the tripod securely and the screw may damage your camcorder is ... Tripod receptacle Make sure that this product is in -power" microphone connected, and is a trademark of Sony Corporation and indicates that the length of video equipment and peripherals connected to it to MIC, and when connecting audio equipment, set it . uh Microphone (p. 96) uj S VIDEO jack (p. 31...
... uf MIC/LINE switch (p. 95) ug MIC jack (PLUG IN POWER) (p. 95) The MIC jack is silent. 169 Quick Reference The DV Interface is used as CONTROL L or REMOTE. is i (headphones) jack When you cannot attach the tripod securely and the screw may damage your camcorder is ... Tripod receptacle Make sure that this product is in -power" microphone connected, and is a trademark of Sony Corporation and indicates that the length of video equipment and peripherals connected to it to MIC, and when connecting audio equipment, set it . uh Microphone (p. 96) uj S VIDEO jack (p. 31...

Operating Instructions
Page 174
... Manual focus 59 Memory chromakey 125 Memory luminancekey ...... 125 Memory mix 125 Memory overlap 125 Memory photo recording .. 121 "Memory Stick 116 Menu settings 109 MIC (PLUG IN POWER) ..... 95 Mirror mode 18 Moisture condensation ...... 158 MONOTONE 38 ND filter 47 Normal charge 10 NTSC system 157 O, P, Q OLD MOVIE 41 Operation...
... Manual focus 59 Memory chromakey 125 Memory luminancekey ...... 125 Memory mix 125 Memory overlap 125 Memory photo recording .. 121 "Memory Stick 116 Menu settings 109 MIC (PLUG IN POWER) ..... 95 Mirror mode 18 Moisture condensation ...... 158 MONOTONE 38 ND filter 47 Normal charge 10 NTSC system 157 O, P, Q OLD MOVIE 41 Operation...


