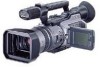
Operating Instructions
Page 2
...Handycam is loaded with the instructions, may cause undesired operation. You are cautioned that may cause harmful interference to persons. equipment generates, uses, and can be of sufficient magnitude to constitute a risk of important operating and maintenance (servicing) Trade Name: SONY Model No.: DCR-VX2100 Responsible Party: Sony... of the following two conditions: (1) This device may not cause harmful interference, and (2) this Sony Digital Handycam camcorder. Consult the dealer or an experienced radio/TV technician for the FCC related matters only. equipment ...
...Handycam is loaded with the instructions, may cause undesired operation. You are cautioned that may cause harmful interference to persons. equipment generates, uses, and can be of sufficient magnitude to constitute a risk of important operating and maintenance (servicing) Trade Name: SONY Model No.: DCR-VX2100 Responsible Party: Sony... of the following two conditions: (1) This device may not cause harmful interference, and (2) this Sony Digital Handycam camcorder. Consult the dealer or an experienced radio/TV technician for the FCC related matters only. equipment ...
Operating Instructions
Page 3
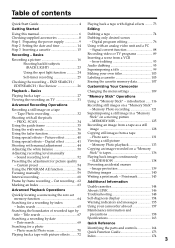
... Table of recorded tape by index Warning indicators and messages 155 - Insert editing 93 Audio dubbing 95 Superimposing a title 99 Making your camcorder abroad 157 Searching the boundaries of contents Quick Start Guide 4 Playing back a tape with an analog video unit and a PC - ...60 Writing a print mark - Index search 65 Using your own titles 103 Labeling a cassette 105 Erasing the cassette memory data 107 Customizing Your Camcorder Playback - Basics Recording a picture 16 Shooting backlit subjects (BACK LIGHT 23 Using the spot light function 24 Self-timer recording 25...
... Table of recorded tape by index Warning indicators and messages 155 - Insert editing 93 Audio dubbing 95 Superimposing a title 99 Making your camcorder abroad 157 Searching the boundaries of contents Quick Start Guide 4 Playing back a tape with an analog video unit and a PC - ...60 Writing a print mark - Index search 65 Using your own titles 103 Labeling a cassette 105 Erasing the cassette memory data 107 Customizing Your Camcorder Playback - Basics Recording a picture 16 Shooting backlit subjects (BACK LIGHT 23 Using the spot light function 24 Self-timer recording 25...

Operating Instructions
Page 4
...-protect tab Quick Start Guide This guide introduces you to insert it in parentheses "( )" for more information. Connecting the power cord (p. 13) Use the battery pack when using your camcorder outdoors (p. 9). Connect the plug with the window facing out and the write-protect tab facing upward. AC Adaptor (supplied) Open the DC IN...
...-protect tab Quick Start Guide This guide introduces you to insert it in parentheses "( )" for more information. Connecting the power cord (p. 13) Use the battery pack when using your camcorder outdoors (p. 9). Connect the plug with the window facing out and the write-protect tab facing upward. AC Adaptor (supplied) Open the DC IN...
Operating Instructions
Page 5
... CAMERA (CHG) VCR 4 Press START/ STOP. Recording a picture (p. 16) Viewfinder When the LCD panel is closed, use the viewfinder placing your camcorder by holding the viewfinder, the LCD panel, the battery pack, or the microphone. Your camcorder starts recording. POWER If the ND1 or ND2 indicator flashes, see page 167. 2 Set the POWER...
... CAMERA (CHG) VCR 4 Press START/ STOP. Recording a picture (p. 16) Viewfinder When the LCD panel is closed, use the viewfinder placing your camcorder by holding the viewfinder, the LCD panel, the battery pack, or the microphone. Your camcorder starts recording. POWER If the ND1 or ND2 indicator flashes, see page 167. 2 Set the POWER...
Operating Instructions
Page 6
... your own titles (p. 103) •Labeling a cassette (p. 105). title search (p. 67) •Superimposing a title (p. 99) •Making your camcorder. You can hear a beep or a melody sound to CAMERA. Using this manual As you use mini DV cassettes with cassette memory . photo search (p. 70). Tapes with (Cassette Memory). 6 The functions which require different operations...
... your own titles (p. 103) •Labeling a cassette (p. 105). title search (p. 67) •Superimposing a title (p. 99) •Making your camcorder. You can hear a beep or a melody sound to CAMERA. Using this manual As you use mini DV cassettes with cassette memory . photo search (p. 70). Tapes with (Cassette Memory). 6 The functions which require different operations...

Operating Instructions
Page 7
... finder. These points are manufactured using extremely high-precision technology, so over 99.99% of the copyright laws. Unauthorized recording of such materials may be contrary to the provision of the pixels are operational for long periods may cause your camcorder to malfunction. Exposing the LCD ...screen, the finder or the lens to direct sunlight for effective use. To view your camcorder away from rain and sea water. Take pictures of the...
... finder. These points are manufactured using extremely high-precision technology, so over 99.99% of the copyright laws. Unauthorized recording of such materials may be contrary to the provision of the pixels are operational for long periods may cause your camcorder to malfunction. Exposing the LCD ...screen, the finder or the lens to direct sunlight for effective use. To view your camcorder away from rain and sea water. Take pictures of the...
Operating Instructions
Page 9
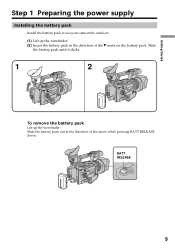
BATT RELEASE 9 Slide the battery pack out in the direction of the arrow while pressing BATT RELEASE down. Getting Started Step 1 Preparing the power supply Installing the battery pack Install the battery pack to use your camcorder outdoors. (1) Lift up the viewfinder. Slide the battery pack until it clicks. 1 2 To remove the battery pack Lift up the viewfinder. (2) Insert the battery pack in the direction of the V mark on the battery pack.
BATT RELEASE 9 Slide the battery pack out in the direction of the arrow while pressing BATT RELEASE down. Getting Started Step 1 Preparing the power supply Installing the battery pack Install the battery pack to use your camcorder outdoors. (1) Lift up the viewfinder. Slide the battery pack until it clicks. 1 2 To remove the battery pack Lift up the viewfinder. (2) Insert the battery pack in the direction of the V mark on the battery pack.
Operating Instructions
Page 10
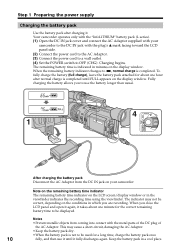
... FULL appears on the display window. The remaining battery time is completed. Keep the battery pack in the viewfinder indicates the recording time using the viewfinder. When you to be correct, depending on the conditions in minutes on the display window. To fully charge the battery (...the AC Adaptor. Notes •Prevent metallic objects from the DC IN jack on the LCD screen/display window or in a cool place. Your camcorder operates only with the "InfoLITHIUM" battery pack (L series). (1) Open the DC IN jack cover and connect the AC Adaptor supplied with the plug's...
... FULL appears on the display window. The remaining battery time is completed. Keep the battery pack in the viewfinder indicates the recording time using the viewfinder. When you to be correct, depending on the conditions in minutes on the display window. To fully charge the battery (...the AC Adaptor. Notes •Prevent metallic objects from the DC IN jack on the LCD screen/display window or in a cool place. Your camcorder operates only with the "InfoLITHIUM" battery pack (L series). (1) Open the DC IN jack cover and connect the AC Adaptor supplied with the plug's...

Operating Instructions
Page 11
.../510/710 battery pack on /off. Getting Started Step 1 Preparing the power supply Until your camcorder. * Approximate minutes when recording while you use it near the wall outlet. When using the AC Adaptor Be sure to charge an empty battery pack Recording time Battery pack Recording with ...125 (110) 145 (130) 265 (240) Approximate minutes of recording time when you repeat recording start/stop, zooming and turning the power on your camcorder calculates the actual remaining battery time "- - - - The actual battery life may be shorter. 11 Charging time Battery pack NP-F330 (supplied) ...
.../510/710 battery pack on /off. Getting Started Step 1 Preparing the power supply Until your camcorder. * Approximate minutes when recording while you use it near the wall outlet. When using the AC Adaptor Be sure to charge an empty battery pack Recording time Battery pack Recording with ...125 (110) 145 (130) 265 (240) Approximate minutes of recording time when you repeat recording start/stop, zooming and turning the power on your camcorder calculates the actual remaining battery time "- - - - The actual battery life may be shorter. 11 Charging time Battery pack NP-F330 (supplied) ...

Operating Instructions
Page 12
...830 (745) Approximate minutes of playing time when you use your camcorder in a cold environment. "InfoLITHIUM" battery packs (L ...will be sold in parentheses "( )" indicate the time using a normally charged battery. This unit is compatible with ... the battery packs may not be shorter if you use the NP-500/510/710 battery pack on LCD screen...time with the "InfoLITHIUM" battery. You cannot use a fully charged battery Numbers in your camcorder. "InfoLITHIUM" is displayed. 12 Notes &#...pack (L series). If the camcorder is immediately turned off Even if the remaining battery time...
...830 (745) Approximate minutes of playing time when you use your camcorder in a cold environment. "InfoLITHIUM" battery packs (L ...will be sold in parentheses "( )" indicate the time using a normally charged battery. This unit is compatible with ... the battery packs may not be shorter if you use the NP-500/510/710 battery pack on LCD screen...time with the "InfoLITHIUM" battery. You cannot use a fully charged battery Numbers in your camcorder. "InfoLITHIUM" is displayed. 12 Notes &#...pack (L series). If the camcorder is immediately turned off Even if the remaining battery time...

Operating Instructions
Page 13
Using a car battery Use the Sony DC Adaptor/Charger (optional). 13 Notes •The power cord must only be changed at an...source (house current) as long as it from a wall outlet using the AC Adaptor. (1) Open the DC IN jack cover and connect the AC Adaptor to the DC IN jack on your camcorder with the plug's v mark facing toward the LCD panel side.... supply Connecting to a wall outlet When you power it is not plugged into a wall outlet. This means that you use your camcorder for a long time, we recommend that the battery pack cannot supply any power if the power cord is connected to the...
Using a car battery Use the Sony DC Adaptor/Charger (optional). 13 Notes •The power cord must only be changed at an...source (house current) as long as it from a wall outlet using the AC Adaptor. (1) Open the DC IN jack cover and connect the AC Adaptor to the DC IN jack on your camcorder with the plug's v mark facing toward the LCD panel side.... supply Connecting to a wall outlet When you power it is not plugged into a wall outlet. This means that you use your camcorder for a long time, we recommend that the battery pack cannot supply any power if the power cord is connected to the...

Operating Instructions
Page 14
... midnight. 14 •12:00 PM stands for noon. The clock starts to move. (7) Press MENU to CAMERA or MEMORY unless you do not use your camcorder will have been discharged (p.160). If you do not set the date and time time) and date) are recorded on the time indicator The internal.../PUSH EXEC dial to select CLOCK SET, then press the dial. (4) Turn the SEL/PUSH EXEC dial to adjust to display the menu in your camcorder for about four months, the date and time may be displayed each time that you set the POWER switch to erase the menu display. 1,7 MENU...
... midnight. 14 •12:00 PM stands for noon. The clock starts to move. (7) Press MENU to CAMERA or MEMORY unless you do not use your camcorder will have been discharged (p.160). If you do not set the date and time time) and date) are recorded on the time indicator The internal.../PUSH EXEC dial to select CLOCK SET, then press the dial. (4) Turn the SEL/PUSH EXEC dial to adjust to display the menu in your camcorder for about four months, the date and time may be displayed each time that you set the POWER switch to erase the menu display. 1,7 MENU...

Operating Instructions
Page 15
...above, and take out the cassette in a straight line deeply into the cassette compartment with cassette memory Read the instruction about cassette memory to use mini DV cassettes with the window facing out and the write-protect tab facing upward. (4) Close the cassette compartment by pressing the PUSH mark...grip strap prevents the cassette lid from opening fully Adjust the length of the arrow. Note The cassette lid will not be closed when you use this function properly (p. 144). If Q flashes even if the cassette has been inserted Press the PUSH button again to SAVE. After the ...
...above, and take out the cassette in a straight line deeply into the cassette compartment with cassette memory Read the instruction about cassette memory to use mini DV cassettes with the window facing out and the write-protect tab facing upward. (4) Close the cassette compartment by pressing the PUSH mark...grip strap prevents the cassette lid from opening fully Adjust the length of the arrow. Note The cassette lid will not be closed when you use this function properly (p. 144). If Q flashes even if the cassette has been inserted Press the PUSH button again to SAVE. After the ...
Operating Instructions
Page 16
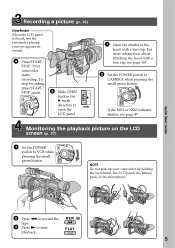
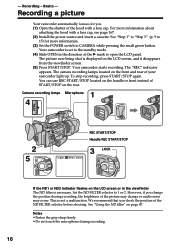
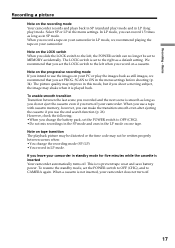
... change or audio noise may occur. For more information. (3) Set the POWER switch to CAMERA while pressing the small green button. Your camcorder starts recording. The camera recording lamps located on the LCD screen, and it disappears from the viewfinder screen. (5) Press START/STOP. This... being shot is not a malfunction. However, if you check the position of the picture may change the position during recording. 16 Recording - See "Using the ND filter" on the LCD screen or in the direction of START/STOP on the rear. 1 Camera recording lamps Microphone 4 OPEN 3 2...
... change or audio noise may occur. For more information. (3) Set the POWER switch to CAMERA while pressing the small green button. Your camcorder starts recording. The camera recording lamps located on the LCD screen, and it disappears from the viewfinder screen. (5) Press START/STOP. This... being shot is not a malfunction. However, if you check the position of the picture may change the position during recording. 16 Recording - See "Using the ND filter" on the LCD screen or in the direction of START/STOP on the rear. 1 Camera recording lamps Microphone 4 OPEN 3 2...
Operating Instructions
Page 17
... images, we recommend playing the tape on your PC or play ) mode. When you use the images on your camcorder in LP mode, we recommend that you leave your camcorder. This is inserted Your camcorder automatically turns off . 17 Select SP or LP in the LP mode on tape transition...;You change the battery pack, set to prevent tape wear and save battery power. However, check the following: •When you turn off your camcorder does not turn off . Note on a cassette. We recommend that you shoot a moving subject, the image may improve in this mode, but ...
... images, we recommend playing the tape on your PC or play ) mode. When you use the images on your camcorder in LP mode, we recommend that you leave your camcorder. This is inserted Your camcorder automatically turns off . 17 Select SP or LP in the LP mode on tape transition...;You change the battery pack, set to prevent tape wear and save battery power. However, check the following: •When you turn off your camcorder does not turn off . Note on a cassette. We recommend that you shoot a moving subject, the image may improve in this mode, but ...
Operating Instructions
Page 18
... other indicators appear mirror-reversed and others are not displayed. Pictures in the mirror mode The picture on the Remote Commander does not work. When using the viewfinder only. Indicators in mirror mode ZERO SET MEMORY on the LCD screen is opened up to the lens side. When you open the... LCD panel, the viewfinder is automatically turned off when the LCD panel is turned over or the camcorder is in the viewfinder (Mirror mode). 180° 90° OPEN To close the LCD panel with the LCD screen turned over so that the...
... other indicators appear mirror-reversed and others are not displayed. Pictures in the mirror mode The picture on the Remote Commander does not work. When using the viewfinder only. Indicators in mirror mode ZERO SET MEMORY on the LCD screen is opened up to the lens side. When you open the... LCD panel, the viewfinder is automatically turned off when the LCD panel is turned over or the camcorder is in the viewfinder (Mirror mode). 180° 90° OPEN To close the LCD panel with the LCD screen turned over so that the...

Operating Instructions
Page 19
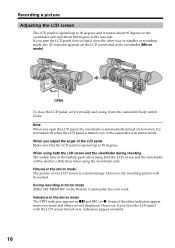
.... 19 T/STOP Recording - To brighten To darken On the LCD screen backlight You can record in a low position You can change the brightness of the camcorder. and LCD COLOR items in the menu settings (p. 109). REC STAR REC START/ STOP After recording (1) Set the POWER switch to record from a low position... an interesting recording angle. Basics LCD BRIGHT Recording a picture Adjusting the brightness of the LCD screen To adjust the brightness of the LCD screen to use the REC START/STOP located on the handle or front of the backlight. In this case, it is closed...
.... 19 T/STOP Recording - To brighten To darken On the LCD screen backlight You can record in a low position You can change the brightness of the camcorder. and LCD COLOR items in the menu settings (p. 109). REC STAR REC START/ STOP After recording (1) Set the POWER switch to record from a low position... an interesting recording angle. Basics LCD BRIGHT Recording a picture Adjusting the brightness of the LCD screen To adjust the brightness of the LCD screen to use the REC START/STOP located on the handle or front of the backlight. In this case, it is closed...
Operating Instructions
Page 20
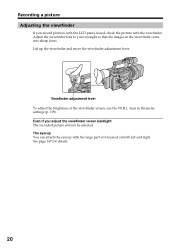
... will not be affected. Even if you record pictures with the LCD panel closed, check the picture with the large part of the viewfinder screen, use the VF B.L. Adjust the viewfinder lens to your eyesight so that the images in the menu settings (p. 109). Viewfinder adjustment lever To adjust the brightness...
... will not be affected. Even if you record pictures with the LCD panel closed, check the picture with the large part of the viewfinder screen, use the VF B.L. Adjust the viewfinder lens to your eyesight so that the images in the menu settings (p. 109). Viewfinder adjustment lever To adjust the brightness...

Operating Instructions
Page 21
... a slower zoom. "T" side: for telephoto (subject appears closer) "W" side: for wide-angle (subject appears farther away) When using the handle zoom lever, you can make fine adjustments. To zoom using the zoom ring Using the zoom ring, you can control the zoom by your desired speed and you cannot operate the handle... respond to the desired speed. Zoom ring For wide-angle For telephoto Note If you cannot get a sharp focus, press the "W" side of the camcorder. When you shoot close to a subject If you turn the zoom ring to the zoom ring. 21 Rotate the zoom ring with the zoom lever...
... a slower zoom. "T" side: for telephoto (subject appears closer) "W" side: for wide-angle (subject appears farther away) When using the handle zoom lever, you can make fine adjustments. To zoom using the zoom ring Using the zoom ring, you can control the zoom by your desired speed and you cannot operate the handle... respond to the desired speed. Zoom ring For wide-angle For telephoto Note If you cannot get a sharp focus, press the "W" side of the camcorder. When you shoot close to a subject If you turn the zoom ring to the zoom ring. 21 Rotate the zoom ring with the zoom lever...
Operating Instructions
Page 22
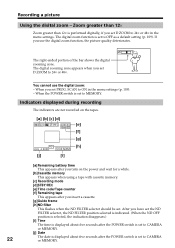
...when the ND FILTER selector should be set PROG. When the POWER switch is set to CAMERA or MEMORY. When you use the digital zoom: - Recording a picture Using the disital zoom - Indicators displayed during recording The indicators are not recorded on the tapes. [a] [b] [c] [d] 40min ... [j] [i] [a] Remaining battery time This appears after you turn on the power and wait for a while. [b]Cassette memory This appears when using a tape with cassette memory. [c] Recording mode [d] STBY/REC [e] Time code/Tape counter [f] Remaining tape This appears after you have set...
...when the ND FILTER selector should be set PROG. When the POWER switch is set to CAMERA or MEMORY. When you use the digital zoom: - Recording a picture Using the disital zoom - Indicators displayed during recording The indicators are not recorded on the tapes. [a] [b] [c] [d] 40min ... [j] [i] [a] Remaining battery time This appears after you turn on the power and wait for a while. [b]Cassette memory This appears when using a tape with cassette memory. [c] Recording mode [d] STBY/REC [e] Time code/Tape counter [f] Remaining tape This appears after you have set...


