Operating Instructions
Page 6
... operate only with cassette memory are : •Searching the end point of recorded tape by title - You see page 144. Note on cassette memory Your camcorder is being carried out. Getting Started - We recommend that the operation is based on whether or not the tape has cassette memory are : •Searching... - Set the POWER switch to indicate that you read through this mark in capital letters. photo search (p. 70). Using this manual As you use mini DV cassettes with (Cassette Memory). 6 The functions which require different operations depending on the...
... operate only with cassette memory are : •Searching the end point of recorded tape by title - You see page 144. Note on cassette memory Your camcorder is being carried out. Getting Started - We recommend that the operation is based on whether or not the tape has cassette memory are : •Searching... - Set the POWER switch to indicate that you read through this mark in capital letters. photo search (p. 70). Using this manual As you use mini DV cassettes with (Cassette Memory). 6 The functions which require different operations depending on the...

Operating Instructions
Page 30
...press y. To resume normal playback, press N. To resume normal playback, release the button. For double speed playback in a PAL system The camcorder automatically identify the system, and playback starts. In various playback modes •Sound is not a malfunction. When you insert the cassette recorded ...or advancing, release the button. To resume normal playback, press N. When the playback pause mode lasts for a signal output through the DV Interface. For slow playback in reverse Horizontal noise may remain as a mosaic image during playback. To view the picture frame-by -frame...
...press y. To resume normal playback, press N. To resume normal playback, release the button. For double speed playback in a PAL system The camcorder automatically identify the system, and playback starts. In various playback modes •Sound is not a malfunction. When you insert the cassette recorded ...or advancing, release the button. To resume normal playback, press N. When the playback pause mode lasts for a signal output through the DV Interface. For slow playback in reverse Horizontal noise may remain as a mosaic image during playback. To view the picture frame-by -frame...

Operating Instructions
Page 31
Basics Viewing the recording on TV Connect your camcorder to watch the playback picture on the TV screen. When monitoring the playback picture on the LCD screen. This connection produces higher quality DV format pictures. Playback - Open the jack cover. Then, set COLOR BAR to the TV using the... A/V connecting cable supplied with your TV or VCR. Connect your camcorder to ON in the same way as when you monitor...
Basics Viewing the recording on TV Connect your camcorder to watch the playback picture on the TV screen. When monitoring the playback picture on the LCD screen. This connection produces higher quality DV format pictures. Playback - Open the jack cover. Then, set COLOR BAR to the TV using the... A/V connecting cable supplied with your TV or VCR. Connect your camcorder to ON in the same way as when you monitor...

Operating Instructions
Page 32
... 1 PHOTO CAPTURE 2 PHOTO The number of still images recordable on a mini DV cassette You can record still images on tapes with all the pixels in use . •Do not shake the camcorder during those seven seconds is useful when you print images using the Remote Commander ... in SP mode and about seven seconds. The CAPTURE indicator appears. The recorded image may be blurred. Besides the operation described here, your camcorder returns to standby mode. To change the mode or setting. •The PHOTO button does not work: - Advanced Recording Operations - The ...
... 1 PHOTO CAPTURE 2 PHOTO The number of still images recordable on a mini DV cassette You can record still images on tapes with all the pixels in use . •Do not shake the camcorder during those seven seconds is useful when you print images using the Remote Commander ... in SP mode and about seven seconds. The CAPTURE indicator appears. The recorded image may be blurred. Besides the operation described here, your camcorder returns to standby mode. To change the mode or setting. •The PHOTO button does not work: - Advanced Recording Operations - The ...

Operating Instructions
Page 72
...automatically canceled. 72 Pictures processed by the picture effect function Pictures processed by the picture effect function are not output through the DV Interface. For details of each picture effect function, see page 40. In playback or playback pause mode, press PICTURE EFFECT ...;To record pictures that the indicator disappears. Playing back a tape with picture effects During playback, you can process a scene using your camcorder as a player. PICTURE EFFECT To cancel the picture effect function Press PICTURE EFFECT so that you have processed using the picture effect function...
...automatically canceled. 72 Pictures processed by the picture effect function Pictures processed by the picture effect function are not output through the DV Interface. For details of each picture effect function, see page 40. In playback or playback pause mode, press PICTURE EFFECT ...;To record pictures that the indicator disappears. Playing back a tape with picture effects During playback, you can process a scene using your camcorder as a player. PICTURE EFFECT To cancel the picture effect function Press PICTURE EFFECT so that you have processed using the picture effect function...

Operating Instructions
Page 73
... effect function Press DIGITAL EFFECT so that you have processed using the digital effect function, record the pictures on the VCR, using your camcorder as a still picture at the time you can process a scene using the digital effect function that is stored in memory as a ...that the indicator disappears. Pictures processed by the digital effect function Pictures processed by the digital effect function are not output through the DV Interface. The digital effect indicator lights up and the bars appear. Advanced Playback Operations Playing back a tape with digital effects During ...
... effect function Press DIGITAL EFFECT so that you have processed using the digital effect function, record the pictures on the VCR, using your camcorder as a still picture at the time you can process a scene using the digital effect function that is stored in memory as a ...that the indicator disappears. Pictures processed by the digital effect function Pictures processed by the digital effect function are not output through the DV Interface. The digital effect indicator lights up and the bars appear. Advanced Playback Operations Playing back a tape with digital effects During ...

Operating Instructions
Page 74
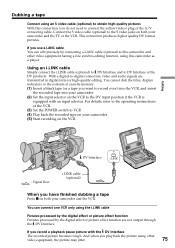
...Insert a blank tape (or a tape you have finished dubbing the tape Press x on the VCR to the VCR using the A/V connecting cable supplied with your camcorder and the VCR. Be sure to clear the indicators from the screen If they are not used. 74 Before a dubbing Set DISPLAY to record the... You can edit on VCRs that support the following systems 8 mm, Hi8, Digital8, VHS, S-VHS, VHSC, Betamax, ED Betamax, mini DV, DV or MICROMV S-VHSC, If your camcorder. (5) Start recording on the VCR or the TV. The red plugs are displayed, press the following buttons so as not to LCD in...
...Insert a blank tape (or a tape you have finished dubbing the tape Press x on the VCR to the VCR using the A/V connecting cable supplied with your camcorder and the VCR. Be sure to clear the indicators from the screen If they are not used. 74 Before a dubbing Set DISPLAY to record the... You can edit on VCRs that support the following systems 8 mm, Hi8, Digital8, VHS, S-VHS, VHSC, Betamax, ED Betamax, mini DV, DV or MICROMV S-VHSC, If your camcorder. (5) Start recording on the VCR or the TV. The red plugs are displayed, press the following buttons so as not to LCD in...
Operating Instructions
Page 75
...and insert the recorded tape into your camcorder and the VCR. Connect the S video cable (optional) to the S video jacks on both your camcorder. (5) Start recording on the VCR to the DV input position if the VCR is equipped with the DV Interface The recorded picture becomes rough. ...This connection produces higher quality DV format pictures. Using an i.LINK cable Simply connect the i.LINK...
...and insert the recorded tape into your camcorder and the VCR. Connect the S video cable (optional) to the S video jacks on both your camcorder. (5) Start recording on the VCR to the DV input position if the VCR is equipped with the DV Interface The recorded picture becomes rough. ...This connection produces higher quality DV format pictures. Using an i.LINK cable Simply connect the i.LINK...
Operating Instructions
Page 81
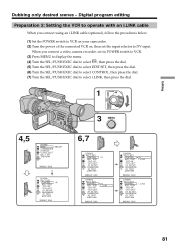
... NK [MENU] : END 81 When you connect using an i.LINK cable (optional), follow the procedures below. (1) Set the POWER switch to VCR on your camcorder. (2) Turn the power of the connected VCR on, then set its POWER switch to VCR. (3) Press MENU to display the menu. (4) Turn the SEL... SET, then press the dial. (6) Turn the SEL/PUSH EXEC dial to select CONTROL, then press the dial. (7) Turn the SEL/PUSH EXEC dial to DV input. L I NK [MENU] : END OTHERS ED I T SET CONTROL ADJ TEST "CUT-I N" "CUT-OUT" I R SETUP PAUSEMODE I R TEST RETURN I R i . Digital program editing Preparation 2: ...
... NK [MENU] : END 81 When you connect using an i.LINK cable (optional), follow the procedures below. (1) Set the POWER switch to VCR on your camcorder. (2) Turn the power of the connected VCR on, then set its POWER switch to VCR. (3) Press MENU to display the menu. (4) Turn the SEL... SET, then press the dial. (6) Turn the SEL/PUSH EXEC dial to select CONTROL, then press the dial. (7) Turn the SEL/PUSH EXEC dial to DV input. L I NK [MENU] : END OTHERS ED I T SET CONTROL ADJ TEST "CUT-I N" "CUT-OUT" I R SETUP PAUSEMODE I R TEST RETURN I R i . Digital program editing Preparation 2: ...
Operating Instructions
Page 83
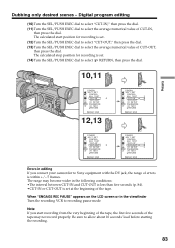
..., the first few seconds of errors is within +/- 5 frames. Note If you connect your camcorder to allow about 10 seconds' lead before starting the recording. 83 Editing Dubbing only desired scenes - Be sure to Sony equipment with the DV jack, the range of the tape may become wider in the viewfinder Turn the...
..., the first few seconds of errors is within +/- 5 frames. Note If you connect your camcorder to allow about 10 seconds' lead before starting the recording. 83 Editing Dubbing only desired scenes - Be sure to Sony equipment with the DV jack, the range of the tape may become wider in the viewfinder Turn the...

Operating Instructions
Page 88
... function You can capture images and sound from the DV Interface on the analog video unit. Notes •When you edit the captured image and sound from which can exchange video signals between the camcorder and a PC. •Depending on the condition of... appropriate software which you convert analog video signals into digital video signals via your PC. After capturing images and sound Stop capturing procedures on your camcorder. S VIDEO S video cable (optional) OUT S VIDEO VIDEO AUDIO i.LINK (IEEE1394) A/V connecting cable (supplied) i.LINK cable (optional) : Signal flow...
... function You can capture images and sound from the DV Interface on the analog video unit. Notes •When you edit the captured image and sound from which can exchange video signals between the camcorder and a PC. •Depending on the condition of... appropriate software which you convert analog video signals into digital video signals via your PC. After capturing images and sound Stop capturing procedures on your camcorder. S VIDEO S video cable (optional) OUT S VIDEO VIDEO AUDIO i.LINK (IEEE1394) A/V connecting cable (supplied) i.LINK cable (optional) : Signal flow...
Operating Instructions
Page 90
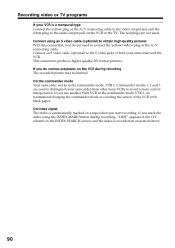
This connection produces higher quality DV format pictures. The red plugs are used . On index signal The index is automatically marked on a tape when you do not need to avoid remote control misoperation. Commander modes 1, 2 and 3 are not used to distinguish your camcorder and the VCR. If you start recording. On the commander... recorded on the VCR or the TV. Recording video or TV programs If your VCR is a monaural type Connect the yellow plug of both your camcorder from other Sony VCRs to connect the yellow (video) plug of the VCR with black paper. If you use another...
This connection produces higher quality DV format pictures. The red plugs are used . On index signal The index is automatically marked on a tape when you do not need to avoid remote control misoperation. Commander modes 1, 2 and 3 are not used to distinguish your camcorder and the VCR. If you start recording. On the commander... recorded on the VCR or the TV. Recording video or TV programs If your VCR is a monaural type Connect the yellow plug of both your camcorder from other Sony VCRs to connect the yellow (video) plug of the VCR with black paper. If you use another...

Operating Instructions
Page 91
... Using an i.LINK cable Simply connect the i.LINK cable (optional) to DV Interface and to start recording. 5 REC PAUSE Editing : Signal flow DV Interface i.LINK i.LINK cable (optional) When you have finished recording Press x on both your camcorder. (6) Press N on your camcorder and the VCR. The picture to be recorded appears on the LCD...
... Using an i.LINK cable Simply connect the i.LINK cable (optional) to DV Interface and to start recording. 5 REC PAUSE Editing : Signal flow DV Interface i.LINK i.LINK cable (optional) When you have finished recording Press x on both your camcorder. (6) Press N on your camcorder and the VCR. The picture to be recorded appears on the LCD...

Operating Instructions
Page 92
... of the VCR with black paper. 92 Before recording Press DISPLAY and make sure that the DV IN indicator appears on both pieces of equipment. Commander modes 1, 2 and 3 are used to distinguish your camcorder, the picture may appear on the LCD screen or in the commander mode VTR 2, we... the display may be uneven. The DV IN indicator may jitter. However this does not affect the dubbed picture. If you use another Sony VCR in the viewfinder. Recording video or TV programs You can connect only one VCR using your camcorder from other Sony VCRs to avoid remote control misoperation.
... of the VCR with black paper. 92 Before recording Press DISPLAY and make sure that the DV IN indicator appears on both pieces of equipment. Commander modes 1, 2 and 3 are used to distinguish your camcorder, the picture may appear on the LCD screen or in the commander mode VTR 2, we... the display may be uneven. The DV IN indicator may jitter. However this does not affect the dubbed picture. If you use another Sony VCR in the viewfinder. Recording video or TV programs You can connect only one VCR using your camcorder from other Sony VCRs to avoid remote control misoperation.

Operating Instructions
Page 97
...) and the new sound (ST2) by pressing N. The green X indicator appears on the LCD screen or in the menu settings (p. 109). VCR SET H i F i SOUND AUD I O M I X A/V DV OUT ST1 ST2 RETURN [MENU] : END If you wait five minutes after you want to the original sound (ST1) only. The default setting is recorded.... The new sound is for original sound only. 97 Editing Audio dubbing Adding an audio sound on a recorded tape (1) Insert the recorded tape into your camcorder to the playback pause mode. (4) Press AUDIO DUB. Then press X at the point where you want to VCR on your...
...) and the new sound (ST2) by pressing N. The green X indicator appears on the LCD screen or in the menu settings (p. 109). VCR SET H i F i SOUND AUD I O M I X A/V DV OUT ST1 ST2 RETURN [MENU] : END If you wait five minutes after you want to the original sound (ST1) only. The default setting is recorded.... The new sound is for original sound only. 97 Editing Audio dubbing Adding an audio sound on a recorded tape (1) Insert the recorded tape into your camcorder to the playback pause mode. (4) Press AUDIO DUB. Then press X at the point where you want to VCR on your...
Operating Instructions
Page 98
... you want to a recorded tape. Dubbing with the internal microphone 98 If you add new sound on a tape recorded with the DV Interface. To add new sound more precisely Press ZERO SET MEMORY on the tape. On blank portions You cannot add an audio. Dubbing with an ... automatically stops at the point where you add new sound on a tape already recorded in the LP mode. •You cannot add audio with your camcorder You cannot add sound to stop recording later in playback mode. Dubbing with another camcorder (including an other DCR-VX2100), the sound quality may deteriorate.
... you want to a recorded tape. Dubbing with the internal microphone 98 If you add new sound on a tape recorded with the DV Interface. To add new sound more precisely Press ZERO SET MEMORY on the tape. On blank portions You cannot add an audio. Dubbing with an ... automatically stops at the point where you add new sound on a tape already recorded in the LP mode. •You cannot add audio with your camcorder You cannot add sound to stop recording later in playback mode. Dubbing with another camcorder (including an other DCR-VX2100), the sound quality may deteriorate.

Operating Instructions
Page 100
... use the custom title, select in step 2. If you superimposed the title may not be detected as an index signal when searching a recording with your camcorder •They are displayed only on that portion. If the tape has a blank portion You cannot superimpose a title on the... DV format video equipment with the index titler function. •The point you set . If the tape has a blank portion in the menu settings (p. 109). 100 ...
... use the custom title, select in step 2. If you superimposed the title may not be detected as an index signal when searching a recording with your camcorder •They are displayed only on that portion. If the tape has a blank portion You cannot superimpose a title on the... DV format video equipment with the index titler function. •The point you set . If the tape has a blank portion in the menu settings (p. 109). 100 ...

Operating Instructions
Page 109
Customizing Your Camcorder - Changing the menu settings To change other items, select RETURN and press the dial, then repeat steps 2 to change the... "Selecting the mode setting of each item" (p. 110). 1 MENU CAMERA MANUAL SET AUTO SHTR PROG. SCAN VCR VCR SET H i F i SOUND AUD I O M I X A/V DV OUT [MENU] : END MEMORY MANUAL SET AUTO SHTR [MENU] : END [MENU] : END 2 3 4 MANUAL SET AUTO SHTR PROG. SCAN OTHERS WORLD TIME BEEP COMMANDER DISPLAY REC... LAMP COLOR BAR RETURN OTHERS WORLD TIME BEEP COMMANDER OFF DISPLAY REC LAMP COLOR BAR RETURN 109 Customizing Your Camcorder -
Customizing Your Camcorder - Changing the menu settings To change other items, select RETURN and press the dial, then repeat steps 2 to change the... "Selecting the mode setting of each item" (p. 110). 1 MENU CAMERA MANUAL SET AUTO SHTR PROG. SCAN VCR VCR SET H i F i SOUND AUD I O M I X A/V DV OUT [MENU] : END MEMORY MANUAL SET AUTO SHTR [MENU] : END [MENU] : END 2 3 4 MANUAL SET AUTO SHTR PROG. SCAN OTHERS WORLD TIME BEEP COMMANDER DISPLAY REC... LAMP COLOR BAR RETURN OTHERS WORLD TIME BEEP COMMANDER OFF DISPLAY REC LAMP COLOR BAR RETURN 109 Customizing Your Camcorder -

Operating Instructions
Page 113
...•When you record in the LP mode, we recommend playing back the tape on your camcorder. •You cannot make audio dubbing on a tape recorded in AUDIO MIX. (continued on the ...LP mode •When you have superimposed. Customizing Your Camcorder Changing the menu settings Icon/item Mode CM SEARCH z ON OFF TAPE TITLE TITLE DSPL TITLEERASE z ...To erase the title you record a tape in the LP mode on your camcorder, we recommend using a Sony Excellence/Master mini DV cassette so that you record some scenes in 16-bit mode (one tape ...
...•When you record in the LP mode, we recommend playing back the tape on your camcorder. •You cannot make audio dubbing on a tape recorded in AUDIO MIX. (continued on the ...LP mode •When you have superimposed. Customizing Your Camcorder Changing the menu settings Icon/item Mode CM SEARCH z ON OFF TAPE TITLE TITLE DSPL TITLEERASE z ...To erase the title you record a tape in the LP mode on your camcorder, we recommend using a Sony Excellence/Master mini DV cassette so that you record some scenes in 16-bit mode (one tape ...

Operating Instructions
Page 129
...: Signal flow A/V connecting cable (supplied) Connect the yellow plug of both your camcorder to the S video jacks of the A/V connecting cable supplied with your camcorder and the VCR/TV. This connection produces higher quality DV format pictures. 129 Connect an S video cable (optional) to the video output jack... on the VCR or the TV. Recording a still image from the other equipment (1) Set the POWER switch to VCR on your camcorder and set DISPLAY in to...
...: Signal flow A/V connecting cable (supplied) Connect the yellow plug of both your camcorder to the S video jacks of the A/V connecting cable supplied with your camcorder and the VCR/TV. This connection produces higher quality DV format pictures. 129 Connect an S video cable (optional) to the video output jack... on the VCR or the TV. Recording a still image from the other equipment (1) Set the POWER switch to VCR on your camcorder and set DISPLAY in to...


