
Camera Operations Guide
Page 8
Troubleshooting Troubleshooting 118 Warning indicators and messages .......132 Additional Information Using your camcorder abroad 136 Usable cassette tapes 137 About the "Memory Stick 138 About the "InfoLITHIUM" battery pack 140 About i.LINK 141 Maintenance and precautions 142 Specification 145 Quick Reference Identifying parts and controls 148 Index 154 Two operating instructions are supplied with your camcorder: • Camera Operations Guide (This manual) • "First Step Guide" for using the supplied applications (included in the supplied CD-ROM) 8
Troubleshooting Troubleshooting 118 Warning indicators and messages .......132 Additional Information Using your camcorder abroad 136 Usable cassette tapes 137 About the "Memory Stick 138 About the "InfoLITHIUM" battery pack 140 About i.LINK 141 Maintenance and precautions 142 Specification 145 Quick Reference Identifying parts and controls 148 Index 154 Two operating instructions are supplied with your camcorder: • Camera Operations Guide (This manual) • "First Step Guide" for using the supplied applications (included in the supplied CD-ROM) 8
Camera Operations Guide
Page 15
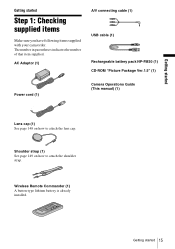
Getting started Step 1: Checking supplied items Make sure you have following items supplied with your camcorder. Getting started Getting started 15 The number in parentheses indicates the number of that item supplied. Wireless Remote Commander (1) A button-type lithium ...Shoulder strap (1) See page 149 on how to attach the shoulder strap. AC Adaptor (1) A/V connecting cable (1) USB cable (1) Rechargeable battery pack NP-FM30 (1) CD-ROM "Picture Package Ver.1.5" (1) Power cord (1) Camera Operations Guide (This manual) (1) Lens cap (1) See page 148 on how to attach the lens cap.
Getting started Step 1: Checking supplied items Make sure you have following items supplied with your camcorder. Getting started Getting started 15 The number in parentheses indicates the number of that item supplied. Wireless Remote Commander (1) A button-type lithium ...Shoulder strap (1) See page 149 on how to attach the shoulder strap. AC Adaptor (1) A/V connecting cable (1) USB cable (1) Rechargeable battery pack NP-FM30 (1) CD-ROM "Picture Package Ver.1.5" (1) Power cord (1) Camera Operations Guide (This manual) (1) Lens cap (1) See page 148 on how to attach the lens cap.

Camera Operations Guide
Page 46
CAM M 101 101-0001 CHROMA M CAM CHROMA OK 5 Touch / to select the still image to "First Step Guide" in the supplied CD-ROM for use the MEMORY MIX function in the mirror mode (p. 30), the picture on the LCD screen appears normally, without being mirror-reversed.... overlapping still image has a large amount of the blue area in the movie. APPLI.) menu. 1 Check that you have a "Memory Stick" with other camcorders on your camcorder. 2 Slide the POWER switch repeatedly to 4, then touch [OFF] in step 5. Thumbnail screen 60min STBY MEMORY MIX: OFF OFF 0:00:00 M CAM LUMI...
CAM M 101 101-0001 CHROMA M CAM CHROMA OK 5 Touch / to select the still image to "First Step Guide" in the supplied CD-ROM for use the MEMORY MIX function in the mirror mode (p. 30), the picture on the LCD screen appears normally, without being mirror-reversed.... overlapping still image has a large amount of the blue area in the movie. APPLI.) menu. 1 Check that you have a "Memory Stick" with other camcorders on your camcorder. 2 Slide the POWER switch repeatedly to 4, then touch [OFF] in step 5. Thumbnail screen 60min STBY MEMORY MIX: OFF OFF 0:00:00 M CAM LUMI...
Camera Operations Guide
Page 76
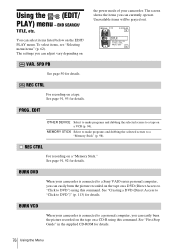
...a "Memory Stick" (p. 98). MEMORY STICK Select to make programs and dubbing the selected scenes to a Sony VAIO series personal computer, you can currently operate. BURN DVD When your camcorder is connected to DVD")" (p. 113) for details. SPD PB See page 50 for details. BURN VCD When... your camcorder. See page 91, 93 for details. See "Creating a DVD (Direct Access to "Click to a personal computer, you can adjust vary depending on a CD-R using this command. The screen shows the items you can select ...
...a "Memory Stick" (p. 98). MEMORY STICK Select to make programs and dubbing the selected scenes to a Sony VAIO series personal computer, you can currently operate. BURN DVD When your camcorder is connected to DVD")" (p. 113) for details. SPD PB See page 50 for details. BURN VCD When... your camcorder. See page 91, 93 for details. See "Creating a DVD (Direct Access to "Click to a personal computer, you can adjust vary depending on a CD-R using this command. The screen shows the items you can select ...

Camera Operations Guide
Page 82
... from Hi8 /standard 8 mm to "First Step Guide" in the supplied CD-ROM. For details, refer to Digital8 . PB MODE For DCR-TRV480: GAUTO / Select to automatically detect the system (Hi8 /standard 8 mm or Digital8 ) that was used to the A/V jack of your camcorder will be heard. A hissing noise also sometimes can be converted and output...
... from Hi8 /standard 8 mm to "First Step Guide" in the supplied CD-ROM. For details, refer to Digital8 . PB MODE For DCR-TRV480: GAUTO / Select to automatically detect the system (Hi8 /standard 8 mm or Digital8 ) that was used to the A/V jack of your camcorder will be heard. A hissing noise also sometimes can be converted and output...

Camera Operations Guide
Page 83
... the camera settings data during playback. Select to deactivate the Remote Commander to prevent your camcorder from your camcorder for about 8 seconds: • After you touch (play/pause). b Note •...using the Remote Commander supplied with the cassette inserted, and your camcorder calculates the remaining amount of your camcorder during recording. ,continued Using the Menu 83 DATA CODE GOFF...). Select to "First Step Guide" in your camcorder on the front of tape. • When you select the CAMERA-TAPE mode with your camcorder. Using the Menu USB-PLY/EDT You can ...
... the camera settings data during playback. Select to deactivate the Remote Commander to prevent your camcorder from your camcorder for about 8 seconds: • After you touch (play/pause). b Note •...using the Remote Commander supplied with the cassette inserted, and your camcorder calculates the remaining amount of your camcorder during recording. ,continued Using the Menu 83 DATA CODE GOFF...). Select to "First Step Guide" in your camcorder on the front of tape. • When you select the CAMERA-TAPE mode with your camcorder. Using the Menu USB-PLY/EDT You can ...

Camera Operations Guide
Page 106
...Copying tape to a computer. Video Capturing Tool You can import the entire contents of videos and slide shows. The CD-ROM includes the following operations by connecting your camcorder to a "Memory Stick." - For "First Step Guide," see "First Step Guide." Image data is transferred in ..., and copying files to your computer. USB cable This method is compatible with a menu of a tape to a CD-R. Still images and movies are 2 ways to connect your camcorder to a "Memory Stick." ImageMixer VCD2 is good for copying video and sound recorded on a computer. Save the images...
...Copying tape to a computer. Video Capturing Tool You can import the entire contents of videos and slide shows. The CD-ROM includes the following operations by connecting your camcorder to a "Memory Stick." - For "First Step Guide," see "First Step Guide." Image data is transferred in ..., and copying files to your computer. USB cable This method is compatible with a menu of a tape to a CD-R. Still images and movies are 2 ways to connect your camcorder to a "Memory Stick." ImageMixer VCD2 is good for copying video and sound recorded on a computer. Save the images...

Camera Operations Guide
Page 107
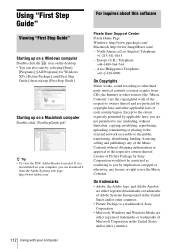
...0c or later (this must be provided as standard), DV Interface (IEEE1394, i.LINK) (to connect via an i.LINK cable), disc drive (You need a CD-R drive to have DirectX installed.) Windows Media Player 7.0 or later Macromedia Flash Player 6.0 or later • Sound system: 16 bit stereo sound card and stereo..."First Step Guide" "First Step Guide" is an instruction manual you use the software stored on the CD-ROM (supplied). To display the Help guide, click the [?] mark on your camcorder and computer and making settings, to general operation the first time you can refer to the Help guide ...
...0c or later (this must be provided as standard), DV Interface (IEEE1394, i.LINK) (to connect via an i.LINK cable), disc drive (You need a CD-R drive to have DirectX installed.) Windows Media Player 7.0 or later Macromedia Flash Player 6.0 or later • Sound system: 16 bit stereo sound card and stereo..."First Step Guide" "First Step Guide" is an instruction manual you use the software stored on the CD-ROM (supplied). To display the Help guide, click the [?] mark on your camcorder and computer and making settings, to general operation the first time you can refer to the Help guide ...

Camera Operations Guide
Page 108
... case, refer to it in HTML on your computer without using automatic installation, copy the desired language folder from a tape, connect your camcorder to the computer with your computer It may not be provided as standard) Installing the software and "First Step Guide" on a computer... by double-clicking "index.html." 108 Using with an i.LINK cable and use the standard software in a recommended environment, depending on the CD-ROM, to your computer. Windows computer: Picture Package (including ImageMixer VCD2) Macintosh computer: ImageMixer VCD2 For the details on a Windows computer, ...
... case, refer to it in HTML on your computer without using automatic installation, copy the desired language folder from a tape, connect your camcorder to the computer with your computer It may not be provided as standard) Installing the software and "First Step Guide" on a computer... by double-clicking "index.html." 108 Using with an i.LINK cable and use the standard software in a recommended environment, depending on the CD-ROM, to your computer. Windows computer: Picture Package (including ImageMixer VCD2) Macintosh computer: ImageMixer VCD2 For the details on a Windows computer, ...

Camera Operations Guide
Page 109
... (E:)) may vary depending on the computer. 4 Click [Install]. 7 Read [License Agreement], check [I accept the terms of your camcorder is not connected to the computer. 2 Turn on the computer before installing the software. 3 Place the CD-ROM in the disc drive of the license agreement] when you that your computer. In such a case...
... (E:)) may vary depending on the computer. 4 Click [Install]. 7 Read [License Agreement], check [I accept the terms of your camcorder is not connected to the computer. 2 Turn on the computer before installing the software. 3 Place the CD-ROM in the disc drive of the license agreement] when you that your computer. In such a case...

Camera Operations Guide
Page 111
... with your computer Using with your computer. (and "First Step Guide," if installed by steps 11-12) appear on the desktop. 15Remove the CD-ROM from the disc drive of your computer 111 Installing on a Macintosh computer 7 Double-click [IMXINST.SIT] in the [MAC] folder of ... VCD2, refer to . 8 Double-click the unzipped [ImageMixerVCD2_Install]. 9 When the user acceptance screen is displayed, enter your camcorder is listed on the computer. The installation of the CD-ROM to the computer. 2 Turn on page 112. If you have any questions about Picture Package Contact information is not...
... with your computer Using with your computer. (and "First Step Guide," if installed by steps 11-12) appear on the desktop. 15Remove the CD-ROM from the disc drive of your computer 111 Installing on a Macintosh computer 7 Double-click [IMXINST.SIT] in the [MAC] folder of ... VCD2, refer to . 8 Double-click the unzipped [ImageMixerVCD2_Install]. 9 When the user acceptance screen is displayed, enter your camcorder is listed on the computer. The installation of the CD-ROM to the computer. 2 Turn on page 112. If you have any questions about Picture Package Contact information is not...
Camera Operations Guide
Page 112
... Home Page Windows: http://www.ppackage.com/ Macintosh: http://www.ImageMixer.com/ - z Tip • To view the PDF, Adobe Reader is a trademark of Sony Corporation. • Microsoft, Windows and Windows Media are not permitted to use the Music Contents. License of Picture Package by...Step Guide" Viewing "First Step Guide" Starting up on a Windows computer Double-click the icon on the desktop. • You can download it from CDs, the Internet or other sources (the "Music Contents") are the copyrighted work of the respective owners thereof and are protected by copyright laws and other...
... Home Page Windows: http://www.ppackage.com/ Macintosh: http://www.ImageMixer.com/ - z Tip • To view the PDF, Adobe Reader is a trademark of Sony Corporation. • Microsoft, Windows and Windows Media are not permitted to use the Music Contents. License of Picture Package by...Step Guide" Viewing "First Step Guide" Starting up on a Windows computer Double-click the icon on the desktop. • You can download it from CDs, the Internet or other sources (the "Music Contents") are the copyrighted work of the respective owners thereof and are protected by copyright laws and other...

Camera Operations Guide
Page 125
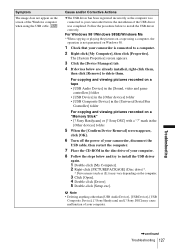
...cable) You cannot view the pictures recorded on a tape on the computer. cFinish camcorder operation before connecting the camcorder to the computer. An error message appears when you cSet the computer display as follows: place the CD-ROM in the (STANDARD SET) menu. (p. 83) • The computer ...does not recognize the "Memory Stick" during camcorder operation such as tape playback or editing. You cannot view the pictures recorded on ...
...cable) You cannot view the pictures recorded on a tape on the computer. cFinish camcorder operation before connecting the camcorder to the computer. An error message appears when you cSet the computer display as follows: place the CD-ROM in the (STANDARD SET) menu. (p. 83) • The computer ...does not recognize the "Memory Stick" during camcorder operation such as tape playback or editing. You cannot view the pictures recorded on ...
Camera Operations Guide
Page 127
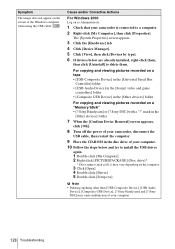
...Device Manager] tab. 4 If devices below are already installed, right-click them . Sony Handycam] or [? Sony DSC] may vary depending on the computer. 3 Click [Open]. 4 Double-click [Driver]. 5 Double-click [Setup.exe]. Sony Handycam] and [? Follow the procedure below and try to install the USB driver again. ... operation is not guaranteed on Windows 98. 1 Check that your camcorder is connected to your camcorder before the installation of your camcorder, disconnect the USB cable, then restart the computer. 7 Place the CD-ROM in the [Universal Serial Bus Controller] folder For copying and...
...Device Manager] tab. 4 If devices below are already installed, right-click them . Sony Handycam] or [? Sony DSC] may vary depending on the computer. 3 Click [Open]. 4 Double-click [Driver]. 5 Double-click [Setup.exe]. Sony Handycam] and [? Follow the procedure below and try to install the USB driver again. ... operation is not guaranteed on Windows 98. 1 Check that your camcorder is connected to your camcorder before the installation of your camcorder, disconnect the USB cable, then restart the computer. 7 Place the CD-ROM in the [Universal Serial Bus Controller] folder For copying and...
Camera Operations Guide
Page 128
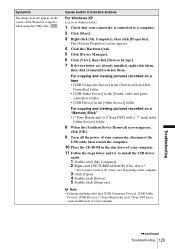
...click [OK]. 8 Turn off the power of your camcorder, disconnect the USB cable, then restart the computer. 9 Place the CD-ROM in the [Other devices] folder For copying and viewing pictures recorded on a "Memory Stick" • [? Sony Handycam] or [? Sony DSC] with a "?" b Note • Deleting...]. Cause and/or Corrective Actions For Windows 2000 Log on the computer. 3 Click [Open]. 4 Double-click [Driver]. 5 Double-click [Setup.exe]. Sony Handycam] and [? The [System Properties] screen appears. 3 Click the [Hardware] tab. 4 Click [Device Manager]. 5 Click [View], then click [Devices by...
...click [OK]. 8 Turn off the power of your camcorder, disconnect the USB cable, then restart the computer. 9 Place the CD-ROM in the [Other devices] folder For copying and viewing pictures recorded on a "Memory Stick" • [? Sony Handycam] or [? Sony DSC] with a "?" b Note • Deleting...]. Cause and/or Corrective Actions For Windows 2000 Log on the computer. 3 Click [Open]. 4 Double-click [Driver]. 5 Double-click [Setup.exe]. Sony Handycam] and [? The [System Properties] screen appears. 3 Click the [Hardware] tab. 4 Click [Device Manager]. 5 Click [View], then click [Devices by...
Camera Operations Guide
Page 129
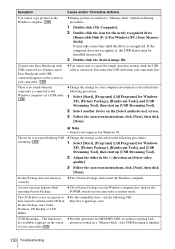
... Audio Device], [USB Device], [? Troubleshooting ,continued Troubleshooting 129 Sony Handycam] or [? mark in the [Other devices] folder 8 When the [Confirm Device Removal] screen appears, click [OK]. 9 Turn off the power of your camcorder, disconnect the USB cable, then restart the computer. 10 Place the CD-ROM in the [Other devices] folder For copying and...
... Audio Device], [USB Device], [? Troubleshooting ,continued Troubleshooting 129 Sony Handycam] or [? mark in the [Other devices] folder 8 When the [Confirm Device Removal] screen appears, click [OK]. 9 Turn off the power of your camcorder, disconnect the USB cable, then restart the computer. 10 Place the CD-ROM in the [Other devices] folder For copying and...
Camera Operations Guide
Page 130
...camcorder. If the computer does not recognize it, the USB driver may take some time until the drive is connected. This function is not supported on the CD-R in the following procedures: 1 Double-click [My Computer]. 2 Double-click the icon for Windows XP), [Picture Package], [Handycam... the camcorder is ...camcorder. 130 Troubleshooting b Note • Sound is cStart the operations for your camcorder... then click [Done]. The CD-R drive is connected to the...Handycam Tools], and [USB Streaming Tool], then start Easy Handycam with USB connected] or [Cannot cancel Easy Handycam...
...camcorder. If the computer does not recognize it, the USB driver may take some time until the drive is connected. This function is not supported on the CD-R in the following procedures: 1 Double-click [My Computer]. 2 Double-click the icon for Windows XP), [Picture Package], [Handycam... the camcorder is ...camcorder. 130 Troubleshooting b Note • Sound is cStart the operations for your camcorder... then click [Done]. The CD-R drive is connected to the...Handycam Tools], and [USB Streaming Tool], then start Easy Handycam with USB connected] or [Cannot cancel Easy Handycam...

Camera Operations Guide
Page 154
...144 Camera Chroma key (CAMTM CHROMA 45 Camera settings data display 57 Cassette 22, 137 CD-ROM 106 Charging the battery Battery pack 16 Pre-installed rechargeable battery 145 Clock set (CLOCK...116 Digital effect (D.EFFECT)..........44, 51 Digital program editing (PROG.EDIT 94 DIGITAL ZOOM 66 Digital8 system 137 Direct Access to "Click to DVD".........113 DirectX 9.0c 110 Display DISPLAY 84...43 Dual sound track tape ........79 Dubbing (REC CTRL).......91 DV Interface 113, 116 E Easy Handycam ...........35, 54 EDIT SEARCH 47 END SEARCH 47, 77 Erase ALL ERASE (still image)...........69 ...
...144 Camera Chroma key (CAMTM CHROMA 45 Camera settings data display 57 Cassette 22, 137 CD-ROM 106 Charging the battery Battery pack 16 Pre-installed rechargeable battery 145 Clock set (CLOCK...116 Digital effect (D.EFFECT)..........44, 51 Digital program editing (PROG.EDIT 94 DIGITAL ZOOM 66 Digital8 system 137 Direct Access to "Click to DVD".........113 DirectX 9.0c 110 Display DISPLAY 84...43 Dual sound track tape ........79 Dubbing (REC CTRL).......91 DV Interface 113, 116 E Easy Handycam ...........35, 54 EDIT SEARCH 47 END SEARCH 47, 77 Erase ALL ERASE (still image)...........69 ...


