Operating Instructions
Page 5
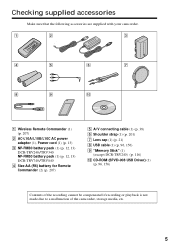
... accessories are supplied with your camcorder. 1 2 3 4 5 6 7 8 9 0 1 Wireless Remote Commander (1) (p. 207) 2 AC-L10A/L10B/L10C AC power adaptor (1), Power cord (1) (p. 13) 3 NP-FM30 battery pack (1) (p. 12, 13) DCR-TRV240/TRV340 NP-FM50 battery pack (1) (p. 12, 13) DCR-TRV740/TRV840 4 Size AA (R6) battery for Remote Commander (2) (p. 207) 5 A/V connecting cable (1) (p. 38) 6 Shoulder strap (1) (p. 201) 7 Lens cap (1) (p. 21) 8 USB cable (1) (p. 96...
... accessories are supplied with your camcorder. 1 2 3 4 5 6 7 8 9 0 1 Wireless Remote Commander (1) (p. 207) 2 AC-L10A/L10B/L10C AC power adaptor (1), Power cord (1) (p. 13) 3 NP-FM30 battery pack (1) (p. 12, 13) DCR-TRV240/TRV340 NP-FM50 battery pack (1) (p. 12, 13) DCR-TRV740/TRV840 4 Size AA (R6) battery for Remote Commander (2) (p. 207) 5 A/V connecting cable (1) (p. 38) 6 Shoulder strap (1) (p. 201) 7 Lens cap (1) (p. 21) 8 USB cable (1) (p. 96...
Operating Instructions
Page 6
... subjects - NightShot/Super NightShot/ Color Slow Shutter 29 Self-timer recording (except DCR-TRV240 31 Checking recordings - Display function 35 Viewing recordings on TV 38 Advanced Recording...Operations Recording still images on your computer (Windows users only 94 Customizing Your Camcorder Changing the menu settings 105 6 Tape Photo recording 39 Using the wide...recording - Table of contents Main features 4 Checking supplied accessories 5 Quick Start Guide 8 Getting Started Using this manual 10 Step 1 Preparing the power supply ... 12 Installing the battery pack 12 Charging ...
... subjects - NightShot/Super NightShot/ Color Slow Shutter 29 Self-timer recording (except DCR-TRV240 31 Checking recordings - Display function 35 Viewing recordings on TV 38 Advanced Recording...Operations Recording still images on your computer (Windows users only 94 Customizing Your Camcorder Changing the menu settings 105 6 Tape Photo recording 39 Using the wide...recording - Table of contents Main features 4 Checking supplied accessories 5 Quick Start Guide 8 Getting Started Using this manual 10 Step 1 Preparing the power supply ... 12 Installing the battery pack 12 Charging ...
Operating Instructions
Page 8
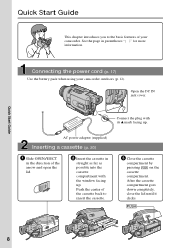
... down completely, close the lid until it clicks. Connect the plug with the window facing up . Connecting the power cord (p. 17) Use the battery pack when using your camcorder. Quick Start Guide 8 See the page in straight as far as possible into the cassette compartment with its v... mark facing up . AC power adaptor (supplied) Inserting a cassette (p. 20) 1 Slide OPEN/EJECT in the direction of the cassette back to ...
... down completely, close the lid until it clicks. Connect the plug with the window facing up . Connecting the power cord (p. 17) Use the battery pack when using your camcorder. Quick Start Guide 8 See the page in straight as far as possible into the cassette compartment with its v... mark facing up . AC power adaptor (supplied) Inserting a cassette (p. 20) 1 Slide OPEN/EJECT in the direction of the cassette back to ...
Operating Instructions
Page 12
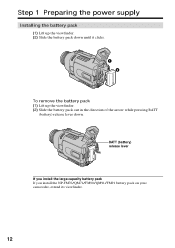
BATT (battery) release lever If you install the large-capacity battery pack If you install the NP-FM70/QM71/FM90/QM91/FM91 battery pack on your camcorder, extend its viewfinder. 12 Step 1 Preparing the power supply Installing the battery pack (1) Lift up the viewfinder. (2) Slide the battery pack down until it clicks. 1 2 To remove the battery pack (1) Lift up the viewfinder. (2) Slide the battery pack out in the direction of the arrow while pressing BATT (battery) release lever down.
BATT (battery) release lever If you install the large-capacity battery pack If you install the NP-FM70/QM71/FM90/QM91/FM91 battery pack on your camcorder, extend its viewfinder. 12 Step 1 Preparing the power supply Installing the battery pack (1) Lift up the viewfinder. (2) Slide the battery pack down until it clicks. 1 2 To remove the battery pack (1) Lift up the viewfinder. (2) Slide the battery pack out in the direction of the arrow while pressing BATT (battery) release lever down.
Operating Instructions
Page 13
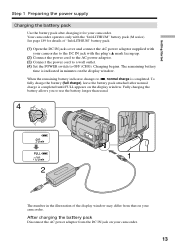
... from the DC IN jack on the display window. Your camcorder operates only with your camcorder. Charging begins. After charging the battery pack Disconnect the AC power adaptor from that on the display window. Getting Started OFCFR(CHG) E ERMAORY CAM M Step 1 Preparing the power supply Charging the battery pack Use the battery pack after normal...
... from the DC IN jack on the display window. Your camcorder operates only with your camcorder. Charging begins. After charging the battery pack Disconnect the AC power adaptor from that on the display window. Getting Started OFCFR(CHG) E ERMAORY CAM M Step 1 Preparing the power supply Charging the battery pack Use the battery pack after normal...
Operating Instructions
Page 14
...- What is not installed correctly. - "InfoLITHIUM" M series battery packs have the mark. The battery pack is "InfoLITHIUM"? Your camcorder operates only with the battery pack. If any trouble occurs with this unit, disconnect the plug from coming into contact with the "...power supply Note Prevent metallic objects from the wall outlet as soon as possible to cut off although the remaining battery time indicator indicates that the battery pack has enough power to 86°F). The "InfoLITHIUM" is a lithium ion battery pack that the indication on the DC plug of Sony...
...- What is not installed correctly. - "InfoLITHIUM" M series battery packs have the mark. The battery pack is "InfoLITHIUM"? Your camcorder operates only with the battery pack. If any trouble occurs with this unit, disconnect the plug from coming into contact with the "...power supply Note Prevent metallic objects from the wall outlet as soon as possible to cut off although the remaining battery time indicator indicates that the battery pack has enough power to 86°F). The "InfoLITHIUM" is a lithium ion battery pack that the indication on the DC plug of Sony...

Operating Instructions
Page 15
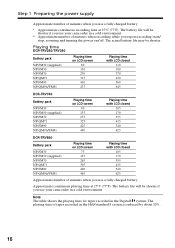
Approximate number of the ambient temperature. Step 1 Preparing the power supply Getting Started Charging time Battery pack NP-FM30 1) NP-FM50 2) NP-FM70 NP-QM71 NP-FM90 NP-QM91/FM91 Full charge (Normal charge) 145 (85) ... DCR-TRV240/TRV340 2) Supplied with DCR-TRV740/TRV840 Recording time DCR-TRV240/TRV340 Battery pack NP-FM30 (supplied) NP-FM50 NP-FM70 NP-QM71 NP-FM90 NP-QM91/FM91 Recording with the viewfinder Continuous* Typical** 100 55 165 95 345 200 400 230 520 300 605 350 Recording with the LCD screen Continuous* Typical** 80 45 130 75...
Approximate number of the ambient temperature. Step 1 Preparing the power supply Getting Started Charging time Battery pack NP-FM30 1) NP-FM50 2) NP-FM70 NP-QM71 NP-FM90 NP-QM91/FM91 Full charge (Normal charge) 145 (85) ... DCR-TRV240/TRV340 2) Supplied with DCR-TRV740/TRV840 Recording time DCR-TRV240/TRV340 Battery pack NP-FM30 (supplied) NP-FM50 NP-FM70 NP-QM71 NP-FM90 NP-QM91/FM91 Recording with the viewfinder Continuous* Typical** 100 55 165 95 345 200 400 230 520 300 605 350 Recording with the LCD screen Continuous* Typical** 80 45 130 75...
Operating Instructions
Page 16
... use your camcorder in a cold environment. ** Approximate number of tapes recorded in the Hi8/standard 8 system is reduced by about 20%.. 16 The battery life will be shorter Playing time DCR-TRV240/TRV340 Battery pack NP-FM30 (supplied) NP-FM50 NP-FM70 NP-QM71 NP-FM90 NP-QM91/FM91 Playing time on LCD screen 80...
... use your camcorder in a cold environment. ** Approximate number of tapes recorded in the Hi8/standard 8 system is reduced by about 20%.. 16 The battery life will be shorter Playing time DCR-TRV240/TRV340 Battery pack NP-FM30 (supplied) NP-FM50 NP-FM70 NP-QM71 NP-FM90 NP-QM91/FM91 Playing time on LCD screen 80...
Operating Instructions
Page 17
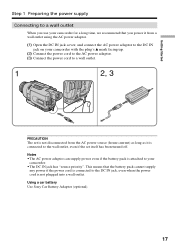
... is connected to the DC IN jack, even when the power cord is not plugged into a wall outlet. Using a car battery Use Sony Car Battery Adaptor (optional). 17 Getting Started Step 1 Preparing the power supply Connecting to a wall outlet When you use your camcorder. •The DC IN jack has "source priority". This means that...
... is connected to the DC IN jack, even when the power cord is not plugged into a wall outlet. Using a car battery Use Sony Car Battery Adaptor (optional). 17 Getting Started Step 1 Preparing the power supply Connecting to a wall outlet When you use your camcorder. •The DC IN jack has "source priority". This means that...
Operating Instructions
Page 34
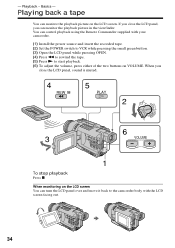
If you can control playback using the Remote Commander supplied with the LCD screen facing out. 34 When you close the LCD panel, you close the LCD panel, sound is muted. 4 REW 5 PLAY 2 V POWER OFCFR(CHG) E ERMAORY CAM M 6 3 VOLUME 1 To stop playback Press x. Playback - You can monitor ...back a tape You can turn the LCD panel over and move it back to the camcorder body with your camcorder. (1) Install the power source and insert the recorded tape. (2) Set the POWER switch to VCR while pressing the small green button. (3) Open the LCD panel while pressing OPEN. (4) Press ...
If you can control playback using the Remote Commander supplied with the LCD screen facing out. 34 When you close the LCD panel, you close the LCD panel, sound is muted. 4 REW 5 PLAY 2 V POWER OFCFR(CHG) E ERMAORY CAM M 6 3 VOLUME 1 To stop playback Press x. Playback - You can monitor ...back a tape You can turn the LCD panel over and move it back to the camcorder body with your camcorder. (1) Install the power source and insert the recorded tape. (2) Set the POWER switch to VCR while pressing the small green button. (3) Open the LCD panel while pressing OPEN. (4) Press ...
Operating Instructions
Page 35
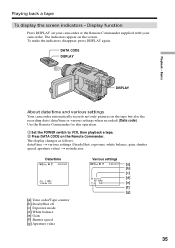
...make the indicators disappear, press DISPLAY again. DATA CODE DISPLAY Playback - Use the Remote Commander for this operation. 1 Set the POWER switch to VCR, then playback a tape. 2 Press DATA CODE on the screen. The indicators appear on the Remote Commander....back a tape To display the screen indicators - Basics DISPLAY About date/time and various settings Your camcorder automatically records not only pictures on your camcorder or the Remote Commander supplied with your camcorder. Display function Press DISPLAY on the tape but also the recording data (date/time or various settings...
...make the indicators disappear, press DISPLAY again. DATA CODE DISPLAY Playback - Use the Remote Commander for this operation. 1 Set the POWER switch to VCR, then playback a tape. 2 Press DATA CODE on the screen. The indicators appear on the Remote Commander....back a tape To display the screen indicators - Basics DISPLAY About date/time and various settings Your camcorder automatically records not only pictures on your camcorder or the Remote Commander supplied with your camcorder. Display function Press DISPLAY on the tape but also the recording data (date/time or various settings...
Operating Instructions
Page 38
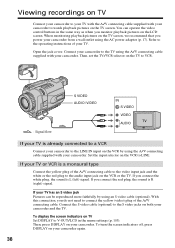
Refer to the operating instructions of your camcorder and the TV. Set the input selector on the VCR to V-OUT/LCD in the same way as when you power your TV or VCR is L (left) signal. If you connect the white plug, the sound is a monaural type Connect the yellow plug of... with the A/V connecting cable supplied with your camcorder. If you connect the red plug, the sound is already connected to watch playback pictures on TV Set DISPLAY to LINE. To display the screen indicators on the TV screen. Connect your camcorder to the TV using the AC power adaptor (p. 17). Then,...
Refer to the operating instructions of your camcorder and the TV. Set the input selector on the VCR to V-OUT/LCD in the same way as when you power your TV or VCR is L (left) signal. If you connect the white plug, the sound is a monaural type Connect the yellow plug of... with the A/V connecting cable supplied with your camcorder. If you connect the red plug, the sound is already connected to watch playback pictures on TV Set DISPLAY to LINE. To display the screen indicators on the TV screen. Connect your camcorder to the TV using the AC power adaptor (p. 17). Then,...

Operating Instructions
Page 71
...camcorder using the A/V connecting cable supplied with your camcorder as a player. You can dub or edit on the VCR. Connect your camcorder to make the indicators disappear so that support the following buttons to the VCR using your camcorder. Before operation •Set DISPLAY to LCD...LCD.) •Press the following systems: 8 mm, Hi8, VHS, S-VHS, VHSC, S-VHSC, ED Betamax, mini DV, DV or Digital8 Betamax, 71 Refer to the operating instructions of your camcorder. (5) Start recording on the VCR connected to the operating instructions of your VCR. (3) Set the POWER...
...camcorder using the A/V connecting cable supplied with your camcorder as a player. You can dub or edit on the VCR. Connect your camcorder to make the indicators disappear so that support the following buttons to the VCR using your camcorder. Before operation •Set DISPLAY to LCD...LCD.) •Press the following systems: 8 mm, Hi8, VHS, S-VHS, VHSC, S-VHSC, ED Betamax, mini DV, DV or Digital8 Betamax, 71 Refer to the operating instructions of your camcorder. (5) Start recording on the VCR connected to the operating instructions of your VCR. (3) Set the POWER...
Operating Instructions
Page 88
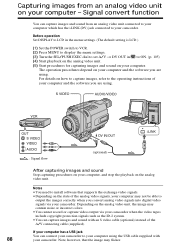
...analog video unit connected to your computer which has the i.LINK (DV) jack connected to your camcorder. Before operation Set DISPLAY to LCD in the menu settings. (The default setting is LCD.) (1) Set the POWER switch to VCR. (2) Press MENU to display the menu settings. (3) Turn the SEL/PUSH... instructions of the analog video signals, your computer may not be able to your computer using the USB cable supplied with an S video cable (optional) instead of the A/V connecting cable (supplied). Notes •You need to install software that the image may contain noise or incorrect colors. ...
...analog video unit connected to your computer which has the i.LINK (DV) jack connected to your camcorder. Before operation Set DISPLAY to LCD in the menu settings. (The default setting is LCD.) (1) Set the POWER switch to VCR. (2) Press MENU to display the menu settings. (3) Turn the SEL/PUSH... instructions of the analog video signals, your computer may not be able to your computer using the USB cable supplied with an S video cable (optional) instead of the A/V connecting cable (supplied). Notes •You need to install software that the image may contain noise or incorrect colors. ...
Operating Instructions
Page 96
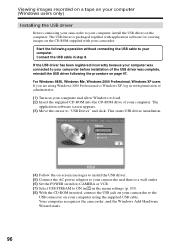
.... (2) Insert the supplied CD-ROM into the CD-ROM drive of administrator. (1) Turn on the computer. This starts USB driver installation. (4) Follow the on-screen messages to install the USB driver. (5) Connect the AC power adaptor to your camcorder and then to a wall outlet. (6) Set the POWER switch to CAMERA or VCR. (7) Select USB STREAM to ON in...
.... (2) Insert the supplied CD-ROM into the CD-ROM drive of administrator. (1) Turn on the computer. This starts USB driver installation. (4) Follow the on-screen messages to install the USB driver. (5) Connect the AC power adaptor to your camcorder and then to a wall outlet. (6) Set the POWER switch to CAMERA or VCR. (7) Select USB STREAM to ON in...
Operating Instructions
Page 97
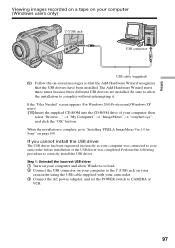
... for Sony'" on page 100. If the "Files Needed" screen appears (For Windows 2000 Professional/Windows XP users) (10)Insert the supplied CD-ROM into the CD-ROM drive of the USB driver was completed. Step 1: Uninstall the incorrect USB driver 1 Turn on your camcorder. 3 Connect the AC power adaptor,... and set the POWER switch to CAMERA or VCR. 97 The Add ...
... for Sony'" on page 100. If the "Files Needed" screen appears (For Windows 2000 Professional/Windows XP users) (10)Insert the supplied CD-ROM into the CD-ROM drive of the USB driver was completed. Step 1: Uninstall the incorrect USB driver 1 Turn on your camcorder. 3 Connect the AC power adaptor,... and set the POWER switch to CAMERA or VCR. 97 The Add ...
Operating Instructions
Page 100
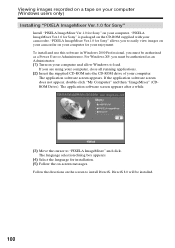
...double-click "My Computer" and then "ImageMixer" (CDROM Drive). For Windows XP, you must be authorized as a Power User or Administrator. "PIXELA ImageMixer Ver.1.0 for Sony" is packaged on your computer for your computer. To install and use this software in Windows 2000 Professional, you must.... "PIXELA ImageMixer Ver.1.0 for Sony" allows you are using your computer, close all running applications. (2) Insert the supplied CD-ROM into the CD-ROM drive of your enjoyment. If you to easily view images on your camcorder on the CD-ROM supplied with your computer and allow Windows...
...double-click "My Computer" and then "ImageMixer" (CDROM Drive). For Windows XP, you must be authorized as a Power User or Administrator. "PIXELA ImageMixer Ver.1.0 for Sony" is packaged on your computer for your computer. To install and use this software in Windows 2000 Professional, you must.... "PIXELA ImageMixer Ver.1.0 for Sony" allows you are using your computer, close all running applications. (2) Insert the supplied CD-ROM into the CD-ROM drive of your enjoyment. If you to easily view images on your camcorder on the CD-ROM supplied with your computer and allow Windows...
Operating Instructions
Page 111
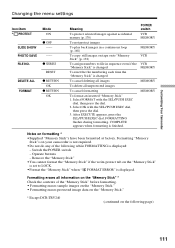
... of the following page) 111 After EXECUTE appears, press the SEL/PUSH EXEC dial. FILE NO. Formatting "Memory Stick"s on your camcorder is not required. •Do not do any of the "Memory Stick" before formatting. • Formatting erases sample images on the...data on the "Memory Stick." * Except DCR-TRV240 (continued on formatting * •Supplied "Memory Stick"s have been formatted at factory. Customizing Your Camcorder Changing the menu settings Icon/item * PROTECT Mode ON SLIDE SHOW z OFF -- Switch the POWER switch - Formatting erases all unprotected images To...
... of the following page) 111 After EXECUTE appears, press the SEL/PUSH EXEC dial. FILE NO. Formatting "Memory Stick"s on your camcorder is not required. •Do not do any of the "Memory Stick" before formatting. • Formatting erases sample images on the...data on the "Memory Stick." * Except DCR-TRV240 (continued on formatting * •Supplied "Memory Stick"s have been formatted at factory. Customizing Your Camcorder Changing the menu settings Icon/item * PROTECT Mode ON SLIDE SHOW z OFF -- Switch the POWER switch - Formatting erases all unprotected images To...
Operating Instructions
Page 114
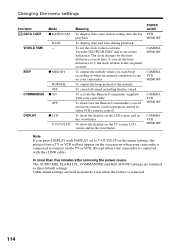
...the viewfinder To show the display on your camcorder To output the beep instead of the melody To cancel all sound including shutter sound To activate the Remote Commander supplied with your camcorder To deactivate the Remote Commander to V-OUT/LCD in memory even when the battery is connected ...with the i.LINK cable) In more than five minutes after removing the power source The AUDIO MIX, FLASH LVL, COMMANDER ...
...the viewfinder To show the display on your camcorder To output the beep instead of the melody To cancel all sound including shutter sound To activate the Remote Commander supplied with your camcorder To deactivate the Remote Commander to V-OUT/LCD in memory even when the battery is connected ...with the i.LINK cable) In more than five minutes after removing the power source The AUDIO MIX, FLASH LVL, COMMANDER ...

Operating Instructions
Page 204
...TITLE button (p. 58) * Except DCR-TRV240 el eh PHOTO button (p. 39, 124) ej "Memory Stick" slot* (p. 118) ek Access lamp* (p. 118) el END SEARCH button (p. 32, 37) Notes on the intelligent accessory shoe •The intelligent accessory shoe supplies power to optional accessories such as a ...video light or microphone or printer (except DCR-TRV240). •The intelligent accessory shoe is linked to the POWER switch, allowing you to turn the power supplied by the shoe on and off.
...TITLE button (p. 58) * Except DCR-TRV240 el eh PHOTO button (p. 39, 124) ej "Memory Stick" slot* (p. 118) ek Access lamp* (p. 118) el END SEARCH button (p. 32, 37) Notes on the intelligent accessory shoe •The intelligent accessory shoe supplies power to optional accessories such as a ...video light or microphone or printer (except DCR-TRV240). •The intelligent accessory shoe is linked to the POWER switch, allowing you to turn the power supplied by the shoe on and off.


