Operating Instructions
Page 2
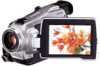
...the product's enclosure that may be producing home video that may not cause harmful interference, and (2)this device must accept any questions about this Sony Handycam. Telephone No.: 201-930-6972 This device complies with superior picture and sound quality. With your purchase of this...precious moments with Part 15 of Conformity Trade Name: SONY Model No.: DCR-TRV18 Responsible Party:Sony Electronics Inc. This symbol is for years to the presence of rechargeable batteries, call : Sony Customer Information Center 1-800-222-SONY (7669) The number below is intended to alert ...
...the product's enclosure that may be producing home video that may not cause harmful interference, and (2)this device must accept any questions about this Sony Handycam. Telephone No.: 201-930-6972 This device complies with superior picture and sound quality. With your purchase of this...precious moments with Part 15 of Conformity Trade Name: SONY Model No.: DCR-TRV18 Responsible Party:Sony Electronics Inc. This symbol is for years to the presence of rechargeable batteries, call : Sony Customer Information Center 1-800-222-SONY (7669) The number below is intended to alert ...
Operating Instructions
Page 4
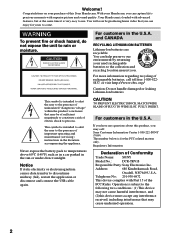
... moving pictures on a "Memory Stick"* (p. 140) Main Features •Viewing images recorded on a "Memory Stick" using the USB cable* (p. 169, 173) •Viewing images recorded on a tape using the USB cable (p. 165) •Capturing images on your computer from your camcorder using the USB cable (p. 166) •Converting an analog signal into digital to...
... moving pictures on a "Memory Stick"* (p. 140) Main Features •Viewing images recorded on a "Memory Stick" using the USB cable* (p. 169, 173) •Viewing images recorded on a tape using the USB cable (p. 165) •Capturing images on your computer from your camcorder using the USB cable (p. 166) •Converting an analog signal into digital to...
Operating Instructions
Page 5
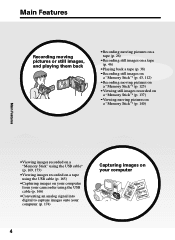
... is OFF. (To zoom greater than 10×, select the digital zoom power in D ZOOM in the menu settings.) •Fader (p. 51) •Picture effect (p. 54) •Digital effect (p. 55) •Titles (p. 98) •MEMORY MIX* (p. 120) Functions for giving a natural appearance to your recordings •Landscape (p. 58) •Sports lesson (p. 58) •Manual...
... is OFF. (To zoom greater than 10×, select the digital zoom power in D ZOOM in the menu settings.) •Fader (p. 51) •Picture effect (p. 54) •Digital effect (p. 55) •Titles (p. 98) •MEMORY MIX* (p. 120) Functions for giving a natural appearance to your recordings •Landscape (p. 58) •Sports lesson (p. 58) •Manual...
Operating Instructions
Page 6
... 51 Using special effects - TITLE SEARCH ..... 70 Searching a recording by frame recording - Digital program editing (on tapes 78 Recording video or TV programs ....... 89 Inserting a scene from a tape ...recording on TV 42 Advanced Recording Operations Recording still images on a "Memory Stick" during recording on a tape (except DCR-TRV16 43 Recording still images on a tape - Frame recording 64 Advanced Playback Operations Playing back tapes with picture effect 65 Playing back tapes with digital effect 66 Enlarging images recorded on a tape - Introduction 105 Recording...
... 51 Using special effects - TITLE SEARCH ..... 70 Searching a recording by frame recording - Digital program editing (on tapes 78 Recording video or TV programs ....... 89 Inserting a scene from a tape ...recording on TV 42 Advanced Recording Operations Recording still images on a "Memory Stick" during recording on a tape (except DCR-TRV16 43 Recording still images on a tape - Frame recording 64 Advanced Playback Operations Playing back tapes with picture effect 65 Playing back tapes with digital effect 66 Enlarging images recorded on a tape - Introduction 105 Recording...
Operating Instructions
Page 7
... (except DCR-TRV16 171 Viewing images recorded on "Memory Stick"s to your computer - Introduction 154 Connecting your camcorder to a tape .......... 143 Enlarging still images recorded on a "Memory Stick" with your computer - For Windows users 165 Viewing images recorded on a "Memory Stick" - Digital program editing (on "Memory Stick"s 132 Copying still images from an analog video unit...
... (except DCR-TRV16 171 Viewing images recorded on "Memory Stick"s to your computer - Introduction 154 Connecting your camcorder to a tape .......... 143 Enlarging still images recorded on a "Memory Stick" with your computer - For Windows users 165 Viewing images recorded on a "Memory Stick" - Digital program editing (on "Memory Stick"s 132 Copying still images from an analog video unit...

Operating Instructions
Page 9
...Press START/STOP. POWER VCR OFF(CHG) CAMERA MEMORY 2 Press m to start playback. Your camcorder starts recording. Monitoring the playback picture on the screen. 2 Set the POWER switch to off. When you want to record the date and time for a picture, set to CAMERA while pressing the small green button. To... stop recording, press START/STOP again. If you purchase your camcorder, the clock setting is closed, ...
...Press START/STOP. POWER VCR OFF(CHG) CAMERA MEMORY 2 Press m to start playback. Your camcorder starts recording. Monitoring the playback picture on the screen. 2 Set the POWER switch to off. When you want to record the date and time for a picture, set to CAMERA while pressing the small green button. To... stop recording, press START/STOP again. If you purchase your camcorder, the clock setting is closed, ...

Operating Instructions
Page 11
... holding the viewfinder, the LCD panel or the battery pack. 11 PHOTO PHOTO When you want to record the date and time for a picture, set to MEMORY or VCR while pressing the small green button. Recording a still image on a "Memory Stick" (p. 112) 1 Remove the lens cap. 3 Open the ...LCD panel while pressing OPEN. POWER VCR OFF(CHG) CAMERA MEMORY 2 Press MEMORY PLAY. LOCK switch POWER VCR OFF(CHG) CAMERA MEMORY Quick ...
... holding the viewfinder, the LCD panel or the battery pack. 11 PHOTO PHOTO When you want to record the date and time for a picture, set to MEMORY or VCR while pressing the small green button. Recording a still image on a "Memory Stick" (p. 112) 1 Remove the lens cap. 3 Open the ...LCD panel while pressing OPEN. POWER VCR OFF(CHG) CAMERA MEMORY 2 Press MEMORY PLAY. LOCK switch POWER VCR OFF(CHG) CAMERA MEMORY Quick ...
Operating Instructions
Page 14
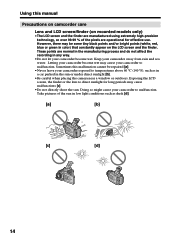
..., the finder or the lens to direct sunlight for effective use. Take pictures of the pixels are normal in the manufacturing process and do not affect the recording in the sun or under direct sunlight [b]. •Be careful when placing the camera near a window or outdoors. However, there may cause malfunctions [c]. •Do...
..., the finder or the lens to direct sunlight for effective use. Take pictures of the pixels are normal in the manufacturing process and do not affect the recording in the sun or under direct sunlight [b]. •Be careful when placing the camera near a window or outdoors. However, there may cause malfunctions [c]. •Do...
Operating Instructions
Page 26
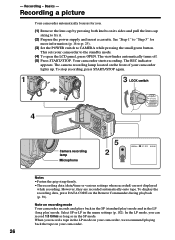
... Microphone 5 2 50min REC 0:00:01 Notes •Fasten the grip strap firmly. •The recording data (date/time or various settings when recorded) are recorded automatically onto tape. The camera recording lamp located on the Remote Commander during playback (p. 39). Recording a picture Your camcorder automatically focuses for more information (p. 16 to p. 25). (3) Set the POWER switch to...
... Microphone 5 2 50min REC 0:00:01 Notes •Fasten the grip strap firmly. •The recording data (date/time or various settings when recorded) are recorded automatically onto tape. The camera recording lamp located on the Remote Commander during playback (p. 39). Recording a picture Your camcorder automatically focuses for more information (p. 16 to p. 25). (3) Set the POWER switch to...
Operating Instructions
Page 27
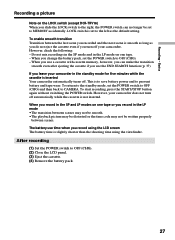
...The battery use the END SEARCH function (p. 37). When you record in the LP mode on the LOCK switch (except DCR-TRV16) When you slide the LOCK switch to the right, ...However, check the following: - To return to the standby mode, set the POWER switch to CAMERA. When you record using the viewfinder. However, your camcorder does not turn off . When you use a cassette with... inserted. If you leave your camcorder. After recording (1) Set the POWER switch to MEMORY accidentally. Basics Recording a picture Note on one tape or you record in the standby mode for five minutes while ...
...The battery use the END SEARCH function (p. 37). When you record in the LP mode on the LOCK switch (except DCR-TRV16) When you slide the LOCK switch to the right, ...However, check the following: - To return to the standby mode, set the POWER switch to CAMERA. When you record using the viewfinder. However, your camcorder does not turn off . When you use a cassette with... inserted. If you leave your camcorder. After recording (1) Set the POWER switch to MEMORY accidentally. Basics Recording a picture Note on one tape or you record in the standby mode for five minutes while ...
Operating Instructions
Page 28
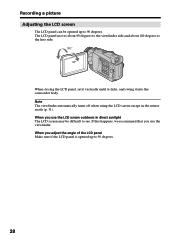
... happens, we recommend that you adjust the angle of the LCD panel Make sure if the LCD panel is opened up to 90 degrees. 28 Recording a picture Adjusting the LCD screen The LCD panel can be difficult to see. When you use the viewfinder. The LCD panel moves about 90 degrees to...
... happens, we recommend that you adjust the angle of the LCD panel Make sure if the LCD panel is opened up to 90 degrees. 28 Recording a picture Adjusting the LCD screen The LCD panel can be difficult to see. When you use the viewfinder. The LCD panel moves about 90 degrees to...

Operating Instructions
Page 29
...(p. 178). 29 in the menu settings when using the battery pack (p. 178). Recording - Set the POWER switch to CAMERA, VCR or MEMORY (except DCR-TRV16). Adjusting the viewfinder If you record pictures with the LCD panel closed, check the picture with LCD BRIGHT, then press the dial. (3) Press MENU to adjust the brightness...VF B.L. The viewfinder lens adjustment lever Viewfinder backlight You can change the brightness of the LCD screen (1) Set the POWER switch to CAMERA, VCR or MEMORY (except DCR-TRV16). Basics Recording a picture Adjusting the brightness of the backlight.
...(p. 178). 29 in the menu settings when using the battery pack (p. 178). Recording - Set the POWER switch to CAMERA, VCR or MEMORY (except DCR-TRV16). Adjusting the viewfinder If you record pictures with the LCD panel closed, check the picture with LCD BRIGHT, then press the dial. (3) Press MENU to adjust the brightness...VF B.L. The viewfinder lens adjustment lever Viewfinder backlight You can change the brightness of the LCD screen (1) Set the POWER switch to CAMERA, VCR or MEMORY (except DCR-TRV16). Basics Recording a picture Adjusting the brightness of the backlight.

Operating Instructions
Page 30
...digital zoom, select the digital zoom power in D ZOOM in better-looking recordings. Note on digital zoom The picture quality deteriorates as a default setting. W: For wide-angle (subject appears farther away) T : For telephoto (subject appears closer) W T W W T T To use the digital zoom. 30 When you shoot close to MEMORY (except DCR...focus is set to OFF as you select the digital zoom power in the wide-angle position. Recording a picture Using the zoom feature Move the power zoom lever a little for a faster zoom. The digital zoom function is set to 20 × or ...
...digital zoom, select the digital zoom power in D ZOOM in better-looking recordings. Note on digital zoom The picture quality deteriorates as a default setting. W: For wide-angle (subject appears farther away) T : For telephoto (subject appears closer) W T W W T T To use the digital zoom. 30 When you shoot close to MEMORY (except DCR...focus is set to OFF as you select the digital zoom power in the wide-angle position. Recording a picture Using the zoom feature Move the power zoom lever a little for a faster zoom. The digital zoom function is set to 20 × or ...

Operating Instructions
Page 31
Recording - Basics Recording a picture Shooting with the Mirror Mode This feature allows the camera subject to CAMERA or MEMORY (except DCR-TRV16). Set the POWER switch to view him-or herself on the LCD screen. The subject uses this feature to check his or her own ... not displayed. Xz appears in the standby mode, and z appears in the mirror mode ZERO SET MEMORY on the LCD screen is a mirror-image. During recording in the recording mode. Picture in the mirror mode The picture on the Remote Commander does not work. 31 Rotate the LCD screen 180 degrees. However, the...
Recording - Basics Recording a picture Shooting with the Mirror Mode This feature allows the camera subject to CAMERA or MEMORY (except DCR-TRV16). Set the POWER switch to view him-or herself on the LCD screen. The subject uses this feature to check his or her own ... not displayed. Xz appears in the standby mode, and z appears in the mirror mode ZERO SET MEMORY on the LCD screen is a mirror-image. During recording in the recording mode. Picture in the mirror mode The picture on the Remote Commander does not work. 31 Rotate the LCD screen 180 degrees. However, the...

Operating Instructions
Page 32
Recording a picture Indicators displayed in the recording mode Indicators are not recorded on . Recording mode STBY/REC 50min REC 0:00:01 45min Time code/Tape counter JUL 4 2002 12:05:56 AM Remaining tape This appears after you are recording. Date The date is displayed about five seconds after the ... five seconds after the power is displayed about one minute for a while. Time code The time code indicates the recording or playback time, "0:00:00" (hours : minutes : seconds) in CAMERA and "0:00:00:00" (hours : minutes : seconds : frames) in minutes to be correct, depending on the...
Recording a picture Indicators displayed in the recording mode Indicators are not recorded on . Recording mode STBY/REC 50min REC 0:00:01 45min Time code/Tape counter JUL 4 2002 12:05:56 AM Remaining tape This appears after you are recording. Date The date is displayed about five seconds after the ... five seconds after the power is displayed about one minute for a while. Time code The time code indicates the recording or playback time, "0:00:00" (hours : minutes : seconds) in CAMERA and "0:00:00:00" (hours : minutes : seconds : frames) in minutes to be correct, depending on the...
Operating Instructions
Page 33
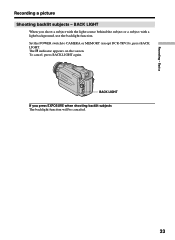
Set the POWER switch to CAMERA or MEMORY (except DCR-TRV16), press BACK LIGHT. indicator appears on the screen. Basics Recording a picture Shooting backlit subjects - BACK LIGHT If you shoot a subject with the light source behind the subject or a subject with a light background, use the backlight function. To cancel, press BACK LIGHT again. The . BACK LIGHT When you press EXPOSURE when shooting backlit subjects The backlight function will be canceled. 33 Recording -
Set the POWER switch to CAMERA or MEMORY (except DCR-TRV16), press BACK LIGHT. indicator appears on the screen. Basics Recording a picture Shooting backlit subjects - BACK LIGHT If you shoot a subject with the light source behind the subject or a subject with a light background, use the backlight function. To cancel, press BACK LIGHT again. The . BACK LIGHT When you press EXPOSURE when shooting backlit subjects The backlight function will be canceled. 33 Recording -
Operating Instructions
Page 34
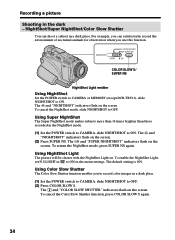
...SUPER NS again. The and "NIGHTSHOT" indicators flash on the screen. (2) Press SUPER NS. Recording a picture Shooting in the NightShot mode. (1) Set the POWER switch to CAMERA, slide NIGHTSHOT to ON. For example, you can shoot a subject in a dark place. ...record color images in the menu settings. NIGHTSHOT OFF COLOR SLOW S SUPER NS ON COLOR SLOW S/ SUPER NS NightShot Light emitter Using NightShot Set the POWER switch to CAMERA or MEMORY (except DCR-TRV16), slide NIGHTSHOT to OFF. The and "SUPER NIGHTSHOT" indicators flash on the screen. Using NightShot Light The picture...
...SUPER NS again. The and "NIGHTSHOT" indicators flash on the screen. (2) Press SUPER NS. Recording a picture Shooting in the NightShot mode. (1) Set the POWER switch to CAMERA, slide NIGHTSHOT to ON. For example, you can shoot a subject in a dark place. ...record color images in the menu settings. NIGHTSHOT OFF COLOR SLOW S SUPER NS ON COLOR SLOW S/ SUPER NS NightShot Light emitter Using NightShot Set the POWER switch to CAMERA or MEMORY (except DCR-TRV16), slide NIGHTSHOT to OFF. The and "SUPER NIGHTSHOT" indicators flash on the screen. Using NightShot Light The picture...
Operating Instructions
Page 35
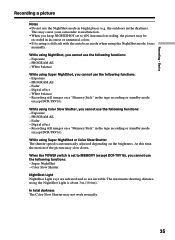
... is automatically adjusted depending on a "Memory Stick" in bright places (e.g. This may cause your camcorder to ON in normal recording, the picture may be recorded in the tape recording or standby mode (except DCR-TRV16). Fader - Digital effect - Recording - the outdoors in the daytime). Exposure - White balance While using NightShot, you keep NIGHTSHOT set to MEMORY (except...
... is automatically adjusted depending on a "Memory Stick" in bright places (e.g. This may cause your camcorder to ON in normal recording, the picture may be recorded in the tape recording or standby mode (except DCR-TRV16). Fader - Digital effect - Recording - the outdoors in the daytime). Exposure - White balance While using NightShot, you keep NIGHTSHOT set to MEMORY (except...

Operating Instructions
Page 36
...). 36 Note The self-timer is finished. - Except DCR-TRV16 Recording with a beep. In the last two seconds of the countdown, the beep gets faster, then recording starts automatically. START/STOP 4 START/STOP 2 CAMERA SET SELFTIMER OFF D ZOOM ON PHOTO REC 16:9WIDE ...STEADYSHOT FRAME REC INT. Self-timer recording is automatically canceled when: - When the POWER switch is set to OFF (CHG) or VCR. Recording a picture Self-timer recording - ...
...). 36 Note The self-timer is finished. - Except DCR-TRV16 Recording with a beep. In the last two seconds of the countdown, the beep gets faster, then recording starts automatically. START/STOP 4 START/STOP 2 CAMERA SET SELFTIMER OFF D ZOOM ON PHOTO REC 16:9WIDE ...STEADYSHOT FRAME REC INT. Self-timer recording is automatically canceled when: - When the POWER switch is set to OFF (CHG) or VCR. Recording a picture Self-timer recording - ...
Operating Instructions
Page 37
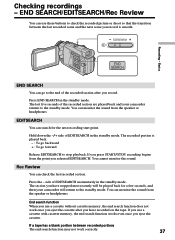
...Review You can monitor the sound from the speaker or headphones. You can use these buttons to check the recorded picture or shoot so that the transition between recorded portions The end search function may not work once you eject the cassette after you have stopped most recently will... to stop playback. The last five seconds of EDITSEARCH in the standby mode. Basics END SEARCH END SEARCH You can check the last recorded section. Rec Review You can go forward Release EDITSEARCH to the standby mode. End search function When you use a cassette with cassette ...
...Review You can monitor the sound from the speaker or headphones. You can use these buttons to check the recorded picture or shoot so that the transition between recorded portions The end search function may not work once you eject the cassette after you have stopped most recently will... to stop playback. The last five seconds of EDITSEARCH in the standby mode. Basics END SEARCH END SEARCH You can check the last recorded section. Rec Review You can go forward Release EDITSEARCH to the standby mode. End search function When you use a cassette with cassette ...
