Operating Instructions
Page 1
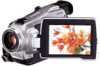
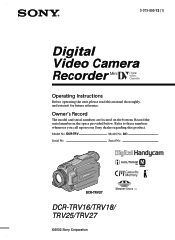
Record the serial number in the space provided below. Serial No. DCR-TRV Model No. Serial No. 3-073-855-12 (1) Digital Video Camera Recorder Operating Instructions Before operating the unit, please read this product. Owner's Record The model and serial numbers are located on the bottom. Refer to these numbers whenever you call upon your Sony dealer regarding this manual thoroughly, and retain it for future reference. Model No. AC- TM SERIES DCR-TRV27 DCR-TRV16/TRV18/ TRV25/TRV27 ©2002 Sony Corporation
Record the serial number in the space provided below. Serial No. DCR-TRV Model No. Serial No. 3-073-855-12 (1) Digital Video Camera Recorder Operating Instructions Before operating the unit, please read this product. Owner's Record The model and serial numbers are located on the bottom. Refer to these numbers whenever you call upon your Sony dealer regarding this manual thoroughly, and retain it for future reference. Model No. AC- TM SERIES DCR-TRV27 DCR-TRV16/TRV18/ TRV25/TRV27 ©2002 Sony Corporation

Operating Instructions
Page 79
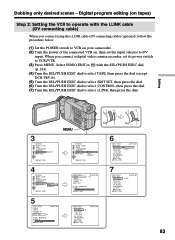
... 0:08:55:06 VIDEO EDIT EDIT SET CONTROL IR ADJ TEST "CUT-IN" "CUT-OUT" IR SETUP PAUSEMODE IR TEST RETURN [MENU] : END 0:08:55:06 6 VIDEO EDIT 0:08:55:06 EDIT SET CONTROL IR ADJ TEST i. When you connect a video camera recorder, set the input selector to VCR/VTR. 3 Press MENU. Dubbing only desired scenes - Digital program editing (on tapes) Step 2: Setting the VCR to operate with the SEL/PUSH...
... 0:08:55:06 VIDEO EDIT EDIT SET CONTROL IR ADJ TEST "CUT-IN" "CUT-OUT" IR SETUP PAUSEMODE IR TEST RETURN [MENU] : END 0:08:55:06 6 VIDEO EDIT 0:08:55:06 EDIT SET CONTROL IR ADJ TEST i. When you connect a video camera recorder, set the input selector to VCR/VTR. 3 Press MENU. Dubbing only desired scenes - Digital program editing (on tapes) Step 2: Setting the VCR to operate with the SEL/PUSH...
Operating Instructions
Page 83
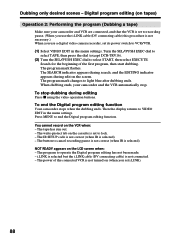
... connect a digital video camera recorder, set the input selector to select i.LINK, then press the dial. When you connect using the i.LINK cable (DV connecting cable) (optional), follow the procedure below. (1) Set the POWER switch to VCR on your camcorder. (2) Turn the power of the connected VCR on tapes) Step 2: Setting the VCR to operate with the SEL/PUSH EXEC dial (p. 184). (4) Turn the SEL/PUSH EXEC dial to select TAPE, then press the dial (except DCR-TRV16). (5) Turn...
... connect a digital video camera recorder, set the input selector to select i.LINK, then press the dial. When you connect using the i.LINK cable (DV connecting cable) (optional), follow the procedure below. (1) Set the POWER switch to VCR on your camcorder. (2) Turn the power of the connected VCR on tapes) Step 2: Setting the VCR to operate with the SEL/PUSH EXEC dial (p. 184). (4) Turn the SEL/PUSH EXEC dial to select TAPE, then press the dial (except DCR-TRV16). (5) Turn...
Operating Instructions
Page 88
... but the i.LINK cable (DV connecting cable) is set to recording pause. (When you use a digital video camera recorder, set i.LINK). 88 Turn the SEL/PUSH EXEC dial to select TAPE, then press the dial (except DCR-TRV16). (2) Turn the SEL/PUSH EXEC dial to VIDEO EDIT in the menu settings. The power of the first program, then start dubbing. The program to end the Digital program editing function. The SEARCH indicator...
... but the i.LINK cable (DV connecting cable) is set to recording pause. (When you use a digital video camera recorder, set i.LINK). 88 Turn the SEL/PUSH EXEC dial to select TAPE, then press the dial (except DCR-TRV16). (2) Turn the SEL/PUSH EXEC dial to VIDEO EDIT in the menu settings. The power of the first program, then start dubbing. The program to end the Digital program editing function. The SEARCH indicator...

Operating Instructions
Page 117
... image displayed on the screen will be recorded on the screen. Otherwise, image data may become damaged. Recording an image from the tape freezes. Recording does not start yet. Except DCR-TRV16 Your camcorder can also capture moving picture data recorded on a tape and record it lightly again. (4) Press PHOTO deeper. Your camcorder can read moving picture data through the input connector and record it as a still image on a "Memory Stick". CAPTURE appears on the "Memory Stick." Also, do not turn the power off, eject a "Memory Stick". Check...
... image displayed on the screen will be recorded on the screen. Otherwise, image data may become damaged. Recording an image from the tape freezes. Recording does not start yet. Except DCR-TRV16 Your camcorder can also capture moving picture data recorded on a tape and record it lightly again. (4) Press PHOTO deeper. Your camcorder can read moving picture data through the input connector and record it as a still image on a "Memory Stick". CAPTURE appears on the "Memory Stick." Also, do not turn the power off, eject a "Memory Stick". Check...
Operating Instructions
Page 161
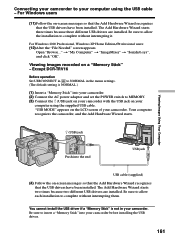
... times because three different USB drivers are installed. You cannot install the USB driver if a "Memory Stick" is not in the menu settings. (The default setting is NORMAL.) (1) Insert a "Memory Stick" into the end USB jack USB cable (supplied) (4) Follow the on your computer using the supplied USB cable. Open "Browse..." Viewing Images Using Your Computer (USB) jack Push into your camcorder. (2) Connect the AC power adaptor and set the POWER switch to MEMORY. (3) Connect the (USB) jack on your camcorder with the USB jack on -screen messages...
... times because three different USB drivers are installed. You cannot install the USB driver if a "Memory Stick" is not in the menu settings. (The default setting is NORMAL.) (1) Insert a "Memory Stick" into the end USB jack USB cable (supplied) (4) Follow the on your computer using the supplied USB cable. Open "Browse..." Viewing Images Using Your Computer (USB) jack Push into your camcorder. (2) Connect the AC power adaptor and set the POWER switch to MEMORY. (3) Connect the (USB) jack on your camcorder with the USB jack on -screen messages...
Operating Instructions
Page 162
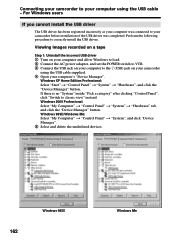
Viewing images recorded on a tape Step 1: Uninstall the incorrect USB driver 1 Turn on your computer and allow Windows to load. 2 Connect the AC power adaptor, and set the POWER switch to VCR. 3 Connect the USB jack on your computer to the (USB) jack on your camcorder using the USB cable - Windows 98SE/Windows Me: Select "My Computer" t "Control Panel" t "System", and click "Device Manager". 5 Select and delete the underlined devices. 162 Windows 98SE Windows Me Connecting your camcorder to your computer using the...
Viewing images recorded on a tape Step 1: Uninstall the incorrect USB driver 1 Turn on your computer and allow Windows to load. 2 Connect the AC power adaptor, and set the POWER switch to VCR. 3 Connect the USB jack on your computer to the (USB) jack on your camcorder using the USB cable - Windows 98SE/Windows Me: Select "My Computer" t "Control Panel" t "System", and click "Device Manager". 5 Select and delete the underlined devices. 162 Windows 98SE Windows Me Connecting your camcorder to your computer using the...
Operating Instructions
Page 164
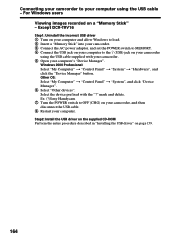
..."Installing the USB driver" on your computer. Ex: (?)Sony Handycam 7 Turn the POWER switch to OFF (CHG) on a "Memory Stick" - mark and delete. Windows 2000 Professional: Select "My Computer" t "Control Panel" t "System" t "Hardware", and click the "Device Manager" button. Connecting your camcorder to your computer's "Device Manager". For Windows users Viewing images recorded on your camcorder, and then disconnect the USB cable. 8 Restart your camcorder using the USB cable - Select the device prefixed with your camcorder. 5 Open your computer using the USB cable supplied...
..."Installing the USB driver" on your computer. Ex: (?)Sony Handycam 7 Turn the POWER switch to OFF (CHG) on a "Memory Stick" - mark and delete. Windows 2000 Professional: Select "My Computer" t "Control Panel" t "System" t "Hardware", and click the "Device Manager" button. Connecting your camcorder to your computer's "Device Manager". For Windows users Viewing images recorded on your camcorder, and then disconnect the USB cable. 8 Restart your camcorder using the USB cable - Select the device prefixed with your camcorder. 5 Open your computer using the USB cable supplied...
Operating Instructions
Page 169
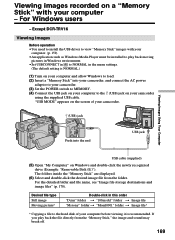
..." folder t Image file* * Copying a file to the hard disk of your camcorder. (USB) jack Push into your camcorder, and connect the AC power adaptor to your camcorder. (3) Set the POWER switch to MEMORY. (4) Connect the USB jack on your computer to the (USB) jack on your camcorder using the supplied USB cable. For the detailed folder and file name, see "Image file storage destinations and image files" (p. 170). For Windows users - Except DCR-TRV16 Viewing images Before operation •You need to install the USB driver to view "Memory Stick" images with...
..." folder t Image file* * Copying a file to the hard disk of your camcorder. (USB) jack Push into your camcorder, and connect the AC power adaptor to your camcorder. (3) Set the POWER switch to MEMORY. (4) Connect the USB jack on your computer to the (USB) jack on your camcorder using the supplied USB cable. For the detailed folder and file name, see "Image file storage destinations and image files" (p. 170). For Windows users - Except DCR-TRV16 Viewing images Before operation •You need to install the USB driver to view "Memory Stick" images with...
Operating Instructions
Page 173
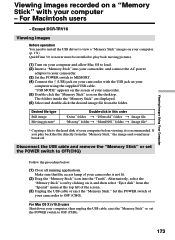
... camcorder, and connect the AC power adaptor to your camcorder. (3) Set the POWER switch to the hard disk of your computer using the supplied USB cable. For Mac OS X (v10.0) users Shut down your computer, then unplug the USB cable, eject the "Memory Stick" or set the POWER switch to OFF (CHG). 173 Except DCR-TRV16 Viewing images Before operation You need to install the USB driver to view a "Memory Stick" images on your computer. (p. 171) QuickTime 3.0 or newer must be installed to play back the file directly...
... camcorder, and connect the AC power adaptor to your camcorder. (3) Set the POWER switch to the hard disk of your computer using the supplied USB cable. For Mac OS X (v10.0) users Shut down your computer, then unplug the USB cable, eject the "Memory Stick" or set the POWER switch to OFF (CHG). 173 Except DCR-TRV16 Viewing images Before operation You need to install the USB driver to view a "Memory Stick" images on your computer. (p. 171) QuickTime 3.0 or newer must be installed to play back the file directly...
Operating Instructions
Page 174
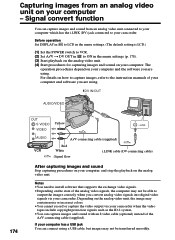
... AUDIO/VIDEO 174 OUT S VIDEO VIDEO Yellow i.LINK AUDIO VCR A/V connecting cable (supplied) Red White : Signal flow i.LINK cable (DV connecting cable) After capturing images and sound Stop capturing procedures on your computer. Signal convert function You can connect using a USB cable, but images may not be able to your computer and the software you are using . Before operation Set DISPLAY in to LCD in the menu settings. (The default setting is LCD.) (1) Set the POWER switch to VCR. (2) Set A/V t DV OUT in the menu settings (p. 178). (3) Start playback on the analog video...
... AUDIO/VIDEO 174 OUT S VIDEO VIDEO Yellow i.LINK AUDIO VCR A/V connecting cable (supplied) Red White : Signal flow i.LINK cable (DV connecting cable) After capturing images and sound Stop capturing procedures on your computer. Signal convert function You can connect using a USB cable, but images may not be able to your computer and the software you are using . Before operation Set DISPLAY in to LCD in the menu settings. (The default setting is LCD.) (1) Set the POWER switch to VCR. (2) Set A/V t DV OUT in the menu settings (p. 178). (3) Start playback on the analog video...

Operating Instructions
Page 176
... flash level higher than normal Normal setting To make the menu display disappear Press MENU. P EFFECT - POWER Icon/item Mode Meaning switch MANUAL SET PROGRAM AE - Note on FLASH LVL You cannot adjust FLASH LVL if the external flash (optional) is the default setting. Menu items are displayed as the following icons: MANUAL SET CAMERA SET VCR SET LCD/VF SET MEMORY SET (except DCR-TRV16) PRINT SET (except DCR-TRV16) CM SET TAPE SET SETUP MENU OTHERS Selecting the mode setting of each item z is not compatible with the flash level...
... flash level higher than normal Normal setting To make the menu display disappear Press MENU. P EFFECT - POWER Icon/item Mode Meaning switch MANUAL SET PROGRAM AE - Note on FLASH LVL You cannot adjust FLASH LVL if the external flash (optional) is the default setting. Menu items are displayed as the following icons: MANUAL SET CAMERA SET VCR SET LCD/VF SET MEMORY SET (except DCR-TRV16) PRINT SET (except DCR-TRV16) CM SET TAPE SET SETUP MENU OTHERS Selecting the mode setting of each item z is not compatible with the flash level...
Operating Instructions
Page 190
... display window. • The battery pack is attempted. No function works though the power is open the LCD panel and press the RESET button using a sharppointed object. (If you may hear a clatter sound from a TV or VCR does not appear even when your camcorder (DCR-TRV25/TRV27 only). • This is blocking the infrared rays. c Contact your camcorder. The cassette cannot be transferred by the USB connection. • The USB cable was connected before installation...
... display window. • The battery pack is attempted. No function works though the power is open the LCD panel and press the RESET button using a sharppointed object. (If you may hear a clatter sound from a TV or VCR does not appear even when your camcorder (DCR-TRV25/TRV27 only). • This is blocking the infrared rays. c Contact your camcorder. The cassette cannot be transferred by the USB connection. • The USB cable was connected before installation...
Operating Instructions
Page 195
... play back Using any other video camera recorder, you cannot record on a tape that has recorded copyright control signals for copyright protection of software which is played back on your camcorder that contains copyright control signals for copyright protection of software. The balance between stereo 1 and stereo 2 can be adjusted by selecting AUDIO MIX in 32 kHz, 44.1 kHz or 48 kHz. Sound from speaker HiFi SOUND mode Playing back a stereo tape...
... play back Using any other video camera recorder, you cannot record on a tape that has recorded copyright control signals for copyright protection of software which is played back on your camcorder that contains copyright control signals for copyright protection of software. The balance between stereo 1 and stereo 2 can be adjusted by selecting AUDIO MIX in 32 kHz, 44.1 kHz or 48 kHz. Sound from speaker HiFi SOUND mode Playing back a stereo tape...
Operating Instructions
Page 207
Specifications Video camera recorder System Video recording system 2 rotary heads Helical scanning system Audio recording system Rotary heads, PCM system Quantization: 12 bits (Fs 32 kHz, stereo 1, stereo 2), 16 bits (Fs 48 kHz, stereo) Video signal NTSC color, EIA standards Usable cassette Mini DV cassette with infrared lighting. and 30 seconds Viewfinder Electric viewfinder (color) Image device DCR-TRV16: 4.5 mm (1/4 type) CCD (Charge Coupled Device) Gross: Approx. 680 000 pixels Effective : Approx. 340 000 pixels DCR-TRV18...
Specifications Video camera recorder System Video recording system 2 rotary heads Helical scanning system Audio recording system Rotary heads, PCM system Quantization: 12 bits (Fs 32 kHz, stereo 1, stereo 2), 16 bits (Fs 48 kHz, stereo) Video signal NTSC color, EIA standards Usable cassette Mini DV cassette with infrared lighting. and 30 seconds Viewfinder Electric viewfinder (color) Image device DCR-TRV16: 4.5 mm (1/4 type) CCD (Charge Coupled Device) Gross: Approx. 680 000 pixels Effective : Approx. 340 000 pixels DCR-TRV18...
Operating Instructions
Page 219
... 120 Memory PB ZOOM 145 Memory Photo recording .... 112 "Memory Stick 105 Menu settings 175 Memory overlap 120 M.FADER 51 Mirror mode 31 Moisture condensation ........ 202 MONOTONE 51 MPEG 105 MPEG movie recording ....... 125 MULTI SCRN 114 NIGHTSHOT 34 NORMAL 114 Normal charge 17 NTSC system 201 O, P, Q OLD MOVIE 55 Operation indicators 217 OVERLAP 51 Photo save 135 Photo scan 73 Photo search 73 PICTURE EFFECT 54, 65 Picture search 40 Playback pause 40 Playback time 20 Power zoom...
... 120 Memory PB ZOOM 145 Memory Photo recording .... 112 "Memory Stick 105 Menu settings 175 Memory overlap 120 M.FADER 51 Mirror mode 31 Moisture condensation ........ 202 MONOTONE 51 MPEG 105 MPEG movie recording ....... 125 MULTI SCRN 114 NIGHTSHOT 34 NORMAL 114 Normal charge 17 NTSC system 201 O, P, Q OLD MOVIE 55 Operation indicators 217 OVERLAP 51 Photo save 135 Photo scan 73 Photo search 73 PICTURE EFFECT 54, 65 Picture search 40 Playback pause 40 Playback time 20 Power zoom...
PIXELA ImageMixer 1.0 Manual
Page 53
... present in the small monitor window. Note that this button depends on the device itself . Play button Click to display the movie in the digital video camera. Single Frame Rewind When the movie is paused, this button will fast forward the DV cassette inside the video camera, as if you pushed the rewind button on the video camera. The function of still pictures. Small Monitor button Click to start playback. Volume control Adjust the volume by -frame (slow motion).
... present in the small monitor window. Note that this button depends on the device itself . Play button Click to display the movie in the digital video camera. Single Frame Rewind When the movie is paused, this button will fast forward the DV cassette inside the video camera, as if you pushed the rewind button on the video camera. The function of still pictures. Small Monitor button Click to start playback. Volume control Adjust the volume by -frame (slow motion).
PIXELA ImageMixer 1.0 Manual
Page 56
...,' (for capturing movie scenes) or 'Ready to capture still picture.' If there seems to a problem with the connection between the PC and the device: A black monitor window will be set to play mode. If there is a problem with the connection between the PC and the device is working properly: A blue monitor window is present in the digital video camera, this icon becomes active (glows). If the digital video camera is not properly connected to...
...,' (for capturing movie scenes) or 'Ready to capture still picture.' If there seems to a problem with the connection between the PC and the device: A black monitor window will be set to play mode. If there is a problem with the connection between the PC and the device is working properly: A blue monitor window is present in the digital video camera, this icon becomes active (glows). If the digital video camera is not properly connected to...
Marketing Specifications
Page 1
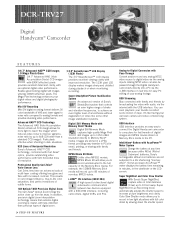
... Movie EX will record up from far away. In addition, precision digital zoom interpolation technology means that controls an even higher range of shake and vibration frequencies, to 10 feet away. USB Streaming Stay connected with family and friends by up to achieve an even higher level of smoothness without degradation of the Memory Stick media. DCR-TRV27 Digital Handycam® Camcorder F E AT U R E S 1/4.7" Advanced HAD™ CCD Imager...
... Movie EX will record up from far away. In addition, precision digital zoom interpolation technology means that controls an even higher range of shake and vibration frequencies, to 10 feet away. USB Streaming Stay connected with family and friends by up to achieve an even higher level of smoothness without degradation of the Memory Stick media. DCR-TRV27 Digital Handycam® Camcorder F E AT U R E S 1/4.7" Advanced HAD™ CCD Imager...
Marketing Specifications
Page 2
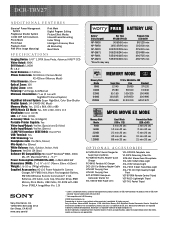
.... Sony, AccuPower, Advanced HAD, Handycam, i.LINK, InfoLithium, Memory Stick, NightShot, Remote Commander, Stamina, SteadyShot, SwivelScreen and Worry Free are trademarks of Sony. Features and specifications subject to designate that a product contains an IEEE 1394 connector. DCR-TRV27 ADDITIONAL FEATURES Stamina® Power Management System Progressive Shutter System 14 Bit DXP A/D Conversion Photo Mode Photo Save Playback Zoom PIM (Print Image Matching) Print Mark Digital Program Editing Picture Effect Modes Interval/Frame Recording Index...
.... Sony, AccuPower, Advanced HAD, Handycam, i.LINK, InfoLithium, Memory Stick, NightShot, Remote Commander, Stamina, SteadyShot, SwivelScreen and Worry Free are trademarks of Sony. Features and specifications subject to designate that a product contains an IEEE 1394 connector. DCR-TRV27 ADDITIONAL FEATURES Stamina® Power Management System Progressive Shutter System 14 Bit DXP A/D Conversion Photo Mode Photo Save Playback Zoom PIM (Print Image Matching) Print Mark Digital Program Editing Picture Effect Modes Interval/Frame Recording Index...


