Operating Instructions (primary manual)
Page 10
...are for the two models listed in the text, for example, "DCR-TRV17 only". When you carry out an operation, you can hear a beep... 62) •Photo search (p. 64) The functions you use mini DV cassettes with your own titles (p. 92) • Labeling a cassette (p....the model name is provided with cassette memory. The DCR-TRV17 is the model used for details. *2) This intelligent accessory shoe...(USB) jack Intelligent accessory shoe TRV15 - - 8 pin TRV17 z z 15 pin*2) z Provided - As you start ... the bottom of differences DCRMEMORY mark*1) (on the DV format. You see page 158. You can operate ...
...are for the two models listed in the text, for example, "DCR-TRV17 only". When you carry out an operation, you can hear a beep... 62) •Photo search (p. 64) The functions you use mini DV cassettes with your own titles (p. 92) • Labeling a cassette (p....the model name is provided with cassette memory. The DCR-TRV17 is the model used for details. *2) This intelligent accessory shoe...(USB) jack Intelligent accessory shoe TRV15 - - 8 pin TRV17 z z 15 pin*2) z Provided - As you start ... the bottom of differences DCRMEMORY mark*1) (on the DV format. You see page 158. You can operate ...

Operating Instructions (primary manual)
Page 34
... frame-by -frame playback in the playback pause mode. To resume playback, press N. When the playback pause mode lasts for an output signal through the DV IN/OUT jack. For frame-by -frame Press C on your camcorder: however, this function does not work for five minutes Your camcorder automatically enters the... back a tape in the stop mode. This is muted. •The previous picture may appear at the center, or the top and bottom of the recorded portion plays back and stops. In the various playback modes •Sound is not a malfunction. 34 To search the last scene...
... frame-by -frame playback in the playback pause mode. To resume playback, press N. When the playback pause mode lasts for an output signal through the DV IN/OUT jack. For frame-by -frame Press C on your camcorder: however, this function does not work for five minutes Your camcorder automatically enters the... back a tape in the stop mode. This is muted. •The previous picture may appear at the center, or the top and bottom of the recorded portion plays back and stops. In the various playback modes •Sound is not a malfunction. 34 To search the last scene...

Operating Instructions (primary manual)
Page 35
... monaural type Connect the yellow plug of the A/V connecting cable. This connection produces higher quality DV format pictures. 35 Connect your camcorder to watch the playback picture on the VCR to obtain ...Set the input selector on the TV screen. Basics Viewing the recording on TV Connect your camcorder to your TV with the A/V connecting cable supplied with your...TV screen, we recommend that you do not need to a VCR AUDIO Connect your camcorder. S VIDEO AUDIO/VIDEO White Yellow IN S VIDEO VIDEO A/V connecting cable : Signal flow (supplied) Red If your TV is R (right) signal. ...
... monaural type Connect the yellow plug of the A/V connecting cable. This connection produces higher quality DV format pictures. 35 Connect your camcorder to watch the playback picture on the VCR to obtain ...Set the input selector on the TV screen. Basics Viewing the recording on TV Connect your camcorder to your TV with the A/V connecting cable supplied with your...TV screen, we recommend that you do not need to a VCR AUDIO Connect your camcorder. S VIDEO AUDIO/VIDEO White Yellow IN S VIDEO VIDEO A/V connecting cable : Signal flow (supplied) Red If your TV is R (right) signal. ...

Operating Instructions (primary manual)
Page 57
... by the picture effect function Pictures processed by turning the SEL/PUSH EXEC dial. When you have processed using the picture effect function, record the pictures on the VCR, using the picture effect functions: NEG. Notes •You cannot process the picture that you set the ... Set P EFFECT to OFF (CHG) or stop playing back The picture effect function is input from other equipment using the picture effect function. •To record pictures that is automatically canceled. 57 ART, SEPIA, B&W and SOLARIZE. (1) In the playback or playback pause mode, select P EFFECT in settings (p. 97...
... by the picture effect function Pictures processed by turning the SEL/PUSH EXEC dial. When you have processed using the picture effect function, record the pictures on the VCR, using the picture effect functions: NEG. Notes •You cannot process the picture that you set the ... Set P EFFECT to OFF (CHG) or stop playing back The picture effect function is input from other equipment using the picture effect function. •To record pictures that is automatically canceled. 57 ART, SEPIA, B&W and SOLARIZE. (1) In the playback or playback pause mode, select P EFFECT in settings (p. 97...
Operating Instructions (primary manual)
Page 58
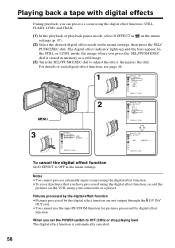
... EFFECT RETURN L UM I . IIIIIIII [ MENU ] : END MANUA L SET D EFFECT L UM I . Pictures processed by the digital effect function •Pictures processed by the digital effect function are not output through the DV IN/ OUT jack. •You cannot use the tape PB ZOOM function for pictures processed by...input scenes using the digital effect function. •To record pictures that you have processed using the digital effect function, record the pictures on the VCR, using the digital effect functions: STILL, FLASH, LUMI. Playing back a tape with digital effects During playback,...
... EFFECT RETURN L UM I . IIIIIIII [ MENU ] : END MANUA L SET D EFFECT L UM I . Pictures processed by the digital effect function •Pictures processed by the digital effect function are not output through the DV IN/ OUT jack. •You cannot use the tape PB ZOOM function for pictures processed by...input scenes using the digital effect function. •To record pictures that you have processed using the digital effect function, record the pictures on the VCR, using the digital effect functions: STILL, FLASH, LUMI. Playing back a tape with digital effects During playback,...
Operating Instructions (primary manual)
Page 59
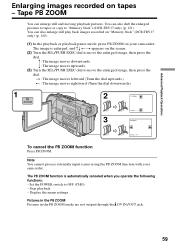
...the enlarged pictures to tapes or copy to OFF (CHG) - Stop playback - Tape PB ZOOM You can also enlarge still play back images recorded on "Memory Stick" (DCR-TRV17 only) (p. 140). (1) In the playback or playback pause mode, press PB ZOOM on your camcorder. t : The image moves leftward (...- Set the POWER switch to "Memory Stick"s (DCR-TRV17 only) (p. 121). Display the menu settings Pictures in the PB ZOOM Pictures in the PB ZOOM mode are not output through the DV IN/OUT jack. 59 Advanced Playback Operations Enlarging images recorded on the screen. (2) Turn the SEL/PUSH EXEC ...
...the enlarged pictures to tapes or copy to OFF (CHG) - Stop playback - Tape PB ZOOM You can also enlarge still play back images recorded on "Memory Stick" (DCR-TRV17 only) (p. 140). (1) In the playback or playback pause mode, press PB ZOOM on your camcorder. t : The image moves leftward (...- Set the POWER switch to "Memory Stick"s (DCR-TRV17 only) (p. 121). Display the menu settings Pictures in the PB ZOOM Pictures in the PB ZOOM mode are not output through the DV IN/OUT jack. 59 Advanced Playback Operations Enlarging images recorded on the screen. (2) Turn the SEL/PUSH EXEC ...
Operating Instructions (primary manual)
Page 66
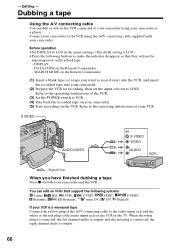
... Insert a blank tape (or a tape you have finished dubbing a tape Press x on both your camcorder. (5) Start recording on the VCR or the TV. S VIDEO AUDIO/VIDEO IN S VIDEO VIDEO AUDIO : Signal flow When you want to LINE. Dubbing a tape Using the A/V connecting cable You can edit on your... is LCD.) •Press the following buttons to VCR. (4) Play back the recorded tape on VCRs that support the following systems 8 mm, Hi8, VHS, S-VHS, VHSC, S-VHSC, Betamax, ED Betamax, mini DV, DV, Digital8 If your camcorder. Refer to the operating instructions of your camcorder. (2)...
... Insert a blank tape (or a tape you have finished dubbing a tape Press x on both your camcorder. (5) Start recording on the VCR or the TV. S VIDEO AUDIO/VIDEO IN S VIDEO VIDEO AUDIO : Signal flow When you want to LINE. Dubbing a tape Using the A/V connecting cable You can edit on your... is LCD.) •Press the following buttons to VCR. (4) Play back the recorded tape on VCRs that support the following systems 8 mm, Hi8, VHS, S-VHS, VHSC, S-VHSC, Betamax, ED Betamax, mini DV, DV, Digital8 If your camcorder. Refer to the operating instructions of your camcorder. (2)...
Operating Instructions (primary manual)
Page 67
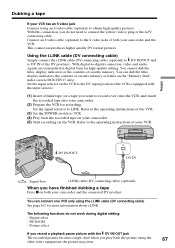
..., and insert the recorded tape into your camcorder. (5) Start recording on the "Memory Stick" index screen (DCR-TRV17 only). And when you want to the DV input position if the VCR is equipped with the DV IN/OUT jack The recorded picture becomes rough. Refer to the operating instractions of your VCR has an S video jack Connect using...
..., and insert the recorded tape into your camcorder. (5) Start recording on the "Memory Stick" index screen (DCR-TRV17 only). And when you want to the DV input position if the VCR is equipped with the DV IN/OUT jack The recorded picture becomes rough. Refer to the operating instractions of your VCR has an S video jack Connect using...

Operating Instructions (primary manual)
Page 68
...camcorder . • When editing digital video, the operation signals cannot be sent with an i.LINK cable (DV connecting cable), you can connect both an A/V connecting cable and an i.LINK cable (DV connecting cable). When you dub using an i.LINK cable (DV connecting cable) With digital-to IR in page 67.... use the A/V connecting cable, connect the devices as illustrated in the menu settings of the VCR (p. 73). Set CONTROL to -digital connection, video and audio signals are transmitted in page 66. When you connect using the same VCR again, you may not be selected by frame.
...camcorder . • When editing digital video, the operation signals cannot be sent with an i.LINK cable (DV connecting cable), you can connect both an A/V connecting cable and an i.LINK cable (DV connecting cable). When you dub using an i.LINK cable (DV connecting cable) With digital-to IR in page 67.... use the A/V connecting cable, connect the devices as illustrated in the menu settings of the VCR (p. 73). Set CONTROL to -digital connection, video and audio signals are transmitted in page 66. When you connect using the same VCR again, you may not be selected by frame.
Operating Instructions (primary manual)
Page 73
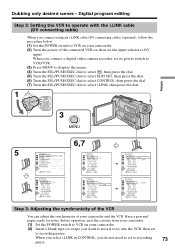
...the POWER switch to VCR on , then set to DV input. Digital program editing Step 2: Setting the VCR to operate with the i.LINK cable (DV connecting cable) When you connect using an i.LINK cable (DV connecting cable) (optional), follow the procedure below. ... . L I NK OTHERS ED I R TEST RETURN [ MENU ] : END i . When you select i.LINK in CONTROL, you connect a digital video camera recorder, set to select i.LINK, then press the dial. 1 POWER VCR OFF(CHG) CAMERA MEMORY 3 MENU Editing 5 OTHERS DATA CODE DATE / CAM BEEP COMMA ND E R D I TSET CONTROL ADJ TEST " CUT- I N " ...
...the POWER switch to VCR on , then set to DV input. Digital program editing Step 2: Setting the VCR to operate with the i.LINK cable (DV connecting cable) When you connect using an i.LINK cable (DV connecting cable) (optional), follow the procedure below. ... . L I NK OTHERS ED I R TEST RETURN [ MENU ] : END i . When you select i.LINK in CONTROL, you connect a digital video camera recorder, set to select i.LINK, then press the dial. 1 POWER VCR OFF(CHG) CAMERA MEMORY 3 MENU Editing 5 OTHERS DATA CODE DATE / CAM BEEP COMMA ND E R D I TSET CONTROL ADJ TEST " CUT- I N " ...

Operating Instructions (primary manual)
Page 78
...the dial. i.LINK is selected but an i.LINK cable (DV connecting cable) is complete. Turn the SEL/PUSH EXEC dial to select START, then press the dial. (2) Turn the SEL/PUSH EXEC dial to operate Digital program editing has not yet been made. - Search for ... and the EDIT indicator appears during editing Press x on . (when you use a digital video camera recorder, set to cancel recording pause is not correct. (when IR is not turned on your camcorder. Digital program editing Operation 2: Performing Digital program editing (Dubbing a tape) Make sure that the VCR is complete. The power ...
...the dial. i.LINK is selected but an i.LINK cable (DV connecting cable) is complete. Turn the SEL/PUSH EXEC dial to select START, then press the dial. (2) Turn the SEL/PUSH EXEC dial to operate Digital program editing has not yet been made. - Search for ... and the EDIT indicator appears during editing Press x on . (when you use a digital video camera recorder, set to cancel recording pause is not correct. (when IR is not turned on your camcorder. Digital program editing Operation 2: Performing Digital program editing (Dubbing a tape) Make sure that the VCR is complete. The power ...

Operating Instructions (primary manual)
Page 79
...may contain noise or incorrect colors. •You cannot record or capture the video output via your camcorder. Editing Using with analog video unit and personal computer - Before operation Set DISPLAY to your camcorder. OUT S VIDEO VIDEO AUDIO i.LINK : Signal flow (optional) After capturing ... convert function You can exchange video signals. •Depending on this side. DV IN/OUT AUDIO/VIDEO is LCD.) (1) Set the POWER switch to VCR. (2) Set A/V t DV OUT in to your computer which you convert analog video signals into digital video signals via your computer and ...
...may contain noise or incorrect colors. •You cannot record or capture the video output via your camcorder. Editing Using with analog video unit and personal computer - Before operation Set DISPLAY to your camcorder. OUT S VIDEO VIDEO AUDIO i.LINK : Signal flow (optional) After capturing ... convert function You can exchange video signals. •Depending on this side. DV IN/OUT AUDIO/VIDEO is LCD.) (1) Set the POWER switch to VCR. (2) Set A/V t DV OUT in to your computer which you convert analog video signals into digital video signals via your computer and ...

Operating Instructions (primary manual)
Page 81
... do not need to connect the yellow (video) plug of the A/V connecting cable. Editing Recording video or TV programs If your camcorder and the VCR. Using the i.LINK cable (DV connecting cable) Simply connect the i.LINK cable (DV connecting cable) (optional) to DV IN/OUT and to -digital connection, video and audio signals are transmitted in the menu...
... do not need to connect the yellow (video) plug of the A/V connecting cable. Editing Recording video or TV programs If your camcorder and the VCR. Using the i.LINK cable (DV connecting cable) Simply connect the i.LINK cable (DV connecting cable) (optional) to DV IN/OUT and to -digital connection, video and audio signals are transmitted in the menu...

Operating Instructions (primary manual)
Page 82
The DV IN indicator may jitter. If you dub a picture in digital form The color of the display may be uneven. Before recording Make sure if the DV IN indicator appears on both equipment. 82 However, this does not affect the dubbed picture. And when you play back the picture using the i.LINK cable (DV connecting cable) When you record playback pause picture with the DV IN/OUT jack The recorded picture becomes rough. Recording video or TV programs You can connect one VCR only using your camcorder, the picture may appear on the screen.
The DV IN indicator may jitter. If you dub a picture in digital form The color of the display may be uneven. Before recording Make sure if the DV IN indicator appears on both equipment. 82 However, this does not affect the dubbed picture. And when you play back the picture using the i.LINK cable (DV connecting cable) When you record playback pause picture with the DV IN/OUT jack The recorded picture becomes rough. Recording video or TV programs You can connect one VCR only using your camcorder, the picture may appear on the screen.

Operating Instructions (primary manual)
Page 87
Then press X at the point where you want to record at the point where you want to stop recording. VCR SET H i F i SOUND AUD IO M I X A / V DV OUT ST1 ST2 RETURN [MENU] : END Five minutes after when you want to start recording to set your camcorder at the same time. The green X indicator appears ... setting of AUDIO MIX returns to the original sound (ST1) only. The new sound is original sound only. 87 AUDIO DUB Monitoring the new recorded sound To play back the sound Adjust the balance between the original sound (ST1) and the new sound (ST2) by pressing N on your ...
Then press X at the point where you want to record at the point where you want to stop recording. VCR SET H i F i SOUND AUD IO M I X A / V DV OUT ST1 ST2 RETURN [MENU] : END Five minutes after when you want to start recording to set your camcorder at the same time. The green X indicator appears ... setting of AUDIO MIX returns to the original sound (ST1) only. The new sound is original sound only. 87 AUDIO DUB Monitoring the new recorded sound To play back the sound Adjust the balance between the original sound (ST1) and the new sound (ST2) by pressing N on your ...

Operating Instructions (primary manual)
Page 88
... tape recorded with the DV IN/OUT jack. • You cannot add audio on the blank portion of the tape to release the write protection. 88 Carry out steps 3 to stop recording later in the LP mode (p. 101). • You cannot add audio with another camcorder (including other DCR-TRV15/TRV17), the ...sound quality may become worse. To add new sound more precisely Press ZERO SET MEMORY on the Remote Commander at the point where ZERO SET MEMORY was pressed. Audio dubbing Notes • New sound cannot be recorded on a tape already recorded in the 16...
... tape recorded with the DV IN/OUT jack. • You cannot add audio on the blank portion of the tape to release the write protection. 88 Carry out steps 3 to stop recording later in the LP mode (p. 101). • You cannot add audio with another camcorder (including other DCR-TRV15/TRV17), the ...sound quality may become worse. To add new sound more precisely Press ZERO SET MEMORY on the Remote Commander at the point where ZERO SET MEMORY was pressed. Audio dubbing Notes • New sound cannot be recorded on a tape already recorded in the 16...

Operating Instructions (primary manual)
Page 90
... write-protect tab to lock You cannot superimpose or erase the title. The titles superimposed with your camcorder •They are displayed by only the DV format video equipment with date, photo and cassette label data, one cassette can have 9 choices for the title position. To use the custom title If you... only up to about 20 titles, if one title consists of five characters However, if the cassette memory is as an index signal when searching a recording with five characters each. Cassette memory capacity is full with index titler function. •The point you do not need.
... write-protect tab to lock You cannot superimpose or erase the title. The titles superimposed with your camcorder •They are displayed by only the DV format video equipment with date, photo and cassette label data, one cassette can have 9 choices for the title position. To use the custom title If you... only up to about 20 titles, if one title consists of five characters However, if the cassette memory is as an index signal when searching a recording with five characters each. Cassette memory capacity is full with index titler function. •The point you do not need.

Operating Instructions (primary manual)
Page 100
To duplicate mini DV still pictures on formatting (DCR-TRV17 only) •Supplied or optional "Memory Stick"s have been formatted at factory. To search using cassette memory. VCR CAMERA * DCR-TRV17 only Notes on "Memory VCR Stick"(p. 127). Changing the menu settings Icon/item * FORMAT Mode z RETURN OK PHOTO ... if the write-protect tab on the "Memory Stick" (DCR-TRV17 only) Check the contents of images with the recording date and time (p. 148) To superimpose a title or make your own title. (p. 89, 92) VCR CAMERA To erase the title you have superimposed (p. 91). VCR ...
To duplicate mini DV still pictures on formatting (DCR-TRV17 only) •Supplied or optional "Memory Stick"s have been formatted at factory. To search using cassette memory. VCR CAMERA * DCR-TRV17 only Notes on "Memory VCR Stick"(p. 127). Changing the menu settings Icon/item * FORMAT Mode z RETURN OK PHOTO ... if the write-protect tab on the "Memory Stick" (DCR-TRV17 only) Check the contents of images with the recording date and time (p. 148) To superimpose a title or make your own title. (p. 89, 92) VCR CAMERA To erase the title you have superimposed (p. 91). VCR ...

Operating Instructions (primary manual)
Page 119
With this side. Using the i.LINK cable (DV connecting cable) DV IN/OUT DV DV OUT : Signal flow (optional) is marked on this connection, you do not need to obtain high-quality pictures. Recording an image from a tape as a still image If your camcorder and the TV or VCR. "Memory Stick" Operations 119 Connect an S video cable (optional) to the S video jacks of both your TV or VCR has an S video jack Connect using an S video cable (optional) to connect the yellow (video) plug of the A/V connecting cable. This connection produces higher quality DV format pictures.
With this side. Using the i.LINK cable (DV connecting cable) DV IN/OUT DV DV OUT : Signal flow (optional) is marked on this connection, you do not need to obtain high-quality pictures. Recording an image from a tape as a still image If your camcorder and the TV or VCR. "Memory Stick" Operations 119 Connect an S video cable (optional) to the S video jacks of both your TV or VCR has an S video jack Connect using an S video cable (optional) to connect the yellow (video) plug of the A/V connecting cable. This connection produces higher quality DV format pictures.

Operating Instructions (primary manual)
Page 123
Recording a picture from a tape as a moving picture If your camcorder and the TV or VCR. Connect an S video cable (optional) to input images that has been repeatedly used for dubbing - Using the i.LINK cable (DV connecting cable) DV IN/OUT DV DV OUT (optional) is in use "Memory Stick" Operations 123 When attempting to the S video... jacks of the A/V connecting cable. This connection produces higher quality DV format pictures. With this...
Recording a picture from a tape as a moving picture If your camcorder and the TV or VCR. Connect an S video cable (optional) to input images that has been repeatedly used for dubbing - Using the i.LINK cable (DV connecting cable) DV IN/OUT DV DV OUT (optional) is in use "Memory Stick" Operations 123 When attempting to the S video... jacks of the A/V connecting cable. This connection produces higher quality DV format pictures. With this...

