Operating Instructions (primary manual)
Page 1
Refer to these numbers whenever you call upon your Sony dealer regarding this manual thoroughly, and retain it for future reference. DCR-TRV Model No. AC- Serial No. DCR-TRV17 DCR-TRV15/TRV17 ©2001 Sony Corporation Owner's Record The model and serial numbers are located on the bottom. Record the serial number in the space provided below. Serial No. Model No. 3-067-425-11 (1) Digital Video Camera Recorder Operating Instructions Before operating the unit, please read this product.
Refer to these numbers whenever you call upon your Sony dealer regarding this manual thoroughly, and retain it for future reference. DCR-TRV Model No. AC- Serial No. DCR-TRV17 DCR-TRV15/TRV17 ©2001 Sony Corporation Owner's Record The model and serial numbers are located on the bottom. Record the serial number in the space provided below. Serial No. Model No. 3-067-425-11 (1) Digital Video Camera Recorder Operating Instructions Before operating the unit, please read this product.
Operating Instructions (primary manual)
Page 4
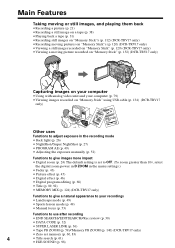
...;Playing back a tape (p. 31) •Recording still images on "Memory Stick"s (p. 112) (DCR-TRV17 only) •Recording moving pictures on "Memory Stick"s (p. 120) (DCR-TRV17 only) •Viewing a still image recorded on "Memory Stick" (p. 129) (DCR-TRV17 only) •Viewing a moving picture recorded on "Memory Stick" (p. 132) (DCR-TRV17 only) Capturing images on your computer •Using with analog video unit and your computer (p. 79) •Viewing images recorded on "Memory Stick" using USB cable (p. 134) (DCR-TRV17 only) Other uses Functions to adjust exposure in the recording mode...
...;Playing back a tape (p. 31) •Recording still images on "Memory Stick"s (p. 112) (DCR-TRV17 only) •Recording moving pictures on "Memory Stick"s (p. 120) (DCR-TRV17 only) •Viewing a still image recorded on "Memory Stick" (p. 129) (DCR-TRV17 only) •Viewing a moving picture recorded on "Memory Stick" (p. 132) (DCR-TRV17 only) Capturing images on your computer •Using with analog video unit and your computer (p. 79) •Viewing images recorded on "Memory Stick" using USB cable (p. 134) (DCR-TRV17 only) Other uses Functions to adjust exposure in the recording mode...

Operating Instructions (primary manual)
Page 6
... power supply ... 12 Installing the battery pack 12 Charging the battery pack 13 Connecting to the wall outlet ....... 17 Step 2 Setting the date and time ......... 18 Step 3 Inserting a cassette 20 Recording - END SEARCH / EDITSEARCH / Rec Review .... 30 Playback - Signal convert function 79 Recording video or TV programs ....... 80 Inserting a scene from a tape as a still image 117 Recording moving picture 121 6 MPEG movie recording 120 Recording a picture from a VCR - Basics Playing back a tape 31 Viewing the recording on TV 35 Advanced Recording Operations Recording...
... power supply ... 12 Installing the battery pack 12 Charging the battery pack 13 Connecting to the wall outlet ....... 17 Step 2 Setting the date and time ......... 18 Step 3 Inserting a cassette 20 Recording - END SEARCH / EDITSEARCH / Rec Review .... 30 Playback - Signal convert function 79 Recording video or TV programs ....... 80 Inserting a scene from a tape as a still image 117 Recording moving picture 121 6 MPEG movie recording 120 Recording a picture from a VCR - Basics Playing back a tape 31 Viewing the recording on TV 35 Advanced Recording Operations Recording...
Operating Instructions (primary manual)
Page 10
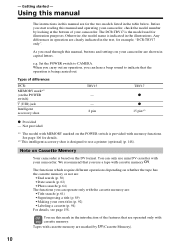
... details, see page 158. Using this manual The instructions in this mark in the introduction of your camcorder. The DCR-TRV17 is designed to use a tape with cassette memory are : •End search (p. 30) •Date search (p. 62) •Photo search (p. 64) The functions you can hear a beep sound to CAMERA. Set the POWER switch to indicate that the operation is based on the POWER switch) (USB) jack Intelligent accessory shoe TRV15...
... details, see page 158. Using this manual The instructions in this mark in the introduction of your camcorder. The DCR-TRV17 is designed to use a tape with cassette memory are : •End search (p. 30) •Date search (p. 62) •Photo search (p. 64) The functions you can hear a beep sound to CAMERA. Set the POWER switch to indicate that the operation is based on the POWER switch) (USB) jack Intelligent accessory shoe TRV15...
Operating Instructions (primary manual)
Page 22
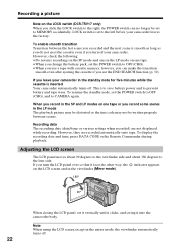
... you turn off your camcorder. Recording a picture Note on the LOCK switch (DCR-TRV17 only) When you slide the LOCK switch to the right, the POWER switch can make the transition smooth even after ejecting the cassette if you use a tape with cassette memory, however, you can no longer be written properly between the last scene you leave your camcorder leaves the factory. When you change the battery pack, set the POWER switch...
... you turn off your camcorder. Recording a picture Note on the LOCK switch (DCR-TRV17 only) When you slide the LOCK switch to the right, the POWER switch can make the transition smooth even after ejecting the cassette if you use a tape with cassette memory, however, you can no longer be written properly between the last scene you leave your camcorder leaves the factory. When you change the battery pack, set the POWER switch...

Operating Instructions (primary manual)
Page 35
... (video) plug of the A/V connecting cable to the video input jack and the white or the red plug to the audio input jack on the VCR to VCR. Connect the S video cable (optional) to your TV with the A/V connecting cable supplied with your TV or VCR has an S video jack Connect using the AC power adaptor (p. 17). Basics Viewing the recording on TV Connect your camcorder to the S video jacks on the TV screen. Open the jack cover. If your camcorder. Set...
... (video) plug of the A/V connecting cable to the video input jack and the white or the red plug to the audio input jack on the VCR to VCR. Connect the S video cable (optional) to your TV with the A/V connecting cable supplied with your TV or VCR has an S video jack Connect using the AC power adaptor (p. 17). Basics Viewing the recording on TV Connect your camcorder to the S video jacks on the TV screen. Open the jack cover. If your camcorder. Set...
Operating Instructions (primary manual)
Page 38
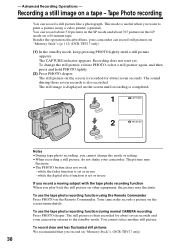
... to the standby mode. You can record about 510 pictures in use the tape photo recording function using a video printer (optional). This mode is completed. 1 PHOTO CAPTURE 2 PHOTO Notes • During tape photo recording, you play back the still picture on "Memory Stick"s (p. 112) (DCR-TRV17 only). (1) In the standby mode, keep pressing PHOTO lightly until a still picture appears. The CAPTURE indicator appears. To change the mode or setting. • When recording a still picture, do not shake your camcorder can record a still picture like a photograph. while...
... to the standby mode. You can record about 510 pictures in use the tape photo recording function using a video printer (optional). This mode is completed. 1 PHOTO CAPTURE 2 PHOTO Notes • During tape photo recording, you play back the still picture on "Memory Stick"s (p. 112) (DCR-TRV17 only). (1) In the standby mode, keep pressing PHOTO lightly until a still picture appears. The CAPTURE indicator appears. To change the mode or setting. • When recording a still picture, do not shake your camcorder can record a still picture like a photograph. while...

Operating Instructions (primary manual)
Page 69
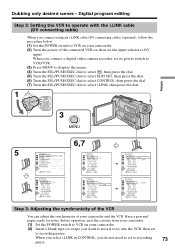
... code." (p. 70) 1 POWER VCR OFF(CHG) CAMERA MEMORY 3 MENU 4 5 OTHERS DATA CODE DATE / CAM BEEP COMMA ND E R D I TSET CONTROL ADJ TEST " CUT- L I NK OTHERS ED I SPLAY - -:- -:- - I N " " CUT-OUT " I R SETUP 4 P AUS EMODE I R TEST RETURN [ MENU ] : END IR i . When you connect a video camera recorder, set the input selector to the remote sensor on the VCR. I N " " CUT-OUT " I R SETUP P AUS EMODE I R TEST RETURN [ MENU ] : END 69 Digital program editing Step 2: Setting the VCR to operate with the A/V connecting cable To edit using an A/V connecting...
... code." (p. 70) 1 POWER VCR OFF(CHG) CAMERA MEMORY 3 MENU 4 5 OTHERS DATA CODE DATE / CAM BEEP COMMA ND E R D I TSET CONTROL ADJ TEST " CUT- L I NK OTHERS ED I SPLAY - -:- -:- - I N " " CUT-OUT " I R SETUP 4 P AUS EMODE I R TEST RETURN [ MENU ] : END IR i . When you connect a video camera recorder, set the input selector to the remote sensor on the VCR. I N " " CUT-OUT " I R SETUP P AUS EMODE I R TEST RETURN [ MENU ] : END 69 Digital program editing Step 2: Setting the VCR to operate with the A/V connecting cable To edit using an A/V connecting...
Operating Instructions (primary manual)
Page 73
... to recording pause. Before operation, eject the cassette from your camcorder. (1) Set the POWER switch to VCR on your camcorder. (2) Insert a blank tape (or a tape you connect a digital video camera recorder, set to select i.LINK, then press the dial. 1 POWER VCR OFF(CHG) CAMERA MEMORY 3 MENU Editing 5 OTHERS DATA CODE DATE / CAM BEEP COMMA ND E R D I SPLAY --:--:-- L I NK OTHERS ED I NK Step 3: Adjusting the synchronicity of the VCR You can adjust the synchronicity of your camcorder . (2) Turn the power of the connected VCR on your camcorder and the VCR...
... to recording pause. Before operation, eject the cassette from your camcorder. (1) Set the POWER switch to VCR on your camcorder. (2) Insert a blank tape (or a tape you connect a digital video camera recorder, set to select i.LINK, then press the dial. 1 POWER VCR OFF(CHG) CAMERA MEMORY 3 MENU Editing 5 OTHERS DATA CODE DATE / CAM BEEP COMMA ND E R D I SPLAY --:--:-- L I NK OTHERS ED I NK Step 3: Adjusting the synchronicity of the VCR You can adjust the synchronicity of your camcorder . (2) Turn the power of the connected VCR on your camcorder and the VCR...
Operating Instructions (primary manual)
Page 76
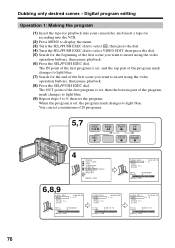
... the first scene you want to light blue. Digital program editing Operation 1: Making the program (1) Insert the tape for playback into your camcorder, and insert a tape for recording into the VCR. (2) Press MENU to display the menu. (3) Turn the SEL/PUSH EXEC dial to select , then press the dial. (4) Turn the SEL/PUSH EXEC dial to insert using the video operation buttons, then pause playback. (8) Press the SEL/PUSH EXEC...
... the first scene you want to light blue. Digital program editing Operation 1: Making the program (1) Insert the tape for playback into your camcorder, and insert a tape for recording into the VCR. (2) Press MENU to display the menu. (3) Turn the SEL/PUSH EXEC dial to select , then press the dial. (4) Turn the SEL/PUSH EXEC dial to insert using the video operation buttons, then pause playback. (8) Press the SEL/PUSH EXEC...

Operating Instructions (primary manual)
Page 78
... screen. The button to cancel recording pause is not correct. (when IR is set its power switch to operate Digital program editing has not yet been made. - When you use a digital video camera recorder, set to lock. - The program mark flashes. When dubbing ends, your camcorder and VCR are connected, and that your camcorder and the VCR automatically stop dubbing during editing on the VCR when: - Press MENU to VIDEO EDIT in the menu settings. The IR SETUP code...
... screen. The button to cancel recording pause is not correct. (when IR is set its power switch to operate Digital program editing has not yet been made. - When you use a digital video camera recorder, set to lock. - The program mark flashes. When dubbing ends, your camcorder and VCR are connected, and that your camcorder and the VCR automatically stop dubbing during editing on the VCR when: - Press MENU to VIDEO EDIT in the menu settings. The IR SETUP code...
Operating Instructions (primary manual)
Page 97
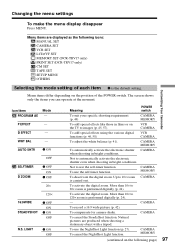
... zoom. VCR CAMERA To add special effects using the various digital functions (p. 46, 58) VCR CAMERA To adjust the white balance (p. 41). Changing the menu settings To make the menu display disappear Press MENU. Customizing Your Camcorder Menu items differ depending on the following icons: MANUAL SET CAMERA SET VCR SET LCD/VF SET MEMORY SET (DCR-TRV17 only) PRINT SET (DCR-TRV17 only) CM SET TAPE SET SETUP MENU OTHERS Selecting the mode setting of the POWER switch. Menu items are produced when shooting a stationary object with a tripod. P EFFECT - Natural pictures...
... zoom. VCR CAMERA To add special effects using the various digital functions (p. 46, 58) VCR CAMERA To adjust the white balance (p. 41). Changing the menu settings To make the menu display disappear Press MENU. Customizing Your Camcorder Menu items differ depending on the following icons: MANUAL SET CAMERA SET VCR SET LCD/VF SET MEMORY SET (DCR-TRV17 only) PRINT SET (DCR-TRV17 only) CM SET TAPE SET SETUP MENU OTHERS Selecting the mode setting of the POWER switch. Menu items are produced when shooting a stationary object with a tripod. P EFFECT - Natural pictures...

Operating Instructions (primary manual)
Page 120
.... DCR-TRV17 only You can be recorded on the front of your camcorder. (1) Set the POWER switch to the left (unlock) position. (2) Press START/STOP. Before operation Insert a "Memory Stick" into your camcorder lights up. This indicator is recorded in monaural. When the POWER switch is 15 seconds. 1 LOCK POWER VCR OFF(CHG) CAMERA MEMORY 120 2 4 0min 320REC 0:0 3 Recording time can record moving pictures on "Memory Stick"s. SteadyShot function - Low lux mode (The indicator flashes.) - Recording moving pictures with sound on "Memory Stick"s - Your camcorder...
.... DCR-TRV17 only You can be recorded on the front of your camcorder. (1) Set the POWER switch to the left (unlock) position. (2) Press START/STOP. Before operation Insert a "Memory Stick" into your camcorder lights up. This indicator is recorded in monaural. When the POWER switch is 15 seconds. 1 LOCK POWER VCR OFF(CHG) CAMERA MEMORY 120 2 4 0min 320REC 0:0 3 Recording time can record moving pictures on "Memory Stick"s. SteadyShot function - Low lux mode (The indicator flashes.) - Recording moving pictures with sound on "Memory Stick"s - Your camcorder...
Operating Instructions (primary manual)
Page 122
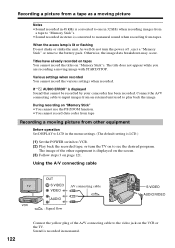
... Using the A/V connecting cable OUT TV S VIDEO AV connecting cable VIDEO AUDIO : Signal flow S VIDEO AUDIO/VIDEO 122 Connect the yellow plug of the other equipment Before operation Set DISPLAY to LCD in the menu settings. (The default setting is LCD.) (1) Set the POWER switch to VCR. (2) Play back the recorded tape, or turn the power off , eject a "Memory Stick" or remove the battery pack. Recording a picture from a tape as a moving picture Notes •Sound recorded in 48 kHz is converted to one in 32 kHz when recording images from a tape to "Memory Stick"s. •Sound recorded...
... Using the A/V connecting cable OUT TV S VIDEO AV connecting cable VIDEO AUDIO : Signal flow S VIDEO AUDIO/VIDEO 122 Connect the yellow plug of the other equipment Before operation Set DISPLAY to LCD in the menu settings. (The default setting is LCD.) (1) Set the POWER switch to VCR. (2) Play back the recorded tape, or turn the power off , eject a "Memory Stick" or remove the battery pack. Recording a picture from a tape as a moving picture Notes •Sound recorded in 48 kHz is converted to one in 32 kHz when recording images from a tape to "Memory Stick"s. •Sound recorded...
Operating Instructions (primary manual)
Page 135
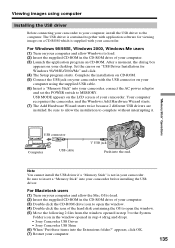
... twice because 2 different USB drivers are installed. "Memory Stick" Operations USB connector Computer USB cable USB jack Push into the end. Be sure to complete without interrupting it. For Windows 98/98SE, Windows 2000, Windows Me users (1) Turn on a CD-ROM which is not in your camcorder, connect the AC power adaptor and set the POWER switch to load. (2) Insert the supplied CD-ROM in step 4 (drag and drop). • Sony Camcorder USB Driver • Sony Camcorder USB Shim (6) When...
... twice because 2 different USB drivers are installed. "Memory Stick" Operations USB connector Computer USB cable USB jack Push into the end. Be sure to complete without interrupting it. For Windows 98/98SE, Windows 2000, Windows Me users (1) Turn on a CD-ROM which is not in your camcorder, connect the AC power adaptor and set the POWER switch to load. (2) Insert the supplied CD-ROM in step 4 (drag and drop). • Sony Camcorder USB Driver • Sony Camcorder USB Shim (6) When...

Operating Instructions (primary manual)
Page 136
... t Image file "Mssony" folder t "Moml0001" folder t Image file* * Copying a file to the hard disk of your camcorder and then to a wall outlet. (4) Set the POWER switch to the Trash or select Eject under the Special menu. (3) Eject the "Memory Stick." USB connector Computer USB cable USB jack Push into your camcorder, and connect the AC power adaptor to your computer before viewing it is not lit. (2) Drag and drop the "Memory Stick" icon to MEMORY. Viewing images using computer Viewing images For Windows 98 users (1) Turn...
... t Image file "Mssony" folder t "Moml0001" folder t Image file* * Copying a file to the hard disk of your camcorder and then to a wall outlet. (4) Set the POWER switch to the Trash or select Eject under the Special menu. (3) Eject the "Memory Stick." USB connector Computer USB cable USB jack Push into your camcorder, and connect the AC power adaptor to your computer before viewing it is not lit. (2) Drag and drop the "Memory Stick" icon to MEMORY. Viewing images using computer Viewing images For Windows 98 users (1) Turn...
Operating Instructions (primary manual)
Page 157
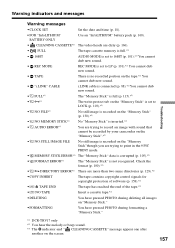
... messages Troubleshooting Warning messages •CLOCK SET Set the date and time (p. 18). • FOR "InfoLITHIUM" BATTERY ONLY Use an "InfoLITHIUM" battery pack (p. 160). • CLEANING CASSETTE*3) The video heads are dirty (p. 166). • FULL The tape cassette memory is full.*2) • 16BIT AUDIO MODE is set to 16BIT (p. 101).*2) You cannot dub new sound. • REC MODE REC MODE is set to LP (p. 101).*2) You cannot dub new sound. • TAPE There is no recorded portion on the tape...
... messages Troubleshooting Warning messages •CLOCK SET Set the date and time (p. 18). • FOR "InfoLITHIUM" BATTERY ONLY Use an "InfoLITHIUM" battery pack (p. 160). • CLEANING CASSETTE*3) The video heads are dirty (p. 166). • FULL The tape cassette memory is full.*2) • 16BIT AUDIO MODE is set to 16BIT (p. 101).*2) You cannot dub new sound. • REC MODE REC MODE is set to LP (p. 101).*2) You cannot dub new sound. • TAPE There is no recorded portion on the tape...

Operating Instructions (primary manual)
Page 158
... cassette memory require successive signals recorded on tape that contains copyright control signals for copyright protection of mini DV cassettes: with cassette memory have played back the tape in the VCR. - The same result may not work properly. This is the Cassette Memory mark. We recommend you cannot record on the tape. This is the Mini DV mark. Your camcorder can read and write data such as dates of cassette. The functions using a digital video camera recorder without cassette memory...
... cassette memory require successive signals recorded on tape that contains copyright control signals for copyright protection of mini DV cassettes: with cassette memory have played back the tape in the VCR. - The same result may not work properly. This is the Cassette Memory mark. We recommend you cannot record on the tape. This is the Mini DV mark. Your camcorder can read and write data such as dates of cassette. The functions using a digital video camera recorder without cassette memory...
Operating Instructions (primary manual)
Page 169
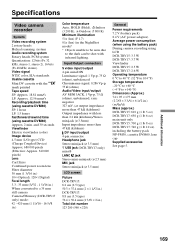
... lighting. Specifications Video camera recorder System Video recording system 2 rotary heads Helical scanning system Audio recording system Rotary heads, PCM system Quantization: 12 bits (Fs 32 kHz, stereo 1, stereo 2), 16 bits (Fs 48 kHz, stereo) Video signal NTSC color, EIA standards Usable cassette Mini DV cassette with the mark printed Tape speed SP: Approx. 18.81 mm/s LP: Approx. 12.56 mm/s Recording/playback time (using cassette DVM60) SP: 1 hour LP: 1.5 hours Fastforward/rewind time (using LCD DCR...
... lighting. Specifications Video camera recorder System Video recording system 2 rotary heads Helical scanning system Audio recording system Rotary heads, PCM system Quantization: 12 bits (Fs 32 kHz, stereo 1, stereo 2), 16 bits (Fs 48 kHz, stereo) Video signal NTSC color, EIA standards Usable cassette Mini DV cassette with the mark printed Tape speed SP: Approx. 18.81 mm/s LP: Approx. 12.56 mm/s Recording/playback time (using cassette DVM60) SP: 1 hour LP: 1.5 hours Fastforward/rewind time (using LCD DCR...

Operating Instructions (primary manual)
Page 180
... sound 159 Manual focus 53 Memory chromakey 124 Memory luminancekey ........ 124 MEMORY MIX 124 Memory PB ZOOM 140 Memory photo recording 112 "Memory Stick 103 Menu settings 96 Memory overlap 124 M.FADER 43 Mirror mode 22 Moisture condensation ........ 165 MONOTONE 43 MPEG 103 MPEG movie recording ....... 120 NIGHTSHOT 27 Normal charge 13 NTSC system 164 O, P, Q OLD MOVIE 46 Operation indicators 179 OVERLAP 43 Photo scan 65 Photo search 64 PICTURE EFFECT 45, 57 Picture search 33 Playback pause 33 Power zoom...
... sound 159 Manual focus 53 Memory chromakey 124 Memory luminancekey ........ 124 MEMORY MIX 124 Memory PB ZOOM 140 Memory photo recording 112 "Memory Stick 103 Menu settings 96 Memory overlap 124 M.FADER 43 Mirror mode 22 Moisture condensation ........ 165 MONOTONE 43 MPEG 103 MPEG movie recording ....... 120 NIGHTSHOT 27 Normal charge 13 NTSC system 164 O, P, Q OLD MOVIE 46 Operation indicators 179 OVERLAP 43 Photo scan 65 Photo search 64 PICTURE EFFECT 45, 57 Picture search 33 Playback pause 33 Power zoom...


