
Operating Instructions
Page 1
Model No. DCR-TRV Model No. DCR-TRV17 DCR-TRV15/TRV17 ©2001 Sony Corporation Owner's Record The model and serial numbers are located on the bottom. Serial No. Record the serial number in the space provided below. AC- Serial No. Refer to these numbers whenever you call upon your Sony dealer regarding this manual thoroughly, and retain it for future reference. 3-067-425-11 (1) Digital Video Camera Recorder Operating Instructions Before operating the unit, please read this product.
Model No. DCR-TRV Model No. DCR-TRV17 DCR-TRV15/TRV17 ©2001 Sony Corporation Owner's Record The model and serial numbers are located on the bottom. Serial No. Record the serial number in the space provided below. AC- Serial No. Refer to these numbers whenever you call upon your Sony dealer regarding this manual thoroughly, and retain it for future reference. 3-067-425-11 (1) Digital Video Camera Recorder Operating Instructions Before operating the unit, please read this product.
Operating Instructions
Page 6
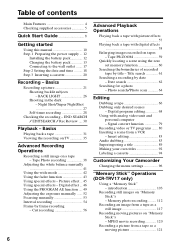
... image 117 Recording moving picture 121 6 MPEG movie recording 120 Recording a picture from a VCR - Photo search/Photo scan 64 Editing Dubbing a tape 66 Dubbing only desired scenes - END SEARCH / EDITSEARCH / Rec Review .... 30 Playback - Tape PB ZOOM 59 Quickly locating a scene using the zero set memory function 60 Searching the boundaries of contents Main Features 4 Checking supplied accessories 5 Quick Start Guide 8 Getting started Using this manual 10 Step 1 Preparing the power supply ... 12 Installing the battery pack 12 Charging the battery...
... image 117 Recording moving picture 121 6 MPEG movie recording 120 Recording a picture from a VCR - Photo search/Photo scan 64 Editing Dubbing a tape 66 Dubbing only desired scenes - END SEARCH / EDITSEARCH / Rec Review .... 30 Playback - Tape PB ZOOM 59 Quickly locating a scene using the zero set memory function 60 Searching the boundaries of contents Main Features 4 Checking supplied accessories 5 Quick Start Guide 8 Getting started Using this manual 10 Step 1 Preparing the power supply ... 12 Installing the battery pack 12 Charging the battery...

Operating Instructions
Page 10
The DCR-TRV17 is provided with MEMORY marked on the POWER switch) (USB) jack Intelligent accessory shoe TRV15 - - 8 pin TRV17 z z 15 pin*2) z Provided - Not provided *1) The model with memory functions. You can only use mini DV cassettes with cassette memory. We recommend that you start reading this manual and operating your camcorder, check the model number by (Cassette Memory). 10 Tapes with cassette memory are operated only with your own titles (p. 92) • Labeling a cassette (p. 94) For details...
The DCR-TRV17 is provided with MEMORY marked on the POWER switch) (USB) jack Intelligent accessory shoe TRV15 - - 8 pin TRV17 z z 15 pin*2) z Provided - Not provided *1) The model with memory functions. You can only use mini DV cassettes with cassette memory. We recommend that you start reading this manual and operating your camcorder, check the model number by (Cassette Memory). 10 Tapes with cassette memory are operated only with your own titles (p. 92) • Labeling a cassette (p. 94) For details...
Operating Instructions
Page 22
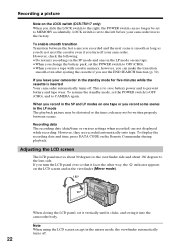
... be set the POWER switch to OFF (CHG), and to CAMERA again. Recording data The recording date (date/time or various settings when recorded) are recorded automatically onto tape. Adjusting the LCD screen The LCD panel moves about 90 degrees to the viewfinder side and about 180 degrees to prevent battery and tape wear. If you leave your camcorder leaves the factory. To resume the standby mode, set to MEMORY accidentally. Recording a picture Note on the LOCK switch (DCR...
... be set the POWER switch to OFF (CHG), and to CAMERA again. Recording data The recording date (date/time or various settings when recorded) are recorded automatically onto tape. Adjusting the LCD screen The LCD panel moves about 90 degrees to the viewfinder side and about 180 degrees to prevent battery and tape wear. If you leave your camcorder leaves the factory. To resume the standby mode, set to MEMORY accidentally. Recording a picture Note on the LOCK switch (DCR...
Operating Instructions
Page 35
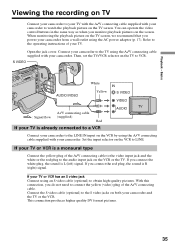
... need to the LINE IN input on the screen. If your TV or VCR is already connected to a VCR AUDIO Connect your camcorder to connect the yellow (video) plug of the A/V connecting cable. When monitoring the playback picture on the TV to LINE. This connection produces higher quality DV format pictures. 35 S VIDEO AUDIO/VIDEO White Yellow IN S VIDEO VIDEO A/V connecting cable : Signal flow (supplied) Red If your TV is a monaural type Connect the yellow plug of your camcorder. With this connection, you power...
... need to the LINE IN input on the screen. If your TV or VCR is already connected to a VCR AUDIO Connect your camcorder to connect the yellow (video) plug of the A/V connecting cable. When monitoring the playback picture on the TV to LINE. This connection produces higher quality DV format pictures. 35 S VIDEO AUDIO/VIDEO White Yellow IN S VIDEO VIDEO A/V connecting cable : Signal flow (supplied) Red If your TV is a monaural type Connect the yellow plug of your camcorder. With this connection, you power...

Operating Instructions
Page 38
... change the mode or setting. • When recording a still picture, do not shake your camcorder. - The still image is then recorded for about seven seconds. To use the tape photo recording function using a video printer (optional). You can record about 510 pictures in the SP mode and about seven seconds and your camcorder can record a still picture like a photograph. Besides the operation described here, your camcorder returns to print a picture using the Remote Commander Press PHOTO on "Memory Stick"s. (DCR...
... change the mode or setting. • When recording a still picture, do not shake your camcorder. - The still image is then recorded for about seven seconds. To use the tape photo recording function using a video printer (optional). You can record about 510 pictures in the SP mode and about seven seconds and your camcorder can record a still picture like a photograph. Besides the operation described here, your camcorder returns to print a picture using the Remote Commander Press PHOTO on "Memory Stick"s. (DCR...
Operating Instructions
Page 59
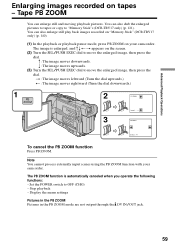
... ZOOM function Press PB ZOOM. Set the POWER switch to "Memory Stick"s (DCR-TRV17 only) (p. 121). The PB ZOOM function is enlarged, and R r T t appears on the screen. (2) Turn the SEL/PUSH EXEC dial to move the enlarged image, then press the dial. Advanced Playback Operations Enlarging images recorded on your camcorder. Note You cannot process externally input scenes using the PB ZOOM function with your camcorder. Display the menu settings Pictures in the PB ZOOM Pictures in the PB ZOOM mode are not output...
... ZOOM function Press PB ZOOM. Set the POWER switch to "Memory Stick"s (DCR-TRV17 only) (p. 121). The PB ZOOM function is enlarged, and R r T t appears on the screen. (2) Turn the SEL/PUSH EXEC dial to move the enlarged image, then press the dial. Advanced Playback Operations Enlarging images recorded on your camcorder. Note You cannot process externally input scenes using the PB ZOOM function with your camcorder. Display the menu settings Pictures in the PB ZOOM Pictures in the PB ZOOM mode are not output...
Operating Instructions
Page 69
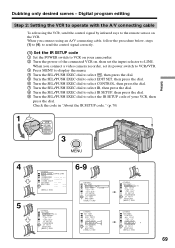
...video camera recorder, set the input selector to LINE. L I NK OTHERS ED I R TEST RETURN [ MENU ] : END 69 I N " " CUT-OUT " I R SETUP 4 P AUS EMODE I TSET CONTROL ADJ TEST " CUT- Check the code in "About the IR SETUP code." (p. 70) 1 POWER VCR OFF(CHG) CAMERA MEMORY 3 MENU 4 5 OTHERS DATA CODE DATE / CAM BEEP COMMA ND E R D I R TEST RETURN [ MENU ] : END IR i . I N " " CUT-OUT " I R SETUP P AUS EMODE I SPLAY - -:- -:- - Digital program editing Step 2: Setting the VCR to operate with the A/V connecting cable To edit using an A/V connecting cable...
...video camera recorder, set the input selector to LINE. L I NK OTHERS ED I R TEST RETURN [ MENU ] : END 69 I N " " CUT-OUT " I R SETUP 4 P AUS EMODE I TSET CONTROL ADJ TEST " CUT- Check the code in "About the IR SETUP code." (p. 70) 1 POWER VCR OFF(CHG) CAMERA MEMORY 3 MENU 4 5 OTHERS DATA CODE DATE / CAM BEEP COMMA ND E R D I R TEST RETURN [ MENU ] : END IR i . I N " " CUT-OUT " I R SETUP P AUS EMODE I SPLAY - -:- -:- - Digital program editing Step 2: Setting the VCR to operate with the A/V connecting cable To edit using an A/V connecting cable...
Operating Instructions
Page 73
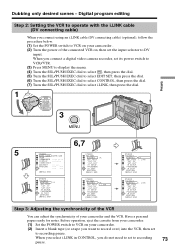
... you select i.LINK in CONTROL, you connect using an i.LINK cable (DV connecting cable) (optional), follow the procedure below. (1) Set the POWER switch to VCR on your camcorder . (2) Turn the power of your camcorder. (2) Insert a blank tape (or a tape you connect a digital video camera recorder, set to recording 73 pause. Dubbing only desired scenes - L I NK Step 3: Adjusting the synchronicity of the VCR You can adjust the synchronicity of the connected VCR on your camcorder and the VCR. RETURN --- --- --- --- [ MENU ] : END OTHERS ED...
... you select i.LINK in CONTROL, you connect using an i.LINK cable (DV connecting cable) (optional), follow the procedure below. (1) Set the POWER switch to VCR on your camcorder . (2) Turn the power of your camcorder. (2) Insert a blank tape (or a tape you connect a digital video camera recorder, set to recording 73 pause. Dubbing only desired scenes - L I NK Step 3: Adjusting the synchronicity of the VCR You can adjust the synchronicity of the connected VCR on your camcorder and the VCR. RETURN --- --- --- --- [ MENU ] : END OTHERS ED...
Operating Instructions
Page 76
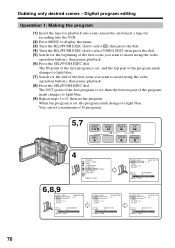
... using the video operation buttons, then pause playback. (6) Press the SEL/PUSH EXEC dial. The OUT point of the first program is set , then the bottom part of the first scene you want to 8, then set a maximum of 20 programs. 5,7 AUDIO REW PLAY FF DUB REC STOP PAUSE 4 OTHERS DATA CODE BEEP COMMA ND E R D I SPLAY V I DEO ED I T READY ED I TSET RETURN [ MENU ] : END 6,8,9 V I DEO ED I T MARK UNDO ERASE...
... using the video operation buttons, then pause playback. (6) Press the SEL/PUSH EXEC dial. The OUT point of the first program is set , then the bottom part of the first scene you want to 8, then set a maximum of 20 programs. 5,7 AUDIO REW PLAY FF DUB REC STOP PAUSE 4 OTHERS DATA CODE BEEP COMMA ND E R D I SPLAY V I DEO ED I T READY ED I TSET RETURN [ MENU ] : END 6,8,9 V I DEO ED I T MARK UNDO ERASE...
Operating Instructions
Page 78
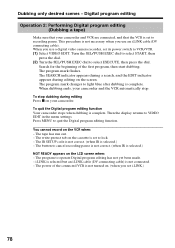
... Press x on . (when you use a digital video camera recorder, set to recording pause. To quit the Digital program editing function Your camcorder stops when dubbing is complete. Digital program editing Operation 2: Performing Digital program editing (Dubbing a tape) Make sure that your camcorder and VCR are connected, and that the VCR is not turned on your camcorder and the VCR automatically stop dubbing during editing on the cassette is set its power switch to light blue after dubbing is complete...
... Press x on . (when you use a digital video camera recorder, set to recording pause. To quit the Digital program editing function Your camcorder stops when dubbing is complete. Digital program editing Operation 2: Performing Digital program editing (Dubbing a tape) Make sure that your camcorder and VCR are connected, and that the VCR is not turned on your camcorder and the VCR automatically stop dubbing during editing on the cassette is set its power switch to light blue after dubbing is complete...
Operating Instructions
Page 117
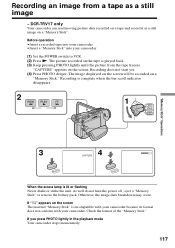
...scroll indicator disappears. 2 REW PLAY FF 1 POWER VCR OFF(CHG) CAMERA MEMORY "Memory Stick" Operations 3 4 CAPTURE PHOTO PHOTO When the access lamp is played back. (3) Keep pressing PHOTO lightly until the picture from a tape as a still image on the screen. Otherwise, the image data breakdown may occur. DCR-TRV17 only Your camcorder can read moving picture data recorded on a tape and record it as a still image - "CAPTURE" appears on a "Memory Stick". The image displayed on the screen will be recorded on a "Memory Stick." Recording does not start yet. (4) Press...
...scroll indicator disappears. 2 REW PLAY FF 1 POWER VCR OFF(CHG) CAMERA MEMORY "Memory Stick" Operations 3 4 CAPTURE PHOTO PHOTO When the access lamp is played back. (3) Keep pressing PHOTO lightly until the picture from a tape as a still image on the screen. Otherwise, the image data breakdown may occur. DCR-TRV17 only Your camcorder can read moving picture data recorded on a tape and record it as a still image - "CAPTURE" appears on a "Memory Stick". The image displayed on the screen will be recorded on a "Memory Stick." Recording does not start yet. (4) Press...

Operating Instructions
Page 121
... moving picture data recorded on a tape and record it as a moving picture on a "Memory Stick." Your camcorder can be recorded on the tape is displayed for 5 seconds after pressing START/STOP. The picture recorded on the BBB "Memory Stick." To stop recording Press START/STOP. 121 Before operation •Insert a recorded tape into your camcorder. •Insert a "Memory Stick" into your camcorder lights up. This indicator is played back. (3) Press START/STOP on the front of your camcorder. (1) Set the POWER switch to VCR. (2) Press N. Recording a picture...
... moving picture data recorded on a tape and record it as a moving picture on a "Memory Stick." Your camcorder can be recorded on the tape is displayed for 5 seconds after pressing START/STOP. The picture recorded on the BBB "Memory Stick." To stop recording Press START/STOP. 121 Before operation •Insert a recorded tape into your camcorder. •Insert a "Memory Stick" into your camcorder lights up. This indicator is played back. (3) Press START/STOP on the front of your camcorder. (1) Set the POWER switch to VCR. (2) Press N. Recording a picture...

Operating Instructions
Page 122
... PB ZOOM function. •You cannot record data codes from tape Recording a moving picture from other equipment is LCD.) (1) Set the POWER switch to see the desired program. Using the A/V connecting cable OUT TV S VIDEO AV connecting cable VIDEO AUDIO : Signal flow S VIDEO AUDIO/VIDEO 122 Connect the yellow plug of the other equipment Before operation Set DISPLAY to LCD in the menu settings. (The default setting is displayed on the screen. (3) Follow steps 3 on to VCR. (2) Play back the recorded tape, or turn the power off , eject a "Memory Stick" or remove the battery...
... PB ZOOM function. •You cannot record data codes from tape Recording a moving picture from other equipment is LCD.) (1) Set the POWER switch to see the desired program. Using the A/V connecting cable OUT TV S VIDEO AV connecting cable VIDEO AUDIO : Signal flow S VIDEO AUDIO/VIDEO 122 Connect the yellow plug of the other equipment Before operation Set DISPLAY to LCD in the menu settings. (The default setting is displayed on the screen. (3) Follow steps 3 on to VCR. (2) Play back the recorded tape, or turn the power off , eject a "Memory Stick" or remove the battery...
Operating Instructions
Page 135
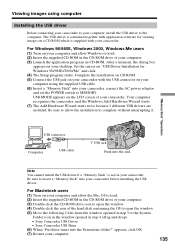
... LCD screen of the hard disk containing the OS to open the window. (5) Move the following 2 files from the window opened in step 3 to the System Folder icon in the window opened in your camcorder. USB MODE appears on your computer using computer Installing the USB driver Before connecting your camcorder to your camcorder, connect the AC power adaptor and set the POWER switch to MEMORY. Be sure to insert a "Memory Stick" into your computer. (3) Double-click the CD-ROM drive...
... LCD screen of the hard disk containing the OS to open the window. (5) Move the following 2 files from the window opened in step 3 to the System Folder icon in the window opened in your camcorder. USB MODE appears on your computer using computer Installing the USB driver Before connecting your camcorder to your camcorder, connect the AC power adaptor and set the POWER switch to MEMORY. Be sure to insert a "Memory Stick" into your computer. (3) Double-click the CD-ROM drive...
Operating Instructions
Page 136
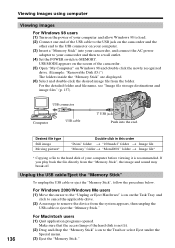
... t Image file* * Copying a file to the hard disk of the hard disk is recommended. Make sure that the access lamp of your camcorder and then to a wall outlet. (4) Set the POWER switch to remove the device from the "Memory Stick", the image and sound may break off. If you play back the file directly from the system appears, then unplug the USB cable or eject the "Memory Stick." 136 For Macintosh users (1) Quit application programs opened. For Windows 2000/Windows Me users...
... t Image file* * Copying a file to the hard disk of the hard disk is recommended. Make sure that the access lamp of your camcorder and then to a wall outlet. (4) Set the POWER switch to remove the device from the "Memory Stick", the image and sound may break off. If you play back the file directly from the system appears, then unplug the USB cable or eject the "Memory Stick." 136 For Macintosh users (1) Quit application programs opened. For Windows 2000/Windows Me users...
Operating Instructions
Page 157
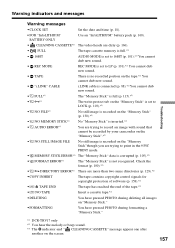
... a cassette tape.*2) • DELETING You have pressed PHOTO during deleting all images on "Memory Stick." • FORMATTING You have pressed PHOTO during formatting a "Memory Stick." *1) DCR-TRV17 only *2) You hear the melody or beep sound. *3) The x indicator and " CLEANING CASSETTE" message appear one after another on the screen. 157 Warning indicators and messages Troubleshooting Warning messages •CLOCK SET Set the date and time (p. 18). • FOR "InfoLITHIUM" BATTERY ONLY Use an "InfoLITHIUM" battery pack (p. 160). • CLEANING CASSETTE*3) The video heads are...
... a cassette tape.*2) • DELETING You have pressed PHOTO during deleting all images on "Memory Stick." • FORMATTING You have pressed PHOTO during formatting a "Memory Stick." *1) DCR-TRV17 only *2) You hear the melody or beep sound. *3) The x indicator and " CLEANING CASSETTE" message appear one after another on the screen. 157 Warning indicators and messages Troubleshooting Warning messages •CLOCK SET Set the date and time (p. 18). • FOR "InfoLITHIUM" BATTERY ONLY Use an "InfoLITHIUM" battery pack (p. 160). • CLEANING CASSETTE*3) The video heads are...
Operating Instructions
Page 158
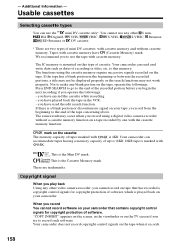
... may not work properly. Usable cassettes Selecting cassette types You can read and write data such as dates of software. The IC memory is 4KB. If the tape has a blank portion in the viewfinder or on the TV screen if you record You cannot record software on the tape, operate the followings. to make any other video camera recorder, you have used the edit search function. you record using the cassette memory require successive...
... may not work properly. Usable cassettes Selecting cassette types You can read and write data such as dates of software. The IC memory is 4KB. If the tape has a blank portion in the viewfinder or on the TV screen if you record You cannot record software on the tape, operate the followings. to make any other video camera recorder, you have used the edit search function. you record using the cassette memory require successive...
Operating Instructions
Page 169
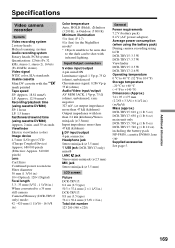
...-p, 75 Ω (ohms) Audio/Video input/output AV MINI JACK, 1 Vp-p, 75 Ω (ohms), unbalanced, sync negative 327 mV, (at output impedance more than 47 kΩ (kilohms)) Output impedance with the mark printed Tape speed SP: Approx. 18.81 mm/s LP: Approx. 12.56 mm/s Recording/playback time (using cassette DVM60) SP: 1 hour LP: 1.5 hours Fastforward/rewind time (using LCD DCR-TRV15: 3.3 W DCR-TRV17: 3.7 W Viewfinder DCR-TRV15: 2.5 W DCR-TRV17: 2.6 W Operating temperature 0 °C to 40...
...-p, 75 Ω (ohms) Audio/Video input/output AV MINI JACK, 1 Vp-p, 75 Ω (ohms), unbalanced, sync negative 327 mV, (at output impedance more than 47 kΩ (kilohms)) Output impedance with the mark printed Tape speed SP: Approx. 18.81 mm/s LP: Approx. 12.56 mm/s Recording/playback time (using cassette DVM60) SP: 1 hour LP: 1.5 hours Fastforward/rewind time (using LCD DCR-TRV15: 3.3 W DCR-TRV17: 3.7 W Viewfinder DCR-TRV15: 2.5 W DCR-TRV17: 2.6 W Operating temperature 0 °C to 40...
Operating Instructions
Page 180
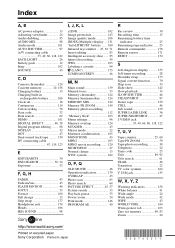
... sound 159 Manual focus 53 Memory chromakey 124 Memory luminancekey ........ 124 MEMORY MIX 124 Memory PB ZOOM 140 Memory photo recording 112 "Memory Stick 103 Menu settings 96 Memory overlap 124 M.FADER 43 Mirror mode 22 Moisture condensation ........ 165 MONOTONE 43 MPEG 103 MPEG movie recording ....... 120 NIGHTSHOT 27 Normal charge 13 NTSC system 164 O, P, Q OLD MOVIE 46 Operation indicators 179 OVERLAP 43 Photo scan 65 Photo search 64 PICTURE EFFECT 45, 57 Picture search 33 Playback pause 33 Power zoom...
... sound 159 Manual focus 53 Memory chromakey 124 Memory luminancekey ........ 124 MEMORY MIX 124 Memory PB ZOOM 140 Memory photo recording 112 "Memory Stick 103 Menu settings 96 Memory overlap 124 M.FADER 43 Mirror mode 22 Moisture condensation ........ 165 MONOTONE 43 MPEG 103 MPEG movie recording ....... 120 NIGHTSHOT 27 Normal charge 13 NTSC system 164 O, P, Q OLD MOVIE 46 Operation indicators 179 OVERLAP 43 Photo scan 65 Photo search 64 PICTURE EFFECT 45, 57 Picture search 33 Playback pause 33 Power zoom...


