
Operating Instructions
Page 5
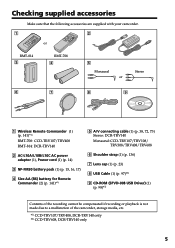
... Make sure that the following accessories are supplied with your camcorder. 1 2 or RMT-814 3 RMT-708 4 5 Monaural or Stereo 6 7 8 9 1 Wireless Remote Commander (1) (p. 141)*1) RMT-708: CCD-TRV107/TRV408 RMT-814: DCR-TRV140 2 AC-L10A/L10B/L10C AC power adaptor (1), Power cord (1) (p. 14) 3 NP-FM30 battery pack (1) (p. 15, 16, 17) 4 Size AA (R6) battery for Remote Commander...
... Make sure that the following accessories are supplied with your camcorder. 1 2 or RMT-814 3 RMT-708 4 5 Monaural or Stereo 6 7 8 9 1 Wireless Remote Commander (1) (p. 141)*1) RMT-708: CCD-TRV107/TRV408 RMT-814: DCR-TRV140 2 AC-L10A/L10B/L10C AC power adaptor (1), Power cord (1) (p. 14) 3 NP-FM30 battery pack (1) (p. 15, 16, 17) 4 Size AA (R6) battery for Remote Commander...

Operating Instructions
Page 6
...power supply ... 13 Installing the battery pack 13 Charging the battery pack 14 Connecting to a wall outlet 18 Step 2 Setting the date and time ........ 19 Step 3 Inserting a cassette 21 Recording - Basics Recording a picture 23 Shooting backlit subjects - NightShot/ Super NightShot (DCR-TRV140 only)/ Color Slow Shutter (DCR-TRV140... 66 Quickly locating a scene using the zero set memory function 67 Searching a recording by frame recording - Cut recording (DCR-TRV140 only 56 Superimposing a title 57 Making your own titles 59 Using the built-in the dark - BACK LIGHT 29 Shooting...
...power supply ... 13 Installing the battery pack 13 Charging the battery pack 14 Connecting to a wall outlet 18 Step 2 Setting the date and time ........ 19 Step 3 Inserting a cassette 21 Recording - Basics Recording a picture 23 Shooting backlit subjects - NightShot/ Super NightShot (DCR-TRV140 only)/ Color Slow Shutter (DCR-TRV140... 66 Quickly locating a scene using the zero set memory function 67 Searching a recording by frame recording - Cut recording (DCR-TRV140 only 56 Superimposing a title 57 Making your own titles 59 Using the built-in the dark - BACK LIGHT 29 Shooting...
Operating Instructions
Page 8
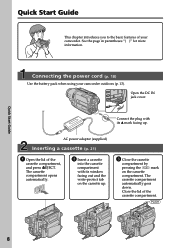
...plug with its v mark facing up . 3 Close the cassette compartment by pressing the mark on the cassette up . AC power adaptor (supplied) Inserting a cassette (p. 21) 1 Open the lid of your camcorder outdoors (p. 13). See the page in parentheses "( )" for more information. The cassette compartment opens automatically. EJECT 2 Insert a... and the write-protect tab on the cassette compartment. Close the lid of the cassette compartment. Connecting the power cord (p. 18) Use the battery pack when using your camcorder. The cassette compartment automatically goes down.
...plug with its v mark facing up . 3 Close the cassette compartment by pressing the mark on the cassette up . AC power adaptor (supplied) Inserting a cassette (p. 21) 1 Open the lid of your camcorder outdoors (p. 13). See the page in parentheses "( )" for more information. The cassette compartment opens automatically. EJECT 2 Insert a... and the write-protect tab on the cassette compartment. Close the lid of the cassette compartment. Connecting the power cord (p. 18) Use the battery pack when using your camcorder. The cassette compartment automatically goes down.

Operating Instructions
Page 13
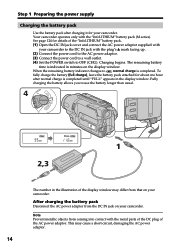
To remove the battery pack Slide the battery pack out in the direction of the arrow while pressing V BATT down until it clicks. V BATT release lever 13 Getting started Step 1 Preparing the power supply Installing the battery pack Slide the battery pack down .
To remove the battery pack Slide the battery pack out in the direction of the arrow while pressing V BATT down until it clicks. V BATT release lever 13 Getting started Step 1 Preparing the power supply Installing the battery pack Slide the battery pack down .
Operating Instructions
Page 14
...the DC plug of the "InfoLITHIUM" battery pack. (1) Open the DC IN jack cover and connect the AC power adaptor supplied with your camcorder. Step 1 Preparing the power supply Charging the battery pack Use the battery pack after normal charge is completed until "FULL" appears in the display... window. The remaining battery time is indicated in minutes on your camcorder to OFF (CHG). Note Prevent metallic ...
...the DC plug of the "InfoLITHIUM" battery pack. (1) Open the DC IN jack cover and connect the AC power adaptor supplied with your camcorder. Step 1 Preparing the power supply Charging the battery pack Use the battery pack after normal charge is completed until "FULL" appears in the display... window. The remaining battery time is indicated in minutes on your camcorder to OFF (CHG). Note Prevent metallic ...
Operating Instructions
Page 15
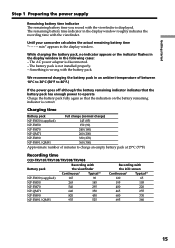
Until your camcorder calculates the actual remaining battery time "- - - - Something is disconnected. - min" appears in the following cases: - While charging the battery pack, no indicator appears or the indicator flashes in the display window in the display window. The AC power adapter is wrong ...on the battery remaining indicator is not installed properly. - Getting started Step 1 Preparing the power supply Remaining battery time indicator The remaining battery time you record with the LCD screen Continuous* Typical** 120 65 195 105 400 220 465 255 600 330 695 380 ...
Until your camcorder calculates the actual remaining battery time "- - - - Something is disconnected. - min" appears in the following cases: - While charging the battery pack, no indicator appears or the indicator flashes in the display window in the display window. The AC power adapter is wrong ...on the battery remaining indicator is not installed properly. - Getting started Step 1 Preparing the power supply Remaining battery time indicator The remaining battery time you record with the LCD screen Continuous* Typical** 120 65 195 105 400 220 465 255 600 330 695 380 ...

Operating Instructions
Page 16
... with the LCD screen Continuous* Typical** 100 55 160 90 335 185 390 215 505 275 585 320 DCR-TRV140 Battery pack Recording with the viewfinder Recording with LCD closed 175 280 570 675 865 1010 CCD-TRV608 Battery pack NP-FM30 (supplied) NP-FM50...camcorder in a cold environment. ** Approximate number of minutes when recording while you use a fully charged battery pack * Approximate continuous recording time at 25°C (77°F). The actual battery life may be shorter if you repeat recording start/ stop, zooming and turning the power on LCD screen NP-FM30 (supplied...
... with the LCD screen Continuous* Typical** 100 55 160 90 335 185 390 215 505 275 585 320 DCR-TRV140 Battery pack Recording with the viewfinder Recording with LCD closed 175 280 570 675 865 1010 CCD-TRV608 Battery pack NP-FM30 (supplied) NP-FM50...camcorder in a cold environment. ** Approximate number of minutes when recording while you use a fully charged battery pack * Approximate continuous recording time at 25°C (77°F). The actual battery life may be shorter if you repeat recording start/ stop, zooming and turning the power on LCD screen NP-FM30 (supplied...

Operating Instructions
Page 17
...InfoLITHIUM" is the "InfoLITHIUM"? This unit is a trademark of Sony Corporation. 17 "InfoLITHIUM" M series battery packs have the mark. The battery life will be shorter if you use your camcorder in a cold environment. "InfoLITHIUM" is compatible with the "...camcorder operates only with the "InfoLITHIUM" battery pack. The recording and playing time of a normally charged battery are about 90% of those of a fully charged battery. Getting started Step 1 Preparing the power supply DCR-TRV140 Battery pack Playing time on LCD screen Playing time with LCD closed NP-FM30 (supplied...
...InfoLITHIUM" is the "InfoLITHIUM"? This unit is a trademark of Sony Corporation. 17 "InfoLITHIUM" M series battery packs have the mark. The battery life will be shorter if you use your camcorder in a cold environment. "InfoLITHIUM" is compatible with the "...camcorder operates only with the "InfoLITHIUM" battery pack. The recording and playing time of a normally charged battery are about 90% of those of a fully charged battery. Getting started Step 1 Preparing the power supply DCR-TRV140 Battery pack Playing time on LCD screen Playing time with LCD closed NP-FM30 (supplied...

Operating Instructions
Page 18
... Use Sony DC Adaptor/Charger (optional). Refer to the operating instructions of the DC Adaptor/Charger for a long time, we recommend that the battery pack cannot supply any trouble occurs with the plug's v mark facing up. (2) Connect the power cord to the AC power adaptor. (3) Connect the power cord to...camcorder for further information. 18 Step 1 Preparing the power supply Connecting to a wall outlet When you power it from a wall outlet using the AC power adaptor, if any power if the power cord is connected to the DC IN jack, even when the power cord is attached to your camcorder...
... Use Sony DC Adaptor/Charger (optional). Refer to the operating instructions of the DC Adaptor/Charger for a long time, we recommend that the battery pack cannot supply any trouble occurs with the plug's v mark facing up. (2) Connect the power cord to the AC power adaptor. (3) Connect the power cord to...camcorder for further information. 18 Step 1 Preparing the power supply Connecting to a wall outlet When you power it from a wall outlet using the AC power adaptor, if any power if the power cord is connected to the DC IN jack, even when the power cord is attached to your camcorder...

Operating Instructions
Page 21
... tape on Hi8 /Digital8 tape. The cassette compartment automatically goes down . If you select the LP mode in the menu settings, the recording time is half of the indicated time on other camcorders (including other DCR-TRV140.)*1) •The cassette compartment may appear when you use Hi8 video cassettes.*2) (1) Prepare the power supply (p. 13). (2) Open the...
... tape on Hi8 /Digital8 tape. The cassette compartment automatically goes down . If you select the LP mode in the menu settings, the recording time is half of the indicated time on other camcorders (including other DCR-TRV140.)*1) •The cassette compartment may appear when you use Hi8 video cassettes.*2) (1) Prepare the power supply (p. 13). (2) Open the...

Operating Instructions
Page 33
... camcorder.*3) CR OFF(CHG) 4 REW 5 2 V POWER PLAY RA CAME 6 VOLUME 3 1 To stop playback Press x. *1) DCR-TRV140 only *2) CCD-TRV107/TRV108/TRV308/TRV408/TRV608 only *3) CCD-TRV107/TRV408, DCR-TRV140 only 33 Playing back a tape You can playback tapes recorded in the Digital8 system.*1) You can control playback using the Remote Commander supplied with your camcorder is silent when the LCD...
... camcorder.*3) CR OFF(CHG) 4 REW 5 2 V POWER PLAY RA CAME 6 VOLUME 3 1 To stop playback Press x. *1) DCR-TRV140 only *2) CCD-TRV107/TRV108/TRV308/TRV408/TRV608 only *3) CCD-TRV107/TRV408, DCR-TRV140 only 33 Playing back a tape You can playback tapes recorded in the Digital8 system.*1) You can control playback using the Remote Commander supplied with your camcorder is silent when the LCD...
Operating Instructions
Page 38
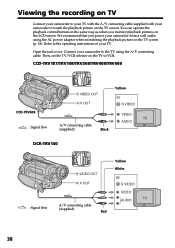
... TV to the TV using the AC power adaptor when monitoring the playback picture on the LCD screen. CCD-TRV107/TRV108/TRV308/TRV408/TRV608 CCD-TRV608 : Signal flow S VIDEO OUT A/ V OUT Yellow IN S VIDEO A/V connecting cable (supplied) Black VIDEO AUDIO DCR-TRV140 : Signal flow S VIDEO OUT A/ V OUT A/V connecting cable (supplied) Red Yellow White IN S VIDEO VIDEO...
... TV to the TV using the AC power adaptor when monitoring the playback picture on the LCD screen. CCD-TRV107/TRV108/TRV308/TRV408/TRV608 CCD-TRV608 : Signal flow S VIDEO OUT A/ V OUT Yellow IN S VIDEO A/V connecting cable (supplied) Black VIDEO AUDIO DCR-TRV140 : Signal flow S VIDEO OUT A/ V OUT A/V connecting cable (supplied) Red Yellow White IN S VIDEO VIDEO...

Operating Instructions
Page 62
...the subject properly. The supplied halogen lamp is turned on for more than 5 minutes - When it off when not in use. •When you do not use your camcorder, turn the built-... in the AUTO mode ( ) for more than 5 minutes with the groove when inserting. Purchase the Sony XB-3D halogen lamp. When you use the PROGRAM AE or backlight function while shooting in the AUTO...when you leave it clockwise, then replace the built-in light is not commercially available. Remove the power source before replacing the bulb. (1) Remove the built-in light unit while pushing the hole under...
...the subject properly. The supplied halogen lamp is turned on for more than 5 minutes - When it off when not in use. •When you do not use your camcorder, turn the built-... in the AUTO mode ( ) for more than 5 minutes with the groove when inserting. Purchase the Sony XB-3D halogen lamp. When you use the PROGRAM AE or backlight function while shooting in the AUTO...when you leave it clockwise, then replace the built-in light is not commercially available. Remove the power source before replacing the bulb. (1) Remove the built-in light unit while pushing the hole under...

Operating Instructions
Page 72
... VCR to record over) into the VCR, and insert the recorded tape into your camcorder as a player. Set DISPLAY to LCD in in the menu settings. (The default setting is set to LCD.) If you want to LINE. DATA CODE/SEARCH MODE on the Remote Commander*2) (1)...your camcorder. (5) Start recording on tapes. DISPLAY on your VCR for more information. *1) CCD-TRV107/TRV408, DCR-TRV140 only *2) DCR-TRV140 only *3) CCD-TRV107/TRV108/TRV308/TRV408/TRV608 only CCD-TRV107/TRV108/TRV308/TRV408/TRV608 CCD-TRV608 : Signal flow S VIDEO OUT A / V OUT Yellow IN S VIDEO A/V connecting cable (supplied) ...
... VCR to record over) into the VCR, and insert the recorded tape into your camcorder as a player. Set DISPLAY to LCD in in the menu settings. (The default setting is set to LCD.) If you want to LINE. DATA CODE/SEARCH MODE on the Remote Commander*2) (1)...your camcorder. (5) Start recording on tapes. DISPLAY on your VCR for more information. *1) CCD-TRV107/TRV408, DCR-TRV140 only *2) DCR-TRV140 only *3) CCD-TRV107/TRV108/TRV308/TRV408/TRV608 only CCD-TRV107/TRV108/TRV308/TRV408/TRV608 CCD-TRV608 : Signal flow S VIDEO OUT A / V OUT Yellow IN S VIDEO A/V connecting cable (supplied) ...
Operating Instructions
Page 84
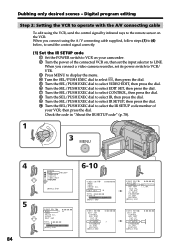
... CONTROL ADJ TEST "CUT- When you connect using the VCR, send the control signal by infrared rays to the remote sensor on , then set its power switch to VCR/ VTR. 3 Press MENU to display the menu. 4 Turn the SEL/PUSH EXEC dial to select , then press the dial. 5 Turn...operate with the A/V connecting cable To edit using the A/V connecting cable supplied, follow steps (1) to (4) below, to send the control signal correctly. (1) Set the IR SETUP code 1 Set the POWER switch to select the IR SETUP code number of your camcorder. 2 Turn the power of the connected VCR on the VCR. L I NK V I DEO...
... CONTROL ADJ TEST "CUT- When you connect using the VCR, send the control signal by infrared rays to the remote sensor on , then set its power switch to VCR/ VTR. 3 Press MENU to display the menu. 4 Turn the SEL/PUSH EXEC dial to select , then press the dial. 5 Turn...operate with the A/V connecting cable To edit using the A/V connecting cable supplied, follow steps (1) to (4) below, to send the control signal correctly. (1) Set the IR SETUP code 1 Set the POWER switch to select the IR SETUP code number of your camcorder. 2 Turn the power of the connected VCR on the VCR. L I NK V I DEO...
Operating Instructions
Page 99
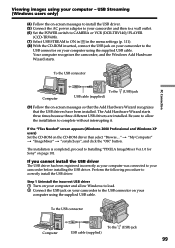
...Windows users only) (4) Follow the on-screen messages to install the USB driver. (5) Connect the AC power adaptor to your camcorder and then to a wall outlet. (6) Set the POWER switch to CAMERA or VCR (DCR-TRV140)/PLAYER (CCD-TRV608). (7) Select USB STREAM to ON in in the menu settings (p. 111). (8) ... t "My Computer" t "ImageMixer" t "sonyhcb.sys", and click the "OK" button. Perform the following procedure to Installing "PIXELA ImageMixer Ver.1.0 for Sony" on your computer using the supplied USB cable. Be sure to allow Windows to load. 2 Connect the USB jack on your computer using the...
...Windows users only) (4) Follow the on-screen messages to install the USB driver. (5) Connect the AC power adaptor to your camcorder and then to a wall outlet. (6) Set the POWER switch to CAMERA or VCR (DCR-TRV140)/PLAYER (CCD-TRV608). (7) Select USB STREAM to ON in in the menu settings (p. 111). (8) ... t "My Computer" t "ImageMixer" t "sonyhcb.sys", and click the "OK" button. Perform the following procedure to Installing "PIXELA ImageMixer Ver.1.0 for Sony" on your computer using the supplied USB cable. Be sure to allow Windows to load. 2 Connect the USB jack on your computer using the...
Operating Instructions
Page 101
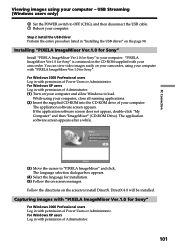
... listed in "Installing the USB driver" on your camcorder, using your computer. You can view video images easily on the page 98. The language selection dialogue box appears. (4) Select the language for Sony" For Windows 2000 Professional users Log in with "PIXELA... ImageMixer Ver.1.0 for Sony". Capturing images with "PIXELA ImageMixer Ver.1.0 for installation. (5) Follow the on the CD-ROM supplied with permission of Power Users or Administrator. PC Connection Viewing images...
... listed in "Installing the USB driver" on your camcorder, using your computer. You can view video images easily on the page 98. The language selection dialogue box appears. (4) Select the language for Sony" For Windows 2000 Professional users Log in with "PIXELA... ImageMixer Ver.1.0 for Sony". Capturing images with "PIXELA ImageMixer Ver.1.0 for installation. (5) Follow the on the CD-ROM supplied with permission of Power Users or Administrator. PC Connection Viewing images...

Operating Instructions
Page 102
... recorded on a tape (1) Turn on your computer and allow Windows to your computer - The images recorded on your computer using your camcorder. (4) Set the POWER switch to VCR (DCR-TRV140)/PLAYER (CCD-TRV608). (5) Select USB STREAM to ON in in the menu settings (p. 111). (6) Select "Start" t "Program..." t "Pixela" t "ImageMixer" t "PIXELA ImageMixer Ver.1.0 for Sony" on Windows. (7) Click the input mode button in the preview window. Preview ...
... recorded on a tape (1) Turn on your computer and allow Windows to your computer - The images recorded on your computer using your camcorder. (4) Set the POWER switch to VCR (DCR-TRV140)/PLAYER (CCD-TRV608). (5) Select USB STREAM to ON in in the menu settings (p. 111). (6) Select "Start" t "Program..." t "Pixela" t "ImageMixer" t "PIXELA ImageMixer Ver.1.0 for Sony" on Windows. (7) Click the input mode button in the preview window. Preview ...

Operating Instructions
Page 112
...of your camcorder. To show the display on your camcorder when recording. To make programs and perform video editing. (p. 83) POWER switch CAMERA ...power source The AUDIO MIX*1), COMMANDER*3) and HiFi SOUND*1) items are held in memory even when the battery is removed. In this case, we recommend you start/stop recording or when an unusual condition occurs on the TV screen, LCD screen, and in the viewfinder. To deactivate the Remote Commander to OFF. *1) DCR-TRV140... recording lamp at the front of the camcorder may reflect on the LCD screen and in the viewfinder. Meaning To...
...of your camcorder. To show the display on your camcorder when recording. To make programs and perform video editing. (p. 83) POWER switch CAMERA ...power source The AUDIO MIX*1), COMMANDER*3) and HiFi SOUND*1) items are held in memory even when the battery is removed. In this case, we recommend you start/stop recording or when an unusual condition occurs on the TV screen, LCD screen, and in the viewfinder. To deactivate the Remote Commander to OFF. *1) DCR-TRV140... recording lamp at the front of the camcorder may reflect on the LCD screen and in the viewfinder. Meaning To...
Operating Instructions
Page 116
...USB cable was not recognized by the computer. c Set it to your camcorder and the VCR is not adjusted. polarities incorrectly matching the + - c Adjust the synchronization of the VCR. ...function.*2) You cannot install the USB driver.*3) USB Streaming function does not work.*3) The Remote Commander supplied with the IR TEST function. (p. 76) • The input selector on the VCR is... starting up the application software. c Insert the batteries with the + - Also,make sure the power switch of Sony using the i.LINK cable (DV connecting cable). c Set the selector correctly, and check the connection...
...USB cable was not recognized by the computer. c Set it to your camcorder and the VCR is not adjusted. polarities incorrectly matching the + - c Adjust the synchronization of the VCR. ...function.*2) You cannot install the USB driver.*3) USB Streaming function does not work.*3) The Remote Commander supplied with the IR TEST function. (p. 76) • The input selector on the VCR is... starting up the application software. c Insert the batteries with the + - Also,make sure the power switch of Sony using the i.LINK cable (DV connecting cable). c Set the selector correctly, and check the connection...


