
Handycam® Handbook
Page 2
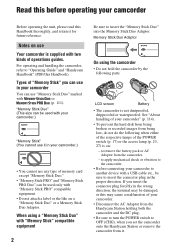
...to remove the battery pack or AC Adaptor from being broken or recorded images from the camcorder. - Types of operations guides. See "About handling of your camcorder" (p. 114). • To prevent the hard disk from being lost, do not do the following parts. "Memory Stick Duo" (This... size can be sure to insert the connector plug in your camcorder You can use "Memory Stick Duo" marked with "Memory Stick" compatible equipment 2 Be sure to "Operating Guide" and "Handycam Handbook"...
...to remove the battery pack or AC Adaptor from being broken or recorded images from the camcorder. - Types of operations guides. See "About handling of your camcorder" (p. 114). • To prevent the hard disk from being lost, do not do the following parts. "Memory Stick Duo" (This... size can be sure to insert the connector plug in your camcorder You can use "Memory Stick Duo" marked with "Memory Stick" compatible equipment 2 Be sure to "Operating Guide" and "Handycam Handbook"...
Handycam® Handbook
Page 4
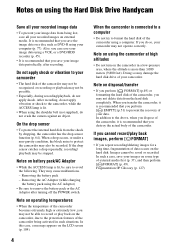
.... - Do not apply shock or vibration to prevent the recovery of your camcorder may not be saved or recorded. Removing the battery pack - Doing so may damage the hard disk drive of your image data periodically, after turning off the POWER switch. Also, you...camcorder. When a drop occurs, or under a non-gravity condition, the block noise to format the hard disk of data occurs on the hard disk. In such a case, save your recorded images on external media. In addition to remove the battery pack or the AC Adaptor after recording. Notes on using the Hard Disk Drive Handycam...
.... - Do not apply shock or vibration to prevent the recovery of your camcorder may not be saved or recorded. Removing the battery pack - Doing so may damage the hard disk drive of your image data periodically, after turning off the POWER switch. Also, you...camcorder. When a drop occurs, or under a non-gravity condition, the block noise to format the hard disk of data occurs on the hard disk. In such a case, save your recorded images on external media. In addition to remove the battery pack or the AC Adaptor after recording. Notes on using the Hard Disk Drive Handycam...
Handycam® Handbook
Page 5
... printer 46 Utilizing recording media (MANAGE HDD/MEMORY) category 49 Formatting the hard disk or the "Memory Stick Duo 49 Checking the hard disk information 50 Preventing data on using the Hard Disk Drive Handycam 4 Subject examples and solutions ..... 7 Enjoying your camcorder Operation flow 8 " HOME" and " OPTION" - Taking advantage of ...aspect ratio (16:9 or 4:3) of the recording image ...... 28 Recording the fast action in slow-motion (SMTH SLW REC) (DCR-SR190E/SR200E/SR290E/ SR300E 29 Playback 31 Using PB zoom 33 Searching for desired images by date (Date Index 33 Playing back a...
... printer 46 Utilizing recording media (MANAGE HDD/MEMORY) category 49 Formatting the hard disk or the "Memory Stick Duo 49 Checking the hard disk information 50 Preventing data on using the Hard Disk Drive Handycam 4 Subject examples and solutions ..... 7 Enjoying your camcorder Operation flow 8 " HOME" and " OPTION" - Taking advantage of ...aspect ratio (16:9 or 4:3) of the recording image ...... 28 Recording the fast action in slow-motion (SMTH SLW REC) (DCR-SR190E/SR200E/SR290E/ SR300E 29 Playback 31 Using PB zoom 33 Searching for desired images by date (Date Index 33 Playing back a...
Handycam® Handbook
Page 9
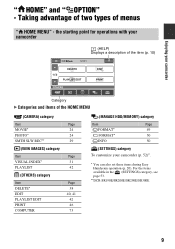
... B Categories and items of menus " HOME MENU" - " HOME" and " Enjoying your camcorder (p. 52)*. * You can also set these items during Easy Handycam operation (p. 20). For the items available in the (SETTINGS) category, see page 53. **DCR-SR190E/SR200E/SR290E/SR300E 9 Taking advantage of two types of the HOME MENU (CAMERA) category Item MOVIE... 42 Page 38 40, 41 42 46 73 (MANAGE HDD/MEMORY) category Item Page FORMAT* 49 FORMAT* 50 INFO 50 (SETTINGS) category To customize your camcorder OPTION" -
... B Categories and items of menus " HOME MENU" - " HOME" and " Enjoying your camcorder (p. 52)*. * You can also set these items during Easy Handycam operation (p. 20). For the items available in the (SETTINGS) category, see page 53. **DCR-SR190E/SR200E/SR290E/SR300E 9 Taking advantage of two types of the HOME MENU (CAMERA) category Item MOVIE... 42 Page 38 40, 41 42 46 73 (MANAGE HDD/MEMORY) category Item Page FORMAT* 49 FORMAT* 50 INFO 50 (SETTINGS) category To customize your camcorder OPTION" -

Handycam® Handbook
Page 12
... (1) (p. 13) Wireless Remote Commander (1) (p. 122) (except for DCR-SR32E/SR33E/SR42E) A button-type lithium battery is already installed. mark printed on their CD-ROM "Handycam Application Software" (1) (p. 73) - Handycam Handbook (This Handbook) Operating Guide (1) 12 Rechargeable battery pack NP-FH40...112) (DCR-SR32E/ SR33E/SR42E/SR52E/SR62E/SR72E/ SR82E) NP-FH60 (1) (p. 13, 112) (DCR-SR190E/ SR200E/SR290E/SR300E) Handycam Station (1) (p. 13) A/V connecting cable (1) (p. 35, 45) USB cable (1) (p. 46, 78, 81) 21-pin adaptor (p. 36) For the model with your camcorder. Getting...
... (1) (p. 13) Wireless Remote Commander (1) (p. 122) (except for DCR-SR32E/SR33E/SR42E) A button-type lithium battery is already installed. mark printed on their CD-ROM "Handycam Application Software" (1) (p. 73) - Handycam Handbook (This Handbook) Operating Guide (1) 12 Rechargeable battery pack NP-FH40...112) (DCR-SR32E/ SR33E/SR42E/SR52E/SR62E/SR72E/ SR82E) NP-FH60 (1) (p. 13, 112) (DCR-SR190E/ SR200E/SR290E/SR300E) Handycam Station (1) (p. 13) A/V connecting cable (1) (p. 35, 45) USB cable (1) (p. 46, 78, 81) 21-pin adaptor (p. 36) For the model with your camcorder. Getting...
Handycam® Handbook
Page 13
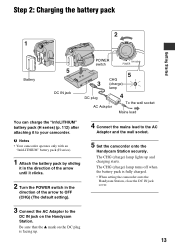
...(charge) lamp lights up . 13 The CHG (charge) lamp turns off when the battery pack is fully charged. • When setting the camcorder onto the Handycam Station, close the DC IN jack cover. 3 Connect the AC Adaptor to the DC IN jack on the DC plug is facing up and ...The default setting). 4 Connect the mains lead to the AC Adaptor and the wall socket. 5 Set the camcorder onto the Handycam Station securely. Be sure that the v mark on the Handycam Station. b Notes • Your camcorder operates only with an "InfoLITHIUM" battery pack (H series). 1 Attach the battery pack by sliding it in ...
...(charge) lamp lights up . 13 The CHG (charge) lamp turns off when the battery pack is fully charged. • When setting the camcorder onto the Handycam Station, close the DC IN jack cover. 3 Connect the AC Adaptor to the DC IN jack on the DC plug is facing up and ...The default setting). 4 Connect the mains lead to the AC Adaptor and the wall socket. 5 Set the camcorder onto the Handycam Station securely. Be sure that the v mark on the Handycam Station. b Notes • Your camcorder operates only with an "InfoLITHIUM" battery pack (H series). 1 Attach the battery pack by sliding it in ...
Handycam® Handbook
Page 14
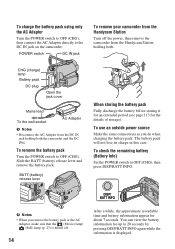
...DISP/BATT INFO again while the information is turned off the power, then remove the camcorder from the Handycam Station holding both . POWER switch DC IN jack To remove your camcorder from the DC IN jack holding both the camcorder and the DC plug. BATT (battery) release lever When storing the battery pack ... appear for the details of storage). To check the remaining battery (Battery Info) Set the POWER switch to the DC IN jack on the camcorder. To charge the battery pack using only the AC Adaptor Turn the POWER switch to OFF (CHG), then connect the AC Adaptor directly to ...
...DISP/BATT INFO again while the information is turned off the power, then remove the camcorder from the Handycam Station holding both . POWER switch DC IN jack To remove your camcorder from the DC IN jack holding both the camcorder and the DC plug. BATT (battery) release lever When storing the battery pack ... appear for the details of storage). To check the remaining battery (Battery Info) Set the POWER switch to the DC IN jack on the camcorder. To charge the battery pack using only the AC Adaptor Turn the POWER switch to OFF (CHG), then connect the AC Adaptor directly to ...
Handycam® Handbook
Page 16
... • The power will be supplied from the battery as long as the AC Adaptor is connected to the DC IN jack of your camcorder or the Handycam Station, even when the mains lead is disconnected from the wall socket. • When attaching an optional video light, it is recommended). ... pack, turn the POWER switch to 86 °F) is recommended that you use your camcorder. The battery pack is damaged. - Bottom: When the LCD backlight turns off (except for DCR-SR32E/SR33E/ SR42E). • We do not recommend using the camcorder at 25 °C (77 °F) (10 °C to 30 °C (50 ...
... • The power will be supplied from the battery as long as the AC Adaptor is connected to the DC IN jack of your camcorder or the Handycam Station, even when the mains lead is disconnected from the wall socket. • When attaching an optional video light, it is recommended). ... pack, turn the POWER switch to 86 °F) is recommended that you use your camcorder. The battery pack is damaged. - Bottom: When the LCD backlight turns off (except for DCR-SR32E/SR33E/ SR42E). • We do not recommend using the camcorder at 25 °C (77 °F) (10 °C to 30 °C (50 ...

Handycam® Handbook
Page 20
...the POWER switch G until the (Movie) lamp lights up . 2 Press EASY A. Recording/Playback Recording and playback with ease (Easy Handycam operation) Easy Handycam operation makes nearly all settings automatic so that you can change the recording media of [ QUALITY] is set to OFF (CHG), turn ... Open the lens cover (DCR-SR32E/SR33E/ SR42E/SR52E/SR62E/SR72E/SR82E) (p. 19) Recording movies 1 Turn the POWER switch G until the (Still) lamp lights up . 2 Press EASY A. You can perform recording or playback operation without detailed settings. appears on the hard disk in the default setting.
...the POWER switch G until the (Movie) lamp lights up . 2 Press EASY A. Recording/Playback Recording and playback with ease (Easy Handycam operation) Easy Handycam operation makes nearly all settings automatic so that you can change the recording media of [ QUALITY] is set to OFF (CHG), turn ... Open the lens cover (DCR-SR32E/SR33E/ SR42E/SR52E/SR62E/SR72E/SR82E) (p. 19) Recording movies 1 Turn the POWER switch G until the (Still) lamp lights up . 2 Press EASY A. You can perform recording or playback operation without detailed settings. appears on the hard disk in the default setting.

Handycam® Handbook
Page 22
...see page 95. • You cannot use some menu items are automatically set an invalid operation, [Invalid during Easy Handycam operation You cannot use (OPTION) menu. • Cancel Easy Handycam operation if you set (p. 95). If you want to add effects to images or change settings. from the selected...the last movie, the screen returns to the VISUAL INDEX screen. • You can slow down the playback speed by touching / during Easy Handycam operation Press (HOME) C (or B) to display the menu items available for setup changes (p. 9, 53). The recording date/time* Previous/Next To ...
...see page 95. • You cannot use some menu items are automatically set an invalid operation, [Invalid during Easy Handycam operation You cannot use (OPTION) menu. • Cancel Easy Handycam operation if you set (p. 95). If you want to add effects to images or change settings. from the selected...the last movie, the screen returns to the VISUAL INDEX screen. • You can slow down the playback speed by touching / during Easy Handycam operation Press (HOME) C (or B) to display the menu items available for setup changes (p. 9, 53). The recording date/time* Previous/Next To ...

Handycam® Handbook
Page 35
... A/V OUT jacks (p. 120, 121). When your TV is not necessary. Connect the A/V connecting cable either to the Handycam Station or to your camcorder, according to your camcorder to the LINE IN input on a computer, see page 73. Device without an S VIDEO jack IN Device with an...VIDEO (Yellow) (White) AUDIO (Red) VIDEO (White) AUDIO (Red) (Yellow) VCRs or TVs 1 A/V connecting cable (supplied) The Handycam Station and your camcorder and the Handycam Station at the same time. S VIDEO connection only will not output audio. Playing the image on the TV screen by using an A/V connecting...
... A/V OUT jacks (p. 120, 121). When your TV is not necessary. Connect the A/V connecting cable either to the Handycam Station or to your camcorder, according to your camcorder to the LINE IN input on a computer, see page 73. Device without an S VIDEO jack IN Device with an...VIDEO (Yellow) (White) AUDIO (Red) VIDEO (White) AUDIO (Red) (Yellow) VCRs or TVs 1 A/V connecting cable (supplied) The Handycam Station and your camcorder and the Handycam Station at the same time. S VIDEO connection only will not output audio. Playing the image on the TV screen by using an A/V connecting...

Handycam® Handbook
Page 40
...- You can divide movies on the LCD screen to be deleted. The movie pauses. Touch to return to be divided. b Notes • During Easy Handycam operation, you press . 5 Touch t [YES] t . 40 The selected still image is write-protected (p. 111). - write-protection is set to ... the other device. Play and pause toggles as you cannot divide movies. Press and hold the still image on the hard disk of the selected movie. Returns to the beginning of your camcorder. To delete all images recorded on the "Memory Stick Duo" In step 3, touch [ DELETE ALL] t [YES] t [YES...
...- You can divide movies on the LCD screen to be deleted. The movie pauses. Touch to return to be divided. b Notes • During Easy Handycam operation, you press . 5 Touch t [YES] t . 40 The selected still image is write-protected (p. 111). - write-protection is set to ... the other device. Play and pause toggles as you cannot divide movies. Press and hold the still image on the hard disk of the selected movie. Returns to the beginning of your camcorder. To delete all images recorded on the "Memory Stick Duo" In step 3, touch [ DELETE ALL] t [YES] t [YES...

Handycam® Handbook
Page 42
... COPY by date]. Cancel Easy Handycam operation. 1 On the (HOME MENU), touch (OTHERS) t [PLAYLIST EDIT]. 2 Touch [ ADD]. 3 Touch the movie to be copied. • You cannot copy still images on the screen. b Notes • Use the AC Adaptor as the power source to the hard disk. Press and hold the image ... on the screen. A Playlist is a list showing thumbnails of still images are not modified even though you cannot add movies to your camcorder from running out of the desired still image. 4 Touch while the selected recording date is marked with . Touch to return to confirm ...
... COPY by date]. Cancel Easy Handycam operation. 1 On the (HOME MENU), touch (OTHERS) t [PLAYLIST EDIT]. 2 Touch [ ADD]. 3 Touch the movie to be copied. • You cannot copy still images on the screen. b Notes • Use the AC Adaptor as the power source to the hard disk. Press and hold the image ... on the screen. A Playlist is a list showing thumbnails of still images are not modified even though you cannot add movies to your camcorder from running out of the desired still image. 4 Touch while the selected recording date is marked with . Touch to return to confirm ...
Handycam® Handbook
Page 45
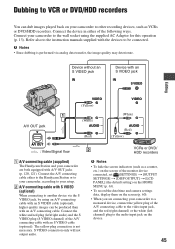
... A/V OUT jack A/V OUT : Video/Signal flow (White) AUDIO (Red) (White) AUDIO (Red) (Yellow) VCRs or DVD/ HDD recorders A A/V connecting cable (supplied) The Handycam Station and your camcorder are connecting your camcorder to a monaural device, connect the yellow plug of the A/V connecting cable to the video input jack, and the red (right channel) or... supplied with the devices to your setup. Dubbing to VCR or DVD/HDD recorders You can be connected. Connect the device in either to the Handycam Station or to your camcorder, according to be produced than with an A/V connecting cable.
... A/V OUT jack A/V OUT : Video/Signal flow (White) AUDIO (Red) (White) AUDIO (Red) (Yellow) VCRs or DVD/ HDD recorders A A/V connecting cable (supplied) The Handycam Station and your camcorder are connecting your camcorder to a monaural device, connect the yellow plug of the A/V connecting cable to the video input jack, and the red (right channel) or... supplied with the devices to your setup. Dubbing to VCR or DVD/HDD recorders You can be connected. Connect the device in either to the Handycam Station or to your camcorder, according to be produced than with an A/V connecting cable.

Handycam® Handbook
Page 46
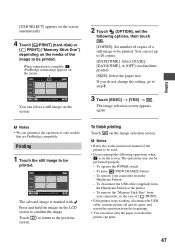
...your recording device has an input selector, set it on the printer. Turn on the recording device. Connect your camcorder to the input jacks of the Handycam Station to the printer using the supplied USB cable. 46 Refer to the instruction manuals supplied with your recording ...(optional) 2. Printing recorded images (PictBridge compliant printer) You can print out still images using the supplied AC Adaptor. 2 Set the camcorder onto the Handycam Station securely, then turn the POWER switch to turn on a "Memory Stick Duo," insert the "Memory Stick Duo" containing them into your...
...your recording device has an input selector, set it on the printer. Turn on the recording device. Connect your camcorder to the input jacks of the Handycam Station to the printer using the supplied USB cable. 46 Refer to the instruction manuals supplied with your recording ...(optional) 2. Printing recorded images (PictBridge compliant printer) You can print out still images using the supplied AC Adaptor. 2 Set the camcorder onto the Handycam Station securely, then turn the POWER switch to turn on a "Memory Stick Duo," insert the "Memory Stick Duo" containing them into your...
Handycam® Handbook
Page 47
...[USB SELECT] appears on the screen automatically. 4 Touch [ PRINT] (hard disk) or [ PRINT] ("Memory Stick Duo") depending on the media of the... [YES] t . To operate the POWER switch - Press and hold the image on the screen. To remove your camcorder, in the case of a still image to be printed. b Notes • Refer also to the instruction manual of...SIZE]: Select the paper size. To finish printing Touch on again, and restart the operation from your camcorder from the Handycam Station or the printer - b Notes • We can guarantee the operation of only models that...
...[USB SELECT] appears on the screen automatically. 4 Touch [ PRINT] (hard disk) or [ PRINT] ("Memory Stick Duo") depending on the media of the... [YES] t . To operate the POWER switch - Press and hold the image on the screen. To remove your camcorder, in the case of a still image to be printed. b Notes • Refer also to the instruction manual of...SIZE]: Select the paper size. To finish printing Touch on again, and restart the operation from your camcorder from the Handycam Station or the printer - b Notes • We can guarantee the operation of only models that...

Handycam® Handbook
Page 53
Customizing your camcorder List of the (SETTINGS) category items MOVIE SETTINGS (p. 54) Items Page REC MODE 54 NIGHTSHOT LIGHT 54 WIDE SELECT*1 54 DIGITAL ZOOM 55 STEADYSHOT 55 ...*4 63 GENERAL SET (p. 64) Items Page DEMO MODE 64 CALIBRATION 115 A.SHUT OFF 64 REMOTE CTRL*3 64 DROP SENSOR 64 *1 DCR-SR32E/SR33E/SR42E *2 DCR-SR190E/SR200E/SR290E/SR300E *3 DCR-SR52E/SR62E/SR72E/SR82E/SR190E/ SR200E/SR290E/SR300E *4 You can set these items also during Easy Handycam operation (p. 20). *5 DCR-SR290E/SR300E *6 [SOUND SETTINGS] (during Easy...
Customizing your camcorder List of the (SETTINGS) category items MOVIE SETTINGS (p. 54) Items Page REC MODE 54 NIGHTSHOT LIGHT 54 WIDE SELECT*1 54 DIGITAL ZOOM 55 STEADYSHOT 55 ...*4 63 GENERAL SET (p. 64) Items Page DEMO MODE 64 CALIBRATION 115 A.SHUT OFF 64 REMOTE CTRL*3 64 DROP SENSOR 64 *1 DCR-SR32E/SR33E/SR42E *2 DCR-SR190E/SR200E/SR290E/SR300E *3 DCR-SR52E/SR62E/SR72E/SR82E/SR190E/ SR200E/SR290E/SR300E *4 You can set these items also during Easy Handycam operation (p. 20). *5 DCR-SR290E/SR300E *6 [SOUND SETTINGS] (during Easy...

Handycam® Handbook
Page 65
... the time. • Some items appear without a tab. • The OPTION MENU cannot be used during Easy Handycam operation. Various functions are displayed in the context of your camcorder 65 If you cannot find the desired item, touch another tab. When the item you right-click the mouse on a computer. b Notes •...-up window that appear on the screen depend on the recording/playback status of the operation. Tab 2 Touch the desired item. Activating functions using your camcorder, touch (OPTION) on the screen. (OPTION) 3 Change the setting, then touch .
... the time. • Some items appear without a tab. • The OPTION MENU cannot be used during Easy Handycam operation. Various functions are displayed in the context of your camcorder 65 If you cannot find the desired item, touch another tab. When the item you right-click the mouse on a computer. b Notes •...-up window that appear on the screen depend on the recording/playback status of the operation. Tab 2 Touch the desired item. Activating functions using your camcorder, touch (OPTION) on the screen. (OPTION) 3 Change the setting, then touch .

Handycam® Handbook
Page 73
... Main functions x Creating a DVD using a computer. x Deleting images recorded on the hard disk of your camcorder by a computer (DCR-SR42E/SR62E/ SR82E/SR200E/SR300E) (p. 85) You can delete images recorded on the hard disk of your camcorder by using the One Touch Disc Burn function (p. 77) You can save images recorded ...on the hard disk of your camcorder on a DVD by date, and select images you want to view as it is not compatible with movies included in a Playlist on your Handycam Station (One Touch Disc Burn function). x Copying a DVD t...
... Main functions x Creating a DVD using a computer. x Deleting images recorded on the hard disk of your camcorder by a computer (DCR-SR42E/SR62E/ SR82E/SR200E/SR300E) (p. 85) You can delete images recorded on the hard disk of your camcorder by using the One Touch Disc Burn function (p. 77) You can save images recorded ...on the hard disk of your camcorder on a DVD by date, and select images you want to view as it is not compatible with movies included in a Playlist on your Handycam Station (One Touch Disc Burn function). x Copying a DVD t...
Handycam® Handbook
Page 75
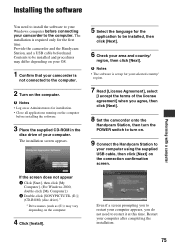
... before connecting your computer appears, you agree, then click [Next]. 8 Set the camcorder onto the Handycam Station, then turn the POWER switch to turn on. 9 Connect the Handycam Station to your computer after completing the installation. 75 The installation is set up for...Start], then click [My Computer]. (For Windows 2000, double-click [My Computer].) 2 Double-click [SONYPICTUTIL (E:)] (CD-ROM) (disc drive).* * Drive names (such as Administrators for the application to be installed and procedures may vary depending on the connection confirmation screen. b Notes • ...
... before connecting your computer appears, you agree, then click [Next]. 8 Set the camcorder onto the Handycam Station, then turn the POWER switch to turn on. 9 Connect the Handycam Station to your computer after completing the installation. 75 The installation is set up for...Start], then click [My Computer]. (For Windows 2000, double-click [My Computer].) 2 Double-click [SONYPICTUTIL (E:)] (CD-ROM) (disc drive).* * Drive names (such as Administrators for the application to be installed and procedures may vary depending on the connection confirmation screen. b Notes • ...


