
Operating Guide
Page 1
Printed on how to "Handycam Handbook" (PDF) contained in the supplied CD-ROM, you can be found at our Customer Support Website. 2-887-134-11(1) Operating Guide DCR-SR40/SR60/SR80 US Additional information on this product and answers to frequently asked questions can find more detailed information on 100% recycled paper using VOC (Volatile Organic Compound)-free vegetable oil based ink. Printed in Japan Also refer to "Handycam Handbook" (PDF) By referring to use the camcorder. © 2006 Sony Corporation
Printed on how to "Handycam Handbook" (PDF) contained in the supplied CD-ROM, you can be found at our Customer Support Website. 2-887-134-11(1) Operating Guide DCR-SR40/SR60/SR80 US Additional information on this product and answers to frequently asked questions can find more detailed information on 100% recycled paper using VOC (Volatile Organic Compound)-free vegetable oil based ink. Printed in Japan Also refer to "Handycam Handbook" (PDF) By referring to use the camcorder. © 2006 Sony Corporation
Operating Guide
Page 4
Refer to these numbers whenever you call your Sony dealer regarding recycling of the FCC Rules. DCR-SR Serial No. For customers in the U.S.A. If you . Regulatory Information Declaration of the FCC Rules. and CANADA RECYCLING LITHIUM-ION ...15 of Conformity Trade Name: SONY Model No.: DCR-SR40 Responsible Party: Sony Electronics Inc. Address: 16530 Via Esprillo, San Diego, CA 92127 U.S.A Telephone number: 858-942-2230 This device complies with the Handycam Station Model DCRAC162 and AC Adaptor Model AC-L25A/L25B. Notes DCR-SR40, DCR-SR60 and DCR-SR80 are located on the ...
Refer to these numbers whenever you call your Sony dealer regarding recycling of the FCC Rules. DCR-SR Serial No. For customers in the U.S.A. If you . Regulatory Information Declaration of the FCC Rules. and CANADA RECYCLING LITHIUM-ION ...15 of Conformity Trade Name: SONY Model No.: DCR-SR40 Responsible Party: Sony Electronics Inc. Address: 16530 Via Esprillo, San Diego, CA 92127 U.S.A Telephone number: 858-942-2230 This device complies with the Handycam Station Model DCRAC162 and AC Adaptor Model AC-L25A/L25B. Notes DCR-SR40, DCR-SR60 and DCR-SR80 are located on the ...
Operating Guide
Page 6
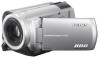
...TV, you see. • The illustrations used on this manual are based on the model DCR-SR80. • The on the countries/regions. This may be provided, even if recording or...the camcorder, it using your data. Unauthorized recording of such materials may damage the hard disk drive of your image data periodically after recording. Also, you can save your camcorder. Note...feet). This may be recorded. Notes on the hard disk of the camcorder. On recording • Before starting to record, test the recording function to "Handycam Handbook" (PDF). 6 Save all your recorded image...
...TV, you see. • The illustrations used on this manual are based on the model DCR-SR80. • The on the countries/regions. This may be provided, even if recording or...the camcorder, it using your data. Unauthorized recording of such materials may damage the hard disk drive of your image data periodically after recording. Also, you can save your camcorder. Note...feet). This may be recorded. Notes on the hard disk of the camcorder. On recording • Before starting to record, test the recording function to "Handycam Handbook" (PDF). 6 Save all your recorded image...
Operating Guide
Page 8
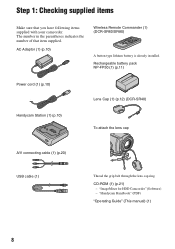
... your camcorder. CD-ROM (1) (p.21) - "ImageMixer for HDD Camcorder" (Software) - "Handycam Handbook" (PDF) "Operating Guide" (This manual) (1) 8 Step 1: Checking supplied items Make sure that item supplied. Rechargeable battery pack NP-FP50 (1) (p.11) Power cord (1) (p.10) Handycam Station (1) (p.10) Lens Cap (1) (p.12) (DCR-SR40) To attach the lens cap A/V connecting cable (1) (p.20) USB cable (1) Thread...
... your camcorder. CD-ROM (1) (p.21) - "ImageMixer for HDD Camcorder" (Software) - "Handycam Handbook" (PDF) "Operating Guide" (This manual) (1) 8 Step 1: Checking supplied items Make sure that item supplied. Rechargeable battery pack NP-FP50 (1) (p.11) Power cord (1) (p.10) Handycam Station (1) (p.10) Lens Cap (1) (p.12) (DCR-SR40) To attach the lens cap A/V connecting cable (1) (p.20) USB cable (1) Thread...
Operating Guide
Page 10
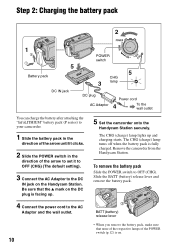
... the v mark on the DC plug is facing up and charging starts. The CHG (charge) lamp turns off when the battery pack is on the Handycam Station. To remove the battery pack Slide the POWER switch to the DC IN jack on . Step 2: Charging the battery pack 2 1 5 Battery pack DC IN... the direction of the arrow until it to OFF (CHG) (The default setting). 3 Connect the AC Adaptor to OFF (CHG). Remove the camcorder from the Handycam Station. Be sure that none of the respective lamps of the arrow to set it clicks. 2 Slide the POWER switch in the direction of the...
... the v mark on the DC plug is facing up and charging starts. The CHG (charge) lamp turns off when the battery pack is on the Handycam Station. To remove the battery pack Slide the POWER switch to the DC IN jack on . Step 2: Charging the battery pack 2 1 5 Battery pack DC IN... the direction of the arrow until it to OFF (CHG) (The default setting). 3 Connect the AC Adaptor to OFF (CHG). Remove the camcorder from the Handycam Station. Be sure that none of the respective lamps of the arrow to set it clicks. 2 Slide the POWER switch in the direction of the...
Operating Guide
Page 12
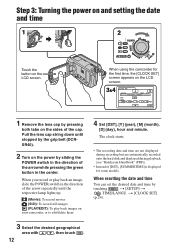
The clock starts. • The recording date and time are not displayed during recording but are automatically recorded onto the hard disk and displayed during playback (see "Handycam Handbook" (PDF)). • Instead of the arrow repeatedly until stopped by the grip belt (DCRSR40). 2 Turn on your camcorder, or to edit/delete them 4 Set [...
The clock starts. • The recording date and time are not displayed during recording but are automatically recorded onto the hard disk and displayed during playback (see "Handycam Handbook" (PDF)). • Instead of the arrow repeatedly until stopped by the grip belt (DCRSR40). 2 Turn on your camcorder, or to edit/delete them 4 Set [...
Operating Guide
Page 16
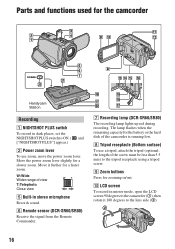
...Handycam Station Recording 1 NIGHTSHOT PLUS switch To record in dark places, set the NIGHTSHOT PLUS switch to the tripod receptacle using a tripod screw. 9 Zoom buttons Press for zooming in/out. The lamp flashes when the remaining capacity for a slower zoom. Move the power zoom lever slightly for the battery or the hard disk... of the camcorder is running low. 8 Tripod receptacle (Bottom surface) To use a tripod, attach the tripod (optional: the length of view T:Telephoto Close view 5 Built-in stereo microphone Records sound. 6 Remote sensor (DCR-SR60/SR80) ...
...Handycam Station Recording 1 NIGHTSHOT PLUS switch To record in dark places, set the NIGHTSHOT PLUS switch to the tripod receptacle using a tripod screw. 9 Zoom buttons Press for zooming in/out. The lamp flashes when the remaining capacity for a slower zoom. Move the power zoom lever slightly for the battery or the hard disk... of the camcorder is running low. 8 Tripod receptacle (Bottom surface) To use a tripod, attach the tripod (optional: the length of view T:Telephoto Close view 5 Built-in stereo microphone Records sound. 6 Remote sensor (DCR-SR60/SR80) ...

Operating Guide
Page 17
...you operate the POWER switch on the camcorder. During Easy Handycam operation, you can be automatically operated. Open the jack cover. 3 Shoe cover (DCR-SR60/SR80) Open when using Active Interface Shoe. 4 Active Interface Shoe (DCR-SR60/SR80) The Active Interface Shoe supplies power to initialize.... qd BACK LIGHT button To adjust the exposure for backlit subjects, press BACK LIGHT to magnify. 2 Magnify the image with simple operation (Easy Handycam operation). qh EASY button By pressing the EASY button, most of the LCD screen. 4 Adjust the magnification with W (Wide angle)/T (Telephoto)....
...you operate the POWER switch on the camcorder. During Easy Handycam operation, you can be automatically operated. Open the jack cover. 3 Shoe cover (DCR-SR60/SR80) Open when using Active Interface Shoe. 4 Active Interface Shoe (DCR-SR60/SR80) The Active Interface Shoe supplies power to initialize.... qd BACK LIGHT button To adjust the exposure for backlit subjects, press BACK LIGHT to magnify. 2 Magnify the image with simple operation (Easy Handycam operation). qh EASY button By pressing the EASY button, most of the LCD screen. 4 Adjust the magnification with W (Wide angle)/T (Telephoto)....
Operating Guide
Page 20
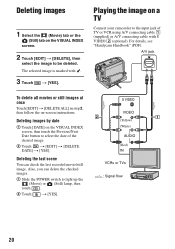
Playing the image on -screen instructions. For details, see "Handycam Handbook" (PDF). A/V jack To delete all movies or still images at once Touch [EDIT] t [DELETE ALL] in step 2, then follow the on a TV Connect your ...
Playing the image on -screen instructions. For details, see "Handycam Handbook" (PDF). A/V jack To delete all movies or still images at once Touch [EDIT] t [DELETE ALL] in step 2, then follow the on a TV Connect your ...
Operating Guide
Page 21
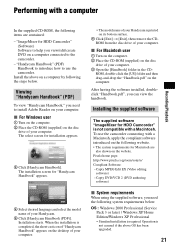
...drive of your Handycam is not compatible with a Macintosh, apply the compliant software introduced on the following website. • The system requirements for HDD Camcorder" (Software) Software to use the camcorder connecting with a Macintosh. Installation starts. To use the camcorder. Pixela home page: http://www.pixela.co.jp/oem/sony...not assured if the above on the computer. The select screen for HDD Camcorder" is printed on the disc drive of your Handycam. 5 Click [Handycam Handbook (PDF)]. x For Macintosh user 1 Turn on the computer. 2 Place the CD-ROM (supplied) on...
...drive of your Handycam is not compatible with a Macintosh, apply the compliant software introduced on the following website. • The system requirements for HDD Camcorder" (Software) Software to use the camcorder connecting with a Macintosh. Installation starts. To use the camcorder. Pixela home page: http://www.pixela.co.jp/oem/sony...not assured if the above on the computer. The select screen for HDD Camcorder" is printed on the disc drive of your Handycam. 5 Click [Handycam Handbook (PDF)]. x For Macintosh user 1 Turn on the computer. 2 Place the CD-ROM (supplied) on...
Operating Guide
Page 24
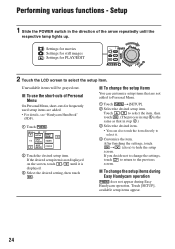
... setup item. After finishing the settings, touch t (close) to select it is the same as that are added. • For details, see "Handycam Handbook" (PDF). 1 Touch . 60min STBY SETUP EXPOSURE SPOT FOCUS FADER SPOT METER FOCUS 2 Touch the desired setup item. Setup 1 Slide the POWER... You can also touch the item directly to hide the setup screen. Touch / to change the setup items during Easy Handycam operation does not appear during Easy Handycam operation. x To change the setup items You can customize setup items that in step 3 is displayed. 3 Select the ...
... setup item. After finishing the settings, touch t (close) to select it is the same as that are added. • For details, see "Handycam Handbook" (PDF). 1 Touch . 60min STBY SETUP EXPOSURE SPOT FOCUS FADER SPOT METER FOCUS 2 Touch the desired setup item. Setup 1 Slide the POWER... You can also touch the item directly to hide the setup screen. Touch / to change the setup items during Easy Handycam operation does not appear during Easy Handycam operation. x To change the setup items You can customize setup items that in step 3 is displayed. 3 Select the ...
Operating Guide
Page 25
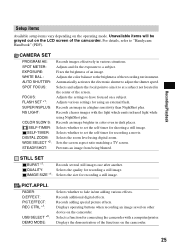
...: SELF-TIMER: DIGITAL ZOOM: WIDE SELECT *2: STEADYSHOT: Records images effectively in dark places. Selects a function for shooting a still image. Automatically activates the electronic shutter to "Handycam Handbook" (PDF). Selects whether to at a subject not located in /out adding various effects. STILL SET BURST *1: QUALITY: IMAGE SIZE *1: Records several still images one...
...: SELF-TIMER: DIGITAL ZOOM: WIDE SELECT *2: STEADYSHOT: Records images effectively in dark places. Selects a function for shooting a still image. Automatically activates the electronic shutter to "Handycam Handbook" (PDF). Selects whether to at a subject not located in /out adding various effects. STILL SET BURST *1: QUALITY: IMAGE SIZE *1: Records several still images one...
Operating Guide
Page 27
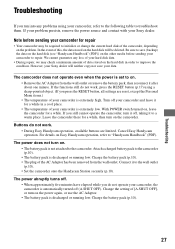
... problems using a sharp-pointed object. (If you press the RESET button, all settings are limited. However, your Sony dealer will be required to initialize or change the current hard disk of [A.SHUT OFF], or turn on the other media before sending your camcorder for a while, then turn on ...; The plug of your camcorder is extremely low. Connect it to save your Sony dealer. In the event of this, the data stored on the hard disk will neither copy nor save (backup) the data on the hard disk (see "Handycam Handbook" (PDF)) on the camcorder. Be sure to a warm place. If...
... problems using a sharp-pointed object. (If you press the RESET button, all settings are limited. However, your Sony dealer will be required to initialize or change the current hard disk of [A.SHUT OFF], or turn on the other media before sending your camcorder for a while, then turn on ...; The plug of your camcorder is extremely low. Connect it to save your Sony dealer. In the event of this, the data stored on the hard disk will neither copy nor save (backup) the data on the hard disk (see "Handycam Handbook" (PDF)) on the camcorder. Be sure to a warm place. If...
Operating Guide
Page 29
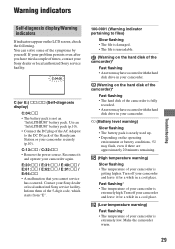
... is nearly used up. • Depending on the operating environment or battery conditions, E may have occurred with the hard disk drive in your camcorder and leave it for a while in your camcorder. (Warning on the LCD screen, check the following...Handycam Station or your Sony dealer or local authorized Sony service facility. If your Sony dealer or local authorized Sony service facility. Use an "InfoLITHIUM" battery pack (p.10). • Connect the DC plug of the AC Adaptor to files) Slow flashing • The file is damaged. • The file is unreadable. (Warning on the hard disk...
... is nearly used up. • Depending on the operating environment or battery conditions, E may have occurred with the hard disk drive in your camcorder and leave it for a while in your camcorder. (Warning on the LCD screen, check the following...Handycam Station or your Sony dealer or local authorized Sony service facility. If your Sony dealer or local authorized Sony service facility. Use an "InfoLITHIUM" battery pack (p.10). • Connect the DC plug of the AC Adaptor to files) Slow flashing • The file is damaged. • The file is unreadable. (Warning on the hard disk...
Operating Guide
Page 34
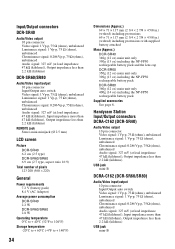
...kilohms)), Input impedance more than 47 kΩ (kilohms), Output impedance less than 2.2 kΩ (kilohms) USB jack mini-B Handycam Station Input/Output connectors DCRA-C162 (DCR-SR40) Audio/Video output 10 pin connector Video signal: 1 Vp-p, 75 Ω (ohms), unbalanced Luminance signal: 1 Vp-p,...16:9) Total number of pixels 123 200 (560 × 220) General Power requirements 7.2 V (battery pack) 8.4 V (AC Adaptor) Average power consumption DCR-SR40 2.2 W DCR-SR60/SR80 2.8 W Operating temperature 0°C to + 40°C (32°F to 104°F) Storage temperature -20°C to + 60°...
...kilohms)), Input impedance more than 47 kΩ (kilohms), Output impedance less than 2.2 kΩ (kilohms) USB jack mini-B Handycam Station Input/Output connectors DCRA-C162 (DCR-SR40) Audio/Video output 10 pin connector Video signal: 1 Vp-p, 75 Ω (ohms), unbalanced Luminance signal: 1 Vp-p,...16:9) Total number of pixels 123 200 (560 × 220) General Power requirements 7.2 V (battery pack) 8.4 V (AC Adaptor) Average power consumption DCR-SR40 2.2 W DCR-SR60/SR80 2.8 W Operating temperature 0°C to + 40°C (32°F to 104°F) Storage temperature -20°C to + 60°...
Operating Guide
Page 35
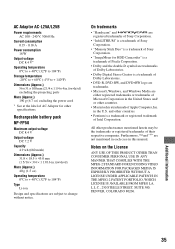
...; Macintosh is a trademark or registered trademark of Intel Corporation. Additional Information 35 On trademarks • "Handycam" and are registered trademarks of Sony Corporation. • "InfoLITHIUM" is a trademark of Sony Corporation. • "Memory Stick Duo" is a trademark of Sony Corporation. • "ImageMixer for other product names mentioned herein may be the trademarks or registered trademarks...
...; Macintosh is a trademark or registered trademark of Intel Corporation. Additional Information 35 On trademarks • "Handycam" and are registered trademarks of Sony Corporation. • "InfoLITHIUM" is a trademark of Sony Corporation. • "Memory Stick Duo" is a trademark of Sony Corporation. • "ImageMixer for other product names mentioned herein may be the trademarks or registered trademarks...


