
Operating Guide
Page 7
... may damage the hard disk drive of the camcorder may not be recognized, or recording or playback may not operate correctly. See "Precautions" (p.34). • To prevent the hard disk from being broken ..., when you dispose of the POWER switch (p.13) or the access lamp* is on DCR-SR300. • The screenshots are recorded without notice. • Unless otherwise specially indicated,... camcorder may not delete data from the camcorder. - In addition to "Handycam Handbook" (PDF). 7 Note on using a computer. If you destroy the actual body of the camcorder using the camcorder at...
... may damage the hard disk drive of the camcorder may not be recognized, or recording or playback may not operate correctly. See "Precautions" (p.34). • To prevent the hard disk from being broken ..., when you dispose of the POWER switch (p.13) or the access lamp* is on DCR-SR300. • The screenshots are recorded without notice. • Unless otherwise specially indicated,... camcorder may not delete data from the camcorder. - In addition to "Handycam Handbook" (PDF). 7 Note on using a computer. If you destroy the actual body of the camcorder using the camcorder at...

Operating Guide
Page 9
... your camcorder. AC Adaptor (1) (p.11) Power cord (1) (p.11) Wireless Remote Commander (1) (except for DCR-SR42) A button-type lithium battery is already installed. Handycam Handbook (PDF) "Operating Guide" (This manual) (1) 9 Getting Started Step 1: Checking supplied items Make sure that item supplied. Rechargeable battery pack NP-FH40 (1) (p.11) (DCR-SR42/SR62/ SR82) NP-FH60 (1) (p.11) (DCR-SR200/SR300) Handycam...
... your camcorder. AC Adaptor (1) (p.11) Power cord (1) (p.11) Wireless Remote Commander (1) (except for DCR-SR42) A button-type lithium battery is already installed. Handycam Handbook (PDF) "Operating Guide" (This manual) (1) 9 Getting Started Step 1: Checking supplied items Make sure that item supplied. Rechargeable battery pack NP-FH40 (1) (p.11) (DCR-SR42/SR62/ SR82) NP-FH60 (1) (p.11) (DCR-SR200/SR300) Handycam...
Operating Guide
Page 11
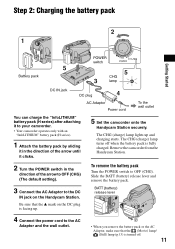
The CHG (charge) lamp turns off . 11 Remove the camcorder from the Handycam Station. 2 Turn the POWER switch in the direction of ... wall outlet You can charge the "InfoLITHIUM" battery pack (H series) after attaching it to your camcorder. • Your camcorder operates only with an "InfoLITHIUM" battery pack (H series). 1 Attach the battery pack by sliding... it in the direction of the arrow until it clicks. 5 Set the camcorder onto the Handycam Station securely. Slide the BATT (battery) release lever and remove the battery pack. Be sure that the (Movie...
The CHG (charge) lamp turns off . 11 Remove the camcorder from the Handycam Station. 2 Turn the POWER switch in the direction of ... wall outlet You can charge the "InfoLITHIUM" battery pack (H series) after attaching it to your camcorder. • Your camcorder operates only with an "InfoLITHIUM" battery pack (H series). 1 Attach the battery pack by sliding... it in the direction of the arrow until it clicks. 5 Set the camcorder onto the Handycam Station securely. Slide the BATT (battery) release lever and remove the battery pack. Be sure that the (Movie...

Operating Guide
Page 12
...the POWER switch to the wall outlet via the AC Adaptor. This may cause a malfunction. • Even if your camcorder or the Handycam Station, even when the power cord is disconnected from the wall outlet immediately if any metallic objects. NP-FH40: (Unit:min....) DCR-SR200 DCR-SR300 Charging time 135 135 Recording time*1 Continuous recording time 115*2 120*3 95*2 100*3 Typical 55*2 45*2 recording time*4 60*3 50*3 Playback time*2 165 160 *1 When [REC MODE] is recommended). • The available recording and playback time will be shorter when you use your camcorder. ...
...the POWER switch to the wall outlet via the AC Adaptor. This may cause a malfunction. • Even if your camcorder or the Handycam Station, even when the power cord is disconnected from the wall outlet immediately if any metallic objects. NP-FH40: (Unit:min....) DCR-SR200 DCR-SR300 Charging time 135 135 Recording time*1 Continuous recording time 115*2 120*3 95*2 100*3 Typical 55*2 45*2 recording time*4 60*3 50*3 Playback time*2 165 160 *1 When [REC MODE] is recommended). • The available recording and playback time will be shorter when you use your camcorder. ...

Operating Guide
Page 16
... to save still images, then touch . Do not shake or knock your camcorder is reading/writing data. For details, see "Handycam Handbook" (PDF). You can check the free hard disk space by Sony Corporation. • You can use some buttons/functions during movie recording (DCR-SR200/ SR300). • The maximum continuous recordable time is approximately 13 hours...
... to save still images, then touch . Do not shake or knock your camcorder is reading/writing data. For details, see "Handycam Handbook" (PDF). You can check the free hard disk space by Sony Corporation. • You can use some buttons/functions during movie recording (DCR-SR200/ SR300). • The maximum continuous recordable time is approximately 13 hours...
Operating Guide
Page 19
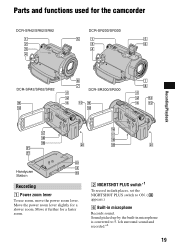
Move the power zoom lever slightly for the camcorder DCR-SR42/SR62/SR82 DCR-SR200/SR300 DCR-SR42/SR62/SR82 DCR-SR200/SR300 Recording/Playback Handycam Station Recording 1 Power zoom lever To use zoom, move the power zoom lever. Move it further for a faster zoom. 2 NIGHTSHOT PLUS switch*1 To record in microphone Records sound. Sound picked up by the built-in microphone is converted to ON. ( appears.) 6 Built-in dark places, set the NIGHTSHOT PLUS switch to 5.1ch surround sound and recorded.*2 19 Parts and functions used for a slower zoom.
Move the power zoom lever slightly for the camcorder DCR-SR42/SR62/SR82 DCR-SR200/SR300 DCR-SR42/SR62/SR82 DCR-SR200/SR300 Recording/Playback Handycam Station Recording 1 Power zoom lever To use zoom, move the power zoom lever. Move it further for a faster zoom. 2 NIGHTSHOT PLUS switch*1 To record in microphone Records sound. Sound picked up by the built-in microphone is converted to ON. ( appears.) 6 Built-in dark places, set the NIGHTSHOT PLUS switch to 5.1ch surround sound and recorded.*2 19 Parts and functions used for a slower zoom.
Operating Guide
Page 21
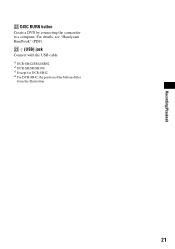
wd (USB) jack Connect with the USB cable. *1 DCR-SR42/SR62/SR82 *2 DCR-SR200/SR300 *3 Except for DCR-SR42 *4 For DCR-SR42, the position of the buttons differ from the illustration. 21 Recording/Playback ws DISC BURN button Create a DVD by connecting the camcorder to a computer. For details, see "Handycam Handbook" (PDF).
wd (USB) jack Connect with the USB cable. *1 DCR-SR42/SR62/SR82 *2 DCR-SR200/SR300 *3 Except for DCR-SR42 *4 For DCR-SR42, the position of the buttons differ from the illustration. 21 Recording/Playback ws DISC BURN button Create a DVD by connecting the camcorder to a computer. For details, see "Handycam Handbook" (PDF).

Operating Guide
Page 24
... [ DELETE ALL] t [YES] t [YES] t . 24 For details, see "Handycam Handbook" (PDF). For details, see "Handycam Handbook" (PDF). Creating a DVD with ease. Saving images on a computer You can also edit those images. You can save images recorded on the camcorder on the hard disk of the internal hard disk, make sure that you can save images recorded on...
... [ DELETE ALL] t [YES] t [YES] t . 24 For details, see "Handycam Handbook" (PDF). For details, see "Handycam Handbook" (PDF). Creating a DVD with ease. Saving images on a computer You can also edit those images. You can save images recorded on the camcorder on the hard disk of the internal hard disk, make sure that you can save images recorded on...
Operating Guide
Page 25
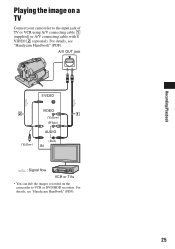
For details, see "Handycam Handbook" (PDF). For details, see "Handycam Handbook" (PDF). 25 A/V OUT jack S VIDEO VIDEO (Yellow) (White) AUDIO (Yellow) (Red) IN : Signal flow VCR or TVs • You can dub the images recorded on a TV Connect your camcorder to VCR or DVD/HDD recorders. Recording/Playback Playing the image on the camcorder to the input jack of TV or VCR using A/V connecting cable 1 (supplied) or A/V connecting cable with S VIDEO 2 (optional).
For details, see "Handycam Handbook" (PDF). For details, see "Handycam Handbook" (PDF). 25 A/V OUT jack S VIDEO VIDEO (Yellow) (White) AUDIO (Yellow) (Red) IN : Signal flow VCR or TVs • You can dub the images recorded on a TV Connect your camcorder to VCR or DVD/HDD recorders. Recording/Playback Playing the image on the camcorder to the input jack of TV or VCR using A/V connecting cable 1 (supplied) or A/V connecting cable with S VIDEO 2 (optional).
Operating Guide
Page 26
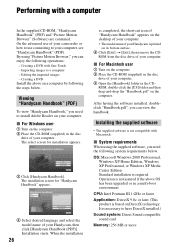
...your computer. 3 Open the [Handbook] folder in the disc drive of your computer. ROM from the disc drive of your computer. Installing the supplied software • The supplied software is completed, the short-cut icon of "Handycam Handbook" appears on a computer by following operations: - Importing..., you can view the handbook. Creating a DVD Install the above OS has been upgraded or in the disc drive of your camcorder or how to your Handycam, then click [Handycam Handbook (PDF)]. Installation starts. x For Macintosh user 1 Turn on the computer. ROM, double-click the [US...
...your computer. 3 Open the [Handbook] folder in the disc drive of your computer. ROM from the disc drive of your computer. Installing the supplied software • The supplied software is completed, the short-cut icon of "Handycam Handbook" appears on a computer by following operations: - Importing..., you can view the handbook. Creating a DVD Install the above OS has been upgraded or in the disc drive of your camcorder or how to your Handycam, then click [Handycam Handbook (PDF)]. Installation starts. x For Macintosh user 1 Turn on the computer. ROM, double-click the [US...

Operating Guide
Page 27
...drive that your camcorder is set up for your selected country/region. 7 Read [License Agreement], select [I accept the terms of the license agreement] when you agree, then click [Next]. 8 Set the camcorder onto the Handycam Station, then turn the POWER switch to turn on. 9 Connect the Handycam... movies, resulting in a computer environment where the operations are not guaranteed, even on the connection confirmation screen. Recording/Playback Hard disk: Available free hard disk space for installation required: Approximately 600 MB (for creating a DVD, 5 GB or more may be required) Display: ...
...drive that your camcorder is set up for your selected country/region. 7 Read [License Agreement], select [I accept the terms of the license agreement] when you agree, then click [Next]. 8 Set the camcorder onto the Handycam Station, then turn the POWER switch to turn on. 9 Connect the Handycam... movies, resulting in a computer environment where the operations are not guaranteed, even on the connection confirmation screen. Recording/Playback Hard disk: Available free hard disk space for installation required: Approximately 600 MB (for creating a DVD, 5 GB or more may be required) Display: ...

Operating Guide
Page 28
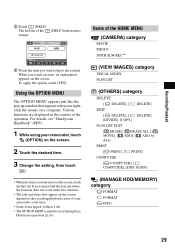
.../registration/di/ • For the information about Picture Motion Browser, visit the following URL: http://www.sony.net/support-disoft/ Performing various functions - To see "Handycam Handbook" (PDF). After you install the software, a shortcut icon for the customers registration website is not on -... recording/playback situation. q; qa Remove the CD-ROM from the disc drive of each item on the website, you register on the HOME MENU (HELP) 1 Press (HOME). 28 For details, see "Handycam Handbook" (PDF). 1 Turn on your camcorder, then press (HOME) A (or B). 2 Touch the desired setup...
.../registration/di/ • For the information about Picture Motion Browser, visit the following URL: http://www.sony.net/support-disoft/ Performing various functions - To see "Handycam Handbook" (PDF). After you install the software, a shortcut icon for the customers registration website is not on -... recording/playback situation. q; qa Remove the CD-ROM from the disc drive of each item on the website, you register on the HOME MENU (HELP) 1 Press (HOME). 28 For details, see "Handycam Handbook" (PDF). 1 Turn on your camcorder, then press (HOME) A (or B). 2 Touch the desired setup...
Operating Guide
Page 29
...situation. • The tabs and items that appears when you want to know the content. Items of the operation. For details, see "Handycam Handbook" (PDF). 1 While using your camcorder at the time. • Some items appear without a tab. • The OPTION MENU cannot be used during Easy... Handycam operation (p.16). Recording/Playback 2 Touch (HELP). When you want is not on the screen. Various functions are displayed in the context of...
...situation. • The tabs and items that appears when you want to know the content. Items of the operation. For details, see "Handycam Handbook" (PDF). 1 While using your camcorder at the time. • Some items appear without a tab. • The OPTION MENU cannot be used during Easy... Handycam operation (p.16). Recording/Playback 2 Touch (HELP). When you want is not on the screen. Various functions are displayed in the context of...

Operating Guide
Page 31
..." (PDF). You cannot make new recording during this , the data stored on Easy Handycam operation, refer to troubleshoot the problem. However, your Sony dealer will be required to initialize or change the current hard disk of your camcorder, use the AC Adaptor. • Charge the battery pack (p.11). If the problem persists, disconnect the power...
..." (PDF). You cannot make new recording during this , the data stored on Easy Handycam operation, refer to troubleshoot the problem. However, your Sony dealer will be required to initialize or change the current hard disk of your camcorder, use the AC Adaptor. • Charge the battery pack (p.11). If the problem persists, disconnect the power...

Operating Guide
Page 32
Lights appear on the screen even if the lens cover is closed (DCR-SR42/ SR62/SR82). • When you turn on your camcorder while the lens cover is unreadable. 32 Self-diagnosis display/Warning indicators If indicators appear on the screen. Some symptoms you cannot ... the 5-digit code, which starts from "E." 101-0001 (Warning indicator pertaining to the DC IN jack of the Handycam Station or your Sony dealer or local authorized Sony service facility. For details, see "Handycam Handbook" (PDF). If the problem persists even after you cannot activate simultaneously. C:04:00 C:(or E:) ss:ss...
Lights appear on the screen even if the lens cover is closed (DCR-SR42/ SR62/SR82). • When you turn on your camcorder while the lens cover is unreadable. 32 Self-diagnosis display/Warning indicators If indicators appear on the screen. Some symptoms you cannot ... the 5-digit code, which starts from "E." 101-0001 (Warning indicator pertaining to the DC IN jack of the Handycam Station or your Sony dealer or local authorized Sony service facility. For details, see "Handycam Handbook" (PDF). If the problem persists even after you cannot activate simultaneously. C:04:00 C:(or E:) ss:ss...


