
Operating Guide
Page 3
... place the set yourself as opening or removing covers may result in the operating instructions. This will often require extensive work by the manufacturer. When the set due to direct sunlight. Never cover the slots and openings with water for service. If the set from the appliance. Adjust only those controls that the set does not operate normally when following conditions: - Power-Cord Protection Route the power cord so...
... place the set yourself as opening or removing covers may result in the operating instructions. This will often require extensive work by the manufacturer. When the set due to direct sunlight. Never cover the slots and openings with water for service. If the set from the appliance. Adjust only those controls that the set does not operate normally when following conditions: - Power-Cord Protection Route the power cord so...
Operating Guide
Page 5
... number: 858-942-2230 This device complies with the limits for help. Connect the equipment into an outlet on , the user is subject to operate this device must accept any changes or modifications not expressly approved in a residential installation. The supplied interface cable must accept any interference received, including interference that may cause undesired operation. Declaration of Conformity Trade Name: SONY Model No.: DCR...
... number: 858-942-2230 This device complies with the limits for help. Connect the equipment into an outlet on , the user is subject to operate this device must accept any changes or modifications not expressly approved in a residential installation. The supplied interface cable must accept any interference received, including interference that may cause undesired operation. Declaration of Conformity Trade Name: SONY Model No.: DCR...

Operating Guide
Page 7
... record, test the recording function to make sure the image and sound are from Windows XP. Unauthorized recording of your image data periodically, after recording. Also, you can save your data. On the drop sensor • To protect the internal hard disk from being lost , save the image data on a disc such as DVD-R using a computer. to protect the camcorder may be able to record or play back may damage the hard disk drive of your image data using a VCR, or a DVD/HDD recorder...
... record, test the recording function to make sure the image and sound are from Windows XP. Unauthorized recording of your image data periodically, after recording. Also, you can save your data. On the drop sensor • To protect the internal hard disk from being lost , save the image data on a disc such as DVD-R using a computer. to protect the camcorder may be able to record or play back may damage the hard disk drive of your image data using a VCR, or a DVD/HDD recorder...

Operating Guide
Page 9
... battery pack NP-FH40 (1) (p.11) (DCR-SR42/SR62/ SR82) NP-FH60 (1) (p.11) (DCR-SR200/SR300) Handycam Station (1) (p.11) A/V connecting cable (1) (p.25) USB cable (1) (p.27) CD-ROM "Handycam Application Software" (1) (p.26) - Picture Motion Browser (Software) - The number in the parentheses indicates the number of that you have the following items supplied with your camcorder. AC Adaptor (1) (p.11) Power cord (1) (p.11) Wireless Remote Commander (1) (except for DCR-SR42) A button-type lithium battery is already installed. Handycam Handbook (PDF) "Operating Guide" (This manual...
... battery pack NP-FH40 (1) (p.11) (DCR-SR42/SR62/ SR82) NP-FH60 (1) (p.11) (DCR-SR200/SR300) Handycam Station (1) (p.11) A/V connecting cable (1) (p.25) USB cable (1) (p.27) CD-ROM "Handycam Application Software" (1) (p.26) - Picture Motion Browser (Software) - The number in the parentheses indicates the number of that you have the following items supplied with your camcorder. AC Adaptor (1) (p.11) Power cord (1) (p.11) Wireless Remote Commander (1) (except for DCR-SR42) A button-type lithium battery is already installed. Handycam Handbook (PDF) "Operating Guide" (This manual...

Operating Guide
Page 12
... NP-FH60: (Unit:min.) DCR-SR200 DCR-SR300 Charging time 135 135 Recording time*1 Continuous recording time 115*2 120*3 95*2 100*3 Typical 55*2 45*2 recording time*4 60*3 50*3 Playback time*2 165 160 *1 When [REC MODE] is disconnected from the wall outlet. On the battery pack • Before changing the battery pack, turn the POWER switch to OFF (CHG) and turn off and zooming. On the AC Adaptor • Use the nearby wall outlet when...
... NP-FH60: (Unit:min.) DCR-SR200 DCR-SR300 Charging time 135 135 Recording time*1 Continuous recording time 115*2 120*3 95*2 100*3 Typical 55*2 45*2 recording time*4 60*3 50*3 Playback time*2 165 160 *1 When [REC MODE] is disconnected from the wall outlet. On the battery pack • Before changing the battery pack, turn the POWER switch to OFF (CHG) and turn off and zooming. On the AC Adaptor • Use the nearby wall outlet when...
Operating Guide
Page 15
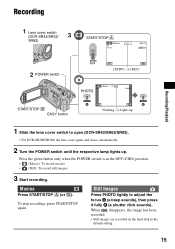
.../STOP A Recording/Playback POWER switch PHOTO [STBY] t [REC] START/STOP B EASY button Flashing t Lights up 1 Slide the lens cover switch to adjust the focus A (a beep sounds), then press it fully B (a shutter click sounds). Still Images Press PHOTO lightly to open (DCR-SR42/SR62/SR82). • For DCR-SR200/SR300, the lens cover opens and closes automatically. 2 Turn the POWER switch until the respective lamp lights up. To stop recording, press START/STOP again. When disappears, the image has been recorded. • Still images are recorded on the hard disk in...
.../STOP A Recording/Playback POWER switch PHOTO [STBY] t [REC] START/STOP B EASY button Flashing t Lights up 1 Slide the lens cover switch to adjust the focus A (a beep sounds), then press it fully B (a shutter click sounds). Still Images Press PHOTO lightly to open (DCR-SR42/SR62/SR82). • For DCR-SR200/SR300, the lens cover opens and closes automatically. 2 Turn the POWER switch until the respective lamp lights up. To stop recording, press START/STOP again. When disappears, the image has been recorded. • Still images are recorded on the hard disk in...

Operating Guide
Page 16
... recording standby mode. To cancel Easy Handycam operation, press EASY again. • You cannot use only a "Memory Stick Duo" marked with the default setting of still images 1 Touch (OPTION) t tab t [STILL MEDIA]. 2 Select the media in the right direction until it means data is lit or flashing, your camcorder, turn the power off, eject the "Memory Stick Duo," or remove the battery pack. For details, see "Handycam Handbook" (PDF). • You can check the free hard disk space by Sony...
... recording standby mode. To cancel Easy Handycam operation, press EASY again. • You cannot use only a "Memory Stick Duo" marked with the default setting of still images 1 Touch (OPTION) t tab t [STILL MEDIA]. 2 Select the media in the right direction until it means data is lit or flashing, your camcorder, turn the power off, eject the "Memory Stick Duo," or remove the battery pack. For details, see "Handycam Handbook" (PDF). • You can check the free hard disk space by Sony...

Operating Guide
Page 20
... mirror mode, open the LCD screen 90 degrees to the camcorder (1), then rotate it 180 degrees to on or off as a video light, a flash, or a microphone. qg Shoulder belt hook Attach the shoulder belt (optional). Playback 1 Power zoom lever q; qh NIGHTSHOT switch*2 To record in /out. w; q; 7 Remote sensor*3 Receive the signal from the Remote Commander. 8 Flash*2 Flashes when using a tripod screw. qs DISP/BATT INFO button You can check the remaining battery. Zoom buttons...
... mirror mode, open the LCD screen 90 degrees to the camcorder (1), then rotate it 180 degrees to on or off as a video light, a flash, or a microphone. qg Shoulder belt hook Attach the shoulder belt (optional). Playback 1 Power zoom lever q; qh NIGHTSHOT switch*2 To record in /out. w; q; 7 Remote sensor*3 Receive the signal from the Remote Commander. 8 Flash*2 Flashes when using a tripod screw. qs DISP/BATT INFO button You can check the remaining battery. Zoom buttons...
Operating Guide
Page 23
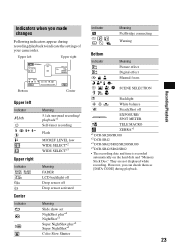
... can check them as [DATA CODE] during recording/playback to indicate the settings of your camcorder. They are not displayed while recording. Backlight n White balance SteadyShot off Drop sensor activated Meaning Slide show set NightShot plus*4 NightShot*1 Super NightShot plus*4 Super NightShot*1 Color Slow Shutter Indicator E Meaning PictBridge connecting Warning Bottom Indicator 9 Meaning Picture effect Digital effect Manual focus SCENE SELECTION . However, you made changes Following indicators appear during playback. 23 Recording/Playback Upper...
... can check them as [DATA CODE] during recording/playback to indicate the settings of your camcorder. They are not displayed while recording. Backlight n White balance SteadyShot off Drop sensor activated Meaning Slide show set NightShot plus*4 NightShot*1 Super NightShot plus*4 Super NightShot*1 Color Slow Shutter Indicator E Meaning PictBridge connecting Warning Bottom Indicator 9 Meaning Picture effect Digital effect Manual focus SCENE SELECTION . However, you made changes Following indicators appear during playback. 23 Recording/Playback Upper...

Operating Guide
Page 24
... internal hard disk of your camcorder. You can save images recorded on the camcorder directly to be deleted. Saving images by connecting your computer on the "Memory Stick Duo," in the "Memory Stick Duo" 1 In step 2, touch [ DELETE]. 2 Touch [ DELETE], then touch the still image to your camcorder to other devices You can save images on the camcorder as a DVD-R or a computer. For details, see "Handycam Handbook" (PDF). Deleting the images on the hard disk 1 On the (HOME MENU), touch (OTHERS) t [DELETE]. 2 Touch [ DELETE]. 3 Touch [ DELETE] (movies) or [ DELETE...
... internal hard disk of your camcorder. You can save images recorded on the camcorder directly to be deleted. Saving images by connecting your computer on the "Memory Stick Duo," in the "Memory Stick Duo" 1 In step 2, touch [ DELETE]. 2 Touch [ DELETE], then touch the still image to your camcorder to other devices You can save images on the camcorder as a DVD-R or a computer. For details, see "Handycam Handbook" (PDF). Deleting the images on the hard disk 1 On the (HOME MENU), touch (OTHERS) t [DELETE]. 2 Touch [ DELETE]. 3 Touch [ DELETE] (movies) or [ DELETE...
Operating Guide
Page 26
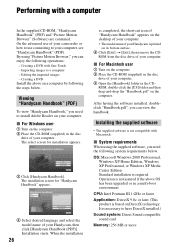
... DirectX installed.) Sound system: Direct Sound compatible sound card Memory: 256 MB or more CPU: Intel Pentium III 1 GHz or faster Application: DirectX 9.0c or later (This product is based on the computer. It is required. Viewing "Handycam Handbook" (PDF) To view "Handycam Handbook," you can enjoy the following the steps below . The installation screen for installation appears. 3 Click [Handycam Handbook]. x For Windows user 1 Turn on the desktop of your computer. • The model...
... DirectX installed.) Sound system: Direct Sound compatible sound card Memory: 256 MB or more CPU: Intel Pentium III 1 GHz or faster Application: DirectX 9.0c or later (This product is based on the computer. It is required. Viewing "Handycam Handbook" (PDF) To view "Handycam Handbook," you can enjoy the following the steps below . The installation screen for installation appears. 3 Click [Handycam Handbook]. x For Windows user 1 Turn on the desktop of your computer. • The model...

Operating Guide
Page 27
... disc drive of your computer after completing the installation. 27 Recording/Playback Hard disk: Available free hard disk space for installation required: Approximately 600 MB (for creating a DVD, 5 GB or more may be required) Display: DirectX 7 or later-compatible video card, Minimum 1024 × 768 dots, High Color (16 bit color) Others: USB port (this time. The sound is reproduced in a computer environment where the operations are not guaranteed, even on the connection...
... disc drive of your computer after completing the installation. 27 Recording/Playback Hard disk: Available free hard disk space for installation required: Approximately 600 MB (for creating a DVD, 5 GB or more may be required) Display: DirectX 7 or later-compatible video card, Minimum 1024 × 768 dots, High Color (16 bit color) Others: USB port (this time. The sound is reproduced in a computer environment where the operations are not guaranteed, even on the connection...

Operating Guide
Page 28
..." (HOME) B (HOME) A (OPTION) Using the HOME MENU You can get secure and useful customer support. If the installation screen appears, follow the instructions to create a DVD - For details, see "Handycam Handbook" (PDF). Microsoft DirectX 9.0c Software required to handle movies Restart the computer if required to change the recording functions and the operating settings for your computer. • For disconnecting the USB cable, see "Handycam Handbook" (PDF). 1 Turn on your camcorder, then press (HOME) A (or...
..." (HOME) B (HOME) A (OPTION) Using the HOME MENU You can get secure and useful customer support. If the installation screen appears, follow the instructions to create a DVD - For details, see "Handycam Handbook" (PDF). Microsoft DirectX 9.0c Software required to handle movies Restart the computer if required to change the recording functions and the operating settings for your computer. • For disconnecting the USB cable, see "Handycam Handbook" (PDF). 1 Turn on your camcorder, then press (HOME) A (or...
Operating Guide
Page 29
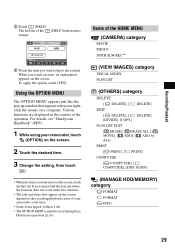
For details, see "Handycam Handbook" (PDF). 1 While using your camcorder at the time. • Some items appear without a tab. • The OPTION MENU cannot be used during Easy Handycam operation (p.16). Various functions are displayed in the context of the HOME MENU (CAMERA) category MOVIE PHOTO SMTH SLW REC*1 (VIEW IMAGES) category VISUAL INDEX PLAYLIST (OTHERS) category DELETE [ DELETE], [ DELETE] EDIT [ DELETE], [ DELETE], [DIVIDE], [COPY] PLAYLIST EDIT [ ERASE], [ ERASE ALL], [ MOVE], [ ADD], [ ADD by date] PRINT [ PRINT], [ PRINT] COMPUTER...
For details, see "Handycam Handbook" (PDF). 1 While using your camcorder at the time. • Some items appear without a tab. • The OPTION MENU cannot be used during Easy Handycam operation (p.16). Various functions are displayed in the context of the HOME MENU (CAMERA) category MOVIE PHOTO SMTH SLW REC*1 (VIEW IMAGES) category VISUAL INDEX PLAYLIST (OTHERS) category DELETE [ DELETE], [ DELETE] EDIT [ DELETE], [ DELETE], [DIVIDE], [COPY] PLAYLIST EDIT [ ERASE], [ ERASE ALL], [ MOVE], [ ADD], [ ADD by date] PRINT [ PRINT], [ PRINT] COMPUTER...
Operating Guide
Page 30
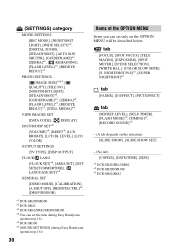
... [WHITE BAL.], [COLOR SLOW SHTR], [S. (SETTINGS) category MOVIE SETTINGS [REC MODE], [NIGHTSHOT LIGHT], [WIDE SELECT]*2, [DIGITAL ZOOM], [STEADYSHOT], [AUTO SLW SHUTTR], [GUIDEFRAME]*1, [ZEBRA]*1, [ REMAINING], [FLASH LEVEL]*1, [REDEYE REDUC]*1 PHOTO SETTINGS [ IMAGE SIZE]*3*4, [ QUALITY], [FILE NO.], [NIGHTSHOT LIGHT], [STEADYSHOT]*5, [GUIDEFRAME]*1, [ZEBRA]*1, [FLASH LEVEL]*3, [REDEYE REDUC]*3, [STILL MEDIA]*4 VIEW IMAGES SET [DATA CODE], [ DISPLAY] SOUND/DISP SET*6 [VOLUME]*4, [BEEP]*4, [LCD BRIGHT], [LCD BL LEVEL], [LCD COLOR] OUTPUT SETTINGS [TV TYPE], [DISP OUTPUT] CLOCK/ LANG [CLOCK SET...
... [WHITE BAL.], [COLOR SLOW SHTR], [S. (SETTINGS) category MOVIE SETTINGS [REC MODE], [NIGHTSHOT LIGHT], [WIDE SELECT]*2, [DIGITAL ZOOM], [STEADYSHOT], [AUTO SLW SHUTTR], [GUIDEFRAME]*1, [ZEBRA]*1, [ REMAINING], [FLASH LEVEL]*1, [REDEYE REDUC]*1 PHOTO SETTINGS [ IMAGE SIZE]*3*4, [ QUALITY], [FILE NO.], [NIGHTSHOT LIGHT], [STEADYSHOT]*5, [GUIDEFRAME]*1, [ZEBRA]*1, [FLASH LEVEL]*3, [REDEYE REDUC]*3, [STILL MEDIA]*4 VIEW IMAGES SET [DATA CODE], [ DISPLAY] SOUND/DISP SET*6 [VOLUME]*4, [BEEP]*4, [LCD BRIGHT], [LCD BL LEVEL], [LCD COLOR] OUTPUT SETTINGS [TV TYPE], [DISP OUTPUT] CLOCK/ LANG [CLOCK SET...

Operating Guide
Page 31
... is because the power has been turned on Easy Handycam operation, refer to recording standby (p.15). • Your camcorder is extremely high. Change the setting of [A.SHUT OFF], or turn on the problem. Set your camcorder to "Handycam Handbook" (PDF). Delete unnecessary images (p.24). Troubleshooting Troubleshooting If you for any problems using a sharppointed object. (If you do not work . • During Easy Handycam operation, available buttons/functions are reset.) • The temperature of your camcorder and leave it...
... is because the power has been turned on Easy Handycam operation, refer to recording standby (p.15). • Your camcorder is extremely high. Change the setting of [A.SHUT OFF], or turn on the problem. Set your camcorder to "Handycam Handbook" (PDF). Delete unnecessary images (p.24). Troubleshooting Troubleshooting If you for any problems using a sharppointed object. (If you do not work . • During Easy Handycam operation, available buttons/functions are reset.) • The temperature of your camcorder and leave it...
Operating Guide
Page 33
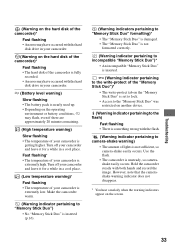
... camera-shake warning) • The amount of lights is unsteady, so camerashake easily occurs. Fast flashing* • The temperature of your camcorder is getting higher. Hold the camcorder steady with the hard disk drive in your camcorder. E (Battery level warning) Slow flashing • The battery pack is nearly used up. • Depending on the operating environment or battery conditions, E may have occurred with both hands and record the image. Troubleshooting...
... camera-shake warning) • The amount of lights is unsteady, so camerashake easily occurs. Fast flashing* • The temperature of your camcorder is getting higher. Hold the camcorder steady with the hard disk drive in your camcorder. E (Battery level warning) Slow flashing • The battery pack is nearly used up. • Depending on the operating environment or battery conditions, E may have occurred with both hands and record the image. Troubleshooting...
Operating Guide
Page 34
... be able to record properly. - Near windows or outdoors, where the LCD screen or the lens may malfunction. If your eyes, wash with the liquid. Be particularly careful of the LCD screen may have it checked by playing back or recording images for a long period of children's reach. x When not using your camcorder, the back of the lens. • Keep the POWER switch setting to OFF (CHG...
... be able to record properly. - Near windows or outdoors, where the LCD screen or the lens may malfunction. If your eyes, wash with the liquid. Be particularly careful of the LCD screen may have it checked by playing back or recording images for a long period of children's reach. x When not using your camcorder, the back of the lens. • Keep the POWER switch setting to OFF (CHG...
Operating Guide
Page 35
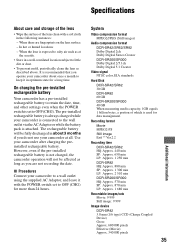
... charged while your camcorder is connected to the wall outlet via the AC Adaptor or while the battery pack is set to OFF (CHG). However, even if the pre-installed rechargeable battery is used for a long time. System Video compression format MPEG2/JPEG (Still images) Audio compression format DCR-SR42/SR62/SR82 Dolby Digital 2ch Dolby Digital Stereo Creator DCR-SR200/SR300 Dolby Digital 2/5.1ch Dolby Digital 5.1 Creator Video signal NTSC color, EIA standards Hard Disk DCR...
... charged while your camcorder is connected to the wall outlet via the AC Adaptor or while the battery pack is set to OFF (CHG). However, even if the pre-installed rechargeable battery is used for a long time. System Video compression format MPEG2/JPEG (Still images) Audio compression format DCR-SR42/SR62/SR82 Dolby Digital 2ch Dolby Digital Stereo Creator DCR-SR200/SR300 Dolby Digital 2/5.1ch Dolby Digital 5.1 Creator Video signal NTSC color, EIA standards Hard Disk DCR...
Operating Guide
Page 37
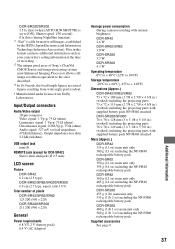
...; (kilohms) USB output jack mini-B REMOTE jack (except for DCR-SR42) Stereo mini-minijack (Ø 2.5 mm) LCD screen Picture DCR-SR42 6.2 cm (2.5 type) DCR-SR62/SR82/SR200/SR300 6.9 cm (2.7 type, aspect ratio 16:9) Total number of Sony's ClearVid CMOS Sensor and image processing system (new Enhanced Imaging Processor) allows still image resolution equivalent to [ON], Shutter speed 1/30 second) 0 lx (lux) (during NightShot function) *1 "Exif" is set to the sizes described. *3 In 16:9 mode, the...
...; (kilohms) USB output jack mini-B REMOTE jack (except for DCR-SR42) Stereo mini-minijack (Ø 2.5 mm) LCD screen Picture DCR-SR42 6.2 cm (2.5 type) DCR-SR62/SR82/SR200/SR300 6.9 cm (2.7 type, aspect ratio 16:9) Total number of Sony's ClearVid CMOS Sensor and image processing system (new Enhanced Imaging Processor) allows still image resolution equivalent to [ON], Shutter speed 1/30 second) 0 lx (lux) (during NightShot function) *1 "Exif" is set to the sizes described. *3 In 16:9 mode, the...


