
Operating Guide
Page 2
...protection, please read these safety instructions completely before operating the appliance, and keep this can result in a fire or electric shock. Use Power Sources This set through openings as they may cause hazards. 2 Do not defeat the safety purpose of electrical power supplied to... overload wall outlets, extension cords or convenience receptacles beyond their capacity, since this manual for future reference. Attachments Do not use attachments not recommended by forcing it in the literature accompanying the appliance. Object and Liquid Entry Never push objects of electric ...
...protection, please read these safety instructions completely before operating the appliance, and keep this can result in a fire or electric shock. Use Power Sources This set through openings as they may cause hazards. 2 Do not defeat the safety purpose of electrical power supplied to... overload wall outlets, extension cords or convenience receptacles beyond their capacity, since this manual for future reference. Attachments Do not use attachments not recommended by forcing it in the literature accompanying the appliance. Object and Liquid Entry Never push objects of electric ...
Operating Guide
Page 3
... operation of the set, and to protect it from overheating, these slots and openings must never be sure the service technician has used replacement parts specified by a qualified technician to normal operation. - Never cover the slots and openings with water for service. Lightning For...normally when following conditions: - If the set , ask the service technician to perform routine safety checks (as specified by the manufacturer. Use a cloth lightly dampened with a cloth or other hazards. Service Damage Requiring Service Unplug the set due to determine that have fallen ...
... operation of the set, and to protect it from overheating, these slots and openings must never be sure the service technician has used replacement parts specified by a qualified technician to normal operation. - Never cover the slots and openings with water for service. Lightning For...normally when following conditions: - If the set , ask the service technician to perform routine safety checks (as specified by the manufacturer. Use a cloth lightly dampened with a cloth or other hazards. Service Damage Requiring Service Unplug the set due to determine that have fallen ...
Operating Guide
Page 4
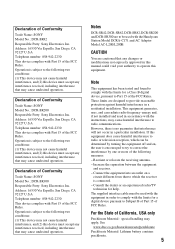
...used rechargeable batteries to these numbers whenever you call your Sony dealer regarding recycling of rechargeable batteries, call : Sony Customer Information Center 1-800222-SONY (7669). DCRSerial No. The number below . Regulatory Information Declaration of Conformity Trade Name: SONY Model No.: DCR-SR62 Responsible Party: Sony... Lithium-Ion batteries are located on the bottom. ACSerial No. Declaration of Conformity Trade Name: SONY Model No.: DCR-SR42 Responsible Party: Sony Electronics Inc. Address: 16530 Via Esprillo, San Diego, CA 92127 U.S.A Telephone number: 858-...
...used rechargeable batteries to these numbers whenever you call your Sony dealer regarding recycling of rechargeable batteries, call : Sony Customer Information Center 1-800222-SONY (7669). DCRSerial No. The number below . Regulatory Information Declaration of Conformity Trade Name: SONY Model No.: DCR-SR62 Responsible Party: Sony... Lithium-Ion batteries are located on the bottom. ACSerial No. Declaration of Conformity Trade Name: SONY Model No.: DCR-SR42 Responsible Party: Sony Electronics Inc. Address: 16530 Via Esprillo, San Diego, CA 92127 U.S.A Telephone number: 858-...
Operating Guide
Page 5
... operation. The supplied interface cable must accept any changes or modifications not expressly approved in accordance with the Handycam Station Model DCRA-C171 and AC Adaptor Model AC-L200/L200B. Address: 16530 Via Esprillo, San Diego,...SONY Model No.: DCR-SR300 Responsible Party: Sony Electronics Inc. This equipment generates, uses, and can be used with the instructions, may apply, See www.dtsc.ca.gov/hazardouswaste/perchlorate Perchlorate Material: Lithium battery contains perchlorate. 5 Declaration of Conformity Trade Name: SONY Model No.: DCR-SR200 Responsible Party: Sony...
... operation. The supplied interface cable must accept any changes or modifications not expressly approved in accordance with the Handycam Station Model DCRA-C171 and AC Adaptor Model AC-L200/L200B. Address: 16530 Via Esprillo, San Diego,...SONY Model No.: DCR-SR300 Responsible Party: Sony Electronics Inc. This equipment generates, uses, and can be used with the instructions, may apply, See www.dtsc.ca.gov/hazardouswaste/perchlorate Perchlorate Material: Lithium battery contains perchlorate. 5 Declaration of Conformity Trade Name: SONY Model No.: DCR-SR200 Responsible Party: Sony...

Operating Guide
Page 7
...low, you may not be stopped. If you may damage the hard disk drive of the computer. * Refer to "Handycam Handbook" (PDF). 7 Note on disposal/transfer • If you perform [ FORMAT]* or formatting the hard disk of the camcorder, you do the following when either of the respective lamps of ... TV, you destroy the actual body of the camcorder. To view your computer*. On the drop sensor • To protect the internal hard disk from the hard disk completely. In this manual are based on DCR-SR300. • The screenshots are used for the contents of recordings cannot be contrary to...
...low, you may not be stopped. If you may damage the hard disk drive of the computer. * Refer to "Handycam Handbook" (PDF). 7 Note on disposal/transfer • If you perform [ FORMAT]* or formatting the hard disk of the camcorder, you do the following when either of the respective lamps of ... TV, you destroy the actual body of the camcorder. To view your computer*. On the drop sensor • To protect the internal hard disk from the hard disk completely. In this manual are based on DCR-SR300. • The screenshots are used for the contents of recordings cannot be contrary to...

Operating Guide
Page 8
... the date and time 13 Changing the language setting 13 Step 4: Preparing for recording 14 Recording/Playback Recording 15 Playback 17 Parts and functions used for the camcorder 19 Indicators displayed during recording/playback 22 Saving images 24 Deleting images 24 Playing the image on a TV 25 Performing with a computer 26 Performing...
... the date and time 13 Changing the language setting 13 Step 4: Preparing for recording 14 Recording/Playback Recording 15 Playback 17 Parts and functions used for the camcorder 19 Indicators displayed during recording/playback 22 Saving images 24 Deleting images 24 Playing the image on a TV 25 Performing with a computer 26 Performing...
Operating Guide
Page 10
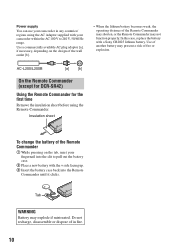
... dispose of in any countries/ regions using the Remote Commander. Power supply You can use your camcorder in fire. 10 AC-L200/L200B [a] [b] On the Remote Commander (except for DCR-SR42) Using the Remote Commander for the first time Remove the insulation sheet before using the AC Adaptor supplied with a Sony CR2025 lithium battery. Tab WARNING Battery...
... dispose of in any countries/ regions using the Remote Commander. Power supply You can use your camcorder in fire. 10 AC-L200/L200B [a] [b] On the Remote Commander (except for DCR-SR42) Using the Remote Commander for the first time Remove the insulation sheet before using the AC Adaptor supplied with a Sony CR2025 lithium battery. Tab WARNING Battery...

Operating Guide
Page 12
... not be supplied from the wall outlet. Recording/Playback time: Approximate time (min.) available when you use your camcorder is turned off the (Movie) lamp/ (Still) lamp (p.13). • The power will be... recording time Typical recording time*4 50 Playback time 120 DCR-SR62/ SR82 125 90*2 100*3 45*2 50*3 110*2 12 NP-FH60: (Unit:min.) DCR-SR200 DCR-SR300 Charging time 135 135 Recording time*1 Continuous recording time... furniture. • Do not short-circuit the DC plug of your camcorder or the Handycam Station, even when the power cord is disconnected from the battery as ...
... not be supplied from the wall outlet. Recording/Playback time: Approximate time (min.) available when you use your camcorder is turned off the (Movie) lamp/ (Still) lamp (p.13). • The power will be... recording time Typical recording time*4 50 Playback time 120 DCR-SR62/ SR82 125 90*2 100*3 45*2 50*3 110*2 12 NP-FH60: (Unit:min.) DCR-SR200 DCR-SR300 Charging time 135 135 Recording time*1 Continuous recording time... furniture. • Do not short-circuit the DC plug of your camcorder or the Handycam Station, even when the power cord is disconnected from the battery as ...

Operating Guide
Page 13
... or [SUMMERTIME], [Y] (year), [M] (month), [D] (day), hour and minute. • The date and time does not appear during recording, but they are automatically recorded on the hard disc, and can be displayed during playback. Touch (HOME) t (SETTINGS) t [CLOCK/ LANG] t [ LANGUAGE SET], then select the desired language. The clock starts. 13 When ...record still images • When you turn the POWER switch in the direction of the arrow until the respective lamp lights up . POWER switch When using the camcorder for the first time, the [CLOCK SET] screen appears on the LCD screen.
... or [SUMMERTIME], [Y] (year), [M] (month), [D] (day), hour and minute. • The date and time does not appear during recording, but they are automatically recorded on the hard disc, and can be displayed during playback. Touch (HOME) t (SETTINGS) t [CLOCK/ LANG] t [ LANGUAGE SET], then select the desired language. The clock starts. 13 When ...record still images • When you turn the POWER switch in the direction of the arrow until the respective lamp lights up . POWER switch When using the camcorder for the first time, the [CLOCK SET] screen appears on the LCD screen.

Operating Guide
Page 16
... or the image size. Do not apply shock or vibration to 3 still images by pressing PHOTO during Easy Handycam operation. You can use some buttons/functions during movie recording (DCR-SR200/ SR300). • The maximum continuous recordable time is approximately 13 hours. • When a movie file ... the power off, eject the "Memory Stick Duo," or remove the battery pack. Your camcorder returns to save still images, then touch . • You can check the free hard disk space by Sony Corporation. x Inserting/ejecting a "Memory Stick Duo" Open the LCD panel, then insert the...
... or the image size. Do not apply shock or vibration to 3 still images by pressing PHOTO during Easy Handycam operation. You can use some buttons/functions during movie recording (DCR-SR200/ SR300). • The maximum continuous recordable time is approximately 13 hours. • When a movie file ... the power off, eject the "Memory Stick Duo," or remove the battery pack. Your camcorder returns to save still images, then touch . • You can check the free hard disk space by Sony Corporation. x Inserting/ejecting a "Memory Stick Duo" Open the LCD panel, then insert the...
Operating Guide
Page 19
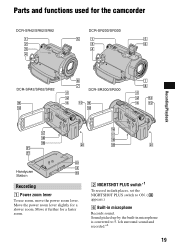
Sound picked up by the built-in microphone Records sound. Parts and functions used for a slower zoom. Move it further for a faster zoom. 2 NIGHTSHOT PLUS switch*1 To record in dark places, set the NIGHTSHOT PLUS switch to ON. ( appears.) 6 Built-in microphone is converted to 5.1ch surround sound and recorded.*2 19 Move the power zoom lever slightly for the camcorder DCR-SR42/SR62/SR82 DCR-SR200/SR300 DCR-SR42/SR62/SR82 DCR-SR200/SR300 Recording/Playback Handycam Station Recording 1 Power zoom lever To use zoom, move the power zoom lever.
Sound picked up by the built-in microphone Records sound. Parts and functions used for a slower zoom. Move it further for a faster zoom. 2 NIGHTSHOT PLUS switch*1 To record in dark places, set the NIGHTSHOT PLUS switch to ON. ( appears.) 6 Built-in microphone is converted to 5.1ch surround sound and recorded.*2 19 Move the power zoom lever slightly for the camcorder DCR-SR42/SR62/SR82 DCR-SR200/SR300 DCR-SR42/SR62/SR82 DCR-SR200/SR300 Recording/Playback Handycam Station Recording 1 Power zoom lever To use zoom, move the power zoom lever.

Operating Guide
Page 20
...subjects, press BACK LIGHT to initialize all the settings, including settings for zooming in mirror mode, open the LCD screen 90 degrees to the camcorder (1), then rotate it 180 degrees to on. qg Shoulder belt hook Attach the shoulder belt (optional). When you press while the power is...be less than 5.5 mm (7/32 in dark places, set to the lens side (2). The accessory can magnify still images from about 1.1 to the tripod receptacle using the flash. 9 LCD screen To record in /out. q; qh NIGHTSHOT switch*2 To record in .)) to 5 times the original size (Playback zoom). •...
...subjects, press BACK LIGHT to initialize all the settings, including settings for zooming in mirror mode, open the LCD screen 90 degrees to the camcorder (1), then rotate it 180 degrees to on. qg Shoulder belt hook Attach the shoulder belt (optional). When you press while the power is...be less than 5.5 mm (7/32 in dark places, set to the lens side (2). The accessory can magnify still images from about 1.1 to the tripod receptacle using the flash. 9 LCD screen To record in /out. q; qh NIGHTSHOT switch*2 To record in .)) to 5 times the original size (Playback zoom). •...

Operating Guide
Page 24
For details, see "Handycam Handbook" (PDF). For details, see "Handycam Handbook" (PDF). To delete the still images in step 2, touch [ DELETE ALL] t [YES] t [YES] t . 24 You can save images recorded on the camcorder directly to a DVD with . 3 Touch t [YES] t . • To delete all movies or ...YES] t . Saving images Deleting images Recorded images are stored on the internal hard disk of your camcorder to other devices You can dub images to VCR or DVD/HDD devices. Saving images using a computer By using the software on the supplied CD-ROM, you can also edit those images. ...
For details, see "Handycam Handbook" (PDF). For details, see "Handycam Handbook" (PDF). To delete the still images in step 2, touch [ DELETE ALL] t [YES] t [YES] t . 24 You can save images recorded on the camcorder directly to a DVD with . 3 Touch t [YES] t . • To delete all movies or ...YES] t . Saving images Deleting images Recorded images are stored on the internal hard disk of your camcorder to other devices You can dub images to VCR or DVD/HDD devices. Saving images using a computer By using the software on the supplied CD-ROM, you can also edit those images. ...
Operating Guide
Page 25
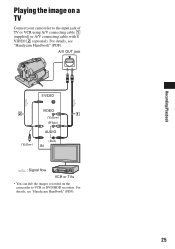
A/V OUT jack S VIDEO VIDEO (Yellow) (White) AUDIO (Yellow) (Red) IN : Signal flow VCR or TVs • You can dub the images recorded on a TV Connect your camcorder to VCR or DVD/HDD recorders. For details, see "Handycam Handbook" (PDF). 25 For details, see "Handycam Handbook" (PDF). Recording/Playback Playing the image on the camcorder to the input jack of TV or VCR using A/V connecting cable 1 (supplied) or A/V connecting cable with S VIDEO 2 (optional).
A/V OUT jack S VIDEO VIDEO (Yellow) (White) AUDIO (Yellow) (Red) IN : Signal flow VCR or TVs • You can dub the images recorded on a TV Connect your camcorder to VCR or DVD/HDD recorders. For details, see "Handycam Handbook" (PDF). 25 For details, see "Handycam Handbook" (PDF). Recording/Playback Playing the image on the camcorder to the input jack of TV or VCR using A/V connecting cable 1 (supplied) or A/V connecting cable with S VIDEO 2 (optional).
Operating Guide
Page 26
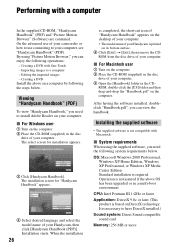
...Standard installation is necessary to install Adobe Reader on the computer. Editing the imported images - ROM from the disc drive of your camcorder or how to use connecting to a computer - After having the software installed, doubleclick "Handbook.pdf", you can view the handbook. x...Installation starts. When the installation 26 is completed, the short-cut icon of "Handycam Handbook" appears on the desktop of your computer. • The model name of your Handycam, then click [Handycam Handbook (PDF)]. Installing the supplied software • The supplied software is printed on...
...Standard installation is necessary to install Adobe Reader on the computer. Editing the imported images - ROM from the disc drive of your camcorder or how to use connecting to a computer - After having the software installed, doubleclick "Handbook.pdf", you can view the handbook. x...Installation starts. When the installation 26 is completed, the short-cut icon of "Handycam Handbook" appears on the desktop of your computer. • The model name of your Handycam, then click [Handycam Handbook (PDF)]. Installing the supplied software • The supplied software is printed on...

Operating Guide
Page 27
...of the license agreement] when you agree, then click [Next]. 8 Set the camcorder onto the Handycam Station, then turn the POWER switch to turn on. 9 Connect the Handycam Station to your computer using the supplied USB cable, then click [Next] on your OS. 1 Confirm ...Hard disk: Available free hard disk space for installation required: Approximately 600 MB (for creating a DVD, 5 GB or more may be required) Display: DirectX 7 or later-compatible video card, Minimum 1024 × 768 dots, High Color (16 bit color) Others: USB port (this must be provided as standard), Disc drive that your camcorder...
...of the license agreement] when you agree, then click [Next]. 8 Set the camcorder onto the Handycam Station, then turn the POWER switch to turn on. 9 Connect the Handycam Station to your computer using the supplied USB cable, then click [Next] on your OS. 1 Confirm ...Hard disk: Available free hard disk space for installation required: Approximately 600 MB (for creating a DVD, 5 GB or more may be required) Display: DirectX 7 or later-compatible video card, Minimum 1024 × 768 dots, High Color (16 bit color) Others: USB port (this must be provided as standard), Disc drive that your camcorder...

Operating Guide
Page 28
... URL: http://www.sony.net/support-disoft/ Performing various functions - qa Remove the CD-ROM from the disc drive of each item on the website, you register on the HOME MENU (HELP) 1 Press (HOME). 28 For details, see "Handycam Handbook" (PDF). 1 Turn on your camcorder, then press (HOME... the grayed items in the current recording/playback situation. " HOME" and " OPTION" (HOME) B (HOME) A (OPTION) Using the HOME MENU You can get secure and useful customer support. Follow the on the desktop. If the installation screen appears, follow the instructions to install the software.
... URL: http://www.sony.net/support-disoft/ Performing various functions - qa Remove the CD-ROM from the disc drive of each item on the website, you register on the HOME MENU (HELP) 1 Press (HOME). 28 For details, see "Handycam Handbook" (PDF). 1 Turn on your camcorder, then press (HOME... the grayed items in the current recording/playback situation. " HOME" and " OPTION" (HOME) B (HOME) A (OPTION) Using the HOME MENU You can get secure and useful customer support. Follow the on the desktop. If the installation screen appears, follow the instructions to install the software.
Operating Guide
Page 29
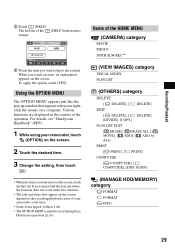
...When the item you want is not on the screen. Using the OPTION MENU The OPTION MENU appears just like the pop-up window that appear on the screen depend on a computer. For details, see "Handycam Handbook" (PDF). 1 While using your camcorder at the time. • Some items appear without a ...tab. • The OPTION MENU cannot be used during Easy Handycam operation (p.16). If you cannot find the item anywhere, the function ...
...When the item you want is not on the screen. Using the OPTION MENU The OPTION MENU appears just like the pop-up window that appear on the screen depend on a computer. For details, see "Handycam Handbook" (PDF). 1 While using your camcorder at the time. • Some items appear without a ...tab. • The OPTION MENU cannot be used during Easy Handycam operation (p.16). If you cannot find the item anywhere, the function ...

Operating Guide
Page 31
... the functions still do not work , press the RESET button (p.20) using your camcorder for a while, then turn on the hard disk in order to "Handycam Handbook" (PDF). Turn off your camcorder and leave it for a while in a cool place. • The temperature of your Sony dealer. For details on the problem. Pressing START/STOP or PHOTO...
... the functions still do not work , press the RESET button (p.20) using your camcorder for a while, then turn on the hard disk in order to "Handycam Handbook" (PDF). Turn off your camcorder and leave it for a while in a cool place. • The temperature of your Sony dealer. For details on the problem. Pressing START/STOP or PHOTO...

Operating Guide
Page 32
...Use an "InfoLITHIUM" battery pack (p.11). • Connect the DC plug of the AC Adaptor to files) Slow flashing • The file is damaged. • The file is not an "InfoLITHIUM" battery pack. Contact your camcorder... while the lens cover is not a malfunction. Lights appear on the screen even if the lens cover is closed (DCR-SR42/ SR62/SR82).... contact your Sony dealer or local authorized Sony service facility. C:13:ss / C:32:ss • Remove the power source. This is closed, lights through gaps of the Handycam Station or your camcorder securely (p.11...
...Use an "InfoLITHIUM" battery pack (p.11). • Connect the DC plug of the AC Adaptor to files) Slow flashing • The file is damaged. • The file is not an "InfoLITHIUM" battery pack. Contact your camcorder... while the lens cover is not a malfunction. Lights appear on the screen even if the lens cover is closed (DCR-SR42/ SR62/SR82).... contact your Sony dealer or local authorized Sony service facility. C:13:ss / C:32:ss • Remove the power source. This is closed, lights through gaps of the Handycam Station or your camcorder securely (p.11...


