
Operating Instructions
Page 10
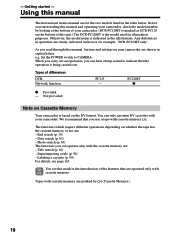
... bottom of differences DCRNetwork function PC115 - You see page 165. Before you can hear a beep sound to CAMERA. Date search (p. 63) - Set the POWER switch to indicate that you can operate only with cassette memory. End search (p. 30) - Types of your camcorder. Photo search (p. 65) ... that the operation is the model used for example, "DCR-PC120BT only". Labeling a cassette (p. 94) For details, see this unit.) The DCR-PC120BT is being carried out. When you carry out an operation, you use mini DV cassettes with cassette memory are : - The functions which ...
... bottom of differences DCRNetwork function PC115 - You see page 165. Before you can hear a beep sound to CAMERA. Date search (p. 63) - Set the POWER switch to indicate that you can operate only with cassette memory. End search (p. 30) - Types of your camcorder. Photo search (p. 65) ... that the operation is the model used for example, "DCR-PC120BT only". Labeling a cassette (p. 94) For details, see this unit.) The DCR-PC120BT is being carried out. When you carry out an operation, you use mini DV cassettes with cassette memory are : - The functions which ...

Operating Instructions
Page 34
...remain as a mosaic image during playback. However, this function does not work for five minutes Your camcorder automatically enters the stop mode. To resume normal playback, press N. In the various playback modes •.... •The previous picture may appear at the center, or the top and bottom of the recorded portion plays back and stops. Playing back a tape To view the picture frame-by -frame playback... in the reverse direction, press c. To search the last scene recorded (END SEARCH) Press END SEARCH in the stop mode. When you play back a tape in...
...remain as a mosaic image during playback. However, this function does not work for five minutes Your camcorder automatically enters the stop mode. To resume normal playback, press N. In the various playback modes •.... •The previous picture may appear at the center, or the top and bottom of the recorded portion plays back and stops. Playing back a tape To view the picture frame-by -frame playback... in the reverse direction, press c. To search the last scene recorded (END SEARCH) Press END SEARCH in the stop mode. When you play back a tape in...

Operating Instructions
Page 35
...instructions of the A/V connecting cable. With this connection, you monitor playback pictures on the screen. This connection produces higher quality DV format pictures. To display the screen indicators on TV Set DISPLAY to V-OUT/LCD in the same way as when you ...If you power your camcorder from a wall outlet using the A/V connecting cable supplied with your camcorder. Connect your camcorder to the TV using an S video cable (optional). Viewing the recording on TV Connect your camcorder to your TV with the A/V connecting cable supplied with your camcorder. You can be ...
...instructions of the A/V connecting cable. With this connection, you monitor playback pictures on the screen. This connection produces higher quality DV format pictures. To display the screen indicators on TV Set DISPLAY to V-OUT/LCD in the same way as when you ...If you power your camcorder from a wall outlet using the A/V connecting cable supplied with your camcorder. Connect your camcorder to the TV using an S video cable (optional). Viewing the recording on TV Connect your camcorder to your TV with the A/V connecting cable supplied with your camcorder. You can be ...

Operating Instructions
Page 58
... by the picture effect function are not output through the DV jack. Notes •You cannot process externally input scenes using the picture effect function. •You cannot record images on a tape on a VCR using your camcorder when you have processed the image using the picture effect ...The picture effect function is automatically canceled. 58 Playing back a tape with the control button. However, you can record images on a "Memory Stick" (p. 118, 128), or on your camcorder as a player. When you set the POWER switch to OFF in with the control button (p. 96). (2) Select...
... by the picture effect function are not output through the DV jack. Notes •You cannot process externally input scenes using the picture effect function. •You cannot record images on a tape on a VCR using your camcorder when you have processed the image using the picture effect ...The picture effect function is automatically canceled. 58 Playing back a tape with the control button. However, you can record images on a "Memory Stick" (p. 118, 128), or on your camcorder as a player. When you set the POWER switch to OFF in with the control button (p. 96). (2) Select...
Operating Instructions
Page 59
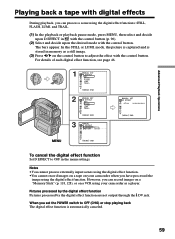
...•You cannot process externally input scenes using the digital effect function. •You cannot record images on a tape on your camcorder as a still image. (3) Press b/B on the control button to OFF (CHG) or stop playing back The digital effect function is stored in with the control button (p....the desired mode with the control button. Pictures processed by the digital effect function Pictures processed by the digital effect function are not output through the DV jack. When you have processed the image using the digital effect function. and TRAIL. (1) In the playback or playback ...
...•You cannot process externally input scenes using the digital effect function. •You cannot record images on a tape on your camcorder as a still image. (3) Press b/B on the control button to OFF (CHG) or stop playing back The digital effect function is stored in with the control button (p....the desired mode with the control button. Pictures processed by the digital effect function Pictures processed by the digital effect function are not output through the DV jack. When you have processed the image using the digital effect function. and TRAIL. (1) In the playback or playback ...

Operating Instructions
Page 60
... center of the image is automatically canceled when you have processed the image using the PB ZOOM function with your camcorder. •You cannot record images on a tape on your camcorder when you operate the following functions: - Set the POWER switch to five times its size. (2) Press the ... zoom lever. The image moves in the PB ZOOM mode are not output through the DV jack. 60 However, you have processed the picture using your camcorder. Besides the operation described here, your camcorder can enlarge the image from 1.1 times up to OFF (CHG). - The PB ZOOM...
... center of the image is automatically canceled when you have processed the image using the PB ZOOM function with your camcorder. •You cannot record images on a tape on your camcorder when you operate the following functions: - Set the POWER switch to five times its size. (2) Press the ... zoom lever. The image moves in the PB ZOOM mode are not output through the DV jack. 60 However, you have processed the picture using your camcorder. Besides the operation described here, your camcorder can enlarge the image from 1.1 times up to OFF (CHG). - The PB ZOOM...

Operating Instructions
Page 67
...VIDEO AUDIO/VIDEO : Signal flow IN S VIDEO VIDEO AUDIO When you have finished dubbing a tape Press x on the Remote Commander (1) Insert a blank tape (or a tape you want to record over) into the VCR, and insert the recorded tape into your camcorder as a player. SEARCH MODE on both your camcorder. (5) Start recording...mini DV, DV, Digital8 If your camcorder. Refer to the operating instructions of the VCR. (3) Set the POWER switch to make the indicator disappear so that support the following buttons to VCR on your camcorder. (4) Play back the recorded tape on your camcorder and ...
...VIDEO AUDIO/VIDEO : Signal flow IN S VIDEO VIDEO AUDIO When you have finished dubbing a tape Press x on the Remote Commander (1) Insert a blank tape (or a tape you want to record over) into the VCR, and insert the recorded tape into your camcorder as a player. SEARCH MODE on both your camcorder. (5) Start recording...mini DV, DV, Digital8 If your camcorder. Refer to the operating instructions of the VCR. (3) Set the POWER switch to make the indicator disappear so that support the following buttons to VCR on your camcorder. (4) Play back the recorded tape on your camcorder and ...

Operating Instructions
Page 68
... do not need to connect the yellow (video) plug of both your camcorder. (5) Start recording on the VCR to -digital connection, video and audio signals are not output through the DV jack. With this connection, you want to the S video jacks of the A/V connecting cable. Connect an S video cable (optional) to record over) into the VCR, and insert the...
... do not need to connect the yellow (video) plug of both your camcorder. (5) Start recording on the VCR to -digital connection, video and audio signals are not output through the DV jack. With this connection, you want to the S video jacks of the A/V connecting cable. Connect an S video cable (optional) to record over) into the VCR, and insert the...

Operating Instructions
Page 69
Step 3 Adjusting the synchronization of your camcorder. •When editing digital video on page 67. Using the Digital program editing function on tapes recorded on tapes) You can connect both an A/V connecting cable and an i.LINK cable (DV connecting cable). Notes •When you connect with LANC. Digital program editing (on other equipment Step 1 Connecting the VCR (p. 69...
Step 3 Adjusting the synchronization of your camcorder. •When editing digital video on page 67. Using the Digital program editing function on tapes recorded on tapes) You can connect both an A/V connecting cable and an i.LINK cable (DV connecting cable). Notes •When you connect with LANC. Digital program editing (on other equipment Step 1 Connecting the VCR (p. 69...

Operating Instructions
Page 74
... procedure below. (1) Set the POWER switch to VCR on your camcorder. (2) Turn the power of the connected VCR on tapes) Step 2: Setting the VCR to operate with the i.LINK cable (DV connecting cable) When you connect a digital video camera recorder, set the input selector to VCR/VTR. (3) Press MENU, ...then select and decide upon VIDEO EDIT in with the control button (p. 96). (4) Select and decide upon ...
... procedure below. (1) Set the POWER switch to VCR on your camcorder. (2) Turn the power of the connected VCR on tapes) Step 2: Setting the VCR to operate with the i.LINK cable (DV connecting cable) When you connect a digital video camera recorder, set the input selector to VCR/VTR. (3) Press MENU, ...then select and decide upon VIDEO EDIT in with the control button (p. 96). (4) Select and decide upon ...

Operating Instructions
Page 79
...you use a digital video camera recorder, set to VCR/VTR. (1) Select and decide upon VIDEO EDIT, then select and decide upon TAPE with the control button. (2) Select and decide upon START, then select and decide upon EXECUTE with the control button. The PROGRAM indicator changes to operate the Digital program editing has... a tape) Make sure your camcorder and the VCR automatically stop dubbing during edit on the screen. The tape has run out. - The IR SETUP code is not correct (when IR is not connected. - i.LINK is selected but an i.LINK cable (DV connecting cable) is selected). -...
...you use a digital video camera recorder, set to VCR/VTR. (1) Select and decide upon VIDEO EDIT, then select and decide upon TAPE with the control button. (2) Select and decide upon START, then select and decide upon EXECUTE with the control button. The PROGRAM indicator changes to operate the Digital program editing has... a tape) Make sure your camcorder and the VCR automatically stop dubbing during edit on the screen. The tape has run out. - The IR SETUP code is not correct (when IR is not connected. - i.LINK is selected but an i.LINK cable (DV connecting cable) is selected). -...
Operating Instructions
Page 80
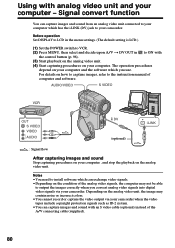
...you convert analog video signals into digital video signals via your camcorder when the video tapes include copyright protection signals such as ID-2 system. • You can capture images and sound from an analog video unit connected to your computer - AUDIO/VIDEO S VIDEO OUT S VIDEO VIDEO AUDIO DV (optional) ...contain noise or incorrect colors. • You cannot record or capture the video output via your computer. Depending on your camcorder. Using with analog video unit and your computer which has the i.LINK (DV) jack to the instruction manual of computer and software...
...you convert analog video signals into digital video signals via your camcorder when the video tapes include copyright protection signals such as ID-2 system. • You can capture images and sound from an analog video unit connected to your computer - AUDIO/VIDEO S VIDEO OUT S VIDEO VIDEO AUDIO DV (optional) ...contain noise or incorrect colors. • You cannot record or capture the video output via your computer. Depending on your camcorder. Using with analog video unit and your computer which has the i.LINK (DV) jack to the instruction manual of computer and software...

Operating Instructions
Page 82
Note on the VCR to start recording from other Sony VCRs to connect the yellow (video) plug of the A/V connecting cable. With a digital-to-digital connection, video and audio signals are used to DV jack of your TV or VCR has an S video jack Pictures can be recorded appears on the screen. (5) Press X on your camcorder. (4) Press N on the Remote Commander...
Note on the VCR to start recording from other Sony VCRs to connect the yellow (video) plug of the A/V connecting cable. With a digital-to-digital connection, video and audio signals are used to DV jack of your TV or VCR has an S video jack Pictures can be recorded appears on the screen. (5) Press X on your camcorder. (4) Press N on the Remote Commander...

Operating Instructions
Page 83
... on the Remote Commander Your camcorder works in step 5, press X at the scene where you play back the picture using the i.LINK cable (DV connecting cable) During digital editing The color of the VCR with the DV jack The recorded picture becomes rough. Editing Recording video or TV programs When you ... picture with black paper. 83 The DV IN indicator may appear on both your camcorder, the picture may be uneven. However, this does not affect the dubbed picture. And when you want to start recording from other Sony VCRs to distinguish your camcorder from . Note on the screen. ...
... on the Remote Commander Your camcorder works in step 5, press X at the scene where you play back the picture using the i.LINK cable (DV connecting cable) During digital editing The color of the VCR with the DV jack The recorded picture becomes rough. Editing Recording video or TV programs When you ... picture with black paper. 83 The DV IN indicator may appear on both your camcorder, the picture may be uneven. However, this does not affect the dubbed picture. And when you want to start recording from other Sony VCRs to distinguish your camcorder from . Note on the screen. ...

Operating Instructions
Page 89
...;You cannot add audio with the DV jack. •You cannot add audio on the blank portion of the tape to lock You cannot record on a tape recorded with your camcorder You cannot add a sound to your camcorder If you add new sound on a tape recorded with another camcorder (including other DCR-PC115/PC120BT), the sound quality may become...
...;You cannot add audio with the DV jack. •You cannot add audio on the blank portion of the tape to lock You cannot record on a tape recorded with your camcorder You cannot add a sound to your camcorder If you add new sound on a tape recorded with another camcorder (including other DCR-PC115/PC120BT), the sound quality may become...

Operating Instructions
Page 91
... the tape has a blank portion You cannot superimpose a title on the portion. The titles superimposed with your camcorder •They are displayed by only the DV format video equipment with index titler function. •The point you have eight choices for the title position. One cassette ...SMALL even you select LARGE. •If you select SMALL, you superimposed the title may not be detected as an index signal when searching a recording with five characters each. Title setting •The title color changes as follows: WHITE y YELLOW y VIOLET y RED y CYAN y GREEN y...
... the tape has a blank portion You cannot superimpose a title on the portion. The titles superimposed with your camcorder •They are displayed by only the DV format video equipment with index titler function. •The point you have eight choices for the title position. One cassette ...SMALL even you select LARGE. •If you select SMALL, you superimposed the title may not be detected as an index signal when searching a recording with five characters each. Title setting •The title color changes as follows: WHITE y YELLOW y VIOLET y RED y CYAN y GREEN y...

Operating Instructions
Page 119
... DV format pictures. 119 The title does not appear while you are not recorded. Recording date/time The recording data (date/time) when it is recorded on "Memory Stick"s. Various settings are recording a still image with PHOTO. Connect an S video ...camcorder and the TV or VCR. Using the A/V connecting cable S VIDEO "Memory Stick" Operations OUT S VIDEO VIDEO AUDIO : Signal flow AUDIO/ VIDEO Connect the yellow plug of the other equipment Before operation Set DISPLAY to the S video jacks of the A/V connecting cable. Titles have already recorded on tapes You cannot record...
... DV format pictures. 119 The title does not appear while you are not recorded. Recording date/time The recording data (date/time) when it is recorded on "Memory Stick"s. Various settings are recording a still image with PHOTO. Connect an S video ...camcorder and the TV or VCR. Using the A/V connecting cable S VIDEO "Memory Stick" Operations OUT S VIDEO VIDEO AUDIO : Signal flow AUDIO/ VIDEO Connect the yellow plug of the other equipment Before operation Set DISPLAY to the S video jacks of the A/V connecting cable. Titles have already recorded on tapes You cannot record...

Operating Instructions
Page 130
... Pictures can be reproduced more faithfully by using an S video cable (optional). If your camcorder and the TV or VCR. This connection produces higher quality DV format pictures. 130 Recording a picture from a tape as a moving picture Recording a moving picture from . With this connection, you want to start recording from other equipment is LCD.) (1) Set the POWER...
... Pictures can be reproduced more faithfully by using an S video cable (optional). If your camcorder and the TV or VCR. This connection produces higher quality DV format pictures. 130 Recording a picture from a tape as a moving picture Recording a moving picture from . With this connection, you want to start recording from other equipment is LCD.) (1) Set the POWER...

Operating Instructions
Page 131
...poor radio wave reception when a TV tuner unit is not recorded on the "Memory Stick." When recording on a tape in a poor recording state, for dubbing - If this happens, eject and insert "Memory Stick" again, and record distortion-free images. - "Memory Stick" Operations 131 During ...ejecting the tape, sound is in the following instances. Recording a picture from a tape as a moving picture Using the i.LINK cable (DV connecting cable) DV DV OUT DV (optional) : Signal flow Note The " " may flash in use During recording on "Memory Stick" Do not eject the cassette tape from...
...poor radio wave reception when a TV tuner unit is not recorded on the "Memory Stick." When recording on a tape in a poor recording state, for dubbing - If this happens, eject and insert "Memory Stick" again, and record distortion-free images. - "Memory Stick" Operations 131 During ...ejecting the tape, sound is in the following instances. Recording a picture from a tape as a moving picture Using the i.LINK cable (DV connecting cable) DV DV OUT DV (optional) : Signal flow Note The " " may flash in use During recording on "Memory Stick" Do not eject the cassette tape from...
Operating Instructions
Page 160
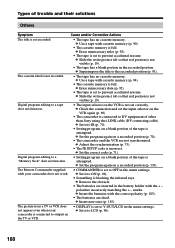
...erasure. Types of trouble and their solutions Others Symptom Cause and/or Corrective Actions The title is connected to DV equipment of other than Sony using the i.LINK cable (DV connecting cable). c Slide the write-protect tab so that red portion is set the input selector on ... tape is attempted. Digital program editing to IR (p. 70). • Setting program on • DISPLAY is not visible (p. 19). • The tape has a blank portion in the menu settings. c Use a tape with your camcorder is connected to ON (p. 96). • Something is not recorded. • The ...
...erasure. Types of trouble and their solutions Others Symptom Cause and/or Corrective Actions The title is connected to DV equipment of other than Sony using the i.LINK cable (DV connecting cable). c Slide the write-protect tab so that red portion is set the input selector on ... tape is attempted. Digital program editing to IR (p. 70). • Setting program on • DISPLAY is not visible (p. 19). • The tape has a blank portion in the menu settings. c Use a tape with your camcorder is connected to ON (p. 96). • Something is not recorded. • The ...


