

Operating Instructions
Page 2
... will soon be producing home video that may be of sufficient magnitude to use. As the laser beam used in the literature accompanying the appliance. Note: In some areas the disposal of this Sony Handycam. For the Sony Service Center nearest you can ...DIGITAL APPARATUS COMPLIES WITH CANADIAN ICES-003. Refer to servicing to the separate Network Operating Instructions. 2 DCR-PC120BT only Countries and areas where you call 1-800-222-SONY (United States only). and CANADA CAUTION TO PREVENT ELECTRIC SHOCK, MATCH WIDE BLADE OF PLUG TO WIDE SLOT, FULLY INSERT. CAUTION The use...
... will soon be producing home video that may be of sufficient magnitude to use. As the laser beam used in the literature accompanying the appliance. Note: In some areas the disposal of this Sony Handycam. For the Sony Service Center nearest you can ...DIGITAL APPARATUS COMPLIES WITH CANADIAN ICES-003. Refer to servicing to the separate Network Operating Instructions. 2 DCR-PC120BT only Countries and areas where you call 1-800-222-SONY (United States only). and CANADA CAUTION TO PREVENT ELECTRIC SHOCK, MATCH WIDE BLADE OF PLUG TO WIDE SLOT, FULLY INSERT. CAUTION The use...

Operating Instructions
Page 3
... pursuant to Part 15 of FCC Rules. 3 Note: This equipment has been tested and found to comply with the limits for a Class B digital device, pursuant to Subpart B of Part 15 of the FCC Rules. However, there is connected. - Reorient or relocate the receiving antenna. - ...can radiate radio frequency energy and, if not installed and used with the equipment in this manual could void your authority to correct the interference by one or more of Conformity Trade Name: SONY Model No.: DCR-PC120 Responsible Party: Sony Electronics Inc. Operation is for help. Consult the dealer or...
... pursuant to Part 15 of FCC Rules. 3 Note: This equipment has been tested and found to comply with the limits for a Class B digital device, pursuant to Subpart B of Part 15 of the FCC Rules. However, there is connected. - Reorient or relocate the receiving antenna. - ...can radiate radio frequency energy and, if not installed and used with the equipment in this manual could void your authority to correct the interference by one or more of Conformity Trade Name: SONY Model No.: DCR-PC120 Responsible Party: Sony Electronics Inc. Operation is for help. Consult the dealer or...
Operating Instructions
Page 4
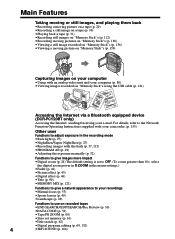
...215;, select the digital zoom power in D ZOOM in the recording mode •Back light (p. 27) •NightShot/Super NightShot (p. 27) •Recording images with an analog video unit and your computer (p. 80) •Viewing images recorded on "Memory Stick"s using the USB cable... (p. 141) Accessing the Internet via a Bluetooth equipped device (DCR-PC120BT only) Accessing the Internet, sending/receiving your recordings •Manual focus ...
...215;, select the digital zoom power in D ZOOM in the recording mode •Back light (p. 27) •NightShot/Super NightShot (p. 27) •Recording images with an analog video unit and your computer (p. 80) •Viewing images recorded on "Memory Stick"s using the USB cable... (p. 141) Accessing the Internet via a Bluetooth equipped device (DCR-PC120BT only) Accessing the Internet, sending/receiving your recordings •Manual focus ...
Operating Instructions
Page 6
... convert function 80 Recording video or TV programs ....... 81 Inserting a scene from a tape as a still image 118 Superimposing a still image in the dark - Tape Photo recording 36 Adjusting the white balance manually 40 Using the wide mode 41 Using the fader function 42 Using special effects - Picture effect .. 45 Using special effects - Digital effect ... 46 Using the PROGRAM AE...
... convert function 80 Recording video or TV programs ....... 81 Inserting a scene from a tape as a still image 118 Superimposing a still image in the dark - Tape Photo recording 36 Adjusting the white balance manually 40 Using the wide mode 41 Using the fader function 42 Using special effects - Picture effect .. 45 Using special effects - Digital effect ... 46 Using the PROGRAM AE...
Operating Instructions
Page 7
SLIDE SHOW 149 Preventing accidental erasure - Memory photo playback .......... 136 Viewing a moving picture - Digital program editing (on "Memory Stick"s - PRINT MARK 153 Using the optional printer 154 Using the Network function Accessing the network 155 Troubleshooting Types of contents Recording a picture from a tape - Memory PB ZOOM 148 Playing back images in a continuous loop - Image protection...
SLIDE SHOW 149 Preventing accidental erasure - Memory photo playback .......... 136 Viewing a moving picture - Digital program editing (on "Memory Stick"s - PRINT MARK 153 Using the optional printer 154 Using the Network function Accessing the network 155 Troubleshooting Types of contents Recording a picture from a tape - Memory PB ZOOM 148 Playing back images in a continuous loop - Image protection...
Operating Instructions
Page 8
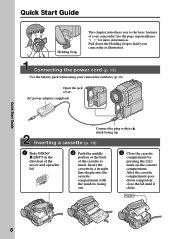
... the middle portion of the back of your camcorder outdoors (p. 12). Pull down completely, close the lid until it clicks. Connecting the power cord (p. 15) Use the battery pack when...
... the middle portion of the back of your camcorder outdoors (p. 12). Pull down completely, close the lid until it clicks. Connecting the power cord (p. 15) Use the battery pack when...
Operating Instructions
Page 10
...operation, you can operate only with cassette memory are marked by looking at the bottom of differences DCRNetwork function PC115 - You can hear a beep sound to CAMERA. You see page 165. Getting started - - Set the POWER switch to indicate that are shown in capital... letters. Types of your camcorder. (DCR-PC120BT is being carried out. Photo search (p. 65) The functions you can only use a tape with cassette memory . Using this ...
...operation, you can operate only with cassette memory are marked by looking at the bottom of differences DCRNetwork function PC115 - You can hear a beep sound to CAMERA. You see page 165. Getting started - - Set the POWER switch to indicate that are shown in capital... letters. Types of your camcorder. (DCR-PC120BT is being carried out. Photo search (p. 65) The functions you can only use a tape with cassette memory . Using this ...
Operating Instructions
Page 11
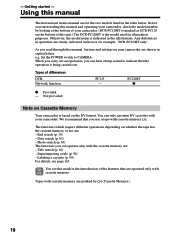
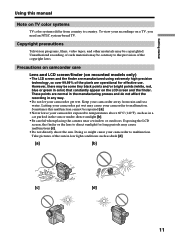
... finder are manufactured using extremely high-precision technology, so over 99.99% of the pixels are normal in the manufacturing process and do not affect the recording in any way....camcorder away from country to malfunction. Copyright precautions Television programs, films, video tapes, and other materials may be copyrighted. Unauthorized recording of the sun in low light conditions such as in a car ... [b]. •Be careful when placing the camera near a window or outdoors. Keep your camcorder get wet. Doing so might cause your recordings on the LCD screen and the finder. Exposing...
... finder are manufactured using extremely high-precision technology, so over 99.99% of the pixels are normal in the manufacturing process and do not affect the recording in any way....camcorder away from country to malfunction. Copyright precautions Television programs, films, video tapes, and other materials may be copyrighted. Unauthorized recording of the sun in low light conditions such as in a car ... [b]. •Be careful when placing the camera near a window or outdoors. Keep your camcorder get wet. Doing so might cause your recordings on the LCD screen and the finder. Exposing...

Operating Instructions
Page 13
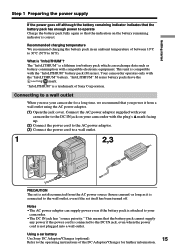
See page 167 for your camcorder. When you use the AC power adaptor Place the AC power adaptor near a wall outlet. Your camcorder operates only with the plug's v mark facing up when the charge ... adaptor from a wall outlet as soon as possible to cut off the power. 13 Getting started Step 1 Preparing the power supply Charging the battery pack Use the battery pack after charging it for details of the AC power adaptor. Note Prevent metallic objects from coming into contact with the metal parts...
See page 167 for your camcorder. When you use the AC power adaptor Place the AC power adaptor near a wall outlet. Your camcorder operates only with the plug's v mark facing up when the charge ... adaptor from a wall outlet as soon as possible to cut off the power. 13 Getting started Step 1 Preparing the power supply Charging the battery pack Use the battery pack after charging it for details of the AC power adaptor. Note Prevent metallic objects from coming into contact with the metal parts...

Operating Instructions
Page 14
... Battery pack NP-FM50 (supplied) NP-FM70 NP-FM90 NP-FM91 Recording with the viewfinder Continuous* Typical** 130 75 270 155 410 235 475 275 Recording with LCD closed 185 385 580 670 Approximate minutes when you use your camcorder in a cold environment. 14 Step 1 Preparing the power supply Charging time Battery pack...
... Battery pack NP-FM50 (supplied) NP-FM70 NP-FM90 NP-FM91 Recording with the viewfinder Continuous* Typical** 130 75 270 155 410 235 475 275 Recording with LCD closed 185 385 580 670 Approximate minutes when you use your camcorder in a cold environment. 14 Step 1 Preparing the power supply Charging time Battery pack...
Operating Instructions
Page 15
...the battery pack has enough power to operate Charge the battery pack fully again so that the indication on your camcorder for further information. Using a car battery Use Sony DC Adaptor/Charger (optional). 15 Refer to the wall outlet, even if the set is not plugged into a wall outlet. Connecting ...to the DC IN jack, even when the power cord is not disconnected from a wall outlet using the AC power adaptor. (1) Open the jack cover. This...
...the battery pack has enough power to operate Charge the battery pack fully again so that the indication on your camcorder for further information. Using a car battery Use Sony DC Adaptor/Charger (optional). 15 Refer to the wall outlet, even if the set is not plugged into a wall outlet. Connecting ...to the DC IN jack, even when the power cord is not disconnected from a wall outlet using the AC power adaptor. (1) Open the jack cover. This...

Operating Instructions
Page 16
... 174). Select OFF if the time is . (6) Press v/V on the control button to make the menu settings disappear. 16 If you do not use your camcorder will be released (bars may appear) because the built-in rechargeable battery installed in that you set the date and time settings. Set...to select , then press z or B. (3) Press v/V on the control button to select CLOCK SET, then press zor B. (4) Press v/V on the control button to CAMERA or MEMORY unless you set the POWER switch to adjust the desired area (where you are), then press z. (5) Press v/V on the control button and pressing...
... 174). Select OFF if the time is . (6) Press v/V on the control button to make the menu settings disappear. 16 If you do not use your camcorder will be released (bars may appear) because the built-in rechargeable battery installed in that you set the date and time settings. Set...to select , then press z or B. (3) Press v/V on the control button to select CLOCK SET, then press zor B. (4) Press v/V on the control button to CAMERA or MEMORY unless you set the POWER switch to adjust the desired area (where you are), then press z. (5) Press v/V on the control button and pressing...

Operating Instructions
Page 17
... data code of your camcorder abroad Set the clock to the local time (p. 18). If you do not set the date and time "--:--:--" and are recorded on the screen for noon. Note on a 12-hour cycle. •12:00 AM stands for midnight. •12:00 PM stands for some models...
... data code of your camcorder abroad Set the clock to the local time (p. 18). If you do not set the date and time "--:--:--" and are recorded on the screen for noon. Note on a 12-hour cycle. •12:00 AM stands for midnight. •12:00 PM stands for some models...

Operating Instructions
Page 19
... deeply into the cassette compartment with the window facing out. (4) Close the cassette compartment by pressing the mark on the cassette to use cassette with cassette memory Read the instruction about cassette memory to expose the red mark. 19 When you press any part of the... power source. (2) Slide OPEN/Z EJECT in step 3. Doing so may cause a malfunction. •The cassette compartment may not be closed when you use this function properly (p. 165). The cassette compartment automatically lifts up and opens. (3) Push the middle portion of the back of the arrow and open ...
... deeply into the cassette compartment with the window facing out. (4) Close the cassette compartment by pressing the mark on the cassette to use cassette with cassette memory Read the instruction about cassette memory to expose the red mark. 19 When you press any part of the... power source. (2) Slide OPEN/Z EJECT in step 3. Doing so may cause a malfunction. •The cassette compartment may not be closed when you use this function properly (p. 165). The cassette compartment automatically lifts up and opens. (3) Push the middle portion of the back of the arrow and open ...
Operating Instructions
Page 21
... time code may not be set to the right as you do not eject the cassette even if you leave your camcorder. When you record using the viewfinder. The battery use time when you record in the standby mode for five minutes while the cassette is slightly shorter than the shooting time... switch can make the transition smooth even after ejecting the cassette if you recorded and the next scene is not inserted. To display the recording data, press DATA CODE on the LOCK switch When you slide the LOCK switch to CAMERA again. This is set to OFF (CHG). - LOCK switch is to...
... time code may not be set to the right as you do not eject the cassette even if you leave your camcorder. When you record using the viewfinder. The battery use time when you record in the standby mode for five minutes while the cassette is slightly shorter than the shooting time... switch can make the transition smooth even after ejecting the cassette if you recorded and the next scene is not inserted. To display the recording data, press DATA CODE on the LOCK switch When you slide the LOCK switch to CAMERA again. This is set to OFF (CHG). - LOCK switch is to...
Operating Instructions
Page 22
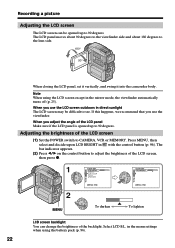
... in the menu settings when using the LCD screen except in with the control button (p. 96). Adjusting the brightness of the LCD screen (1) Set the POWER switch to 90 degrees. in direct sunlight The LCD screen may be opened up to CAMERA, VCR or MEMORY. LCD COLOR VF B.L. Recording a picture Adjusting the LCD...
... in the menu settings when using the LCD screen except in with the control button (p. 96). Adjusting the brightness of the LCD screen (1) Set the POWER switch to 90 degrees. in direct sunlight The LCD screen may be opened up to CAMERA, VCR or MEMORY. LCD COLOR VF B.L. Recording a picture Adjusting the LCD...

Operating Instructions
Page 23
... the backlight. Select VF B.L. Photocell window Notes •When you use the Remote Commander and the lens hood, the Remote Commander may appear in the menu settings when using the battery pack (p. 96). Recording - Adjust the viewfinder lens to remove filters or other objects onto ...the lens hood. Attaching the supplied lens hood To record fine pictures under strong light, we recommend attaching the...
... the backlight. Select VF B.L. Photocell window Notes •When you use the Remote Commander and the lens hood, the Remote Commander may appear in the menu settings when using the battery pack (p. 96). Recording - Adjust the viewfinder lens to remove filters or other objects onto ...the lens hood. Attaching the supplied lens hood To record fine pictures under strong light, we recommend attaching the...

Operating Instructions
Page 24
...×. •The picture quality deteriorates as you select the digital zoom power in the wide-angle position. Recording a picture Using the zoom feature Move the power zoom lever a little for a faster zoom. Notes on digital zoom •Digital zoom starts to MEMORY You cannot use zoom greater than 10× Zoom greater than 10×...
...×. •The picture quality deteriorates as you select the digital zoom power in the wide-angle position. Recording a picture Using the zoom feature Move the power zoom lever a little for a faster zoom. Notes on digital zoom •Digital zoom starts to MEMORY You cannot use zoom greater than 10× Zoom greater than 10×...

Operating Instructions
Page 25
... appear mirror-reversed and others are not displayed. During recording in the mirror mode The picture on the Remote Commander does not work. 25 Basics Recording a picture Shooting with the Mirror Mode This feature allows the camera subject to CAMERA or MEMORY. The indicator appears in the viewfinder and ...on the LCD screen while you look at the subject in the recording mode. Pull out the viewfinder and rotate the LCD screen 180 degrees. The subject uses this feature to check ...
... appear mirror-reversed and others are not displayed. During recording in the mirror mode The picture on the Remote Commander does not work. 25 Basics Recording a picture Shooting with the Mirror Mode This feature allows the camera subject to CAMERA or MEMORY. The indicator appears in the viewfinder and ...on the LCD screen while you look at the subject in the recording mode. Pull out the viewfinder and rotate the LCD screen 180 degrees. The subject uses this feature to check ...

Operating Instructions
Page 26
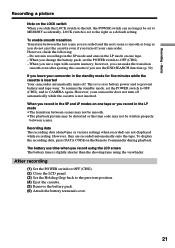
...code The time code indicates the recording or playback time, "0:00:00" (hours : minutes : seconds) in CAMERA mode and "0:00:00:00" (hours : minutes : seconds : frames) in the recording mode The indicators are recording. However, they are not displayed while recording. Recording mode STBY/REC 40min REC ... be correct, depending on tapes. Date The date is turned on the tape. Recording a picture Indicators displayed in VCR mode. Remaining battery time Cassette memory This appears when using a tape with cassette memory. Remaining tape indicator The indicator may not be displayed ...
...code The time code indicates the recording or playback time, "0:00:00" (hours : minutes : seconds) in CAMERA mode and "0:00:00:00" (hours : minutes : seconds : frames) in the recording mode The indicators are recording. However, they are not displayed while recording. Recording mode STBY/REC 40min REC ... be correct, depending on tapes. Date The date is turned on the tape. Recording a picture Indicators displayed in VCR mode. Remaining battery time Cassette memory This appears when using a tape with cassette memory. Remaining tape indicator The indicator may not be displayed ...


