Computer Applications Guide
Page 2
... (Windows computer only). See below. System requirements for using ImageMixer Ver.1.5 for Sony When viewing pictures recorded on a tape on a computer b Note • When you cannot view pictures recorded on a tape on a "Memory Stick": ImageMixer 1) 2) 1) for Windows computer 2) for ... separate MovieShaker Application Guide supplied with ImageMixer and Image Transfer*. If your camcorder is required. You cannot hear sound if your camcorder is a MICROMV format model • When editing pictures on a tape: ImageMixer 1), MovieShaker 1) • When editing pictures on the computer ...
... (Windows computer only). See below. System requirements for using ImageMixer Ver.1.5 for Sony When viewing pictures recorded on a tape on a computer b Note • When you cannot view pictures recorded on a tape on a "Memory Stick": ImageMixer 1) 2) 1) for Windows computer 2) for ... separate MovieShaker Application Guide supplied with ImageMixer and Image Transfer*. If your camcorder is required. You cannot hear sound if your camcorder is a MICROMV format model • When editing pictures on a tape: ImageMixer 1), MovieShaker 1) • When editing pictures on the computer ...
Computer Applications Guide
Page 4
..."Memory Stick 26 Editing still images on your computer 28 Copying pictures edited on ImageMixer Ver.1.5 for Sony 9 Step 3: Installing the image exchange software (Image Transfer 11 Step 4: Connecting your camcorder to a computer 13 Connecting with the USB cable (supplied 14 Connecting with an i.LINK cable (... recorded on a "Memory Stick" on your computer 18 Managing pictures on a Windows computer Copying and viewing pictures recorded on a tape 19 Copying movies onto your computer 19 Copying still images extracted from a movie on your computer 21 Editing pictures on your computer ...
..."Memory Stick 26 Editing still images on your computer 28 Copying pictures edited on ImageMixer Ver.1.5 for Sony 9 Step 3: Installing the image exchange software (Image Transfer 11 Step 4: Connecting your camcorder to a computer 13 Connecting with the USB cable (supplied 14 Connecting with an i.LINK cable (... recorded on a "Memory Stick" on your computer 18 Managing pictures on a Windows computer Copying and viewing pictures recorded on a tape 19 Copying movies onto your computer 19 Copying still images extracted from a movie on your computer 21 Editing pictures on your computer ...
Computer Applications Guide
Page 6
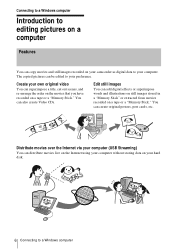
...on your computer. Connecting to a Windows computer Introduction to editing pictures on a computer Features You can copy movies and still images recorded on your camcorder as digital data to your hard disk. 6 Connecting to your own original video You can superimpose a title, cut out scenes, and re-arrange... the order on the movies that you have recorded on a tape or a "Memory Stick." Edit still images You can also create Video CDs. You can add digital effects or superimpose words and illustrations on ...
...on your computer. Connecting to a Windows computer Introduction to editing pictures on a computer Features You can copy movies and still images recorded on your camcorder as digital data to your hard disk. 6 Connecting to your own original video You can superimpose a title, cut out scenes, and re-arrange... the order on the movies that you have recorded on a tape or a "Memory Stick." Edit still images You can also create Video CDs. You can add digital effects or superimpose words and illustrations on ...
Computer Applications Guide
Page 13
... the USB cable (supplied)" (p. 14). If your camcorder. To check where the images are stored on your camcorder. b Note • When you insert the connector in your camcorder to a Windows computer 13 See "Connecting with your camcorder is a MICROMV format model, refer also to the separate MovieShaker Application ... a "Memory Stick" to a computer for copying and editing pictures and sound recorded on a tape. • Image data is seeing on a computer, or play back pictures and sound recorded on a tape and view them on a computer. (PC Camera, Video Streaming) • You need to...
... the USB cable (supplied)" (p. 14). If your camcorder. To check where the images are stored on your camcorder. b Note • When you insert the connector in your camcorder to a Windows computer 13 See "Connecting with your camcorder is a MICROMV format model, refer also to the separate MovieShaker Application ... a "Memory Stick" to a computer for copying and editing pictures and sound recorded on a tape. • Image data is seeing on a computer, or play back pictures and sound recorded on a tape and view them on a computer. (PC Camera, Video Streaming) • You need to...
Computer Applications Guide
Page 14
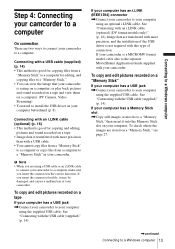
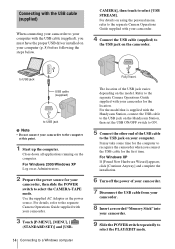
...on your computer (p. 8) before following the steps below. It may take some time for the computer to recognize the camcorder when you must have the proper USB driver installed on the Handycam Station, then set the USB ON/OFF switch to ON. 5 Connect the other end of the USB cable to a...running on the model. Connecting with the USB cable (supplied) When connecting your camcorder to your computer with the USB cable (supplied), you connect the USB cable for your camcorder, then slide the POWER switch to select the CAMERA-TAPE mode. CAMERA], then touch to the computer at this point. 1 Start ...
...on your computer (p. 8) before following the steps below. It may take some time for the computer to recognize the camcorder when you must have the proper USB driver installed on the Handycam Station, then set the USB ON/OFF switch to ON. 5 Connect the other end of the USB cable to a...running on the model. Connecting with the USB cable (supplied) When connecting your camcorder to your computer with the USB cable (supplied), you connect the USB cable for your camcorder, then slide the POWER switch to select the CAMERA-TAPE mode. CAMERA], then touch to the computer at this point. 1 Start ...

Computer Applications Guide
Page 17
... power source. For details, refer to the separate Camera Operations Guide supplied with your camcorder. Connecting to a Windows computer Step 5: Checking the connection Playing pictures recorded on a tape on the desktop. 2 Click (Capture Environment). 4 Prepare the power source for Sony and check the connection. b Note • Before following the procedure below , make sure...
... power source. For details, refer to the separate Camera Operations Guide supplied with your camcorder. Connecting to a Windows computer Step 5: Checking the connection Playing pictures recorded on a tape on the desktop. 2 Click (Capture Environment). 4 Prepare the power source for Sony and check the connection. b Note • Before following the procedure below , make sure...
Computer Applications Guide
Page 19
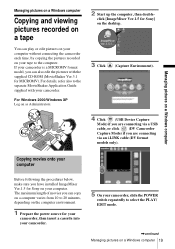
.... 2 Start up the computer, then double- If your camcorder is a MICROMV format model, you can play or edit pictures on your computer without connecting the camcorder each time, by copying the pictures recorded on your tape to the computer. Managing pictures on a Windows computer Managing .... 1 Prepare the power source for your camcorder, then insert a cassette into your camcorder. 5 On your camcorder, slide the POWER switch repeatedly to the separate MovieShaker Application Guide supplied with the supplied CD-ROM (MovieShaker Ver.3.1 for Sony on your computer. Copying movies onto your ...
.... 2 Start up the computer, then double- If your camcorder is a MICROMV format model, you can play or edit pictures on your computer without connecting the camcorder each time, by copying the pictures recorded on your tape to the computer. Managing pictures on a Windows computer Managing .... 1 Prepare the power source for your camcorder, then insert a cassette into your camcorder. 5 On your camcorder, slide the POWER switch repeatedly to the separate MovieShaker Application Guide supplied with the supplied CD-ROM (MovieShaker Ver.3.1 for Sony on your computer. Copying movies onto your ...

Computer Applications Guide
Page 20
This operation is not necessary when connecting the camcorder to the computer via an i.LINK cable (p. 16). 7 Connect your camcorder. b Note • (forward one frame at a time) and (rewind one frame at the point you want to (black). 12Click (Stop) at a time...[ (STANDARD SET)] and [USB-PLY/ EDT], then touch to the separate Camera Operations Guide supplied with your camcorder to the computer (p. 13). 8 Click Capture). (Motion Picture 10Click (Playback) to play back the tape. 11Click (Capture) at the point you want to start copying. 9 Click to select an album to copy...
This operation is not necessary when connecting the camcorder to the computer via an i.LINK cable (p. 16). 7 Connect your camcorder. b Note • (forward one frame at a time) and (rewind one frame at the point you want to (black). 12Click (Stop) at a time...[ (STANDARD SET)] and [USB-PLY/ EDT], then touch to the separate Camera Operations Guide supplied with your camcorder to the computer (p. 13). 8 Click Capture). (Motion Picture 10Click (Playback) to play back the tape. 11Click (Capture) at the point you want to start copying. 9 Click to select an album to copy...

Computer Applications Guide
Page 23
PC Camera You can play a movie recorded on a tape on your camcorder to select [USB STREAM]. MENU], [MENU], [ (STANDARD SET)] and [USB-PLY/ EDT], then touch to the computer via the USB cable (supplied) (p. 14). ,continued Managing...AC Adaptor as the power source. 5 For Video Streaming, touch [P- By using communication software, you have installed ImageMixer Ver.1.5 for Sony on the computer screen. click [ImageMixer Ver.1.5 for Sony] on your camcorder, then slide the POWER switch repeatedly to distribute the picture live via the USB port - Managing pictures on a Windows computer...
PC Camera You can play a movie recorded on a tape on your camcorder to select [USB STREAM]. MENU], [MENU], [ (STANDARD SET)] and [USB-PLY/ EDT], then touch to the computer via the USB cable (supplied) (p. 14). ,continued Managing...AC Adaptor as the power source. 5 For Video Streaming, touch [P- By using communication software, you have installed ImageMixer Ver.1.5 for Sony on the computer screen. click [ImageMixer Ver.1.5 for Sony] on your camcorder, then slide the POWER switch repeatedly to distribute the picture live via the USB port - Managing pictures on a Windows computer...

Computer Applications Guide
Page 24
The following procedure describes how to select the PLAY/ EDIT mode. 24 Managing pictures on a tape (maximum length of about one hour). click [ImageMixer Ver.1.5 for Sony] on the desktop. 2 Click (EZ VIDEO CD). 3 Prepare the power source for your camcorder, then slide the POWER switch repeatedly to create a Video CD from a picture recorded...
The following procedure describes how to select the PLAY/ EDIT mode. 24 Managing pictures on a tape (maximum length of about one hour). click [ImageMixer Ver.1.5 for Sony] on the desktop. 2 Click (EZ VIDEO CD). 3 Prepare the power source for your camcorder, then slide the POWER switch repeatedly to create a Video CD from a picture recorded...

Computer Applications Guide
Page 25
...4GB) to the operating instructions supplied with Windows Media Player (You may be able to the CAMERA-TAPE mode. This is finished. a computer equipped with a DVD drive and software compatible with your camcorder. 5 Search for the point on the created Video CD. To cancel the operation, click [... CD. • Select a hard disk that the camcorder is currently seeing when the POWER switch is imported to the Video CD. a computer equipped with each player for the [Location of the picture stops automatically when the tape is played to the separate Camera Operations Guide supplied with...
...4GB) to the operating instructions supplied with Windows Media Player (You may be able to the CAMERA-TAPE mode. This is finished. a computer equipped with a DVD drive and software compatible with your camcorder. 5 Search for the point on the created Video CD. To cancel the operation, click [... CD. • Select a hard disk that the camcorder is currently seeing when the POWER switch is imported to the Video CD. a computer equipped with each player for the [Location of the picture stops automatically when the tape is played to the separate Camera Operations Guide supplied with...
Computer Applications Guide
Page 33
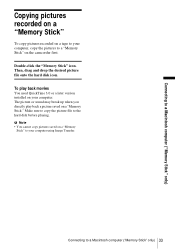
Connecting to a Macintosh computer ("Memory Stick" only) Copying pictures recorded on a "Memory Stick" To copy pictures recorded on a tape to your computer. The picture or sound may break up when you directly play back movies You need QuickTime 3.0 or a later version installed on a "Memory ... Stick" only) 33 Then, drag and drop the desired picture file onto the hard disk icon. b Note • You cannot copy pictures saved on the camcorder first. Double-click the "Memory Stick" icon. Connecting to a "Memory Stick" on a "Memory Stick" to the hard disk before playing.
Connecting to a Macintosh computer ("Memory Stick" only) Copying pictures recorded on a "Memory Stick" To copy pictures recorded on a tape to your computer. The picture or sound may break up when you directly play back movies You need QuickTime 3.0 or a later version installed on a "Memory ... Stick" only) 33 Then, drag and drop the desired picture file onto the hard disk icon. b Note • You cannot copy pictures saved on the camcorder first. Double-click the "Memory Stick" icon. Connecting to a "Memory Stick" on a "Memory Stick" to the hard disk before playing.
Computer Applications Guide
Page 34
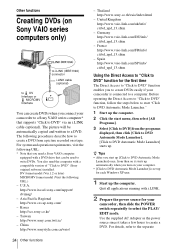
...tape. U.S.A. Asia Pacific Regional http://www.css.ap.sony.com/ - For system and operation requirements, visit the following URL: * Note that you need the computer with i.LINK. 2 Prepare the power source for each Windows XP user. 1 Start up automatically when you connect your camcorder to a Sony ...VAIO series computer* that can create DVDs when you turn on your computer. • [Click to DVD Automatic Mode Launcher] is connected to write DVDs. DV format model (Ver.1.2 or later) MICROMV format model (Visit the ...
...tape. U.S.A. Asia Pacific Regional http://www.css.ap.sony.com/ - For system and operation requirements, visit the following URL: * Note that you need the computer with i.LINK. 2 Prepare the power source for each Windows XP user. 1 Start up automatically when you connect your camcorder to a Sony ...VAIO series computer* that can create DVDs when you turn on your computer. • [Click to DVD Automatic Mode Launcher] is connected to write DVDs. DV format model (Ver.1.2 or later) MICROMV format model (Visit the ...

Computer Applications Guide
Page 35
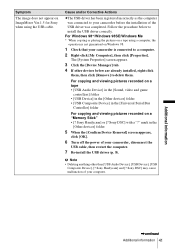
... any of the following occurs, copying of your camcorder, touch [CANCEL] after creating a DVD. "Click to the separate Camera Operations Guide supplied with the same content, touch [YES]. CAPTURING: The picture recorded on the LCD screen of the picture is displayed on the tape. ,continued Other functions 35 Other functions When you...
... any of the following occurs, copying of your camcorder, touch [CANCEL] after creating a DVD. "Click to the separate Camera Operations Guide supplied with the same content, touch [YES]. CAPTURING: The picture recorded on the LCD screen of the picture is displayed on the tape. ,continued Other functions 35 Other functions When you...

Computer Applications Guide
Page 36
While playing back a tape - While recording images onto a "Memory Stick" - When touching [P-MENU], [MENU], [ (STANDARD SET)] and [A/VtDV OUT], then touch to DVD" is started up from the computer 36 Other functions - When "Click to select [ON]. (DV format models only) - When normal and wide size pictures are recorded on the same tape. • You cannot operate your camcorder in the following situations: - When the data of the tape contains a date before the recording date of the later images. -
While playing back a tape - While recording images onto a "Memory Stick" - When touching [P-MENU], [MENU], [ (STANDARD SET)] and [A/VtDV OUT], then touch to DVD" is started up from the computer 36 Other functions - When "Click to select [ON]. (DV format models only) - When normal and wide size pictures are recorded on the same tape. • You cannot operate your camcorder in the following situations: - When the data of the tape contains a date before the recording date of the later images. -

Computer Applications Guide
Page 40
... cannot view the pictures the camcorder is supplied with the Handycam Station, set the USB ON/OFF switch to the camcorder firmly. cDisconnect the cable from the computer and camcorder, then connect it again. cSlide the POWER switch to select the CAMERA-TAPE mode, touch [P-MENU], [MENU.... 40 Additional information You cannot view the pictures recorded on a tape on the Macintosh computer. cTo copy pictures recorded on a tape to your Macintosh computer, copy the pictures to your camcorder. Additional information Troubleshooting Symptom Cause and/or Corrective Actions The computer does...
... cannot view the pictures the camcorder is supplied with the Handycam Station, set the USB ON/OFF switch to the camcorder firmly. cDisconnect the cable from the computer and camcorder, then connect it again. cSlide the POWER switch to select the CAMERA-TAPE mode, touch [P-MENU], [MENU.... 40 Additional information You cannot view the pictures recorded on a tape on the Macintosh computer. cTo copy pictures recorded on a tape to your Macintosh computer, copy the pictures to your camcorder. Additional information Troubleshooting Symptom Cause and/or Corrective Actions The computer does...
Computer Applications Guide
Page 41
...Check that your camcorder is not guaranteed on ImageMixer Ver.1.5 for Sony when using the USB cable. For Windows 98*/Windows 98SE/Windows Me * When copying or playing the pictures on a tape using a computer, the operation is connected to delete them. Sony DSC] with ...continued Additional information 41 Sony Handycam] and [? mark in the [Universal Serial Bus Controller] folder For copying and viewing pictures recorded on a "Memory Stick" • [? b Note • Deleting anything other devices below to your camcorder before the installation of your camcorder, disconnect the USB ...
...Check that your camcorder is not guaranteed on ImageMixer Ver.1.5 for Sony when using the USB cable. For Windows 98*/Windows 98SE/Windows Me * When copying or playing the pictures on a tape using a computer, the operation is connected to delete them. Sony DSC] with ...continued Additional information 41 Sony Handycam] and [? mark in the [Universal Serial Bus Controller] folder For copying and viewing pictures recorded on a "Memory Stick" • [? b Note • Deleting anything other devices below to your camcorder before the installation of your camcorder, disconnect the USB ...
Computer Applications Guide
Page 42
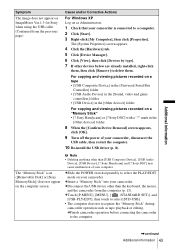
... by type]. 6 If other than [USB Composite Device], [Sound, video and game controllers], [Composite USB Device], [? Sony Handycam] or [? For copying and viewing pictures recorded on a tape • [USB Composite Device] or [Sound, video and game controllers] in the [Universal Serial Bus Controller] folder &#...] in the [Other devices] folder 7 When the [Confirm Device Removal] screen appears, click [OK]. 8 Turn off the power of your camcorder, disconnect the USB cable, then restart the computer. 9 Re-install the USB driver (p. 8). b Note • Deleting anything other devices below...
... by type]. 6 If other than [USB Composite Device], [Sound, video and game controllers], [Composite USB Device], [? Sony Handycam] or [? For copying and viewing pictures recorded on a tape • [USB Composite Device] or [Sound, video and game controllers] in the [Universal Serial Bus Controller] folder &#...] in the [Other devices] folder 7 When the [Confirm Device Removal] screen appears, click [OK]. 8 Turn off the power of your camcorder, disconnect the USB cable, then restart the computer. 9 Re-install the USB driver (p. 8). b Note • Deleting anything other devices below...
Computer Applications Guide
Page 43
...tape • [USB Composite Device] in the [Universal Serial Bus Controller] folder • [USB Audio Device] in the [Sound, video and game controllers] folder • [USB Device] in the [Other devices] folder 8 When the [Confirm Device Removal] screen appears, click [OK]. 9 Turn off the power of your camcorder. Sony Handycam] and [? Sony... DSC] may cause malfunction of your camcorder, disconnect the USB cable, then restart the computer. 10 Re-install the USB ...
...tape • [USB Composite Device] in the [Universal Serial Bus Controller] folder • [USB Audio Device] in the [Sound, video and game controllers] folder • [USB Device] in the [Other devices] folder 8 When the [Confirm Device Removal] screen appears, click [OK]. 9 Turn off the power of your camcorder. Sony Handycam] and [? Sony... DSC] may cause malfunction of your camcorder, disconnect the USB cable, then restart the computer. 10 Re-install the USB ...
Computer Applications Guide
Page 46
... 11 CD-RW 25, 44 Click to DVD 34 Copying and viewing pictures (on a "Memory Stick 26, 33 Copying and viewing pictures recorded on a tape ....... 19 P PC Camera 23 Preview 22 U USB cable 14 USB driver 8 USB Streaming 23 V VAIO 34 Video CD 24 Video Streaming 23 W WINASPI...0a 10 Drag and drop 21 DV Interface 16, 34 DVD 34 H Handycam Station ........ 14, 32 I i.LINK cable 13, 16, 34 Image Transfer 11, 26 ImageMixer Ver.1.5 for Sony 9, 19 Install 8, 9, 11 M Macintosh 3, 31 MEMORY MIX 29 "Memory Stick" ..... 26, 29, 33 MICROMV 2 O On-line help 22 46 Additional information
... 11 CD-RW 25, 44 Click to DVD 34 Copying and viewing pictures (on a "Memory Stick 26, 33 Copying and viewing pictures recorded on a tape ....... 19 P PC Camera 23 Preview 22 U USB cable 14 USB driver 8 USB Streaming 23 V VAIO 34 Video CD 24 Video Streaming 23 W WINASPI...0a 10 Drag and drop 21 DV Interface 16, 34 DVD 34 H Handycam Station ........ 14, 32 I i.LINK cable 13, 16, 34 Image Transfer 11, 26 ImageMixer Ver.1.5 for Sony 9, 19 Install 8, 9, 11 M Macintosh 3, 31 MEMORY MIX 29 "Memory Stick" ..... 26, 29, 33 MICROMV 2 O On-line help 22 46 Additional information


