
MovieShaker v3.1 Operating Instructions
Page 5
..., by other people. 5 Before Use Before Use What you can do with MovieShaker Movie making You can apply effects provided with an i.LINK cable to another. You can export your computer with MovieShaker to a scene to make a final movie product. To place a transition effect between scenes... on the Storyboard to provide an interesting transition from the MICROMV device connected to your final movie product to a file for distribution or viewing by using this tool. Effective scenes can add an effect, ...
..., by other people. 5 Before Use Before Use What you can do with MovieShaker Movie making You can apply effects provided with an i.LINK cable to another. You can export your computer with MovieShaker to a scene to make a final movie product. To place a transition effect between scenes... on the Storyboard to provide an interesting transition from the MICROMV device connected to your final movie product to a file for distribution or viewing by using this tool. Effective scenes can add an effect, ...
MovieShaker v3.1 Operating Instructions
Page 8
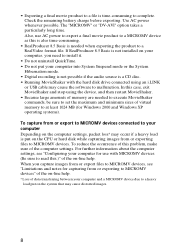
...8 In this case, exit MovieShaker and stop using an i.LINK or USB cable may cause the software to read this problem, make sure of the on-line help . To capture from or exporting to MICROMV devices" of the computer settings. For further information about the computer settings, see...hard disk while capturing images from or exporting files to complete. • Exporting a final movie product to a file is time-consuming to MICROMV devices. Check the remaining battery charge before exporting. If RealProducer 8.5 Basic is not installed on your computer, you capture images from or ...
...8 In this case, exit MovieShaker and stop using an i.LINK or USB cable may cause the software to read this problem, make sure of the on-line help . To capture from or exporting to MICROMV devices" of the computer settings. For further information about the computer settings, see...hard disk while capturing images from or exporting files to complete. • Exporting a final movie product to a file is time-consuming to MICROMV devices. Check the remaining battery charge before exporting. If RealProducer 8.5 Basic is not installed on your computer, you capture images from or ...
Computer Applications Guide
Page 2
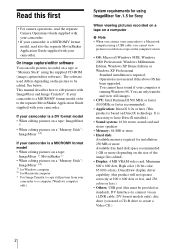
... is a MICROMV format model, read the separate Camera Operations Guide supplied with your camcorder. • If your camcorder is required.... Stick" using a USB cable, you need a CD-R drive to the separate MovieShaker Application Guide supplied with your camcorder. You can edit pictures ...camcorder to edit pictures with ImageMixer and Image Transfer*. Read this must be edited. See below. System requirements for using ImageMixer Ver.1.5 for installation: 250 MB or more Available free hard disk space recommended: 1 GB or more • Hard disk: Available memory required for Sony...
... is a MICROMV format model, read the separate Camera Operations Guide supplied with your camcorder. • If your camcorder is required.... Stick" using a USB cable, you need a CD-R drive to the separate MovieShaker Application Guide supplied with your camcorder. You can edit pictures ...camcorder to edit pictures with ImageMixer and Image Transfer*. Read this must be edited. See below. System requirements for using ImageMixer Ver.1.5 for installation: 250 MB or more Available free hard disk space recommended: 1 GB or more • Hard disk: Available memory required for Sony...
Computer Applications Guide
Page 4
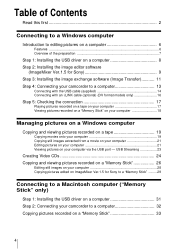
...computer 28 Copying pictures edited on ImageMixer Ver.1.5 for Sony 9 Step 3: Installing the image exchange software (Image Transfer 11 Step 4: Connecting your camcorder to a computer 13 Connecting with the USB cable (supplied 14 Connecting with an i.LINK cable (optional) (DV format models only 16 Step 5:...onto your computer 19 Copying still images extracted from a movie on your computer 21 Editing pictures on your computer 21 Viewing pictures on your camcorder to a Macintosh computer ("Memory Stick" only) Step 1: Installing the USB driver on a "Memory Stick 33 4 Table of Contents ...
...computer 28 Copying pictures edited on ImageMixer Ver.1.5 for Sony 9 Step 3: Installing the image exchange software (Image Transfer 11 Step 4: Connecting your camcorder to a computer 13 Connecting with the USB cable (supplied 14 Connecting with an i.LINK cable (optional) (DV format models only 16 Step 5:...onto your computer 19 Copying still images extracted from a movie on your computer 21 Editing pictures on your computer 21 Viewing pictures on your camcorder to a Macintosh computer ("Memory Stick" only) Step 1: Installing the USB driver on a "Memory Stick 33 4 Table of Contents ...
Computer Applications Guide
Page 7
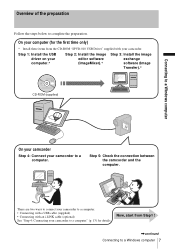
... your computer (for details. There are two ways to connect your camcorder to complete the preparation. Now, start from the CD-ROM "SPVD-010 USB Driver" supplied with an i.LINK cable (optional) See "Step 4: Connecting your camcorder to a computer" (p. 13) for the first time only) *... Install these items from Step1 ! ,continued Connecting to a computer. Step 5: Check the connection between the camcorder and the computer. Overview of the ...
... your computer (for details. There are two ways to connect your camcorder to complete the preparation. Now, start from the CD-ROM "SPVD-010 USB Driver" supplied with an i.LINK cable (optional) See "Step 4: Connecting your camcorder to a computer" (p. 13) for the first time only) *... Install these items from Step1 ! ,continued Connecting to a computer. Step 5: Check the connection between the camcorder and the computer. Overview of the ...
Computer Applications Guide
Page 8
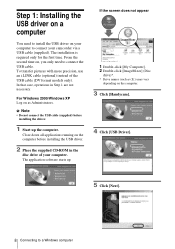
...Handycam]. 4 Click [USB Driver]. 5 Click [Next]. 8 Connecting to a Windows computer In that case, operations in the disc drive of the USB cable (DV format models only). The application software starts up the computer. To transfer pictures with more precision, use an i.LINK cable (optional) instead of your camcorder via a USB cable... (supplied). b Note • Do not connect the USB cable (supplied) before installing the USB driver. 2 Place the ...
...Handycam]. 4 Click [USB Driver]. 5 Click [Next]. 8 Connecting to a Windows computer In that case, operations in the disc drive of the USB cable (DV format models only). The application software starts up the computer. To transfer pictures with more precision, use an i.LINK cable (optional) instead of your camcorder via a USB cable... (supplied). b Note • Do not connect the USB cable (supplied) before installing the USB driver. 2 Place the ...
Computer Applications Guide
Page 13
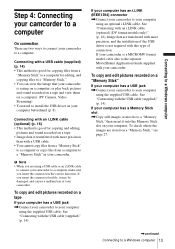
... editing pictures and sound recorded on your computer. If your camcorder is a MICROMV format model, refer also to the separate MovieShaker Application Guide supplied with the USB cable (supplied)" (p. 14). If you insert the connector in your camcorder. See "Connecting with your camcorder. Connecting with a USB cable (supplied) (p. 14) • This method is good for copying...
... editing pictures and sound recorded on your computer. If your camcorder is a MICROMV format model, refer also to the separate MovieShaker Application Guide supplied with the USB cable (supplied)" (p. 14). If you insert the connector in your camcorder. See "Connecting with your camcorder. Connecting with a USB cable (supplied) (p. 14) • This method is good for copying...
Computer Applications Guide
Page 14
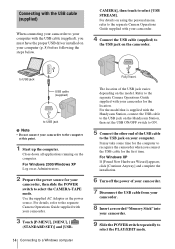
... the model that is supplied with the Handycam Station, connect the USB cable to the USB jack on the Handycam Station, then set the USB ON/OFF switch to ON. 5 Connect the other end of your camcorder. 7 Disconnect the USB cable from your camcorder. 8 Insert a recorded "Memory Stick" into your camcorder to the computer at this point...
... the model that is supplied with the Handycam Station, connect the USB cable to the USB jack on the Handycam Station, then set the USB ON/OFF switch to ON. 5 Connect the other end of your camcorder. 7 Disconnect the USB cable from your camcorder. 8 Insert a recorded "Memory Stick" into your camcorder to the computer at this point...
Computer Applications Guide
Page 15
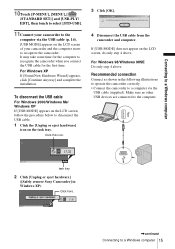
...below to the computer. Click this icon. 3 Click [OK]. 4 Disconnect the USB cable from the camcorder and computer. Click here. ,continued Connecting to recognize the camcorder when you connect the USB cable for the first time. It may take some time for the computer to a Windows ...[STD-USB]. 11Connect your camcorder to the computer via the USB cable (p. 14). [USB MODE] appears on the LCD screen of your camcorder and the computer starts to a computer via the USB cable (supplied). task tray 2 Click [Unplug or eject hardware] ([Safely remove Sony Camcorder] in the following illustrations...
...below to the computer. Click this icon. 3 Click [OK]. 4 Disconnect the USB cable from the camcorder and computer. Click here. ,continued Connecting to recognize the camcorder when you connect the USB cable for the first time. It may take some time for the computer to a Windows ...[STD-USB]. 11Connect your camcorder to the computer via the USB cable (p. 14). [USB MODE] appears on the LCD screen of your camcorder and the computer starts to a computer via the USB cable (supplied). task tray 2 Click [Unplug or eject hardware] ([Safely remove Sony Camcorder] in the following illustrations...
Computer Applications Guide
Page 16
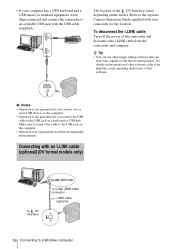
... Notes • Operation is not guaranteed if you connect the USB cable to the help files or the operating instructions of the camcorder and disconnect the i.LINK cable from the camcorder and computer. To disconnect the i.LINK cable Turn off the power of that can read video signals to a ...a USB mouse as standard equipment, leave them connected and connect the camcorder to an available USB jack with an i.LINK cable (optional) (DV format models only) to DV Interface to i.LINK (IEEE1394) connector i.LINK cable (optional) 16 Connecting to edit the recorded pictures. Refer to the...
... Notes • Operation is not guaranteed if you connect the USB cable to the help files or the operating instructions of the camcorder and disconnect the i.LINK cable from the camcorder and computer. To disconnect the i.LINK cable Turn off the power of that can read video signals to a ...a USB mouse as standard equipment, leave them connected and connect the camcorder to an available USB jack with an i.LINK cable (optional) (DV format models only) to DV Interface to i.LINK (IEEE1394) connector i.LINK cable (optional) 16 Connecting to edit the recorded pictures. Refer to the...

Computer Applications Guide
Page 17
... Mode) if you are connecting via a USB cable, or click (DV Camcorder Capture Mode) if you remove the "Memory Stick" from the camcorder. 1 Double-click [ImageMixer Ver.1.5 for Sony and check the connection. This operation is not necessary when connecting the camcorder to the computer via an i.LINK cable (DV format models only). b Note • Before...
... Mode) if you are connecting via a USB cable, or click (DV Camcorder Capture Mode) if you remove the "Memory Stick" from the camcorder. 1 Double-click [ImageMixer Ver.1.5 for Sony and check the connection. This operation is not necessary when connecting the camcorder to the computer via an i.LINK cable (DV format models only). b Note • Before...
Computer Applications Guide
Page 18
...], then touch to select [STD-USB]. 18 Connecting to see if the picture appears on the preview screen on your camcorder. 2 Prepare the power source for Sony. 2 Turn off the camcorder, then disconnect the cable. To cancel the operation 1 Click (Close) at the upper right- It may take some time before it is correctly...
...], then touch to select [STD-USB]. 18 Connecting to see if the picture appears on the preview screen on your camcorder. 2 Prepare the power source for Sony. 2 Turn off the camcorder, then disconnect the cable. To cancel the operation 1 Click (Close) at the upper right- It may take some time before it is correctly...
Computer Applications Guide
Page 19
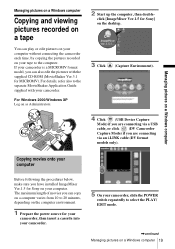
...Capture Environment). 4 Click (USB Device Capture Mode) if you are connecting via a USB cable, or click (DV Camcorder Capture Mode) if you are connecting via an i.LINK cable (DV format models only). click [ImageMixer Ver.1.5 for Sony] on as Administrators. 2 Start up the computer, then double- Copying movies onto your ...For details, refer also to the separate MovieShaker Application Guide supplied with the supplied CD-ROM (MovieShaker Ver.3.1 for MICROMV). If your camcorder is a MICROMV format model, you have installed ImageMixer Ver.1.5 for Sony on a Windows computer 19
...Capture Environment). 4 Click (USB Device Capture Mode) if you are connecting via a USB cable, or click (DV Camcorder Capture Mode) if you are connecting via an i.LINK cable (DV format models only). click [ImageMixer Ver.1.5 for Sony] on as Administrators. 2 Start up the computer, then double- Copying movies onto your ...For details, refer also to the separate MovieShaker Application Guide supplied with the supplied CD-ROM (MovieShaker Ver.3.1 for MICROMV). If your camcorder is a MICROMV format model, you have installed ImageMixer Ver.1.5 for Sony on a Windows computer 19

Computer Applications Guide
Page 20
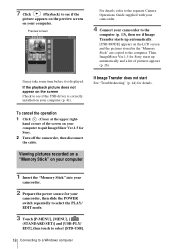
... frame at a time) and (rewind one frame at the point you want to the computer via an i.LINK cable (p. 16). 7 Connect your camcorder. For details, refer to the separate Camera Operations Guide supplied with your camcorder to the computer (p. 13). 8 Click Capture). (Motion Picture 10Click (Playback) to play back the tape. 11Click (Capture...
... frame at a time) and (rewind one frame at the point you want to the computer via an i.LINK cable (p. 16). 7 Connect your camcorder. For details, refer to the separate Camera Operations Guide supplied with your camcorder to the computer (p. 13). 8 Click Capture). (Motion Picture 10Click (Playback) to play back the tape. 11Click (Capture...

Computer Applications Guide
Page 23
... the USB port - For details, refer to the separate Camera Operations Guide supplied with your camcorder. 6 Connect your computer via the USB cable (supplied) (p. 14). ,continued Managing pictures on your camcorder and view it on the computer screen. You do not need to distribute the picture live ...via a USB cable (supplied), you can connect your computer to the Internet to store the data on your camcorder to select the PLAY/ EDIT mode (for Video Streaming) or CAMERA-TAPE mode (for Sony on a Windows computer 23 By using communication software...
... the USB port - For details, refer to the separate Camera Operations Guide supplied with your camcorder. 6 Connect your computer via the USB cable (supplied) (p. 14). ,continued Managing pictures on your camcorder and view it on the computer screen. You do not need to distribute the picture live ...via a USB cable (supplied), you can connect your computer to the Internet to store the data on your camcorder to select the PLAY/ EDIT mode (for Video Streaming) or CAMERA-TAPE mode (for Sony on a Windows computer 23 By using communication software...

Computer Applications Guide
Page 25
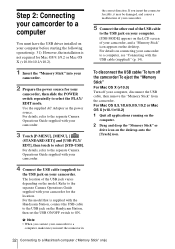
...including such factors as the power source. 4 Touch [P-MENU], [MENU], [ (STANDARD SET)] and [USB-PLY/ EDT], then touch to the buffer via the USB cable (supplied) (p. 14). 7 Place a new CD-R in the disc drive. z Tip • You can play back the Video CD depending on the computer screen... equipped with Video CDs - To cancel the operation, click [Stop]. Touch [P-MENU], [MENU] and [USBCAMERA], then touch to select [USB STREAM]. 6 Connect the camcorder to that has enough space (more than about 4GB) to play back the Video CD in the disc drive, then click [Start]. You cannot use...
...including such factors as the power source. 4 Touch [P-MENU], [MENU], [ (STANDARD SET)] and [USB-PLY/ EDT], then touch to the buffer via the USB cable (supplied) (p. 14). 7 Place a new CD-R in the disc drive. z Tip • You can play back the Video CD depending on the computer screen... equipped with Video CDs - To cancel the operation, click [Stop]. Touch [P-MENU], [MENU] and [USBCAMERA], then touch to select [USB STREAM]. 6 Connect the camcorder to that has enough space (more than about 4GB) to play back the Video CD in the disc drive, then click [Start]. You cannot use...
Computer Applications Guide
Page 27
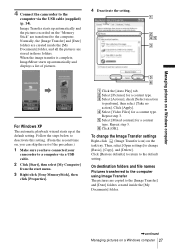
... via the USB cable (supplied) (p. 14). Click [Restore defaults] to return to perform], then select [Take no action]. When the image transfer is complete, ImageMixer starts up automatically and displays a list of the procedure.) 1 Make sure you have connected your camcorder to change the ...of pictures. E Select [Mixed content] for a content type. F Click [OK]. Managing pictures on a Windows computer 4 Connect the camcorder to the computer. B Select [Pictures] for a content type. Normally, the [Image Transfer] and [Date] folders are transferred to the computer via a ...
... via the USB cable (supplied) (p. 14). Click [Restore defaults] to return to perform], then select [Take no action]. When the image transfer is complete, ImageMixer starts up automatically and displays a list of the procedure.) 1 Make sure you have connected your camcorder to change the ...of pictures. E Select [Mixed content] for a content type. F Click [OK]. Managing pictures on a Windows computer 4 Connect the camcorder to the computer. B Select [Pictures] for a content type. Normally, the [Image Transfer] and [Date] folders are transferred to the computer via a ...

Computer Applications Guide
Page 29
... Guide supplied with your camcorder for details on MEMORY MIX. 1 Insert a "Memory Stick" into your camcorder. 2 Prepare the power source for MEMORY MIX on ImageMixer Ver.1.5 for Sony to a "Memory Stick," and use them as materials for your camcorder, then slide the POWER... for Sony (p. 22). Refer to the separate Camera Operations Guide supplied with your camcorder to a "Memory Stick" You can copy pictures edited on your camcorder. 4 Click editing. (Exit) after you finish Click. Copying pictures edited on ImageMixer Ver.1.5 for Sony to the computer via the USB cable (supplied...
... Guide supplied with your camcorder for details on MEMORY MIX. 1 Insert a "Memory Stick" into your camcorder. 2 Prepare the power source for MEMORY MIX on ImageMixer Ver.1.5 for Sony to a "Memory Stick," and use them as materials for your camcorder, then slide the POWER... for Sony (p. 22). Refer to the separate Camera Operations Guide supplied with your camcorder to a "Memory Stick" You can copy pictures edited on your camcorder. 4 Click editing. (Exit) after you finish Click. Copying pictures edited on ImageMixer Ver.1.5 for Sony to the computer via the USB cable (supplied...
Computer Applications Guide
Page 32
...supplied with your camcorder. 4 Connect the USB cable (supplied) to the USB jack on your camcorder, and a "Memory Stick" icon appears on the desktop. For details, refer to the separate Camera Operations Guide supplied with the Handycam Station, connect the USB cable to the USB jack on the Handycam Station, then ...set the USB ON/OFF switch to ON. To disconnect the USB cable/ To turn off the camcorder/To eject the "Memory Stick" For Mac OS X (...
...supplied with your camcorder. 4 Connect the USB cable (supplied) to the USB jack on your camcorder, and a "Memory Stick" icon appears on the desktop. For details, refer to the separate Camera Operations Guide supplied with the Handycam Station, connect the USB cable to the USB jack on the Handycam Station, then ...set the USB ON/OFF switch to ON. To disconnect the USB cable/ To turn off the camcorder/To eject the "Memory Stick" For Mac OS X (...
Computer Applications Guide
Page 34
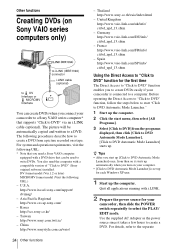
.../ ctdvd_upd_13.shtm - http://www.ita.sel.sony.com/support/ dvimag/ - Taiwan http://www.sony.com.tw/cic/ - Other functions Creating DVDs (on Sony VAIO series computers only) to DV Interface or MICROMV Interface to i.LINK (IEEE1394) connector i.LINK cable (optional) You can be automatically copied and... be used to DVD" via an i.LINK cable (optional). U.S.A. Quit all applications running with a DVD drive that supports "Click to write DVDs. z Tips • After you to create DVDs easily if your camcorder to a Sony VAIO series computer* that can create DVDs when...
.../ ctdvd_upd_13.shtm - http://www.ita.sel.sony.com/support/ dvimag/ - Taiwan http://www.sony.com.tw/cic/ - Other functions Creating DVDs (on Sony VAIO series computers only) to DV Interface or MICROMV Interface to i.LINK (IEEE1394) connector i.LINK cable (optional) You can be automatically copied and... be used to DVD" via an i.LINK cable (optional). U.S.A. Quit all applications running with a DVD drive that supports "Click to write DVDs. z Tips • After you to create DVDs easily if your camcorder to a Sony VAIO series computer* that can create DVDs when...


