
MovieShaker v3.1 Operating Instructions
Page 8
For further information about the computer settings, see "Limitations and notes for use AC power to export a final movie product to a MICROMV device as this case, exit MovieShaker and stop using an i.LINK or USB cable may occur if a heavy load is put on the system that may ...MovieShaker. • Because large amounts of the computer settings. In this is also time-consuming. • RealProducer 8.5 Basic is time-consuming to MICROMV devices" of the on the CPU or hard disk while capturing images from or exporting to complete. To reduce the occurrence of this .)" of...
For further information about the computer settings, see "Limitations and notes for use AC power to export a final movie product to a MICROMV device as this case, exit MovieShaker and stop using an i.LINK or USB cable may occur if a heavy load is put on the system that may ...MovieShaker. • Because large amounts of the computer settings. In this is also time-consuming. • RealProducer 8.5 Basic is time-consuming to MICROMV devices" of the on the CPU or hard disk while capturing images from or exporting to complete. To reduce the occurrence of this .)" of...
MovieShaker v3.1 Operating Instructions
Page 19
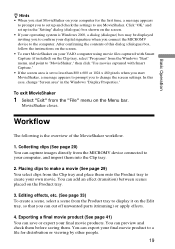
..., and point to "MovieShaker," then click "Use movies captured with Smart Capture." • If the screen area is the overview of this case, change the screen settings. Exporting a final movie product (See page 41) You can capture images directly from the Product tray to create your... After confirming the contents of the MovieShaker workflow. 1. Editing effects, etc. (See page 33) To create a scene, select a scene from the MICROMV device connected to the computer. Workflow The following is set to less than 800 x 600 or 1024 x 480 pixels when you start MovieShaker, a message...
..., and point to "MovieShaker," then click "Use movies captured with Smart Capture." • If the screen area is the overview of this case, change the screen settings. Exporting a final movie product (See page 41) You can capture images directly from the Product tray to create your... After confirming the contents of the MovieShaker workflow. 1. Editing effects, etc. (See page 33) To create a scene, select a scene from the MICROMV device connected to the computer. Workflow The following is set to less than 800 x 600 or 1024 x 480 pixels when you start MovieShaker, a message...
MovieShaker v3.1 Operating Instructions
Page 36
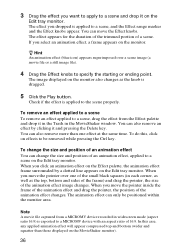
...you move the Effect knobs. When you dropped is exported to be positioned within the monitor area. In this , click on effects to a MICROMV device with an aspect ratio of an animation effect You can only be removed while pressing the Ctrl key. You can also remove an effect...those displayed on the MovieShaker monitor). 36 3 Drag the effect you select an animation effect, a frame appears on the monitor. To do this case, any applied animation effect will appear compressed top and bottom (wider and squatter than one of the animation effect changes. The effect you move ...
...you move the Effect knobs. When you dropped is exported to be positioned within the monitor area. In this , click on effects to a MICROMV device with an aspect ratio of an animation effect You can only be removed while pressing the Ctrl key. You can also remove an effect...those displayed on the MovieShaker monitor). 36 3 Drag the effect you select an animation effect, a frame appears on the monitor. To do this case, any applied animation effect will appear compressed top and bottom (wider and squatter than one of the animation effect changes. The effect you move ...

MovieShaker v3.1 Operating Instructions
Page 39
...the Delete key. Basic Operation To remove a text effect applied to a scene To remove a text effect applied to a scene, drag the text effect from a MICROMV device recorded in widescreen mode (aspect ratio 16:9) is used for adjusting the playback speed of a scene displayed on the Edit tray monitor. To change... You can change the volume and/or playback speed of a scene. You can only be removed while pressing the Ctrl key. To do this case, any applied text effect will appear compressed top and bottom (wider and squatter than one of the small black squares (in each corner, as ...
...the Delete key. Basic Operation To remove a text effect applied to a scene To remove a text effect applied to a scene, drag the text effect from a MICROMV device recorded in widescreen mode (aspect ratio 16:9) is used for adjusting the playback speed of a scene displayed on the Edit tray monitor. To change... You can change the volume and/or playback speed of a scene. You can only be removed while pressing the Ctrl key. To do this case, any applied text effect will appear compressed top and bottom (wider and squatter than one of the small black squares (in each corner, as ...

MovieShaker v3.1 Operating Instructions
Page 45
...movie product. If more than one clip at the same time, etc.), it . It takes a long time to MICROMV device" option takes a particularly long time. In this case, be previewed for capturing from scene to scene. Importing an exported movie product does not place its scenes and BGM... are not displayed on the Product tray, as a single clip. When you cannot resolve the problem, contact your sony dealer. Symptom Cause/Remedy ...
...movie product. If more than one clip at the same time, etc.), it . It takes a long time to MICROMV device" option takes a particularly long time. In this case, be previewed for capturing from scene to scene. Importing an exported movie product does not place its scenes and BGM... are not displayed on the Product tray, as a single clip. When you cannot resolve the problem, contact your sony dealer. Symptom Cause/Remedy ...
MovieShaker v3.1 Operating Instructions
Page 47
...assignees. Additional information For customers who purchased the CAMCORDER and Software in Japan 47 SHOULD THE SOFTWARE PROVE DEFECTIVE, YOU (AND NOT SONY OR A SONY AUTHORIZED REPRESENTATIVE) ASSUME THE ENTIRE COST OF ALL NECESSARY SERVICING, REPAIR OR CORRECTION. SONY DOES NOT WARRANT THAT THE FUNCTIONS CONTAINED IN...WARRANTY OR IN ANY WAY INCREASE THE SCOPE OF THIS WARRANTY. DURATION TO NINETY (90) DAY PERIOD DESCRIBED ABOVE. IN ANY CASE, SONY'S ENTIRE LIABILITY UNDER ANY PROVISION OF THIS EULA SHALL BE LIMITED TO THE AMOUNT ACTUALLY PAID ALLOCABLE TO THE SOFTWARE. EXCLUSION OF ...
...assignees. Additional information For customers who purchased the CAMCORDER and Software in Japan 47 SHOULD THE SOFTWARE PROVE DEFECTIVE, YOU (AND NOT SONY OR A SONY AUTHORIZED REPRESENTATIVE) ASSUME THE ENTIRE COST OF ALL NECESSARY SERVICING, REPAIR OR CORRECTION. SONY DOES NOT WARRANT THAT THE FUNCTIONS CONTAINED IN...WARRANTY OR IN ANY WAY INCREASE THE SCOPE OF THIS WARRANTY. DURATION TO NINETY (90) DAY PERIOD DESCRIBED ABOVE. IN ANY CASE, SONY'S ENTIRE LIABILITY UNDER ANY PROVISION OF THIS EULA SHALL BE LIMITED TO THE AMOUNT ACTUALLY PAID ALLOCABLE TO THE SOFTWARE. EXCLUSION OF ...
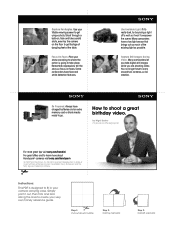
How to shoot a great birthday video.
Page 1
... camcorders have charged batteries and an extra memory card or blank media ready to create your camera carrying case. If it's really dark, try bouncing a light off a wall so it out, then trim and fold along the lines to go. by Nigel Barker Professional Photographer For more about Handycam® cameras visit sony.com/handycam...
... camcorders have charged batteries and an extra memory card or blank media ready to create your camera carrying case. If it's really dark, try bouncing a light off a wall so it out, then trim and fold along the lines to go. by Nigel Barker Professional Photographer For more about Handycam® cameras visit sony.com/handycam...
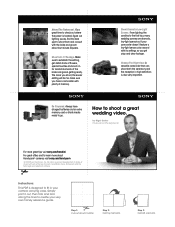
How to shoot a great wedding video.
Page 1
... from and consult with plenty of the bride and groom getting ready. A versatile camcorder that can shoot both the ceremony and the reception in your camera carrying case. How to create your camcorder doesn't feature a low-light sensor, play around outline Step 2: Fold top half... shots of flowers, special touches and zoom in for candid moments of memory. Always have a camcorder with the bride and groom about Handycam® cameras visit sony.com/handycam © 2009 Sony Electronics Inc. Instructions: This PDF is also very important. Make sure to go. All rights ...
... from and consult with plenty of the bride and groom getting ready. A versatile camcorder that can shoot both the ceremony and the reception in your camera carrying case. How to create your camcorder doesn't feature a low-light sensor, play around outline Step 2: Fold top half... shots of flowers, special touches and zoom in for candid moments of memory. Always have a camcorder with the bride and groom about Handycam® cameras visit sony.com/handycam © 2009 Sony Electronics Inc. Instructions: This PDF is also very important. Make sure to go. All rights ...

How to take great vacation video.
Page 1
... whole or in low light. Play with your camcorder's settings before your camera carrying case. Some camcorders have charged batteries and extra memory card or blank media for camera shake. Hearing instructions or parts of Sony. Always have a stabilizing feature that ensure crisp ...side back by Nigel Barker Professional Photographer For more great tips visit sony.com/howdini For great offers and to learn more about Handycam® cameras visit sony.com/handycam © 2009 Sony Electronics Inc. Some camcorders feature technologies that keeps your very own handy reference guide. All...
... whole or in low light. Play with your camcorder's settings before your camera carrying case. Some camcorders have charged batteries and extra memory card or blank media for camera shake. Hearing instructions or parts of Sony. Always have a stabilizing feature that ensure crisp ...side back by Nigel Barker Professional Photographer For more great tips visit sony.com/howdini For great offers and to learn more about Handycam® cameras visit sony.com/handycam © 2009 Sony Electronics Inc. Some camcorders feature technologies that keeps your very own handy reference guide. All...

Computer Applications Guide
Page 3
On trademarks • "Memory Stick" and are registered trademarks of Sony Corporation. • Microsoft and Windows are registered trademarks of Microsoft Corporation in the United States and/or other product names mentioned herein may vary... of Apple Computer, Inc. • QuickTime and the QuickTime logo are from a Windows 2000 computer. Furthermore, "" and "" are not mentioned in each case in this manual are trademarks of their respective companies. However, note that the computer should be the trademarks or registered trademarks of Apple Computer, Inc...
On trademarks • "Memory Stick" and are registered trademarks of Sony Corporation. • Microsoft and Windows are registered trademarks of Microsoft Corporation in the United States and/or other product names mentioned herein may vary... of Apple Computer, Inc. • QuickTime and the QuickTime logo are from a Windows 2000 computer. Furthermore, "" and "" are not mentioned in each case in this manual are trademarks of their respective companies. However, note that the computer should be the trademarks or registered trademarks of Apple Computer, Inc...
Computer Applications Guide
Page 8
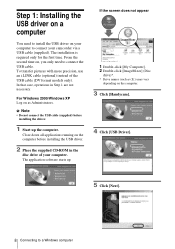
...The installation is required only for the first time. Close down all applications running on the computer before installing the driver. 1 Start up . In that case, operations in the disc drive of the USB cable (DV format models only). From the second time on, you only need to install the USB...[My Computer]. 2 Double-click [ImageMixer] (Disc drive)*. * Drive names (such as Administrators. Step 1: Installing the USB driver on a computer You need to connect your camcorder via a USB cable (supplied). For Windows 2000/Windows XP Log on as (E:)) may vary depending on the computer. 3 Click...
...The installation is required only for the first time. Close down all applications running on the computer before installing the driver. 1 Start up . In that case, operations in the disc drive of the USB cable (DV format models only). From the second time on, you only need to install the USB...[My Computer]. 2 Double-click [ImageMixer] (Disc drive)*. * Drive names (such as Administrators. Step 1: Installing the USB driver on a computer You need to connect your camcorder via a USB cable (supplied). For Windows 2000/Windows XP Log on as (E:)) may vary depending on the computer. 3 Click...

Computer Applications Guide
Page 25
...one of work .) ,continued Managing pictures on a Windows computer 25 Managing pictures on the computer screen. b Notes • Do not press any buttons on the camcorder while creating a Video CD. • Select a hard disk that has enough space (more than about 6GB) for the [Location of the following devices. z... via the USB cable (supplied) (p. 14). 7 Place a new CD-R in the disc drive, then click [Start]. In this case, the picture played up to that the camcorder is currently seeing when the POWER switch is due to the AVI format used to create the Video CD, which divides a picture...
...one of work .) ,continued Managing pictures on a Windows computer 25 Managing pictures on the computer screen. b Notes • Do not press any buttons on the camcorder while creating a Video CD. • Select a hard disk that has enough space (more than about 6GB) for the [Location of the following devices. z... via the USB cable (supplied) (p. 14). 7 Place a new CD-R in the disc drive, then click [Start]. In this case, the picture played up to that the camcorder is currently seeing when the POWER switch is due to the AVI format used to create the Video CD, which divides a picture...

Computer Applications Guide
Page 38
Click (USB Device Capture Mode) in this case. 5 Connect your camcorder to the computer using an i.LINK cable (optional), then connect it may be damaged, and causes a malfunction of your camcorder. 6 Prepare the power source for your camcorder to a computer, make sure you insert the connector ... Mode). For details, refer to connect your camcorder. 38 Other functions z Tip • You can also use the USB cable to the separate Camera Operations Guide supplied with your camcorder and computer for Sony] displayed on the desktop. 4 Click (Preference), check [Capture using the...
Click (USB Device Capture Mode) in this case. 5 Connect your camcorder to the computer using an i.LINK cable (optional), then connect it may be damaged, and causes a malfunction of your camcorder. 6 Prepare the power source for your camcorder to a computer, make sure you insert the connector ... Mode). For details, refer to connect your camcorder. 38 Other functions z Tip • You can also use the USB cable to the separate Camera Operations Guide supplied with your camcorder and computer for Sony] displayed on the desktop. 4 Click (Preference), check [Capture using the...

