Computer Applications Guide
Page 2
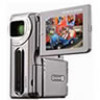
... for installation: 250 MB or more Available free hard disk space recommended: 1 GB or more • Hard disk: Available memory required for Sony When viewing pictures recorded on a tape on a computer b Note • When you cannot view pictures recorded on a tape on the size... display driver capability (this product will not operate correctly at 800 × 600 dots or less, and 256 colors or less.) • Others: USB port (this first • For camera operations, read the separate Camera Operations Guide supplied with your camcorder. • If your camcorder is a MICROMV format ...
... for installation: 250 MB or more Available free hard disk space recommended: 1 GB or more • Hard disk: Available memory required for Sony When viewing pictures recorded on a tape on a computer b Note • When you cannot view pictures recorded on a tape on the size... display driver capability (this product will not operate correctly at 800 × 600 dots or less, and 256 colors or less.) • Others: USB port (this first • For camera operations, read the separate Camera Operations Guide supplied with your camcorder. • If your camcorder is a MICROMV format ...
Computer Applications Guide
Page 4
... to editing pictures on a computer 6 Features ...6 Overview of the preparation 7 Step 1: Installing the USB driver on a computer 8 Step 2: Installing the image editor software (ImageMixer Ver.1.5 for Sony to a "Memory Stick" ......... 29 Connecting to a computer 32 Copying pictures recorded on a computer ...your computer 28 Copying pictures edited on ImageMixer Ver.1.5 for Sony 9 Step 3: Installing the image exchange software (Image Transfer 11 Step 4: Connecting your camcorder to a computer 13 Connecting with the USB cable (supplied 14 Connecting with an i.LINK cable (optional...
... to editing pictures on a computer 6 Features ...6 Overview of the preparation 7 Step 1: Installing the USB driver on a computer 8 Step 2: Installing the image editor software (ImageMixer Ver.1.5 for Sony to a "Memory Stick" ......... 29 Connecting to a computer 32 Copying pictures recorded on a computer ...your computer 28 Copying pictures edited on ImageMixer Ver.1.5 for Sony 9 Step 3: Installing the image exchange software (Image Transfer 11 Step 4: Connecting your camcorder to a computer 13 Connecting with the USB cable (supplied 14 Connecting with an i.LINK cable (optional...
Computer Applications Guide
Page 7
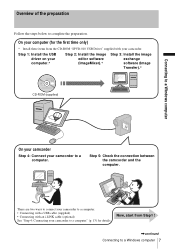
...) • Connecting with your camcorder. There are two ways to connect your camcorder to a Windows computer 7 On your computer (for details. Step 5: Check the connection between the camcorder and the computer. Overview of the preparation Follow the steps below to a computer. Now, start from the CD-ROM "SPVD-010 USB Driver" supplied with an i.LINK...
...) • Connecting with your camcorder. There are two ways to connect your camcorder to a Windows computer 7 On your computer (for details. Step 5: Check the connection between the camcorder and the computer. Overview of the preparation Follow the steps below to a computer. Now, start from the CD-ROM "SPVD-010 USB Driver" supplied with an i.LINK...
Computer Applications Guide
Page 8
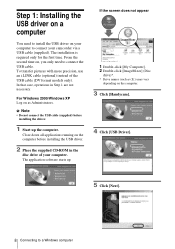
... the computer. To transfer pictures with more precision, use an i.LINK cable (optional) instead of your camcorder via a USB cable (supplied). For Windows 2000/Windows XP Log on as (E:)) may vary depending on the computer. 3 Click [Handycam]. 4 Click [USB Driver]. 5 Click [Next]. 8 Connecting to a Windows computer If the screen does not appear 1 Double-click [My...
... the computer. To transfer pictures with more precision, use an i.LINK cable (optional) instead of your camcorder via a USB cable (supplied). For Windows 2000/Windows XP Log on as (E:)) may vary depending on the computer. 3 Click [Handycam]. 4 Click [USB Driver]. 5 Click [Next]. 8 Connecting to a Windows computer If the screen does not appear 1 Double-click [My...
Computer Applications Guide
Page 9
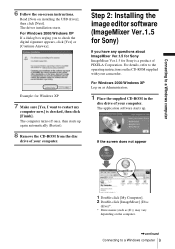
...[Yes, I want to restart my computer now.] is a product of your computer. Step 2: Installing the image editor software (ImageMixer Ver.1.5 for Sony) If you to a Windows computer 9 The application software starts up again automatically (Restart). 8 Remove the CD-ROM from the disc drive of...computer 6 Follow the on-screen instructions. For Windows 2000/Windows XP Log on installing the USB driver], then click [Next]. Connecting to the operating instructions on the CD-ROM supplied with your camcorder. Read [Note on as (E:)) may vary depending on the computer. ,continued Connecting to...
...[Yes, I want to restart my computer now.] is a product of your computer. Step 2: Installing the image editor software (ImageMixer Ver.1.5 for Sony) If you to a Windows computer 9 The application software starts up again automatically (Restart). 8 Remove the CD-ROM from the disc drive of...computer 6 Follow the on-screen instructions. For Windows 2000/Windows XP Log on installing the USB driver], then click [Next]. Connecting to the operating instructions on the CD-ROM supplied with your camcorder. Read [Note on as (E:)) may vary depending on the computer. ,continued Connecting to...
Computer Applications Guide
Page 13
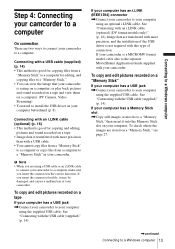
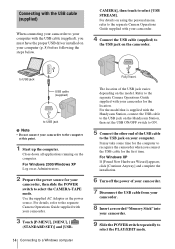
... computer. (PC Camera, Video Streaming) • You need to install the USB driver on a "Memory Stick," see page 27. ,continued Connecting to a computer, make sure you insert the connector in your camcorder. Connecting with a USB cable (supplied) (p. 14) • This method is good for copying and ... and copying files to the separate MovieShaker Application Guide supplied with this type of the USB driver is a MICROMV format model, refer also to a "Memory Stick." • You can view the image that your camcorder is good for copying files from a computer to a "Memory Stick" in the ...
... computer. (PC Camera, Video Streaming) • You need to install the USB driver on a "Memory Stick," see page 27. ,continued Connecting to a computer, make sure you insert the connector in your camcorder. Connecting with a USB cable (supplied) (p. 14) • This method is good for copying and ... and copying files to the separate MovieShaker Application Guide supplied with this type of the USB driver is a MICROMV format model, refer also to a "Memory Stick." • You can view the image that your camcorder is good for copying files from a computer to a "Memory Stick" in the ...
Computer Applications Guide
Page 14
...the model that is supplied with the Handycam Station, connect the USB cable to the USB jack on the Handycam Station, then set the USB ON/OFF switch to the USB jack on the camcorder. For details, refer to the separate Camera Operations Guide supplied with your camcorder, then slide the POWER switch to ...the separate Camera Operations Guide supplied with your computer. It may take some time for the computer to recognize the camcorder when you must have the proper USB driver installed on using the personal menu, refer to select the CAMERA-TAPE mode. CAMERA], then touch to select the ...
...the model that is supplied with the Handycam Station, connect the USB cable to the USB jack on the Handycam Station, then set the USB ON/OFF switch to the USB jack on the camcorder. For details, refer to the separate Camera Operations Guide supplied with your camcorder, then slide the POWER switch to ...the separate Camera Operations Guide supplied with your computer. It may take some time for the computer to recognize the camcorder when you must have the proper USB driver installed on using the personal menu, refer to select the CAMERA-TAPE mode. CAMERA], then touch to select the ...
Computer Applications Guide
Page 18
...Touch [P-MENU], [MENU], [ (STANDARD SET)] and [USB-PLY/ EDT], then touch to select [STD-USB]. 18 Connecting to the computer. Then, ImageMixer Ver.1.5 for Sony starts up automatically. [USB MODE] appears on your camcorder. 2 Prepare the power source for details. It may... quit ImageMixer Ver.1.5 for Sony. 2 Turn off the camcorder, then disconnect the cable. Preview screen For details, refer to the separate Camera Operations Guide supplied with your camcorder. 4 Connect your camcorder to the computer (p. 13), then see if the USB driver is displayed. Viewing pictures recorded...
...Touch [P-MENU], [MENU], [ (STANDARD SET)] and [USB-PLY/ EDT], then touch to select [STD-USB]. 18 Connecting to the computer. Then, ImageMixer Ver.1.5 for Sony starts up automatically. [USB MODE] appears on your camcorder. 2 Prepare the power source for details. It may... quit ImageMixer Ver.1.5 for Sony. 2 Turn off the camcorder, then disconnect the cable. Preview screen For details, refer to the separate Camera Operations Guide supplied with your camcorder. 4 Connect your camcorder to the computer (p. 13), then see if the USB driver is displayed. Viewing pictures recorded...
Computer Applications Guide
Page 31
...Sony Camcorder USB Driver] file and [Sony Camcorder USB Shim] file to a Macintosh computer ("Memory Stick" only) 31 Drag and drop [USB Driver] folder [System Folder] Connecting to [System Folder]. 7 When a message appears, click [OK]. The USB driver is not required for selecting model names appears after a while. 3 Click [Handycam]. 4 Click [USB Driver... to a Macintosh computer ("Memory Stick" only) Step 1: Installing the USB driver on a computer The installation of the USB driver is installed on to "Step 2: Connecting your camcorder to a computer" (p. 32). 1 Start up the computer. 2...
...Sony Camcorder USB Driver] file and [Sony Camcorder USB Shim] file to a Macintosh computer ("Memory Stick" only) 31 Drag and drop [USB Driver] folder [System Folder] Connecting to [System Folder]. 7 When a message appears, click [OK]. The USB driver is not required for selecting model names appears after a while. 3 Click [Handycam]. 4 Click [USB Driver... to a Macintosh computer ("Memory Stick" only) Step 1: Installing the USB driver on a computer The installation of the USB driver is installed on to "Step 2: Connecting your camcorder to a computer" (p. 32). 1 Start up the computer. 2...
Computer Applications Guide
Page 32
...Camera Operations Guide supplied with your camcorder. 4 Connect the USB cable (supplied) to the USB jack on your camcorder to a computer, see "Connecting with the Handycam Station, connect the USB cable to the USB jack on the Handycam Station, then set the USB ON/OFF switch to ON.... with your camcorder to a computer, make sure you connect your camcorder. 3 Touch [P-MENU], [MENU], [ (STANDARD SET)] and [USB-PLY/ EDT], then touch to select [STD-USB]. Step 2: Connecting your camcorder to a computer You must have the USB driver installed on your computer, disconnect the USB cable, then...
...Camera Operations Guide supplied with your camcorder. 4 Connect the USB cable (supplied) to the USB jack on your camcorder to a computer, see "Connecting with the Handycam Station, connect the USB cable to the USB jack on the Handycam Station, then set the USB ON/OFF switch to ON.... with your camcorder to a computer, make sure you connect your camcorder. 3 Touch [P-MENU], [MENU], [ (STANDARD SET)] and [USB-PLY/ EDT], then touch to select [STD-USB]. Step 2: Connecting your camcorder to a computer You must have the USB driver installed on your computer, disconnect the USB cable, then...
Computer Applications Guide
Page 41
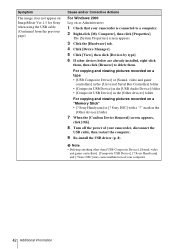
...]. 6 Turn off the power of your computer. Sony DSC] with a "?" Sony Handycam] and [? Sony DSC] may cause malfunction of your camcorder, disconnect the USB cable, then restart the computer. 7 Re-install the USB driver (p. 8). The [System Properties] screen appears. 3 Click the [Device Manager] tab. 4 If other than [USB Audio Device], [USB Device], [USB Composite Device], [? Symptom The image does not appear...
...]. 6 Turn off the power of your computer. Sony DSC] with a "?" Sony Handycam] and [? Sony DSC] may cause malfunction of your camcorder, disconnect the USB cable, then restart the computer. 7 Re-install the USB driver (p. 8). The [System Properties] screen appears. 3 Click the [Device Manager] tab. 4 If other than [USB Audio Device], [USB Device], [USB Composite Device], [? Symptom The image does not appear...
Computer Applications Guide
Page 42
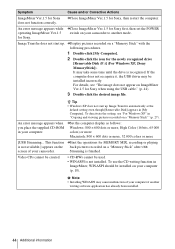
... viewing pictures recorded on as Administrators. 1 Check that your camcorder is connected to delete them , then click [Remove] to a computer. 2 Right-click [My Computer], then click [Properties]. Sony Handycam] or [? Sony DSC] may cause malfunction of your computer. 42 Additional information... USB Device] in the [USB Audio Device] folder • [Composite USB Device] in the [Other devices] folder 7 When the [Confirm Device Removal] screen appears, click [OK]. 8 Turn off the power of your camcorder, disconnect the USB cable, then restart the computer. 9 Re-install the USB driver ...
... viewing pictures recorded on as Administrators. 1 Check that your camcorder is connected to delete them , then click [Remove] to a computer. 2 Right-click [My Computer], then click [Properties]. Sony Handycam] or [? Sony DSC] may cause malfunction of your computer. 42 Additional information... USB Device] in the [USB Audio Device] folder • [Composite USB Device] in the [Other devices] folder 7 When the [Confirm Device Removal] screen appears, click [OK]. 8 Turn off the power of your camcorder, disconnect the USB cable, then restart the computer. 9 Re-install the USB driver ...
Computer Applications Guide
Page 43
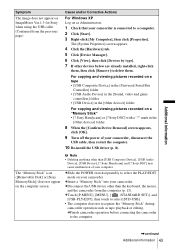
... camcorder, disconnect the USB cable, then restart the computer. 10 Re-install the USB driver (p. 8). mark in the [Other devices] folder For copying and viewing pictures recorded on the computer screen. cSlide the POWER switch repeatedly to delete them. Additional information Symptom The image does not appear on ImageMixer Ver.1.5 for Sony when using the USB...
... camcorder, disconnect the USB cable, then restart the computer. 10 Re-install the USB driver (p. 8). mark in the [Other devices] folder For copying and viewing pictures recorded on the computer screen. cSlide the POWER switch repeatedly to delete them. Additional information Symptom The image does not appear on ImageMixer Ver.1.5 for Sony when using the USB...
Computer Applications Guide
Page 44
...newly recognized drive [Removable Disk (F:)] (For Windows XP, [Sony MemoryStick]). b Note • Installing WINASPI may cause malfunction of your computer (p. 10). cDisplay pictures recorded on your camcorder. cClose ImageMixer Ver.1.5 for Sony does not function correctly. An error message appears when you...be created. • CD-RWs cannot be installed incorrectly. for Sony when using the USB cable." (p. 41). 3 Double-click the desired image file. If the computer does not recognize it, the USB driver may take some time until the drive is finished. cSet the computer...
...newly recognized drive [Removable Disk (F:)] (For Windows XP, [Sony MemoryStick]). b Note • Installing WINASPI may cause malfunction of your computer (p. 10). cDisplay pictures recorded on your camcorder. cClose ImageMixer Ver.1.5 for Sony does not function correctly. An error message appears when you...be created. • CD-RWs cannot be installed incorrectly. for Sony when using the USB cable." (p. 41). 3 Double-click the desired image file. If the computer does not recognize it, the USB driver may take some time until the drive is finished. cSet the computer...
Computer Applications Guide
Page 46
... 14 USB driver 8 USB Streaming 23 V VAIO 34 Video CD 24 Video Streaming 23 W WINASPI 10 Windows 3, 19 Windows Media Player ..... 26 Writable DVD 35 D Digital convert function..... 37 DirectX 8.0a 10 Drag and drop 21 DV Interface 16, 34 DVD 34 H Handycam Station ........ 14, 32 I i....LINK cable 13, 16, 34 Image Transfer 11, 26 ImageMixer Ver.1.5 for Sony 9, 19 Install 8, 9, 11 M Macintosh 3, 31 MEMORY MIX 29 "Memory Stick" ..... 26, 29, 33 MICROMV 2 O On-line help 22 46 Additional information
... 14 USB driver 8 USB Streaming 23 V VAIO 34 Video CD 24 Video Streaming 23 W WINASPI 10 Windows 3, 19 Windows Media Player ..... 26 Writable DVD 35 D Digital convert function..... 37 DirectX 8.0a 10 Drag and drop 21 DV Interface 16, 34 DVD 34 H Handycam Station ........ 14, 32 I i....LINK cable 13, 16, 34 Image Transfer 11, 26 ImageMixer Ver.1.5 for Sony 9, 19 Install 8, 9, 11 M Macintosh 3, 31 MEMORY MIX 29 "Memory Stick" ..... 26, 29, 33 MICROMV 2 O On-line help 22 46 Additional information


