Operating Guide
Page 4
... Damage Requiring Service Unplug the set has been exposed to qualified service personnel. If the set from the wall outlet and disconnect the antenna or cable system. If the set exhibits a distinct change in fire, electric shock, or other hazards. When the set has been subject to excessive shock by the...
... Damage Requiring Service Unplug the set has been exposed to qualified service personnel. If the set from the wall outlet and disconnect the antenna or cable system. If the set exhibits a distinct change in fire, electric shock, or other hazards. When the set has been subject to excessive shock by the...

Operating Guide
Page 6
... interface cable must be used in your camcorder You can use mini DV cassettes marked with . "First Step Guide" for a Class B digital device, pursuant to Part 15 of the FCC Rules. Your camcorder is supplied with two kinds of manuals - Types of "Memory Stick" you can use Your camcorder is...Operating Guide" (This manual) - If this first (Continued) Note This equipment has been tested and found to comply with the limits for connecting the camcorder to a computer and using a "Memory Stick Duo" with "Memory Stick" compatible equipment Be sure to insert the "Memory Stick Duo" into an ...
... interface cable must be used in your camcorder You can use mini DV cassettes marked with . "First Step Guide" for a Class B digital device, pursuant to Part 15 of the FCC Rules. Your camcorder is supplied with two kinds of manuals - Types of "Memory Stick" you can use Your camcorder is...Operating Guide" (This manual) - If this first (Continued) Note This equipment has been tested and found to comply with the limits for connecting the camcorder to a computer and using a "Memory Stick Duo" with "Memory Stick" compatible equipment Be sure to insert the "Memory Stick Duo" into an ...

Operating Guide
Page 7
... operational for illustrating the operating procedures. Doing so might cause your camcorder if necessary (p. 16). Change the screen language before using your camcorder. • Connect the A/V connecting cable to another device with a USB or i.LINK cable, be some tiny black points and/or bright points (white, ..., to avoid damaging the terminal or cause a malfunction of your camcorder attached to the Handycam Station to output audio and video signals. • Disconnect the AC Adaptor from the Handycam Station holding both the Handycam Station and the DC plug. • Be sure to slide ...
... operational for illustrating the operating procedures. Doing so might cause your camcorder if necessary (p. 16). Change the screen language before using your camcorder. • Connect the A/V connecting cable to another device with a USB or i.LINK cable, be some tiny black points and/or bright points (white, ..., to avoid damaging the terminal or cause a malfunction of your camcorder attached to the Handycam Station to output audio and video signals. • Disconnect the AC Adaptor from the Handycam Station holding both the Handycam Station and the DC plug. • Be sure to slide ...

Operating Guide
Page 11
AC Adaptor (1) (p. 12) Rechargeable battery pack NP-FH40 (1) (p. 12, 80) Power cord (1) (p. 12) CD-ROM "Handycam Application Software" (1) (p. 63) Operating Guide (This manual) (1) Handycam Station (1) (p. 12, 93) Wireless Remote Commander (1) (p. 93) A button-type lithium battery is already installed. Getting Started Getting Started Step 1: Checking supplied items Make sure that item supplied. A/V connecting cable (1) (p. 32, 55) USB cable (1) (p. 61) 11 The number in the parentheses indicates the number of that you have following items supplied with your camcorder.
AC Adaptor (1) (p. 12) Rechargeable battery pack NP-FH40 (1) (p. 12, 80) Power cord (1) (p. 12) CD-ROM "Handycam Application Software" (1) (p. 63) Operating Guide (This manual) (1) Handycam Station (1) (p. 12, 93) Wireless Remote Commander (1) (p. 93) A button-type lithium battery is already installed. Getting Started Getting Started Step 1: Checking supplied items Make sure that item supplied. A/V connecting cable (1) (p. 32, 55) USB cable (1) (p. 61) 11 The number in the parentheses indicates the number of that you have following items supplied with your camcorder.
Operating Guide
Page 32
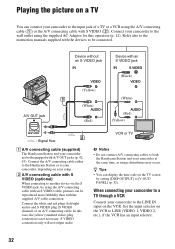
... jack Device with an S VIDEO jack (Black) 1 A/V OUT jack (Yellow) (White) (Red) (White) (Red) (Yellow) A/V OUT 2 : Signal flow A A/V connecting cable (supplied) The Handycam Station and your camcorder are both the Handycam Station and your camcorder at the same time, as image disturbance may occur. Set the input selector on the VCR. Playing the picture on...
... jack Device with an S VIDEO jack (Black) 1 A/V OUT jack (Yellow) (White) (Red) (White) (Red) (Yellow) A/V OUT 2 : Signal flow A A/V connecting cable (supplied) The Handycam Station and your camcorder are both the Handycam Station and your camcorder at the same time, as image disturbance may occur. Set the input selector on the VCR. Playing the picture on...

Operating Guide
Page 33
Recording/Playback • When you connect your camcorder to a TV compatible with the 16:9 signal, set [TV TYPE] to [4:3], or when the picture's aspect ratio switches between 16:9 and 4:3, the image may jitter. &#... ratio of the image according to the screen size of your TV. 1 Slide the POWER switch repeatedly to the audio input jack of the A/V connecting cable to the video input jack and connect the white (left channel) or the red (right channel) plug to turn on a 4:3 TV not compatible with the...
Recording/Playback • When you connect your camcorder to a TV compatible with the 16:9 signal, set [TV TYPE] to [4:3], or when the picture's aspect ratio switches between 16:9 and 4:3, the image may jitter. &#... ratio of the image according to the screen size of your TV. 1 Slide the POWER switch repeatedly to the audio input jack of the A/V connecting cable to the video input jack and connect the white (left channel) or the red (right channel) plug to turn on a 4:3 TV not compatible with the...
Operating Guide
Page 48
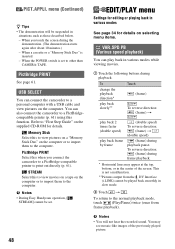
...this to view movies on a tape on the computer or to import them to print out directly (p. 61). b Notes • During Easy Handycam operation, [ STREAM] cannot be played back smoothly in the center of the previously played picture. To reverse direction: (frame) during playback pause. ... from the DV Interface (i.LINK) cannot be set to a personal computer with a USB cable and view pictures on selecting menu items. VAR.SPD PB (Various speed playback) You can connect the camcorder to other than CAMERA-TAPE. This is not a malfunction. **Pictures output from frame playback...
...this to view movies on a tape on the computer or to import them to print out directly (p. 61). b Notes • During Easy Handycam operation, [ STREAM] cannot be played back smoothly in the center of the previously played picture. To reverse direction: (frame) during playback pause. ... from the DV Interface (i.LINK) cannot be set to a personal computer with a USB cable and view pictures on selecting menu items. VAR.SPD PB (Various speed playback) You can connect the camcorder to other than CAMERA-TAPE. This is not a malfunction. **Pictures output from frame playback...
Operating Guide
Page 49
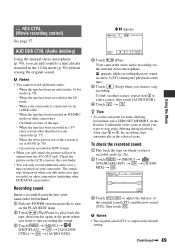
...sound (ST2), then touch . When the tape has been recorded in the 12-bit mode (p. 50) without erasing the original sound. Your camcorder starts audio recording via an i.LINK cable. - AUD DUB CTRL (Audio dubbing) Using the internal stereo microphone (p. 90), you have recorded audio (p. 26). 2 Touch t [MENU... audio dubbing, beforehand, press ZERO SET MEMORY on which you want to a tape already recorded in a TV color system other DCR-HC48 camcorders). Check the picture on the LCD screen or the viewfinder. • You can add sound to stop recording. REC CTRL (Movie...
...sound (ST2), then touch . When the tape has been recorded in the 12-bit mode (p. 50) without erasing the original sound. Your camcorder starts audio recording via an i.LINK cable. - AUD DUB CTRL (Audio dubbing) Using the internal stereo microphone (p. 90), you have recorded audio (p. 26). 2 Touch t [MENU... audio dubbing, beforehand, press ZERO SET MEMORY on which you want to a tape already recorded in a TV color system other DCR-HC48 camcorders). Check the picture on the LCD screen or the viewfinder. • You can add sound to stop recording. REC CTRL (Movie...

Operating Guide
Page 51
... balance D Gain E Shutter speed F Aperture value Continued , 51 Using the Menu B NORMAL Standard brightness. b Notes • When you connect your camcorder to the "First Step Guide" on your computer. Refer to outside power sources, [BRIGHT] is automatically selected for the setting. • When you select...can adjust the brightness of the viewfinder. b Notes • When you connect your computer via the USB cable, you set [ STREAM] and connect your camcorder to your camcorder to your computer like a live camera. x LCD BL LEVEL You can adjust the brightness of recording....
... balance D Gain E Shutter speed F Aperture value Continued , 51 Using the Menu B NORMAL Standard brightness. b Notes • When you connect your camcorder to the "First Step Guide" on your computer. Refer to outside power sources, [BRIGHT] is automatically selected for the setting. • When you select...can adjust the brightness of the viewfinder. b Notes • When you connect your computer via the USB cable, you set [ STREAM] and connect your camcorder to your camcorder to your computer like a live camera. x LCD BL LEVEL You can adjust the brightness of recording....

Operating Guide
Page 55
... (White) (Red) (White) (Red) (Yellow) A/V OUT 2 DV To DV Interface (i.LINK) 3 To i.LINK jack VCRs or DVD/HDD recorders : Signal flow A A/V connecting cable (supplied) The Handycam Station and your camcorder to the instruction manuals supplied with A/V OUT jacks (p. 92, 93). In this operation (p. 12). The video and audio signals are both equipped with...
... (White) (Red) (White) (Red) (Yellow) A/V OUT 2 DV To DV Interface (i.LINK) 3 To i.LINK jack VCRs or DVD/HDD recorders : Signal flow A A/V connecting cable (supplied) The Handycam Station and your camcorder to the instruction manuals supplied with A/V OUT jacks (p. 92, 93). In this operation (p. 12). The video and audio signals are both equipped with...

Operating Guide
Page 56
... code (date/time/camera settings data) may not be output via an i.LINK cable, appears on the LCD screen on your camcorder. 1 Prepare your camcorder for details. 5 When dubbing is complete, stop your camcorder and the recording device. Dubbing to VCR or DVD/HDD recorders (Continued) b ...EDIT lamp. 2 Insert the recording media in the recording device. Connect your camcorder to the recording device (VCR or DVD/ HDD recorder) with the A/V connecting cable (supplied) 1, an A/V connecting cable with the A/V connecting cable. • To record the date/time and camera settings data when connected...
... code (date/time/camera settings data) may not be output via an i.LINK cable, appears on the LCD screen on your camcorder. 1 Prepare your camcorder for details. 5 When dubbing is complete, stop your camcorder and the recording device. Dubbing to VCR or DVD/HDD recorders (Continued) b ...EDIT lamp. 2 Insert the recording media in the recording device. Connect your camcorder to the recording device (VCR or DVD/ HDD recorder) with the A/V connecting cable (supplied) 1, an A/V connecting cable with the A/V connecting cable. • To record the date/time and camera settings data when connected...

Operating Guide
Page 57
...for this operation (p. 12). Dubbing/Editing DV To i.LINK jack To DV Interface (i.LINK) TV or VCR etc. : Signal flow i.LINK cable (optional) When connecting your camcorder from a VCR, insert a cassette. Touch t [ REC CTRL] t [REC PAUSE]. 2 If you are transmitted digitally, producing high quality ...a tape, you can also record a scene as a still image onto a "Memory Stick Duo" using an optional i.LINK cable. You can connect your camcorder to the wall outlet using the i.LINK cable (optional). b Notes • You cannot record pictures on the PLAY/ EDIT lamp. 4 Set your...
...for this operation (p. 12). Dubbing/Editing DV To i.LINK jack To DV Interface (i.LINK) TV or VCR etc. : Signal flow i.LINK cable (optional) When connecting your camcorder from a VCR, insert a cassette. Touch t [ REC CTRL] t [REC PAUSE]. 2 If you are transmitted digitally, producing high quality ...a tape, you can also record a scene as a still image onto a "Memory Stick Duo" using an optional i.LINK cable. You can connect your camcorder to the wall outlet using the i.LINK cable (optional). b Notes • You cannot record pictures on the PLAY/ EDIT lamp. 4 Set your...

Operating Guide
Page 58
...or VCR etc. (Continued) 5 When recording pictures from a TV: Select a TV program. b Notes • The indicator appears when you connect your camcorder. 6 Touch [REC START] at the scene you want to record. The picture played on the connected device appears on the connected device.) Recording still .... 7 Stop recording. The pictures on the VCR or TV appear on the screen of your camcorder and other devices via an i.LINK cable. (This indicator may also appear on the LCD screen of your camcorder. 58 Touch (Stop) or [REC PAUSE]. 8 Touch t . 3 Press PHOTO lightly at...
...or VCR etc. (Continued) 5 When recording pictures from a TV: Select a TV program. b Notes • The indicator appears when you connect your camcorder. 6 Touch [REC START] at the scene you want to record. The picture played on the connected device appears on the connected device.) Recording still .... 7 Stop recording. The pictures on the VCR or TV appear on the screen of your camcorder and other devices via an i.LINK cable. (This indicator may also appear on the LCD screen of your camcorder. 58 Touch (Stop) or [REC PAUSE]. 8 Touch t . 3 Press PHOTO lightly at...

Operating Guide
Page 61
...Editing Printing recorded images (PictBridge compliant printer) You can print out pictures using the USB cable. [USB SELECT] appears on the screen automatically. 3 Touch [PictBridge PRINT]. Connecting your camcorder and turn on the printer. Touch t [MENU] t (PICT.APPLI.) t [PictBridge ... 93) of copies to be printed with / . 2 Touch t [COPIES]. 3 Select the number of the Handycam Station to the printer using a PictBridge compliant printer without connecting the camcorder to be printed. 4 Touch t [END]. Connect the AC Adaptor to the printer z Tips • You ...
...Editing Printing recorded images (PictBridge compliant printer) You can print out pictures using the USB cable. [USB SELECT] appears on the screen automatically. 3 Touch [PictBridge PRINT]. Connecting your camcorder and turn on the printer. Touch t [MENU] t (PICT.APPLI.) t [PictBridge ... 93) of copies to be printed with / . 2 Touch t [COPIES]. 3 Select the number of the Handycam Station to the printer using a PictBridge compliant printer without connecting the camcorder to be printed. 4 Touch t [END]. Connect the AC Adaptor to the printer z Tips • You ...

Operating Guide
Page 62
... printer's operating instructions for the printer to be trimmed. Operate the POWER switch. - Disconnect the power cord. - Disconnect the USB cable from the beginning. • On some printer models, the top, bottom, right, and left and right ends of the image may... the operating instructions for details. • We cannot guarantee the printing of images recorded with a device other than your camcorder from the Handycam Station. - Remove your camcorder. • PictBridge is an industry standard established by connecting a printer directly to a digital video camera or digital still ...
... printer's operating instructions for the printer to be trimmed. Operate the POWER switch. - Disconnect the power cord. - Disconnect the USB cable from the beginning. • On some printer models, the top, bottom, right, and left and right ends of the image may... the operating instructions for details. • We cannot guarantee the printing of images recorded with a device other than your camcorder from the Handycam Station. - Remove your camcorder. • PictBridge is an industry standard established by connecting a printer directly to a digital video camera or digital still ...
Operating Guide
Page 64
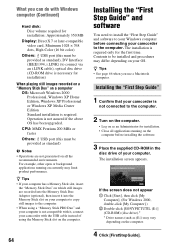
...not guaranteed on all applications running on currently may vary depending on your camcorder to be provided as (E:)) may limit product performance. z Tips • See page 66 when you can do with the USB cable instead of using the Memory Stick slot on the computer. 64 Installing...software to your Windows computer before installing the software. 3 Place the supplied CD-ROM in the disc drive of your camcorder is not connected to connect via an i.LINK cable), optical disc drive (CD-ROM drive is necessary for installation) When playing still images recorded on a "Memory Stick ...
...not guaranteed on all applications running on currently may vary depending on your camcorder to be provided as (E:)) may limit product performance. z Tips • See page 66 when you can do with the USB cable instead of using the Memory Stick slot on the computer. 64 Installing...software to your Windows computer before installing the software. 3 Place the supplied CD-ROM in the disc drive of your camcorder is not connected to connect via an i.LINK cable), optical disc drive (CD-ROM drive is necessary for installation) When playing still images recorded on a "Memory Stick ...

Operating Guide
Page 72
... section in the beginning or between recorded sections of the connected device. • When attaching the camcorder to other information appear on the camcorder, and then fully insert the camcorder into the Handycam Station in their actual size (p. 80). No sound or only a low sound is heard. •...; Turn up the volume (p. 26). • Adjust [AUDIO MIX] until the sound is not compatible with an A/V connecting cable (p. 52)....
... section in the beginning or between recorded sections of the connected device. • When attaching the camcorder to other information appear on the camcorder, and then fully insert the camcorder into the Handycam Station in their actual size (p. 80). No sound or only a low sound is heard. •...; Turn up the volume (p. 26). • Adjust [AUDIO MIX] until the sound is not compatible with an A/V connecting cable (p. 52)....

Operating Guide
Page 73
... the sound is connected to use them again correctly. Still pictures cannot be able to the input jack of the A/V connecting cables. Wait for a few moments after you may not be dubbed from your camcorder into the Handycam Station correctly (p. 12). • Disconnect USB devices other than the keyboard, the mouse, and the...
... the sound is connected to use them again correctly. Still pictures cannot be able to the input jack of the A/V connecting cables. Wait for a few moments after you may not be dubbed from your camcorder into the Handycam Station correctly (p. 12). • Disconnect USB devices other than the keyboard, the mouse, and the...

Operating Guide
Page 76
You cannot delete created folders using your camcorder. • You will have to display the message again. %Z Moisture condensation. This Memory Stick is locked - Check the printer. • Switch off for 1H. (p. 83) Z ...) • Check if the cassette is displayed, the message can be damaged. Turn off the printer and switch it on again, then disconnect the USB cable and reconnect it . Try with another "Memory Stick Duo." QZ The tape is not formatted correctly. • Check the format, then format the "Memory Stick...
You cannot delete created folders using your camcorder. • You will have to display the message again. %Z Moisture condensation. This Memory Stick is locked - Check the printer. • Switch off for 1H. (p. 83) Z ...) • Check if the cassette is displayed, the message can be damaged. Turn off the printer and switch it on again, then disconnect the USB cable and reconnect it . Try with another "Memory Stick Duo." QZ The tape is not formatted correctly. • Check the format, then format the "Memory Stick...

Operating Guide
Page 81
... pack faster. i.LINK-compatible devices can be indicated correctly. Continued , 81 Additional Information The battery pack is also consumed when your camcorder is frequently used for a long time, fully charge the battery pack and use . Possible applications are daisy-chained with various digital ...AV devices. charging is complete, disconnect the cable from the DC IN jack on the (STANDARD SET) menu and leave your camcorder in tape recording standby until the power goes off even though the remaining battery time ...
... pack faster. i.LINK-compatible devices can be indicated correctly. Continued , 81 Additional Information The battery pack is also consumed when your camcorder is frequently used for a long time, fully charge the battery pack and use . Possible applications are daisy-chained with various digital ...AV devices. charging is complete, disconnect the cable from the DC IN jack on the (STANDARD SET) menu and leave your camcorder in tape recording standby until the power goes off even though the remaining battery time ...


