

Operating Guide
Page 6
...installation. Consult the dealer or an experienced radio/TV technician for connecting the camcorder to a computer and using a "Memory Stick Duo" with the instructions, may apply, See www.dtsc.ca.gov/...memory card except "Memory Stick Duo." • "Memory Stick PRO" and "Memory Stick PRO Duo" can radiate radio frequency energy and, if not installed and used in your camcorder You can be used with your camcorder.) "Memory Stick" (You cannot use with your camcorder.) • You cannot use in accordance with "Memory Stick" compatible equipment Be sure to insert the "Memory Stick...
...installation. Consult the dealer or an experienced radio/TV technician for connecting the camcorder to a computer and using a "Memory Stick Duo" with the instructions, may apply, See www.dtsc.ca.gov/...memory card except "Memory Stick Duo." • "Memory Stick PRO" and "Memory Stick PRO Duo" can radiate radio frequency energy and, if not installed and used in your camcorder You can be used with your camcorder.) "Memory Stick" (You cannot use with your camcorder.) • You cannot use in accordance with "Memory Stick" compatible equipment Be sure to insert the "Memory Stick...

Operating Guide
Page 7
...at the sun. See "On use . Take pictures of the Handycam Station when using your camcorder to OFF (CHG) when you insert the camcorder into the Handycam Station or remove the camcorder from the Handycam Station holding both the Handycam Station and the DC plug. • Be sure to slide the... and do not affect the recording in color) that is grayed out is not dustproof, dripproof or waterproof. Memory Stick Duo Adaptor Using the camcorder • Do not hold the camcorder by the following parts. Viewfinder Battery pack About menu items, LCD panel, viewfinder, and lens • A...
...at the sun. See "On use . Take pictures of the Handycam Station when using your camcorder to OFF (CHG) when you insert the camcorder into the Handycam Station or remove the camcorder from the Handycam Station holding both the Handycam Station and the DC plug. • Be sure to slide the... and do not affect the recording in color) that is grayed out is not dustproof, dripproof or waterproof. Memory Stick Duo Adaptor Using the camcorder • Do not hold the camcorder by the following parts. Viewfinder Battery pack About menu items, LCD panel, viewfinder, and lens • A...
Operating Guide
Page 9
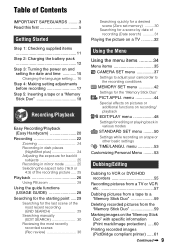
...the language setting ... 16 Step 4: Making setting adjustments before recording 17 Step 5: Inserting a tape or a "Memory Stick Duo 18 Recording/Playback Easy Recording/Playback (Easy Handycam 20 Recording 22 Zooming 24 Recording in dark places (NightShot plus 24 Adjusting the exposure for backlit subjects 25 ...Using the Menu Using the menu items .......... 34 Menu items 35 CAMERA SET menu 37 Settings to adjust your camcorder to a "Memory Stick Duo 59 Deleting recorded pictures from the "Memory Stick Duo 59 Marking images on recording/ playback EDIT/PLAY menu 48 Settings for the...
...the language setting ... 16 Step 4: Making setting adjustments before recording 17 Step 5: Inserting a tape or a "Memory Stick Duo 18 Recording/Playback Easy Recording/Playback (Easy Handycam 20 Recording 22 Zooming 24 Recording in dark places (NightShot plus 24 Adjusting the exposure for backlit subjects 25 ...Using the Menu Using the menu items .......... 34 Menu items 35 CAMERA SET menu 37 Settings to adjust your camcorder to a "Memory Stick Duo 59 Deleting recorded pictures from the "Memory Stick Duo 59 Marking images on recording/ playback EDIT/PLAY menu 48 Settings for the...

Operating Guide
Page 10
... ........ 66 Troubleshooting Troubleshooting 67 Warning indicators and messages 74 Additional Information Using your camcorder abroad ...... 77 Maintenance and precautions ...... 78 Usable cassette tapes 78 About the "Memory Stick 79 About the "InfoLITHIUM" battery pack 80 About i.LINK 81 On using your camcorder 82 Specifications 86 Quick Reference Identifying parts and controls ....... 90 Indicators displayed...
... ........ 66 Troubleshooting Troubleshooting 67 Warning indicators and messages 74 Additional Information Using your camcorder abroad ...... 77 Maintenance and precautions ...... 78 Usable cassette tapes 78 About the "Memory Stick 79 About the "InfoLITHIUM" battery pack 80 About i.LINK 81 On using your camcorder 82 Specifications 86 Quick Reference Identifying parts and controls ....... 90 Indicators displayed...

Operating Guide
Page 15
.... • Even if your camcorder is turned off, AC power (house current) is not attached correctly. - CAMERA-MEMORY: To record on . Battery pack NP-FH70 NP-FH100 LCD panel opened* 300 695 LCD panel closed 370 845 * When the LCD backlight turns on a "Memory Stick Duo." POWER switch 1 While ...battery pack is worn-out (for the first time. If you do not set any malfunction occurs while using your camcorder. • Do not use your camcorder or the Handycam Station, even when the power cord is disconnected from the battery as long as between a wall and furniture. •...
.... • Even if your camcorder is turned off, AC power (house current) is not attached correctly. - CAMERA-MEMORY: To record on . Battery pack NP-FH70 NP-FH100 LCD panel opened* 300 695 LCD panel closed 370 845 * When the LCD backlight turns on a "Memory Stick Duo." POWER switch 1 While ...battery pack is worn-out (for the first time. If you do not set any malfunction occurs while using your camcorder. • Do not use your camcorder or the Handycam Station, even when the power cord is disconnected from the battery as long as between a wall and furniture. •...
Operating Guide
Page 18
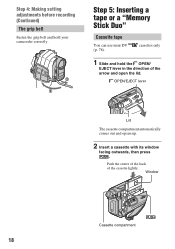
cassettes only 1 Slide and hold your camcorder correctly. 4 1 2 3 Step 5: Inserting a tape or a "Memory Stick Duo" Cassette tape You can use mini DV (p. 78). OPEN/EJECT lever Lid The cassette compartment automatically comes out and opens up. 2 Insert a cassette with its window facing outwards, then press . Push the center of the back of the arrow and open the lid. Window Cassette compartment 18 Step 4: Making setting adjustments before recording (Continued) The grip belt Fasten the grip belt and hold the OPEN/ EJECT lever in the direction of the cassette lightly.
cassettes only 1 Slide and hold your camcorder correctly. 4 1 2 3 Step 5: Inserting a tape or a "Memory Stick Duo" Cassette tape You can use mini DV (p. 78). OPEN/EJECT lever Lid The cassette compartment automatically comes out and opens up. 2 Insert a cassette with its window facing outwards, then press . Push the center of the back of the arrow and open the lid. Window Cassette compartment 18 Step 4: Making setting adjustments before recording (Continued) The grip belt Fasten the grip belt and hold the OPEN/ EJECT lever in the direction of the cassette lightly.

Operating Guide
Page 19
...; When the access lamp is lit or flashing, your camcorder, turn the power off, eject the "Memory Stick Duo," or remove the battery pack. Otherwise, image data may be damaged. • If you force the "Memory Stick Duo" into the "Memory Stick Duo" slot in the right direction until it clicks. ...Getting Started The cassette compartment automatically slides back in once and slide out the "Memory Stick Duo" alongside the camcorder body. For details, see page 42. 19 b Notes • Do not force the cassette compartment closed by pressing the ...
...; When the access lamp is lit or flashing, your camcorder, turn the power off, eject the "Memory Stick Duo," or remove the battery pack. Otherwise, image data may be damaged. • If you force the "Memory Stick Duo" into the "Memory Stick Duo" slot in the right direction until it clicks. ...Getting Started The cassette compartment automatically slides back in once and slide out the "Memory Stick Duo" alongside the camcorder body. For details, see page 42. 19 b Notes • Do not force the cassette compartment closed by pressing the ...

Operating Guide
Page 20
...or C) to start recording.* 60min EASY REC GUIDE MENU The indicator changes from detailed adjustments. Recording/Playback Easy Recording/Playback (Easy Handycam) With this Easy Handycam operation, most of the camera settings are recorded in SP (Standard Play) mode on the EASY screen B. 2 Press EASY ...for easy viewing. E B A If the POWER switch is set to adjust the focus. * Movies are recorded in [FINE] quality on a "Memory Stick Duo." 20 appears on a cassette. ** Still images are automatically optimally adjusted, which frees you from [STBY] to record. to OFF (CHG), slide...
...or C) to start recording.* 60min EASY REC GUIDE MENU The indicator changes from detailed adjustments. Recording/Playback Easy Recording/Playback (Easy Handycam) With this Easy Handycam operation, most of the camera settings are recorded in SP (Standard Play) mode on the EASY screen B. 2 Press EASY ...for easy viewing. E B A If the POWER switch is set to adjust the focus. * Movies are recorded in [FINE] quality on a "Memory Stick Duo." 20 appears on a cassette. ** Still images are automatically optimally adjusted, which frees you from [STBY] to record. to OFF (CHG), slide...

Operating Guide
Page 22
... while pressing the green button. REC START/ STOP A Slide the POWER switch in 4:3 screen (p. 42). 22 b Notes • You cannot record movies onto a "Memory Stick Duo" using your camcorder. z Tips • While recording movies on a tape, or while in standby mode, you can record a still image on a tape. Recording Open the lens cover...
... while pressing the green button. REC START/ STOP A Slide the POWER switch in 4:3 screen (p. 42). 22 b Notes • You cannot record movies onto a "Memory Stick Duo" using your camcorder. z Tips • While recording movies on a tape, or while in standby mode, you can record a still image on a tape. Recording Open the lens cover...

Operating Guide
Page 23
... and hold PHOTO lightly to OFF (CHG), slide it fully. If the POWER switch is heard. To check the latest recording on the "Memory Stick Duo." Beep min 1.0M Shutter click min 1.0M GUIDE P-MENU GUIDE P-MENU Flashing bLights up A shutter sound is set to adjust the ... switch in the direction of recordable pictures. To delete the picture, touch t [YES]. Recording/Playback Recording still images Still images are recorded on a "Memory Stick Duo" Touch . When disappears, the image has been recorded. z Tips • See page 42 for details on the image quality, the image size...
... and hold PHOTO lightly to OFF (CHG), slide it fully. If the POWER switch is heard. To check the latest recording on the "Memory Stick Duo." Beep min 1.0M Shutter click min 1.0M GUIDE P-MENU GUIDE P-MENU Flashing bLights up A shutter sound is set to adjust the ... switch in the direction of recordable pictures. To delete the picture, touch t [YES]. Recording/Playback Recording still images Still images are recorded on a "Memory Stick Duo" Touch . When disappears, the image has been recorded. z Tips • See page 42 for details on the image quality, the image size...

Operating Guide
Page 26
... forward * Playback automatically stops if pause is set to turn on the PLAY/EDIT lamp. Playback Slide the POWER switch in the direction of when a "Memory Stick Duo" with recorded images is inserted and a tape is not being played. If the POWER switch is engaged for a scene during playback Touch and hold...
... forward * Playback automatically stops if pause is set to turn on the PLAY/EDIT lamp. Playback Slide the POWER switch in the direction of when a "Memory Stick Duo" with recorded images is inserted and a tape is not being played. If the POWER switch is engaged for a scene during playback Touch and hold...

Operating Guide
Page 27
.../Next 6 pictures B The picture displayed before switching to the single display mode. Recording/Playback Viewing still images Touch . To display pictures on a "Memory Stick Duo" on the tape playback screen. t t [PB FOLDER], select a folder with Continued , 27 The most recently recorded image is displayed. 1.0M... MEMORY PLAY GUIDE Switch the playback media* Previous/Next P-MENU Go to the index screen display * is displayed on the index screen Touch ....
.../Next 6 pictures B The picture displayed before switching to the single display mode. Recording/Playback Viewing still images Touch . To display pictures on a "Memory Stick Duo" on the tape playback screen. t t [PB FOLDER], select a folder with Continued , 27 The most recently recorded image is displayed. 1.0M... MEMORY PLAY GUIDE Switch the playback media* Previous/Next P-MENU Go to the index screen display * is displayed on the index screen Touch ....

Operating Guide
Page 34
...Personal Menu as that are added. Touch / to select the item, then touch . (The process in step 3 is not displayed during Easy Handycam operation. After finishing the settings, touch t (close) to display the menu index screen. 34 Touch [MENU] to hide the menu screen. ...is displayed. 3 Select the desired setting, then touch . CAMERA-TAPE lamp: settings on a tape CAMERA-MEMORY lamp: Duo" settings on the screen, touch / until the item is not displayed on a "Memory Stick PLAY/EDIT lamp: settings for frequently used menu items are not added to Personal Menu. 1 Touch t [...
...Personal Menu as that are added. Touch / to select the item, then touch . (The process in step 3 is not displayed during Easy Handycam operation. After finishing the settings, touch t (close) to display the menu index screen. 34 Touch [MENU] to hide the menu screen. ...is displayed. 3 Select the desired setting, then touch . CAMERA-TAPE lamp: settings on a tape CAMERA-MEMORY lamp: Duo" settings on the screen, touch / until the item is not displayed on a "Memory Stick PLAY/EDIT lamp: settings for frequently used menu items are not added to Personal Menu. 1 Touch t [...

Operating Guide
Page 42
... Settings for the maximum number of images to be set only when the POWER switch is set to CAMERA-MEMORY. • If you set during Easy Handycam operation. Capacity of the "Memory Stick Duo" (MB) and the number of less than 3 images remaining on selecting menu items. STILL SET ... aspect ratio: Record up to 4 images (1.0M image size), or 13 images (VGA image size) continuously. VGA (0.3M) ( ) Allows for the "Memory Stick Duo" The default settings are selected. The maximum number of images are operating with different exposures at the best exposure. B OFF Select this when not...
... Settings for the maximum number of images to be set only when the POWER switch is set to CAMERA-MEMORY. • If you set during Easy Handycam operation. Capacity of the "Memory Stick Duo" (MB) and the number of less than 3 images remaining on selecting menu items. STILL SET ... aspect ratio: Record up to 4 images (1.0M image size), or 13 images (VGA image size) continuously. VGA (0.3M) ( ) Allows for the "Memory Stick Duo" The default settings are selected. The maximum number of images are operating with different exposures at the best exposure. B OFF Select this when not...

Operating Guide
Page 43
...SIZE] is automatically fixed at [0.2M]. The number of recordable pictures varies depending on a "Memory Stick Duo" with the write-protect tab engaged, cancel image protection by Sony Corporation. Operate the POWER switch/operation buttons. - Formatting is completed, and all the images ..., touch [YES] twice t . Continued , 43 Using the Menu Operate the POWER switch/operation buttons. - b Notes • When using the "Memory Stick Duo" made by sliding the tab back beforehand (p. 79). • The folder will not be deleted. b Notes • All numbers measured at purchase...
...SIZE] is automatically fixed at [0.2M]. The number of recordable pictures varies depending on a "Memory Stick Duo" with the write-protect tab engaged, cancel image protection by Sony Corporation. Operate the POWER switch/operation buttons. - Formatting is completed, and all the images ..., touch [YES] twice t . Continued , 43 Using the Menu Operate the POWER switch/operation buttons. - b Notes • When using the "Memory Stick Duo" made by sliding the tab back beforehand (p. 79). • The folder will not be deleted. b Notes • All numbers measured at purchase...

Operating Guide
Page 44
...8226; You cannot delete the created folders using your camcorder. REC FOLDER (Recording folder) Select the folder to be set as the default folder for storing subsequent images. menu Special effects on pictures or additional functions on a "Memory Stick Duo." PB FOLDER (Playback folder) Select the ... Notes • As the default setting, pictures are selected. When fading out, it gradually changes from black and white to format the "Memory Stick Duo" (p. 43), or delete them using your computer. • The number of recordable pictures on a tape is canceled. The file ...
...8226; You cannot delete the created folders using your camcorder. REC FOLDER (Recording folder) Select the folder to be set as the default folder for storing subsequent images. menu Special effects on pictures or additional functions on a "Memory Stick Duo." PB FOLDER (Playback folder) Select the ... Notes • As the default setting, pictures are selected. When fading out, it gradually changes from black and white to format the "Memory Stick Duo" (p. 43), or delete them using your computer. • The number of recordable pictures on a tape is canceled. The file ...

Operating Guide
Page 45
... the Menu OVERLAP (fade in only) WIPE (fade in only) DOT FADER (fade in only) SLIDE SHOW Plays back in sequence the images stored on a "Memory Stick Duo," or in step 1. TRAIL The fade time of frame-byframe playback. appears. If you want to adjust STILL The degree of transparency of the...
... the Menu OVERLAP (fade in only) WIPE (fade in only) DOT FADER (fade in only) SLIDE SHOW Plays back in sequence the images stored on a "Memory Stick Duo," or in step 1. TRAIL The fade time of frame-byframe playback. appears. If you want to adjust STILL The degree of transparency of the...

Operating Guide
Page 46
... illustration with a serial-still-image effect (strobe effect). b Notes • Effects added to pictures. appears. b Notes • Adjust the focus manually using special effects on a "Memory Stick Duo" (p. 59) or record them on another VCR/DVD device, etc. (p. 55). SLOW SHUTTR (slow shutter) The shutter speed is selected. ([FOCUS], p. 39) • You...
... illustration with a serial-still-image effect (strobe effect). b Notes • Effects added to pictures. appears. b Notes • Adjust the focus manually using special effects on a "Memory Stick Duo" (p. 59) or record them on another VCR/DVD device, etc. (p. 55). SLOW SHUTTR (slow shutter) The shutter speed is selected. ([FOCUS], p. 39) • You...
Operating Guide
Page 47
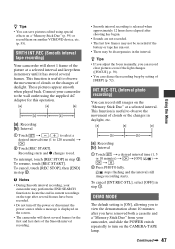
... tape after several frames have been recorded. • Do not turn on the screen. • The camcorder will shoot 1 frame of the picture at a selected interval and keep them on the "Memory Stick Duo" at a selected interval. To interrupt, touch [REC STOP] in step 1. b Notes •...disconnect the power source while a message is released when approximately 12 hours have removed both a cassette and a "Memory Stick Duo" from your camcorder to the wall outlet using special effects on a "Memory Stick Duo" (p. 59) or record them in step 2. z Tips • You can save pictures edited using...
... tape after several frames have been recorded. • Do not turn on the screen. • The camcorder will shoot 1 frame of the picture at a selected interval and keep them on the "Memory Stick Duo" at a selected interval. To interrupt, touch [REC STOP] in step 1. b Notes •...disconnect the power source while a message is released when approximately 12 hours have removed both a cassette and a "Memory Stick Duo" from your camcorder to the wall outlet using special effects on a "Memory Stick Duo" (p. 59) or record them in step 2. z Tips • You can save pictures edited using...
Operating Guide
Page 48
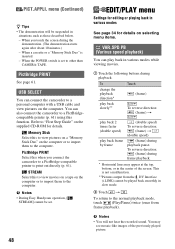
... a PictBridge-compatible printer to print out directly (p. 61). USB SELECT You can also connect the camcorder to a PictBridgecompatible printer (p. 61) using this to view pictures on a "Memory Stick Duo" on the computer or to import them to "First Step Guide" on the supplied CD-.... 1 Touch the following buttons during playback pause. You can connect the camcorder to the computer. menu (Continued) z Tips • The demonstration will not hear the recorded sound. b Notes • During Easy Handycam operation, [ STREAM] cannot be suspended in various modes See page 34 for...
... a PictBridge-compatible printer to print out directly (p. 61). USB SELECT You can also connect the camcorder to a PictBridgecompatible printer (p. 61) using this to view pictures on a "Memory Stick Duo" on the computer or to import them to "First Step Guide" on the supplied CD-.... 1 Touch the following buttons during playback pause. You can connect the camcorder to the computer. menu (Continued) z Tips • The demonstration will not hear the recorded sound. b Notes • During Easy Handycam operation, [ STREAM] cannot be suspended in various modes See page 34 for...


