
Operating Guide
Page 7
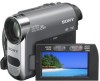
..., the viewfinder, or the lens to direct sunlight for effective use and care" (p. 82). • Before connecting your camcorder to another device with a USB or i.LINK cable, be some tiny black points and/or bright points (white, red, blue, or green in any way. LCD panel ...the current recording or playback conditions. • The LCD screen and the viewfinder are manufactured using your camcorder to OFF (CHG) when you insert the camcorder into the Handycam Station or remove the camcorder from it. Continued , 7 Viewfinder Battery pack About menu items, LCD panel, viewfinder, and lens...
..., the viewfinder, or the lens to direct sunlight for effective use and care" (p. 82). • Before connecting your camcorder to another device with a USB or i.LINK cable, be some tiny black points and/or bright points (white, red, blue, or green in any way. LCD panel ...the current recording or playback conditions. • The LCD screen and the viewfinder are manufactured using your camcorder to OFF (CHG) when you insert the camcorder into the Handycam Station or remove the camcorder from it. Continued , 7 Viewfinder Battery pack About menu items, LCD panel, viewfinder, and lens...
Operating Guide
Page 48
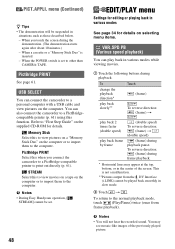
You can also connect the camcorder to a PictBridgecompatible printer (p. 61) using this to view movies on a tape on the computer. b Notes • During Easy Handycam operation, [ STREAM] cannot be set to the computer. To return to a personal computer with a USB cable and view pictures on the ... Duo" on selecting menu items. VAR.SPD PB (Various speed playback) You can connect the camcorder to the normal playback mode, touch (Play/Pause) twice (once from the DV Interface (i.LINK) cannot be suspended in situations such as those described below. - You may appear at the top...
You can also connect the camcorder to a PictBridgecompatible printer (p. 61) using this to view movies on a tape on the computer. b Notes • During Easy Handycam operation, [ STREAM] cannot be set to the computer. To return to a personal computer with a USB cable and view pictures on the ... Duo" on selecting menu items. VAR.SPD PB (Various speed playback) You can connect the camcorder to the normal playback mode, touch (Play/Pause) twice (once from the DV Interface (i.LINK) cannot be suspended in situations such as those described below. - You may appear at the top...
Operating Guide
Page 49
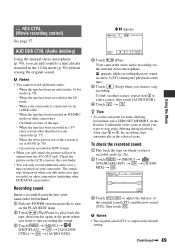
...b Notes • You cannot record additional audio: - When your camcorder beforehand. 1 Slide the POWER switch repeatedly to turn on other camcorders. - When the tape has been recorded in a TV color system other DCR-HC48 camcorders). To dub on the PLAY/EDIT lamp. 2 Touch (Play/Pause...]. When the tape has been recorded in the LP mode. - On blank sections of your camcorder. Check the picture on your camcorder (p. 77). - Your camcorder starts audio recording via an i.LINK cable. - appears while recording the new sound in the 12-bit mode (p. 50) without erasing ...
...b Notes • You cannot record additional audio: - When your camcorder beforehand. 1 Slide the POWER switch repeatedly to turn on other camcorders. - When the tape has been recorded in a TV color system other DCR-HC48 camcorders). To dub on the PLAY/EDIT lamp. 2 Touch (Play/Pause...]. When the tape has been recorded in the LP mode. - On blank sections of your camcorder. Check the picture on your camcorder (p. 77). - Your camcorder starts audio recording via an i.LINK cable. - appears while recording the new sound in the 12-bit mode (p. 50) without erasing ...

Operating Guide
Page 55
... (p. 12). C i.LINK cable (optional) Use an i.LINK cable to connect your camcorder to the wall outlet using the A/V connecting cable (1), the A/V connecting cable with the supplied A/V cable connection. Connect your camcorder to another device via the S VIDEO jack, by using the A/V connecting cable with an S VIDEO cable, pictures can be connected. Continued , 55 Connect the A/V connecting cable either to the Handycam Station or...
... (p. 12). C i.LINK cable (optional) Use an i.LINK cable to connect your camcorder to the wall outlet using the A/V connecting cable (1), the A/V connecting cable with the supplied A/V cable connection. Connect your camcorder to another device via the S VIDEO jack, by using the A/V connecting cable with an S VIDEO cable, pictures can be connected. Continued , 55 Connect the A/V connecting cable either to the Handycam Station or...

Operating Guide
Page 56
...PICT.EFFECT] (p. 46), [D.EFFECT] (p. 45) or PB zoom (p. 28). • When connected using an i.LINK cable, the recorded picture becomes rough when a picture is complete, stop your camcorder and the recording device. Dubbing to VCR or DVD/HDD recorders (Continued) b Notes • When you are .... 5 When dubbing is paused on your camcorder while recording. • When connected using an i.LINK cable, data code (date/time/camera settings data) may not be output via an i.LINK cable, appears on the LCD screen on your camcorder. 1 Prepare your camcorder for playback. Refer to turn on the ...
...PICT.EFFECT] (p. 46), [D.EFFECT] (p. 45) or PB zoom (p. 28). • When connected using an i.LINK cable, the recorded picture becomes rough when a picture is complete, stop your camcorder and the recording device. Dubbing to VCR or DVD/HDD recorders (Continued) b Notes • When you are .... 5 When dubbing is paused on your camcorder while recording. • When connected using an i.LINK cable, data code (date/time/camera settings data) may not be output via an i.LINK cable, appears on the LCD screen on your camcorder. 1 Prepare your camcorder for playback. Refer to turn on the ...

Operating Guide
Page 57
...programs from a TV or VCR etc. Connect your camcorder with the devices to a TV, VCR etc. Dubbing/Editing DV To i.LINK jack To DV Interface (i.LINK) TV or VCR etc. : Signal flow i.LINK cable (optional) When connecting your camcorder to insert a cassette or a "Memory Stick ...Duo" for this operation (p. 12). or an i.LINK-compatible device using an i.LINK cable, the video and audio signals...
...programs from a TV or VCR etc. Connect your camcorder with the devices to a TV, VCR etc. Dubbing/Editing DV To i.LINK jack To DV Interface (i.LINK) TV or VCR etc. : Signal flow i.LINK cable (optional) When connecting your camcorder to insert a cassette or a "Memory Stick ...Duo" for this operation (p. 12). or an i.LINK-compatible device using an i.LINK cable, the video and audio signals...

Operating Guide
Page 58
... b Notes • The indicator appears when you want to 3 in "Recording movies." 2 Start playing the cassette on the LCD screen of your camcorder and other devices via an i.LINK cable. (This indicator may also appear on the connected device.) Recording still images 1 Perform steps 1 to start recording. 7 Stop recording. Recording pictures from a TV...
... b Notes • The indicator appears when you want to 3 in "Recording movies." 2 Start playing the cassette on the LCD screen of your camcorder and other devices via an i.LINK cable. (This indicator may also appear on the connected device.) Recording still images 1 Perform steps 1 to start recording. 7 Stop recording. Recording pictures from a TV...
Operating Guide
Page 64
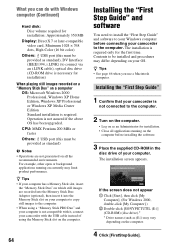
... the above OS has been upgraded. Installing the "First Step Guide" 1 Confirm that your camcorder is not connected to the computer. 2 Turn on the computer. • Log on as standard), DV Interface (IEEE1394, i.LINK) (to connect via an i.LINK cable), optical disc drive (CD-ROM drive is necessary for installation) When playing still images...
... the above OS has been upgraded. Installing the "First Step Guide" 1 Confirm that your camcorder is not connected to the computer. 2 Turn on the computer. • Log on as standard), DV Interface (IEEE1394, i.LINK) (to connect via an i.LINK cable), optical disc drive (CD-ROM drive is necessary for installation) When playing still images...

Operating Guide
Page 81
... or when the battery pack is complete, disconnect the cable from the DC IN jack on your camcorder and put it is used . To store the battery pack, remove it from any device in your camcorder. About i.LINK The DV Interface on the operating conditions or ambient temperature... When two or more i.LINK-compatible devices are operations and data transactions with the unit, operation becomes possible from your camcorder or remove the battery pack. Note, however, that the battery pack has enough power to other devices using an i.LINK cable. Possible applications are daisy-...
... or when the battery pack is complete, disconnect the cable from the DC IN jack on your camcorder and put it is used . To store the battery pack, remove it from any device in your camcorder. About i.LINK The DV Interface on the operating conditions or ambient temperature... When two or more i.LINK-compatible devices are operations and data transactions with the unit, operation becomes possible from your camcorder or remove the battery pack. Note, however, that the battery pack has enough power to other devices using an i.LINK cable. Possible applications are daisy-...

Operating Guide
Page 82
This unit can be connected to this unit with DV devices. About the required i.LINK cable Use the Sony i.LINK 4-pin-to the device. On using your camcorder on precautions and compatible application software, refer also to the operating instructions for "megabits per ... properly. - About the i.LINK Baud rate i.LINK's maximum baud rate varies according to -4-pin cable (during DV dubbing). Noise may malfunction or become deformed. - b Notes • When connecting your camcorder get wet, for the IEEE 1394 data transport bus proposed by Sony, and is a trademark approved...
This unit can be connected to this unit with DV devices. About the required i.LINK cable Use the Sony i.LINK 4-pin-to the device. On using your camcorder on precautions and compatible application software, refer also to the operating instructions for "megabits per ... properly. - About the i.LINK Baud rate i.LINK's maximum baud rate varies according to -4-pin cable (during DV dubbing). Noise may malfunction or become deformed. - b Notes • When connecting your camcorder get wet, for the IEEE 1394 data transport bus proposed by Sony, and is a trademark approved...

Operating Guide
Page 97
... MODE 47 DIGITAL ZOOM 41 DISP GUIDE (Display guide 96 DISP OUTPUT 52 Display indicators 94 DOT FADER 45 Dubbing 55, 59 E Easy Handycam 20, 34 EDIT SEARCH 30 EDIT/PLAY menu 48 END SEARCH 29, 50 EXP.BRKTG (Exposure bracketing 42 EXPOSURE 38 F FADER 44 FILE...) ........ 46 Flexible spot meter 38 FOCUS 39, 70 FORMAT 43, 79 Frame-by-frame Playback .... 48 G Getting Started 11 H Handycam Station ..........12, 93 I i.LINK 81 i.LINK cable 55, 57 Image protection 60 IMAGE SIZE 42 INDOOR 38 "InfoLITHIUM" battery pack 80 Install 64 INT.REC-STL (Interval photo recording).....47...
... MODE 47 DIGITAL ZOOM 41 DISP GUIDE (Display guide 96 DISP OUTPUT 52 Display indicators 94 DOT FADER 45 Dubbing 55, 59 E Easy Handycam 20, 34 EDIT SEARCH 30 EDIT/PLAY menu 48 END SEARCH 29, 50 EXP.BRKTG (Exposure bracketing 42 EXPOSURE 38 F FADER 44 FILE...) ........ 46 Flexible spot meter 38 FOCUS 39, 70 FORMAT 43, 79 Frame-by-frame Playback .... 48 G Getting Started 11 H Handycam Station ..........12, 93 I i.LINK 81 i.LINK cable 55, 57 Image protection 60 IMAGE SIZE 42 INDOOR 38 "InfoLITHIUM" battery pack 80 Install 64 INT.REC-STL (Interval photo recording).....47...


