Operating Guide
Page 6
...DCR-HC46 is to be used with the Handycam Station Model DCRA-C151 and AC Adaptor Model AC-L25A/L25B. • DCR-HC96 is supplied with the limits for help. Connect the equipment into an outlet on the supplied CD-ROM) Types of cassette you call upon your camcorder You can use Your camcorder... for a Class B digital device, pursuant to comply with two kinds of the FCC Rules. "Operating Guide" (This manual) - Note This equipment has been tested and found to Part 15 of Conformity Trade Name: SONY Model No.: DCR-HC96 Responsible Party: Sony Electronics Inc. Refer to...
...DCR-HC46 is to be used with the Handycam Station Model DCRA-C151 and AC Adaptor Model AC-L25A/L25B. • DCR-HC96 is supplied with the limits for help. Connect the equipment into an outlet on the supplied CD-ROM) Types of cassette you call upon your camcorder You can use Your camcorder... for a Class B digital device, pursuant to comply with two kinds of the FCC Rules. "Operating Guide" (This manual) - Note This equipment has been tested and found to Part 15 of Conformity Trade Name: SONY Model No.: DCR-HC96 Responsible Party: Sony Electronics Inc. Refer to...

Operating Guide
Page 12
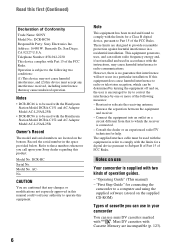
.... See page 6, 123, 124, for compatible cassettes and "Memory Stick Duo" for your camcorder. Handycam Station (1) (DCR-HC46/HC96) (p. 13) Rechargeable battery pack (1) (p. 13, 126) NP-FP30 (DCR-HC36) NP-FP50 (DCR-HC46/HC96) Wireless Remote Commander (1) (p. 40) A button-type lithium battery is already installed. ... (DCR-HC36/HC46) (p. 18, 28, 30) Power cord (1) (p. 13) • To attach the lens cap Attach the lens cap to the metal fittings of that you have following items supplied with your camcorder. Getting Started Step 1: Checking supplied items Make sure that item supplied....
.... See page 6, 123, 124, for compatible cassettes and "Memory Stick Duo" for your camcorder. Handycam Station (1) (DCR-HC46/HC96) (p. 13) Rechargeable battery pack (1) (p. 13, 126) NP-FP30 (DCR-HC36) NP-FP50 (DCR-HC46/HC96) Wireless Remote Commander (1) (p. 40) A button-type lithium battery is already installed. ... (DCR-HC36/HC46) (p. 18, 28, 30) Power cord (1) (p. 13) • To attach the lens cap Attach the lens cap to the metal fittings of that you have following items supplied with your camcorder. Getting Started Step 1: Checking supplied items Make sure that item supplied....
Operating Guide
Page 15
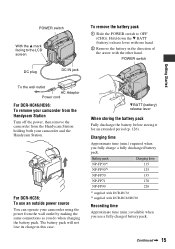
...not lose its charge in the direction of the arrow with DCR-HC46/HC96 Recording time Approximate time (min.) available when you use an outside power source You can operate your camcorder and the Handycam Station. Continued , 15 Charging time Approximate time (min.) required ...220 *1 supplied with DCR-HC36 *2 supplied with the other hand. POWER switch 1 Getting Started To the wall outlet AC Adaptor Power cord For DCR-HC46/HC96: To remove your camcorder from the Handycam Station Turn off the power, then remove the camcorder from the Handycam Station holding both your camcorder using ...
...not lose its charge in the direction of the arrow with DCR-HC46/HC96 Recording time Approximate time (min.) available when you use an outside power source You can operate your camcorder and the Handycam Station. Continued , 15 Charging time Approximate time (min.) required ...220 *1 supplied with DCR-HC36 *2 supplied with the other hand. POWER switch 1 Getting Started To the wall outlet AC Adaptor Power cord For DCR-HC46/HC96: To remove your camcorder from the Handycam Station Turn off the power, then remove the camcorder from the Handycam Station holding both your camcorder using ...
Operating Guide
Page 17
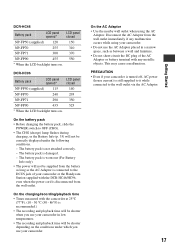
...NP-FP71 255 310 300 370 NP-FP90 455 550 * When the LCD backlight turns on. PRECAUTION • Even if your camcorder or the Handycam Station supplied with the DCR-HC46/HC96, even when the power cord is disconnected from the battery as long as between a wall and furniture. • Do ...not short-circuit the DC plug of your camcorder is turned off, AC power (house current) is recommended.) • The recording and ...
...NP-FP71 255 310 300 370 NP-FP90 455 550 * When the LCD backlight turns on. PRECAUTION • Even if your camcorder or the Handycam Station supplied with the DCR-HC46/HC96, even when the power cord is disconnected from the battery as long as between a wall and furniture. • Do ...not short-circuit the DC plug of your camcorder is turned off, AC power (house current) is recommended.) • The recording and ...
Operating Guide
Page 42
... a malfunction. Playing the picture on the Handycam Station. Connect your camcorder to the wall outlet using the A/V connecting cable (1) or the A/V connecting cable with the devices to be connected. • For DCR-HC46/HC96: Do not insert/eject the cassette while your camcorder is on a TV You can connect your camcorder to the instruction manuals supplied with S VIDEO (2).
... a malfunction. Playing the picture on the Handycam Station. Connect your camcorder to the wall outlet using the A/V connecting cable (1) or the A/V connecting cable with the devices to be connected. • For DCR-HC46/HC96: Do not insert/eject the cassette while your camcorder is on a TV You can connect your camcorder to the instruction manuals supplied with S VIDEO (2).
Operating Guide
Page 43
...(VIDEO 1, VIDEO 2, etc.), if the VCR has an input selector. A A/V connecting cable (supplied) For DCR-HC46/HC96: The Handycam Station and your camcorder are both the Handycam Station and your camcorder at the same time, as image disturbance may not appear in full screen. Connect the white and ...the A/V connecting cable either to the Handycam Station or to your TV is not necessary. B A/V connecting cable with S VIDEO (optional) When connecting to another device via the S VIDEO jack, by setting [DISP OUTPUT] to [V-OUT/ PANEL] (p. 68). • For DCR-HC46/HC96: Do not connect A/V connecting...
...(VIDEO 1, VIDEO 2, etc.), if the VCR has an input selector. A A/V connecting cable (supplied) For DCR-HC46/HC96: The Handycam Station and your camcorder are both the Handycam Station and your camcorder at the same time, as image disturbance may not appear in full screen. Connect the white and ...the A/V connecting cable either to the Handycam Station or to your TV is not necessary. B A/V connecting cable with S VIDEO (optional) When connecting to another device via the S VIDEO jack, by setting [DISP OUTPUT] to [V-OUT/ PANEL] (p. 68). • For DCR-HC46/HC96: Do not connect A/V connecting...
Operating Guide
Page 71
... to be connected. • For DCR-HC46/HC96: Do not insert/eject the cassette while your camcorder to VCR/DVD device, etc. You can copy the picture played back on the Handycam Station. To i.LINK jack Dubbing/Editing Continued , 71 Dubbing/Editing Dubbing to the wall outlet using the supplied AC Adaptor for this operation (p. 13...
... to be connected. • For DCR-HC46/HC96: Do not insert/eject the cassette while your camcorder to VCR/DVD device, etc. You can copy the picture played back on the Handycam Station. To i.LINK jack Dubbing/Editing Continued , 71 Dubbing/Editing Dubbing to the wall outlet using the supplied AC Adaptor for this operation (p. 13...
Operating Guide
Page 72
...digitally, producing high quality pictures and sound. B A/V connecting cable with S VIDEO (optional) When connecting to another device via the S VIDEO jack, by using the A/V connecting cable with an S VIDEO cable, pictures can be reproduced more faithfully than with A/V jacks (p. 84). To i.LINK jack : Signal flow A A/V connecting cable (supplied) For DCR-HC46/HC96: The Handycam Station... and your camcorder to VCR/DVD device, etc. (Continued) DCR-HC46/HC96: A/V or A/V OUT jack 1 AUDIO/VIDEO...
...digitally, producing high quality pictures and sound. B A/V connecting cable with S VIDEO (optional) When connecting to another device via the S VIDEO jack, by using the A/V connecting cable with an S VIDEO cable, pictures can be reproduced more faithfully than with A/V jacks (p. 84). To i.LINK jack : Signal flow A A/V connecting cable (supplied) For DCR-HC46/HC96: The Handycam Station... and your camcorder to VCR/DVD device, etc. (Continued) DCR-HC46/HC96: A/V or A/V OUT jack 1 AUDIO/VIDEO...
Operating Guide
Page 74
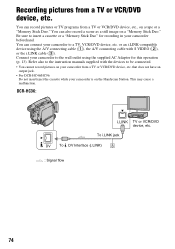
...8226; For DCR-HC46/HC96: Do not insert/eject the cassette while your camcorder is on a "Memory Stick Duo." You can also record a scene as a still image on the Handycam Station. You can record pictures or TV programs from a TV or VCR/DVD device, etc., on your camcorder beforehand. ... a "Memory Stick Duo." Refer also to the instruction manuals supplied with S VIDEO (2), or the i.LINK cable (3). or an i.LINK-compatible device using the supplied AC Adaptor for recording in your camcorder from a TV or VCR/DVD device, etc. DCR-HC36: To i.LINK jack DV To DV Interface (i.LINK)...
...8226; For DCR-HC46/HC96: Do not insert/eject the cassette while your camcorder is on a "Memory Stick Duo." You can also record a scene as a still image on the Handycam Station. You can record pictures or TV programs from a TV or VCR/DVD device, etc., on your camcorder beforehand. ... a "Memory Stick Duo." Refer also to the instruction manuals supplied with S VIDEO (2), or the i.LINK cable (3). or an i.LINK-compatible device using the supplied AC Adaptor for recording in your camcorder from a TV or VCR/DVD device, etc. DCR-HC36: To i.LINK jack DV To DV Interface (i.LINK)...

Operating Guide
Page 75
... your camcorder are transmitted digitally, producing high quality pictures and sound. Continued , 75 S VIDEO connection only will not input audio. DCR-HC46/HC96: A/V jack (DCR-HC96) 1 AUDIO/VIDEO jacks A/V (Yellow) (White) (Red) Dubbing/Editing To S VIDEO jack DV 2 To DV Interface (i.LINK) 3 TV or VCR/DVD device, etc. Connect the A/V connecting cable either to the Handycam Station...
... your camcorder are transmitted digitally, producing high quality pictures and sound. Continued , 75 S VIDEO connection only will not input audio. DCR-HC46/HC96: A/V jack (DCR-HC96) 1 AUDIO/VIDEO jacks A/V (Yellow) (White) (Red) Dubbing/Editing To S VIDEO jack DV 2 To DV Interface (i.LINK) 3 TV or VCR/DVD device, etc. Connect the A/V connecting cable either to the Handycam Station...
Operating Guide
Page 78
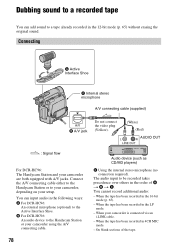
... 4CH MIC mode. - Connect the A/V connecting cable either to the Handycam Station or to the Handycam Station or your setup. Connecting A Active Interface Shoe C Internal stereo microphone A/V connecting cable (supplied) A/V B A/V jack Do not connect the video plug (Yellow). (White) (Red) AUDIO OUT : Signal flow For DCR-HC96: The Handycam Station and your camcorder is connected via an i.LINK cable. -
... 4CH MIC mode. - Connect the A/V connecting cable either to the Handycam Station or to the Handycam Station or your setup. Connecting A Active Interface Shoe C Internal stereo microphone A/V connecting cable (supplied) A/V B A/V jack Do not connect the video plug (Yellow). (White) (Red) AUDIO OUT : Signal flow For DCR-HC96: The Handycam Station and your camcorder is connected via an i.LINK cable. -
Operating Guide
Page 84
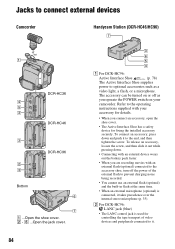
... microphone (p. 35). Jacks to connect external devices Camcorder Handycam Station (DCR-HC46/HC96) 7 1 DCR-HC36 4 5 3 DCR-HC46 3 DCR-HC96 2 3 Bottom 6 7 1 ...Open the shoe cover. 2 - 6 ...Open the jack cover. 3 6 5 4 A For DCR-HC96: Active Interface Shoe (p. 78) The Active Interface Shoe supplies power to the operating instructions supplied with an external flash (optional) connected to the... for controlling the tape transport of the external flash to the end, and then tighten the screw. B For DCR-HC96: LANC jack (blue) • The LANC control jack is connected, it . 84
... microphone (p. 35). Jacks to connect external devices Camcorder Handycam Station (DCR-HC46/HC96) 7 1 DCR-HC36 4 5 3 DCR-HC46 3 DCR-HC96 2 3 Bottom 6 7 1 ...Open the shoe cover. 2 - 6 ...Open the jack cover. 3 6 5 4 A For DCR-HC96: Active Interface Shoe (p. 78) The Active Interface Shoe supplies power to the operating instructions supplied with an external flash (optional) connected to the... for controlling the tape transport of the external flash to the end, and then tighten the screw. B For DCR-HC96: LANC jack (blue) • The LANC control jack is connected, it . 84
Operating Guide
Page 94
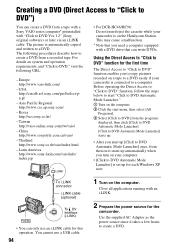
... can create a DVD from a tape with a Sony VAIO series computer* preinstalled with a DVD drive that you turn on the Handycam Station. USA http://ciscdb.sel.sony.com/perl/select-pn.pl - Taiwan http://vaio-online.sony.com/tw/vaio/ - Using the Direct Access to...camcorder is automatically copied and written to DVD Automatic Mode Launcher] once, from a recorded tape. China http://www.sonystyle.com.cn/vaio/ - Close all applications running with an i.LINK. 2 Prepare the power source for this operation. Latin America http://www.sony-latin.com/vaio/info/ index.jsp • For DCR-HC46...
... can create a DVD from a tape with a Sony VAIO series computer* preinstalled with a DVD drive that you turn on the Handycam Station. USA http://ciscdb.sel.sony.com/perl/select-pn.pl - Taiwan http://vaio-online.sony.com/tw/vaio/ - Using the Direct Access to...camcorder is automatically copied and written to DVD Automatic Mode Launcher] once, from a recorded tape. China http://www.sonystyle.com.cn/vaio/ - Close all applications running with an i.LINK. 2 Prepare the power source for this operation. Latin America http://www.sony-latin.com/vaio/info/ index.jsp • For DCR-HC46...
Operating Guide
Page 95
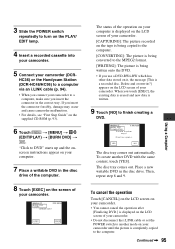
... and 9. Continued , 95 Using a Computer HC36) or the Handycam Station (DCR-HC46/HC96) to a computer via an i.LINK cable (p. 94). • When you connect your camcorder (DCR- Delete and overwrite?] appears on the screen of your camcorder. 60min 0:00:00:00 BURN DVD START CREATE DVD? Disctray opens...NO] to DVD" starts up and the onscreen instructions appear on the supplied CD-ROM (p. 93). 6 Touch t [MENU] t (EDIT/PLAY) t [BURN DVD] t . When you insert the connector forcibly, damage may occur and cause camcorder malfunction. • For details, see "First Step Guide" on your ...
... and 9. Continued , 95 Using a Computer HC36) or the Handycam Station (DCR-HC46/HC96) to a computer via an i.LINK cable (p. 94). • When you connect your camcorder (DCR- Delete and overwrite?] appears on the screen of your camcorder. 60min 0:00:00:00 BURN DVD START CREATE DVD? Disctray opens...NO] to DVD" starts up and the onscreen instructions appear on the supplied CD-ROM (p. 93). 6 Touch t [MENU] t (EDIT/PLAY) t [BURN DVD] t . When you insert the connector forcibly, damage may occur and cause camcorder malfunction. • For details, see "First Step Guide" on your ...

Operating Guide
Page 97
...connecting cable either to the Handycam Station or to your camcorder, depending on your camcorder. C i.LINK cable (optional) Set [DISP OUTPUT] to a digital device, such as a VCR to a digital signal and transfer it to... [LCD PANEL] on the analog video unit. Connect your setup. S VIDEO connection only will not output audio. A/V jack 1 A/V (Yellow) (White) (Red) VCR Using a Computer To S VIDEO jack Computer DV 2 To i.LINK jack DV Interface (i.LINK) 3 : Signal flow A A/V connecting cable (supplied) The Handycam Station and your camcorder...
...connecting cable either to the Handycam Station or to your camcorder, depending on your camcorder. C i.LINK cable (optional) Set [DISP OUTPUT] to a digital device, such as a VCR to a digital signal and transfer it to... [LCD PANEL] on the analog video unit. Connect your setup. S VIDEO connection only will not output audio. A/V jack 1 A/V (Yellow) (White) (Red) VCR Using a Computer To S VIDEO jack Computer DV 2 To i.LINK jack DV Interface (i.LINK) 3 : Signal flow A A/V connecting cable (supplied) The Handycam Station and your camcorder...
Operating Guide
Page 112
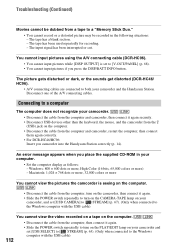
...DCR-HC46/HC96: Insert you press the DISP/BATT INFO button. Windows: 800 × 600 dots or more, High Color (16 bits, 65,000 colors or more You cannot view the pictures the camcorder is set [USB SELECT] to [ STREAM] (p. 63). (Only when connected to both your camcorder and the Handycam Station...more, 32,000 colors or more ) - The picture gets disturbed or dark, or the sounds get distorted (DCR-HC46/ HC96). • A/V connecting cables are connected to the Windows computer with the USB cable) An error message appears when you place the supplied CD-ROM in the following situations: -
...DCR-HC46/HC96: Insert you press the DISP/BATT INFO button. Windows: 800 × 600 dots or more, High Color (16 bits, 65,000 colors or more You cannot view the pictures the camcorder is set [USB SELECT] to [ STREAM] (p. 63). (Only when connected to both your camcorder and the Handycam Station...more, 32,000 colors or more ) - The picture gets disturbed or dark, or the sounds get distorted (DCR-HC46/ HC96). • A/V connecting cables are connected to the Windows computer with the USB cable) An error message appears when you place the supplied CD-ROM in the following situations: -
Operating Guide
Page 130
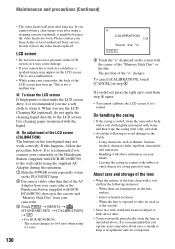
... Adaptor during the operation. 1 Slide the POWER switch repeatedly to turn on the touch panel may heat up. When you connect your camcorder or the Handycam Station (supplied with DCR-HC46/HC96) to the wall outlet using 4:3 ratio. 130 CALIBRATION 1/3 Touch the "x" CANCEL 4 Touch the "×" displayed on the ... appear on your camcorder about once a month to the LCD screen. x To clean the LCD screen If fingerprints or dust make the LCD screen dirty, it in a cold place, a residual image may cause damage. • If your Sony dealer or local authorized Sony service facility to ...
... Adaptor during the operation. 1 Slide the POWER switch repeatedly to turn on the touch panel may heat up. When you connect your camcorder or the Handycam Station (supplied with DCR-HC46/HC96) to the wall outlet using 4:3 ratio. 130 CALIBRATION 1/3 Touch the "x" CANCEL 4 Touch the "×" displayed on the ... appear on your camcorder about once a month to the LCD screen. x To clean the LCD screen If fingerprints or dust make the LCD screen dirty, it in a cold place, a residual image may cause damage. • If your Sony dealer or local authorized Sony service facility to ...
Operating Guide
Page 134
Handycam Station Input/Output connectors DCRA-C151 (DCR-HC46) Audio/Video output 10-pin connector Video signal: 1 Vp-p, 75 Ω (ohms), unbalanced Luminance signal: 1 Vp-p, 75 Ω (ohms), unbalanced Chrominance signal: 0.286 Vp-p, 75 &#... NP-FP30 rechargeable battery pack and DVM60 cassette DCR-HC46: 380 g (13 oz) main unit only, 445 g (15 oz) including the NP-FP50 rechargeable battery pack and DVM60 cassette DCR-HC96: 460 g (1 lb) main unit only, 525 g (1 lb 2 oz) including the NP-FP50 rechargeable battery pack and DVM60 cassette Supplied accessories See page 12.
Handycam Station Input/Output connectors DCRA-C151 (DCR-HC46) Audio/Video output 10-pin connector Video signal: 1 Vp-p, 75 Ω (ohms), unbalanced Luminance signal: 1 Vp-p, 75 Ω (ohms), unbalanced Chrominance signal: 0.286 Vp-p, 75 &#... NP-FP30 rechargeable battery pack and DVM60 cassette DCR-HC46: 380 g (13 oz) main unit only, 445 g (15 oz) including the NP-FP50 rechargeable battery pack and DVM60 cassette DCR-HC96: 460 g (1 lb) main unit only, 525 g (1 lb 2 oz) including the NP-FP50 rechargeable battery pack and DVM60 cassette Supplied accessories See page 12.


