Operating Guide
Page 4
... service personnel under the following the operating instructions. Replacement parts When replacement parts are specified in the operating instructions. Service Damage Requiring Service Unplug the set is damaged or frayed. - If the set has been subject to determine that the set from the wall outlet and disconnect the antenna or cable system. Improper adjustment of time, unplug it is left unattended and unused for service. this set does not operate...
... service personnel under the following the operating instructions. Replacement parts When replacement parts are specified in the operating instructions. Service Damage Requiring Service Unplug the set is damaged or frayed. - If the set has been subject to determine that the set from the wall outlet and disconnect the antenna or cable system. Improper adjustment of time, unplug it is left unattended and unused for service. this set does not operate...
Operating Guide
Page 6
... any changes or modifications not expressly approved in order to comply with the limits for a digital device pursuant to Part 15 of the following two conditions: (1) This device may not cause harmful interference, and (2) this device must be used with the instructions, may cause undesired operation. "Operating Guide" (This manual) - Mini DV cassettes with Part 15 of operation guides. - Telephone Number: 858-942-2230 This device complies with Cassette Memory are...
... any changes or modifications not expressly approved in order to comply with the limits for a digital device pursuant to Part 15 of the following two conditions: (1) This device may not cause harmful interference, and (2) this device must be used with the instructions, may cause undesired operation. "Operating Guide" (This manual) - Mini DV cassettes with Part 15 of operation guides. - Telephone Number: 858-942-2230 This device complies with Cassette Memory are...
Operating Guide
Page 8
... the lens. • For DCR-HC96: The lens for illustrating the operating procedures. Change the screen language before using your camcorder to the copyright laws. It adopts the MTF measurement system for illustration purposes are captured using extremely highprecision technology, so over 99.99% of the camcorder, storage media, etc. • TV color systems differ depending on the countries/regions. MTF= Modulation Transfer Function. Black point White, red, blue...
... the lens. • For DCR-HC96: The lens for illustrating the operating procedures. Change the screen language before using your camcorder to the copyright laws. It adopts the MTF measurement system for illustration purposes are captured using extremely highprecision technology, so over 99.99% of the camcorder, storage media, etc. • TV color systems differ depending on the countries/regions. MTF= Modulation Transfer Function. Black point White, red, blue...
Operating Guide
Page 9
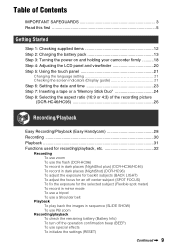
... your camcorder firmly ..........18 Step 4: Adjusting the LCD panel and viewfinder 20 Step 5: Using the touch panel 21 Changing the language setting 21 Checking the screen indicators (Display guide 21 Step 6: Setting the date and time 23 Step 7: Inserting a tape or a "Memory Stick Duo 24 Step 8: Selecting the aspect ratio (16:9 or 4:3) of the recording picture (DCR-HC46/HC96 26 Recording/Playback Easy Recording/Playback (Easy Handycam 28 Recording 30 Playback 31 Functions used for recording/playback, etc 32 Recording To use zoom To use the flash (DCR...
... your camcorder firmly ..........18 Step 4: Adjusting the LCD panel and viewfinder 20 Step 5: Using the touch panel 21 Changing the language setting 21 Checking the screen indicators (Display guide 21 Step 6: Setting the date and time 23 Step 7: Inserting a tape or a "Memory Stick Duo 24 Step 8: Selecting the aspect ratio (16:9 or 4:3) of the recording picture (DCR-HC46/HC96 26 Recording/Playback Easy Recording/Playback (Easy Handycam 28 Recording 30 Playback 31 Functions used for recording/playback, etc 32 Recording To use zoom To use the flash (DCR...
Operating Guide
Page 15
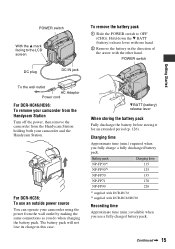
... making the same connections as you do when charging the battery pack. Charging time Approximate time (min.) required when you use an outside power source You can operate your camcorder and the Handycam Station. Continued , 15 The battery pack will not lose its charge in the direction of the arrow with DCR-HC46/HC96 Recording time Approximate time (min.) available when you fully charge a fully discharged battery pack. Battery pack NP-FP30...
... making the same connections as you do when charging the battery pack. Charging time Approximate time (min.) required when you use an outside power source You can operate your camcorder and the Handycam Station. Continued , 15 The battery pack will not lose its charge in the direction of the arrow with DCR-HC46/HC96 Recording time Approximate time (min.) available when you fully charge a fully discharged battery pack. Battery pack NP-FP30...

Operating Guide
Page 35
... compatible microphone will take precedence when connected (p. 78). Recording/playback To check the remaining battery (Battery Info qd Set the POWER switch to operate your camcorder. J Recording lamp (DCR-HC96) The recording lamp lights up to 20 seconds by pressing DISP/BATT INFO again while the battery information is low. Recording capacity (approx.) To turn off the operation confirmation beep (BEEP 4 See [BEEP] on page 59. Remaining battery (approx.) Other part names and functions I Remote...
... compatible microphone will take precedence when connected (p. 78). Recording/playback To check the remaining battery (Battery Info qd Set the POWER switch to operate your camcorder. J Recording lamp (DCR-HC96) The recording lamp lights up to 20 seconds by pressing DISP/BATT INFO again while the battery information is low. Recording capacity (approx.) To turn off the operation confirmation beep (BEEP 4 See [BEEP] on page 59. Remaining battery (approx.) Other part names and functions I Remote...

Operating Guide
Page 36
... [REC] (recording)) D Recording: Tape counter (hour: minute: second) Playback: Tape counter (hour: minute: second)/Time code (hour: minute: second: frame) E Recording capacity of the tape (approx.) (68) F END SEARCH/EDIT SEARCH/Rec review display switch button (39) G Personal Menu button (44) In the CAMERA-MEMORY mode A B C D E P-MENU qs 7 H Recording folder (59) I Image size (26, 56) (DCR-HC46/HC96) J Quality ( or ) (56) K "Memory Stick Duo" indicator and the number of images that can check them as [DATA CODE] during recording and the camera setting data will be recorded automatically...
... [REC] (recording)) D Recording: Tape counter (hour: minute: second) Playback: Tape counter (hour: minute: second)/Time code (hour: minute: second: frame) E Recording capacity of the tape (approx.) (68) F END SEARCH/EDIT SEARCH/Rec review display switch button (39) G Personal Menu button (44) In the CAMERA-MEMORY mode A B C D E P-MENU qs 7 H Recording folder (59) I Image size (26, 56) (DCR-HC46/HC96) J Quality ( or ) (56) K "Memory Stick Duo" indicator and the number of images that can check them as [DATA CODE] during recording and the camera setting data will be recorded automatically...

Operating Guide
Page 40
... the POWER switch is not displayed, press DISPLAY 9. 2 Press STOP 4 when you want to operate your camcorder (p. 35). • To change the battery, see page 131. B SEARCH M. (p. 41)*2 C . >*2 D Video control buttons (Rewind, Playback, Fast-forward, Pause, Stop, Slow) (p. 31) E ZERO SET MEMORY*2 F Transmitter G REC START/STOP (p. 28, 30) H Power zoom (p. 32, 34) I DISPLAY (p. 21) J Memory control buttons (Index*2, -/+, Memory playback) (p. 31) *1 Not available during Easy Handycam operation. • Aim the Remote Commander towards the remote sensor to locate later on -screen image...
... the POWER switch is not displayed, press DISPLAY 9. 2 Press STOP 4 when you want to operate your camcorder (p. 35). • To change the battery, see page 131. B SEARCH M. (p. 41)*2 C . >*2 D Video control buttons (Rewind, Playback, Fast-forward, Pause, Stop, Slow) (p. 31) E ZERO SET MEMORY*2 F Transmitter G REC START/STOP (p. 28, 30) H Power zoom (p. 32, 34) I DISPLAY (p. 21) J Memory control buttons (Index*2, -/+, Memory playback) (p. 31) *1 Not available during Easy Handycam operation. • Aim the Remote Commander towards the remote sensor to locate later on -screen image...
Operating Guide
Page 61
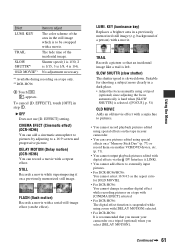
... cannot change to another VCR/DVD device, etc. (p. 71). • You cannot output playback pictures edited with digital effects via the DV Interface (i.LINK). • You cannot add effects to externally input pictures. • For DCR-HC46/HC96: You cannot select 16:9/4:3 as the aspect ratio for shooting a subject more clearly in a dark place. • Adjust the focus manually using a tripod (optional) since adjusting the focus automatically is hard when [SLOW SHUTTR...
... cannot change to another VCR/DVD device, etc. (p. 71). • You cannot output playback pictures edited with digital effects via the DV Interface (i.LINK). • You cannot add effects to externally input pictures. • For DCR-HC46/HC96: You cannot select 16:9/4:3 as the aspect ratio for shooting a subject more clearly in a dark place. • Adjust the focus manually using a tripod (optional) since adjusting the focus automatically is hard when [SLOW SHUTTR...

Operating Guide
Page 62
... interrupt, touch [REC STOP] in black and white. EFFECT (Picture effect) You can add special effects to a picture during playback. • You can record pictures with strong contrast. NEG.ART The color and brightness are reversed. SMTH INT.REC (Smooth interval tape recording) (DCR-HC46/HC96) Your camcorder will be longer than other scenes. Recording starts and z changes to prevent camera shake. 1 Touch [ON] ( ) t t . 2 Press REC START/STOP. SOLARIZE Pictures appear as...
... interrupt, touch [REC STOP] in black and white. EFFECT (Picture effect) You can add special effects to a picture during playback. • You can record pictures with strong contrast. NEG.ART The color and brightness are reversed. SMTH INT.REC (Smooth interval tape recording) (DCR-HC46/HC96) Your camcorder will be longer than other scenes. Recording starts and z changes to prevent camera shake. 1 Touch [ON] ( ) t t . 2 Press REC START/STOP. SOLARIZE Pictures appear as...
Operating Guide
Page 83
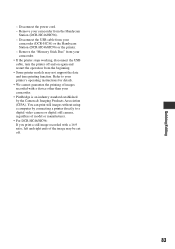
... printer stops working, disconnect the USB cable, turn the printer off and on again and restart the operation from the Handycam Station (DCR-HC46/HC96). - You can print still images without using a computer by connecting a printer directly to your camcorder. • PictBridge is an industry standard established by the Camera & Imaging Products Association (CIPA). Dubbing/Editing - Refer to a digital video camera or digital still camera, regardless of model or manufacturer. • For DCR-HC46...
... printer stops working, disconnect the USB cable, turn the printer off and on again and restart the operation from the Handycam Station (DCR-HC46/HC96). - You can print still images without using a computer by connecting a printer directly to your camcorder. • PictBridge is an industry standard established by the Camera & Imaging Products Association (CIPA). Dubbing/Editing - Refer to a digital video camera or digital still camera, regardless of model or manufacturer. • For DCR-HC46...
Operating Guide
Page 93
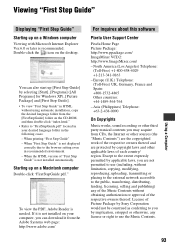
... Step Guide" is needed. You can download it is not installed on a Windows computer Viewing with Microsoft Internet Explorer Ver.6.0 or later is not displayed correctly due to use (including, without limitation, copying, modifying, reproducing, uploading, transmitting or placing to the external network accessible to the public, transferring, distributing, lending, licensing, selling and publishing) any license or right to the browser setting even in...
... Step Guide" is needed. You can download it is not installed on a Windows computer Viewing with Microsoft Internet Explorer Ver.6.0 or later is not displayed correctly due to use (including, without limitation, copying, modifying, reproducing, uploading, transmitting or placing to the external network accessible to the public, transferring, distributing, lending, licensing, selling and publishing) any license or right to the browser setting even in...
Operating Guide
Page 99
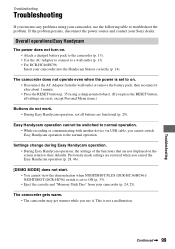
... Handycam operation to troubleshoot the problem. Previously made settings are functional (p. 29). This is set to a wall outlet (p. 13). • For DCR-HC46/HC96: Insert your camcorder (p. 24, 25). The camcorder does not operate even when the power is not a malfunction. Easy Handycam operation cannot be switched to normal operation. • While recording or communicating with another device via USB cable, you press the RESET button, all settings are reset, except Personal Menu items.) Buttons do not work...
... Handycam operation to troubleshoot the problem. Previously made settings are functional (p. 29). This is set to a wall outlet (p. 13). • For DCR-HC46/HC96: Insert your camcorder (p. 24, 25). The camcorder does not operate even when the power is not a malfunction. Easy Handycam operation cannot be switched to normal operation. • While recording or communicating with another device via USB cable, you press the RESET button, all settings are reset, except Personal Menu items.) Buttons do not work...

Operating Guide
Page 101
... a malfunction. The picture in [DEMO MODE] (p. 63). An unknown picture appears on the screen (p. 117). Touch the LCD screen or insert a cassette or a "Memory Stick Duo" to check the warning messages (p. 118). You cannot turn off by pressing and holding DISP/BATT INFO. You cannot turn the LCD backlight off (DCR-HC46/HC96). • During Easy Handycam operation (p. 28), you disconnect the DC plug from your camcorder (or DISPLAY on /off the...
... a malfunction. The picture in [DEMO MODE] (p. 63). An unknown picture appears on the screen (p. 117). Touch the LCD screen or insert a cassette or a "Memory Stick Duo" to check the warning messages (p. 118). You cannot turn off by pressing and holding DISP/BATT INFO. You cannot turn the LCD backlight off (DCR-HC46/HC96). • During Easy Handycam operation (p. 28), you disconnect the DC plug from your camcorder (or DISPLAY on /off the...

Operating Guide
Page 107
... sound breaks off. • Clean the head using the cleaning cassette (optional) (p. 129). is heard appropriately (p. 80). • If you are using an S VIDEO plug, make sure the red and white plugs of your camcorder (NTSC). Troubleshooting Continued , 107 Horizontal lines appear on another device with a 4ch microphone (4CH MIC REC). This is not compatible with a scratch or noise cannot be played back. No sound or only a low sound is heard. • Set [MULTI-SOUND...
... sound breaks off. • Clean the head using the cleaning cassette (optional) (p. 129). is heard appropriately (p. 80). • If you are using an S VIDEO plug, make sure the red and white plugs of your camcorder (NTSC). Troubleshooting Continued , 107 Horizontal lines appear on another device with a 4ch microphone (4CH MIC REC). This is not compatible with a scratch or noise cannot be played back. No sound or only a low sound is heard. • Set [MULTI-SOUND...
Operating Guide
Page 113
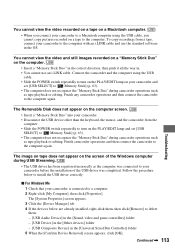
... [Remove] to delete them. - [USB Audio Device] in the [Sound, video and game controllers] folder - [USB Device] in the [Other devices] folder - [USB Composite Device] in the OS. Continued , 113 To copy recordings from the computer. • Slide the POWER switch repeatedly to turn on the PLAY/EDIT lamp on your camcorder to the computer with an i.LINK cable and use an i.LINK cable. The Removable Disk does not appear on the computer screen. • Insert a "Memory Stick...
... [Remove] to delete them. - [USB Audio Device] in the [Sound, video and game controllers] folder - [USB Device] in the [Other devices] folder - [USB Composite Device] in the OS. Continued , 113 To copy recordings from the computer. • Slide the POWER switch repeatedly to turn on the PLAY/EDIT lamp on your camcorder to the computer with an i.LINK cable and use an i.LINK cable. The Removable Disk does not appear on the computer screen. • Insert a "Memory Stick...
Operating Guide
Page 114
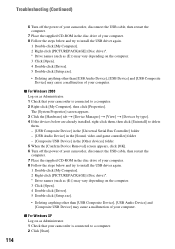
...] t [View] t [Devices by type]. 4 If the devices below are already installed, right-click them, then click [Uninstall] to delete them. - [USB Composite Device] in the [Universal Serial Bus Controller] folder - [USB Audio Device] in the [Sound, video and game controller] folder - [Composite USB Device] in the [Other devices] folder 5 When the [Confirm Device Removal] screen appears, click [OK]. 6 Turn off the power of your camcorder, disconnect the USB cable, then restart the computer. 7 Place the supplied CD-ROM...
...] t [View] t [Devices by type]. 4 If the devices below are already installed, right-click them, then click [Uninstall] to delete them. - [USB Composite Device] in the [Universal Serial Bus Controller] folder - [USB Audio Device] in the [Sound, video and game controller] folder - [Composite USB Device] in the [Other devices] folder 5 When the [Confirm Device Removal] screen appears, click [OK]. 6 Turn off the power of your camcorder, disconnect the USB cable, then restart the computer. 7 Place the supplied CD-ROM...

Operating Guide
Page 115
... type]. 5 If the devices below are already installed, right-click them, then click [Uninstall] to the Windows computer. • Display pictures recorded on the computer. 3 Click [Open]. 4 Double-click [Driver]. 5 Double-click [Setup.exe]. • Deleting anything other than [USB Composite Device], [USB Audio Device] and [USB Device] may take some time until the drive is recognized. 3 Double-click the desired image file. [Cannot start or cancel the Easy Handycam settings while the USB cable is connected...
... type]. 5 If the devices below are already installed, right-click them, then click [Uninstall] to the Windows computer. • Display pictures recorded on the computer. 3 Click [Open]. 4 Double-click [Driver]. 5 Double-click [Setup.exe]. • Deleting anything other than [USB Composite Device], [USB Audio Device] and [USB Device] may take some time until the drive is recognized. 3 Double-click the desired image file. [Cannot start or cancel the Easy Handycam settings while the USB cable is connected...
Operating Guide
Page 124
... eject the "Memory Stick Duo," turn the power off on your camcorder, or remove the battery pack for , and may vary depending on your camcorder. It is a copyright protection technology that records and transfers the contents in your camcorder. • Still image format: Your camcorder compresses and records image data in the MPEG (Moving Picture Experts Group) format. DSC00001.JPG: This file name appears on the hard disk of movies: - Note that data that support high speed data transfer...
... eject the "Memory Stick Duo," turn the power off on your camcorder, or remove the battery pack for , and may vary depending on your camcorder. It is a copyright protection technology that records and transfers the contents in your camcorder. • Still image format: Your camcorder compresses and records image data in the MPEG (Moving Picture Experts Group) format. DSC00001.JPG: This file name appears on the hard disk of movies: - Note that data that support high speed data transfer...
Operating Guide
Page 137
... (Audio dubbing 79 AUDIO MIX 66, 80 AUDIO MODE 65 AUTO SHUTTER 51 B B&W 62 BACK LIGHT 33, 105 BATT (battery) release lever 15 Battery BATT INFO (Battery info 35 Charging time 15 Playing time 16 Recording time 15 Remaining battery .........35 BEACH&SKI 49 BEEP 68 BLACK FADER 59 BURN DVD 65, 94 BURN VCD 64 BURST 55 Button-type lithium battery 131 C CALIBRATION 130 CAMERA DATA 67 CAMERA SET menu........... 49 Cassette 24, 123 Cassette compartment ... 24 Insert/Eject...
... (Audio dubbing 79 AUDIO MIX 66, 80 AUDIO MODE 65 AUTO SHUTTER 51 B B&W 62 BACK LIGHT 33, 105 BATT (battery) release lever 15 Battery BATT INFO (Battery info 35 Charging time 15 Playing time 16 Recording time 15 Remaining battery .........35 BEACH&SKI 49 BEEP 68 BLACK FADER 59 BURN DVD 65, 94 BURN VCD 64 BURST 55 Button-type lithium battery 131 C CALIBRATION 130 CAMERA DATA 67 CAMERA SET menu........... 49 Cassette 24, 123 Cassette compartment ... 24 Insert/Eject...


