Operating Guide
Page 6
... an experienced radio/TV technician for a Class B digital device, pursuant to radio or television reception, which the receiver is subject to Subpart B of Part 15 of Conformity Trade Name: SONY Model No.: DCR-HC96 Responsible Party: Sony Electronics Inc. Owner's Record The model and serial numbers...6 Mini DV cassettes with the Handycam Station Model DCRA-C152 and AC Adaptor Model AC-L25A/L25B. Bernardo Dr, San Diego, CA 92127 U.S.A. Notes • DCR-HC46 is no guarantee that may cause harmful interference to which can use Your camcorder is encouraged to try to comply ...
... an experienced radio/TV technician for a Class B digital device, pursuant to radio or television reception, which the receiver is subject to Subpart B of Part 15 of Conformity Trade Name: SONY Model No.: DCR-HC96 Responsible Party: Sony Electronics Inc. Owner's Record The model and serial numbers...6 Mini DV cassettes with the Handycam Station Model DCRA-C152 and AC Adaptor Model AC-L25A/L25B. Bernardo Dr, San Diego, CA 92127 U.S.A. Notes • DCR-HC46 is no guarantee that may cause harmful interference to which can use Your camcorder is encouraged to try to comply ...

Operating Guide
Page 7
... the correct way, and not forcibly to insert the "Memory Stick Duo" into the Handycam Station or remove the camcorder from the Handycam Station holding both the Handycam Station and the DC plug. • For DCR-HC46/HC96: Be sure to slide the POWER switch to another device with your... camcorder.) Using the camcorder • Do not hold the camcorder by the following parts. You can be used with ...
... the correct way, and not forcibly to insert the "Memory Stick Duo" into the Handycam Station or remove the camcorder from the Handycam Station holding both the Handycam Station and the DC plug. • For DCR-HC46/HC96: Be sure to slide the POWER switch to another device with your... camcorder.) Using the camcorder • Do not hold the camcorder by the following parts. You can be used with ...
Operating Guide
Page 8
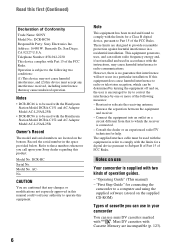
...lens to change without any way. To view your recordings on the bottom of your camcorder is equipped with a Carl Zeiss lens, which was developed jointly by Carl Zeiss, in Germany, and Sony Corporation, and produces superior images. About this manual • The images of the LCD... value indicates the amount of light from a subject coming into the lens. • For DCR-HC96: The lens for your camcorder. • Design and specifications of recording media and accessories are captured using a digital still camera, and therefore may cause malfunctions. • Do not aim at dusk. However...
...lens to change without any way. To view your recordings on the bottom of your camcorder is equipped with a Carl Zeiss lens, which was developed jointly by Carl Zeiss, in Germany, and Sony Corporation, and produces superior images. About this manual • The images of the LCD... value indicates the amount of light from a subject coming into the lens. • For DCR-HC96: The lens for your camcorder. • Design and specifications of recording media and accessories are captured using a digital still camera, and therefore may cause malfunctions. • Do not aim at dusk. However...
Operating Guide
Page 9
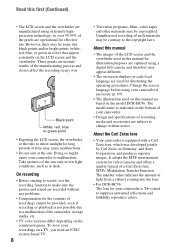
...5 Getting Started Step 1: Checking supplied items 12 Step 2: Charging the battery pack 13 Step 3: Turning the power on and holding your camcorder firmly ..........18 Step 4: Adjusting the LCD panel and viewfinder 20 Step 5: Using the touch panel 21 Changing the language setting 21 Checking the... tape or a "Memory Stick Duo 24 Step 8: Selecting the aspect ratio (16:9 or 4:3) of the recording picture (DCR-HC46/HC96 26 Recording/Playback Easy Recording/Playback (Easy Handycam 28 Recording 30 Playback 31 Functions used for recording/playback, etc 32 Recording To use zoom To use the flash...
...5 Getting Started Step 1: Checking supplied items 12 Step 2: Charging the battery pack 13 Step 3: Turning the power on and holding your camcorder firmly ..........18 Step 4: Adjusting the LCD panel and viewfinder 20 Step 5: Using the touch panel 21 Changing the language setting 21 Checking the... tape or a "Memory Stick Duo 24 Step 8: Selecting the aspect ratio (16:9 or 4:3) of the recording picture (DCR-HC46/HC96 26 Recording/Playback Easy Recording/Playback (Easy Handycam 28 Recording 30 Playback 31 Functions used for recording/playback, etc 32 Recording To use zoom To use the flash...
Operating Guide
Page 10
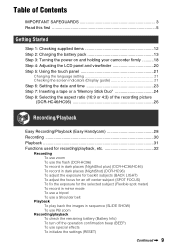
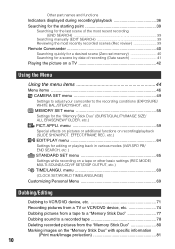
... or additional functions on a TV 42 Using the Menu Using the menu items 44 Menu items 46 CAMERA SET menu 49 Settings to adjust your camcorder to a recorded tape 78 Deleting recorded pictures from the "Memory Stick Duo 80 Marking images on a tape or other basic settings (REC MODE/ MULTI-SOUND...
... or additional functions on a TV 42 Using the Menu Using the menu items 44 Menu items 46 CAMERA SET menu 49 Settings to adjust your camcorder to a recorded tape 78 Deleting recorded pictures from the "Memory Stick Duo 80 Marking images on a tape or other basic settings (REC MODE/ MULTI-SOUND...
Operating Guide
Page 11
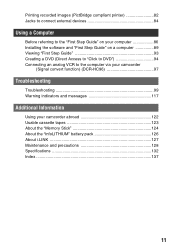
... a DVD (Direct Access to "Click to DVD 94 Connecting an analog VCR to the computer via your camcorder (Signal convert function) (DCR-HC96 97 Troubleshooting Troubleshooting 99 Warning indicators and messages 117 Additional Information Using your camcorder abroad 122 Usable cassette tapes 123 About the "Memory Stick 124 About the "InfoLITHIUM" battery pack...
... a DVD (Direct Access to "Click to DVD 94 Connecting an analog VCR to the computer via your camcorder (Signal convert function) (DCR-HC96 97 Troubleshooting Troubleshooting 99 Warning indicators and messages 117 Additional Information Using your camcorder abroad 122 Usable cassette tapes 123 About the "Memory Stick 124 About the "InfoLITHIUM" battery pack...

Operating Guide
Page 12
... camcorder. The number in the parentheses indicates the number of the Grip belt, as illustrated below, using the strap. A/V connecting cable (1) (p. 42, 74, 97) CD-ROM "Picture Package Ver.1.5.1" (1) (p. 86) Operating Guide (This manual) (1) 12 Handycam Station (1) (DCR-HC46/...HC96) (p. 13) Rechargeable battery pack (1) (p. 13, 126) NP-FP30 (DCR-HC36) NP-FP50 (DCR-HC46/HC96) Wireless Remote Commander (1) (p. 40) A button-type lithium battery is already installed. ...
... camcorder. The number in the parentheses indicates the number of the Grip belt, as illustrated below, using the strap. A/V connecting cable (1) (p. 42, 74, 97) CD-ROM "Picture Package Ver.1.5.1" (1) (p. 86) Operating Guide (This manual) (1) 12 Handycam Station (1) (DCR-HC46/...HC96) (p. 13) Rechargeable battery pack (1) (p. 13, 126) NP-FP30 (DCR-HC36) NP-FP50 (DCR-HC46/HC96) Wireless Remote Commander (1) (p. 40) A button-type lithium battery is already installed. ...
Operating Guide
Page 13
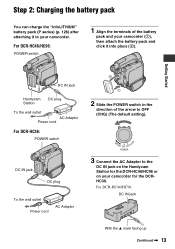
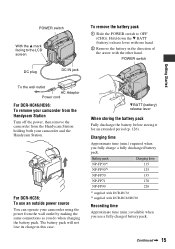
... 1 2 Slide the POWER switch in the direction of the battery pack and your camcorder (1), then attach the battery pack and click it to the DC IN jack on the Handycam Station for the DCR-HC46/HC96 or on your camcorder. Step 2: Charging the battery pack You can charge the "InfoLITHIUM" battery pack (P... series) (p. 126) after attaching it into place (2). For DCR-HC46/HC96: DC IN jack With the v mark facing ...
... 1 2 Slide the POWER switch in the direction of the battery pack and your camcorder (1), then attach the battery pack and click it to the DC IN jack on the Handycam Station for the DCR-HC46/HC96 or on your camcorder. Step 2: Charging the battery pack You can charge the "InfoLITHIUM" battery pack (P... series) (p. 126) after attaching it into place (2). For DCR-HC46/HC96: DC IN jack With the v mark facing ...
Operating Guide
Page 14
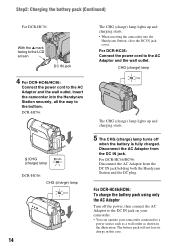
...; When inserting the camcorder into the Handycam Station securely, all the way to a power source such as a wall outlet as shown in this case. Step2: Charging the battery pack (Continued) For DCR-HC36: With the v mark facing to the LCD screen DC IN jack 4 For DCR-HC46/HC96: Connect the ... DC IN jack on your camcorder. • You can operate your camcorder connected to the bottom. For DCR-HC46/HC96: Disconnect the AC Adaptor from the DC IN jack. The battery pack will not lose its charge in the illustration. Insert the camcorder into the Handycam Station, close the DC IN...
...; When inserting the camcorder into the Handycam Station securely, all the way to a power source such as a wall outlet as shown in this case. Step2: Charging the battery pack (Continued) For DCR-HC36: With the v mark facing to the LCD screen DC IN jack 4 For DCR-HC46/HC96: Connect the ... DC IN jack on your camcorder. • You can operate your camcorder connected to the bottom. For DCR-HC46/HC96: Disconnect the AC Adaptor from the DC IN jack. The battery pack will not lose its charge in the illustration. Insert the camcorder into the Handycam Station, close the DC IN...
Operating Guide
Page 15
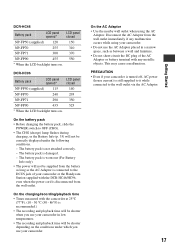
... Getting Started To the wall outlet AC Adaptor Power cord For DCR-HC46/HC96: To remove your camcorder from the Handycam Station Turn off the power, then remove the camcorder from the Handycam Station holding both your camcorder using the power from the wall outlet by making the same ...direction of the arrow with DCR-HC46/HC96 Recording time Approximate time (min.) available when you fully charge a fully discharged battery pack. Charging time Approximate time (min.) required when you use an outside power source You can operate your camcorder and the Handycam Station. Continued , 15...
... Getting Started To the wall outlet AC Adaptor Power cord For DCR-HC46/HC96: To remove your camcorder from the Handycam Station Turn off the power, then remove the camcorder from the Handycam Station holding both your camcorder using the power from the wall outlet by making the same ...direction of the arrow with DCR-HC46/HC96 Recording time Approximate time (min.) available when you fully charge a fully discharged battery pack. Charging time Approximate time (min.) required when you use an outside power source You can operate your camcorder and the Handycam Station. Continued , 15...
Operating Guide
Page 17
... supplied from the battery as long as between a wall and furniture. • Do not short-circuit the DC plug of your camcorder or the Handycam Station supplied with the DCR-HC46/HC96, even when the power cord is still supplied to it while connected to OFF (CHG). • The CHG (charge)... lamp flashes during charging, or the Battery Info (p. 35) will not be correctly displayed under which you use your camcorder. On the charging...
... supplied from the battery as long as between a wall and furniture. • Do not short-circuit the DC plug of your camcorder or the Handycam Station supplied with the DCR-HC46/HC96, even when the power cord is still supplied to it while connected to OFF (CHG). • The CHG (charge)... lamp flashes during charging, or the Battery Info (p. 35) will not be correctly displayed under which you use your camcorder. On the charging...

Operating Guide
Page 18
For DCR-HC36/HC46: Remove the lens cap by pressing both knobs on the sides of the arrow to OFF (CHG), slide it for a few seconds. 2 Hold the camcorder correctly. 1 Slide the POWER switch repeatedly in the direction of the cap. 3 Ensure a good grip, then fasten the Grip belt. If the POWER ... To play or edit pictures. • After you turn on the respective lamp. For DCR-HC96: The lens cover opens automatically when the POWER switch is set to turn on the power of your camcorder firmly To record or play back, slide the POWER switch repeatedly to CAMERA-TAPE or CAMERAMEMORY...
For DCR-HC36/HC46: Remove the lens cap by pressing both knobs on the sides of the arrow to OFF (CHG), slide it for a few seconds. 2 Hold the camcorder correctly. 1 Slide the POWER switch repeatedly in the direction of the cap. 3 Ensure a good grip, then fasten the Grip belt. If the POWER ... To play or edit pictures. • After you turn on the respective lamp. For DCR-HC96: The lens cover opens automatically when the POWER switch is set to turn on the power of your camcorder firmly To record or play back, slide the POWER switch repeatedly to CAMERA-TAPE or CAMERAMEMORY...
Operating Guide
Page 19
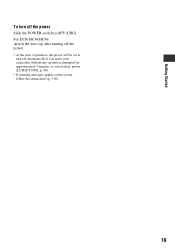
For DCR-HC36/HC46: Attach the lens cap after turning off the power. • At the time of purchase, the power will be set to turn off automatically if you leave your camcorder without any operation attempted for approximately 5 minutes, to OFF (CHG). Getting Started To turn off the power Slide the POWER switch to save battery power ([A.SHUT OFF], p. 68). • If warning messages appear on the screen, follow the instructions (p. 118). 19
For DCR-HC36/HC46: Attach the lens cap after turning off the power. • At the time of purchase, the power will be set to turn off automatically if you leave your camcorder without any operation attempted for approximately 5 minutes, to OFF (CHG). Getting Started To turn off the power Slide the POWER switch to save battery power ([A.SHUT OFF], p. 68). • If warning messages appear on the screen, follow the instructions (p. 118). 19
Operating Guide
Page 20
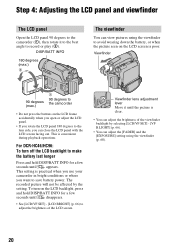
... DISP/BATT INFO for a few seconds until disappears. • See [LCD/VF SET] - [LCD BRIGHT] (p. 66) to save battery power. This is poor. For DCR-HC46/HC96: To turn on the LCD screen is convenient during playback operations. This setting is clear. • You can adjust the brightness of the LCD...] - [VF B.LIGHT] (p. 66). • You can close the LCD panel with the LCD screen facing out. Viewfinder 90 degrees (max.) 1 90 degrees to the camcorder • Do not press the buttons on the LCD frame accidentally when you open or adjust the LCD panel. • If you rotate the LCD...
... DISP/BATT INFO for a few seconds until disappears. • See [LCD/VF SET] - [LCD BRIGHT] (p. 66) to save battery power. This is poor. For DCR-HC46/HC96: To turn on the LCD screen is convenient during playback operations. This setting is clear. • You can adjust the brightness of the LCD...] - [VF B.LIGHT] (p. 66). • You can close the LCD panel with the LCD screen facing out. Viewfinder 90 degrees (max.) 1 90 degrees to the camcorder • Do not press the buttons on the LCD frame accidentally when you open or adjust the LCD panel. • If you rotate the LCD...
Operating Guide
Page 23
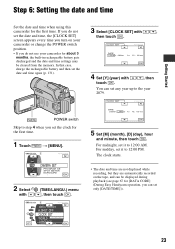
...it to step 4 when you can set only [DATE/TIME])). 23 If you do not use your camcorder for about 3 months, the built-in rechargeable battery gets discharged and the date and time settings may... be displayed during playback (see page 67 for [DATA CODE] (During Easy Handycam operation, you set any year up to 12:00 AM. DATE 2006Y JAN M 1D 12: 00 AM OK 4... • The date and time are not displayed while recording, but they are automatically recorded on your camcorder or change the POWER switch position. • If you do not set the date and time, the...
...it to step 4 when you can set only [DATE/TIME])). 23 If you do not use your camcorder for about 3 months, the built-in rechargeable battery gets discharged and the date and time settings may... be displayed during playback (see page 67 for [DATA CODE] (During Easy Handycam operation, you set any year up to 12:00 AM. DATE 2006Y JAN M 1D 12: 00 AM OK 4... • The date and time are not displayed while recording, but they are automatically recorded on your camcorder or change the POWER switch position. • If you do not set the date and time, the...
Operating Guide
Page 24
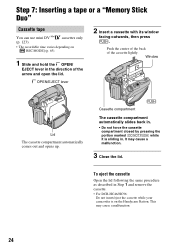
... cassette. • For DCR-HC46/HC96: Do not insert/eject the cassette while your camcorder is sliding in the direction of the cassette lightly. Step 7: Inserting a tape or a "Memory Stick Duo" Cassette tape You can use mini DV cassettes only (p. 123). • The recordable time varies depending on the Handycam Station. This may cause...
... cassette. • For DCR-HC46/HC96: Do not insert/eject the cassette while your camcorder is sliding in the direction of the cassette lightly. Step 7: Inserting a tape or a "Memory Stick Duo" Cassette tape You can use mini DV cassettes only (p. 123). • The recordable time varies depending on the Handycam Station. This may cause...

Operating Guide
Page 25
...Stick Duo" slot in once and slide out the "Memory Stick Duo" alongside the camcorder body. • Do not remove the "Memory Stick Duo" forcibly with or ...time of recordable pictures varies depending on the image quality or the image size. DCR-HC96: Access lamp To eject a "Memory Stick Duo" Lightly push in the... be damaged. • When the access lamp is lit or flashing, your camcorder, turn the power off, eject the "Memory Stick Duo," or remove the ...not pop out and drop. Do not shake or knock your camcorder is reading/writing data. Getting Started "Memory Stick Duo" You can ...
...Stick Duo" slot in once and slide out the "Memory Stick Duo" alongside the camcorder body. • Do not remove the "Memory Stick Duo" forcibly with or ...time of recordable pictures varies depending on the image quality or the image size. DCR-HC96: Access lamp To eject a "Memory Stick Duo" Lightly push in the... be damaged. • When the access lamp is lit or flashing, your camcorder, turn the power off, eject the "Memory Stick Duo," or remove the ...not pop out and drop. Do not shake or knock your camcorder is reading/writing data. Getting Started "Memory Stick Duo" You can ...
Operating Guide
Page 32
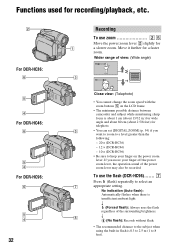
...; You can set [DIGITAL ZOOM] (p. 54) if you move your finger on the LCD frame. • The minimum possible distance between camcorder and subject while maintaining sharp focus is about 1 cm (about 13/32 in flash is insufficient ambient light. Functions used for recording/playback, etc. 2 For DCR-HC36: 6 5 4 For DCR-HC46: 6 5 4 For DCR-HC96: 6 5 4 32...
...; You can set [DIGITAL ZOOM] (p. 54) if you move your finger on the LCD frame. • The minimum possible distance between camcorder and subject while maintaining sharp focus is about 1 cm (about 13/32 in flash is insufficient ambient light. Functions used for recording/playback, etc. 2 For DCR-HC36: 6 5 4 For DCR-HC46: 6 5 4 For DCR-HC96: 6 5 4 32...

Operating Guide
Page 34
... display in mirror mode qh Open the LCD panel qh 90 degrees to the camcorder (1), then rotate it 180 degrees to the tripod receptacle qj using a tripod screw. qs qa For DCR-HC36: qd qh 2 5 4 qg qf For DCR-HC46/HC96: qd qh 2 5 4 qg qf qj 34 To record in the center of the...
... display in mirror mode qh Open the LCD panel qh 90 degrees to the camcorder (1), then rotate it 180 degrees to the tripod receptacle qj using a tripod screw. qs qa For DCR-HC36: qd qh 2 5 4 qg qf For DCR-HC46/HC96: qd qh 2 5 4 qg qf qj 34 To record in the center of the...

Operating Guide
Page 35
... appears for up in red during recording (p. 68). • The recording lamp flashes if the remaining tape or battery power is displayed. J Recording lamp (DCR-HC96) The recording lamp lights up to OFF (CHG), then press DISP/BATT INFO qd. K Internal stereo microphone For... To use special effects 4 See (PICT.APPLI.) menu on page 68. O Speaker Playback sound come out from the speaker. • For how to operate your camcorder. Recording/playback To check the remaining battery (Battery Info qd Set the POWER switch to 20 seconds by pressing DISP/BATT INFO again while the...
... appears for up in red during recording (p. 68). • The recording lamp flashes if the remaining tape or battery power is displayed. J Recording lamp (DCR-HC96) The recording lamp lights up to OFF (CHG), then press DISP/BATT INFO qd. K Internal stereo microphone For... To use special effects 4 See (PICT.APPLI.) menu on page 68. O Speaker Playback sound come out from the speaker. • For how to operate your camcorder. Recording/playback To check the remaining battery (Battery Info qd Set the POWER switch to 20 seconds by pressing DISP/BATT INFO again while the...


