Operating Guide
Page 4
... with a USB or i.LINK cable, be copyrighted. On the menu items, LCD panel, viewfinder, and lens • A menu item that appear constantly on the LCD screen and the viewfinder. Doing so might cause your camcorder. To view your recordings on a TV, you can use in your... camcorder to malfunction. On using extremely highprecision technology, so over 99.99% of the pixels...
... with a USB or i.LINK cable, be copyrighted. On the menu items, LCD panel, viewfinder, and lens • A menu item that appear constantly on the LCD screen and the viewfinder. Doing so might cause your camcorder. To view your recordings on a TV, you can use in your... camcorder to malfunction. On using extremely highprecision technology, so over 99.99% of the pixels...
Operating Guide
Page 5
...LCD screen and the viewfinder used in this manual are captured using your camcorder if necessary (p. 16). • The illustrations used for illustrating the operating procedures. The number value indicates the amount of a Carl Zeiss lens. * MTF stands for illustration purposes are based on the model DCR-HC42... Modulation Transfer Function. About the Carl Zeiss lens Your camcorder is equipped with a Carl Zeiss lens, which was developed jointly by Carl Zeiss, in each local language are used on -screen displays in Germany, and Sony Corporation, and produces superior images.
...LCD screen and the viewfinder used in this manual are captured using your camcorder if necessary (p. 16). • The illustrations used for illustrating the operating procedures. The number value indicates the amount of a Carl Zeiss lens. * MTF stands for illustration purposes are based on the model DCR-HC42... Modulation Transfer Function. About the Carl Zeiss lens Your camcorder is equipped with a Carl Zeiss lens, which was developed jointly by Carl Zeiss, in each local language are used on -screen displays in Germany, and Sony Corporation, and produces superior images.
Operating Guide
Page 12
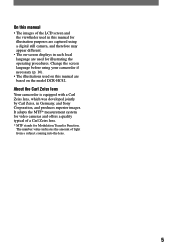
...105 120 150 NP-FP70 NP-FP90 255 310 455 550 For DCR-HC42: Battery pack NP-FP50 (supplied) NP-FP70 NP-FP90 LCD panel opened* 105 225 400 LCD panel closed . Bottom: Recording time when recording with DCR-HC42) 125 NP-FP70 155 NP-FP90 220 Recording time Approximate time...fully charged battery pack. Playing time Approximate time (min.) available when you fully charge a fully discharged battery pack. Bottom: Recording with LCD screen. For DCR-HC32: Battery pack Continuous recording time Typical recording time* NP-FP30 (supplied) NP-FP50 NP-FP70 NP-FP90 80 40 95 45 110...
...105 120 150 NP-FP70 NP-FP90 255 310 455 550 For DCR-HC42: Battery pack NP-FP50 (supplied) NP-FP70 NP-FP90 LCD panel opened* 105 225 400 LCD panel closed . Bottom: Recording time when recording with DCR-HC42) 125 NP-FP70 155 NP-FP90 220 Recording time Approximate time...fully charged battery pack. Playing time Approximate time (min.) available when you fully charge a fully discharged battery pack. Bottom: Recording with LCD screen. For DCR-HC32: Battery pack Continuous recording time Typical recording time* NP-FP30 (supplied) NP-FP50 NP-FP70 NP-FP90 80 40 95 45 110...
Operating Guide
Page 14
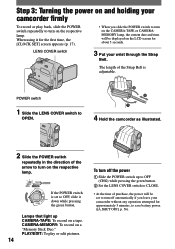
... if you slide the POWER switch to turn on the CAMERA-TAPE or CAMERAMEMORY lamp, the current date and time will be displayed on the LCD screen for approximately 5 minutes, to save battery power. ([A.SHUT OFF], p. 56). When using it down while pressing the green button. LENS COVER switch 3 Put ...your wrist through the Strap Belt. CAMERA-MEMORY: To record on a tape. POWER switch 1 Slide the LENS COVER switch to OPEN. 4 Hold the camcorder as illustrated. 2 Slide the POWER switch repeatedly in the direction of purchase, the power will be set to OFF, slide it for the first...
... if you slide the POWER switch to turn on the CAMERA-TAPE or CAMERAMEMORY lamp, the current date and time will be displayed on the LCD screen for approximately 5 minutes, to save battery power. ([A.SHUT OFF], p. 56). When using it down while pressing the green button. LENS COVER switch 3 Put ...your wrist through the Strap Belt. CAMERA-MEMORY: To record on a tape. POWER switch 1 Slide the LENS COVER switch to OPEN. 4 Hold the camcorder as illustrated. 2 Slide the POWER switch repeatedly in the direction of purchase, the power will be set to OFF, slide it for the first...
Operating Guide
Page 15
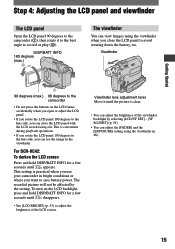
Getting Started Step 4: Adjusting the LCD panel and viewfinder The LCD panel Open the LCD panel 90 degrees to the camcorder (), then rotate it until the picture is clear. • You can adjust the brightness of the LCD screen. Viewfinder lens adjustment lever Move ...degrees (max.) 90 degrees to the camcorder • Do not press the buttons on the LCD backlight, press and hold DISP/BATT INFO for a few seconds until disappears. • See [LCD BRIGHT] (p. 53) to save battery power. For DCR-HC42: To darken the LCD screen Press and hold DISP/BATT INFO for...
Getting Started Step 4: Adjusting the LCD panel and viewfinder The LCD panel Open the LCD panel 90 degrees to the camcorder (), then rotate it until the picture is clear. • You can adjust the brightness of the LCD screen. Viewfinder lens adjustment lever Move ...degrees (max.) 90 degrees to the camcorder • Do not press the buttons on the LCD backlight, press and hold DISP/BATT INFO for a few seconds until disappears. • See [LCD BRIGHT] (p. 53) to save battery power. For DCR-HC42: To darken the LCD screen Press and hold DISP/BATT INFO for...

Operating Guide
Page 16
...touch the buttons displayed on the LCD screen. 16 Select area for guide. Touch the button on the LCD screen. • Perform the same actions as time code, etc.) on the LCD frame accidentally while using the touch panel. When you press the buttons on the LCD frame. • Be careful not...in the area are listed on the (TIME/ LANGU.) menu (p. 36, 56). The meanings of the indicators in [LANGUAGE] on the screen. Touch [MENU] during Easy Handycam operation. 6 0 min MENU 1/3 TELE MACRO SPOT FOCUS 0:00:00 DISP GUIDE EXPOSURE FADER 2 Touch [DISP GUIDE]. The indicators vary ...
...touch the buttons displayed on the LCD screen. 16 Select area for guide. Touch the button on the LCD screen. • Perform the same actions as time code, etc.) on the LCD frame accidentally while using the touch panel. When you press the buttons on the LCD frame. • Be careful not...in the area are listed on the (TIME/ LANGU.) menu (p. 36, 56). The meanings of the indicators in [LANGUAGE] on the screen. Touch [MENU] during Easy Handycam operation. 6 0 min MENU 1/3 TELE MACRO SPOT FOCUS 0:00:00 DISP GUIDE EXPOSURE FADER 2 Touch [DISP GUIDE]. The indicators vary ...
Operating Guide
Page 19
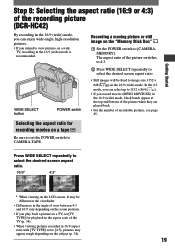
... set the POWER switch to CAMERA-TAPE. WIDE SELECT button POWER switch Recording a moving picture or still image on the LCD screen. Press WIDE SELECT repeatedly to select the desired screen aspect ratio. 16:9* 4:3* * When viewing on the "Memory Stick Duo" Set the POWER switch to [CAMERAMEMORY...If you intend to view pictures on the subject (p. 34). 19 Getting Started Step 8: Selecting the aspect ratio (16:9 or 4:3) of the recording picture (DCR-HC42) By recording in the 16:9 (wide) mode, you can select up to 1152 × 864 ( ). • If you record movies (MPEG MOVIE...
... set the POWER switch to CAMERA-TAPE. WIDE SELECT button POWER switch Recording a moving picture or still image on the LCD screen. Press WIDE SELECT repeatedly to select the desired screen aspect ratio. 16:9* 4:3* * When viewing on the "Memory Stick Duo" Set the POWER switch to [CAMERAMEMORY...If you intend to view pictures on the subject (p. 34). 19 Getting Started Step 8: Selecting the aspect ratio (16:9 or 4:3) of the recording picture (DCR-HC42) By recording in the 16:9 (wide) mode, you can select up to 1152 × 864 ( ). • If you record movies (MPEG MOVIE...
Operating Guide
Page 25
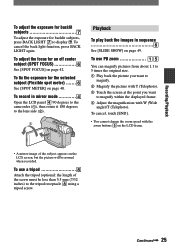
...back the images in sequence See [SLIDE SHOW] on page 42. Continued 25 To record in mirror mode Open the LCD panel 90 degrees to the camcorder (), then rotate it 180 degrees to magnify within the displayed frame. Adjust the magnification with the zoom...-image of the screw must be normal when recorded. To fix the exposure for the selected subject (Flexible spot meter See [SPOT METER] on the LCD screen, but the picture will be less than 5.5 mm (7/32 inches) to display . To cancel, touch [END]. • You cannot change the ...
...back the images in sequence See [SLIDE SHOW] on page 42. Continued 25 To record in mirror mode Open the LCD panel 90 degrees to the camcorder (), then rotate it 180 degrees to magnify within the displayed frame. Adjust the magnification with the zoom...-image of the screw must be normal when recorded. To fix the exposure for the selected subject (Flexible spot meter See [SPOT METER] on the LCD screen, but the picture will be less than 5.5 mm (7/32 inches) to display . To cancel, touch [END]. • You cannot change the ...
Operating Guide
Page 30
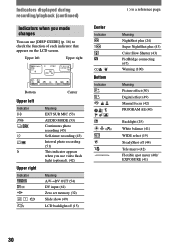
... changes You can use video flash light (optional). (42) Meaning A/VDV OUT (54) DV input (61) Zero set memory (32) Slide show (49) LCD backlight off (44) Tele macro (42) Flexible spot meter (40)/ EXPOSURE (41) 30 Meaning NightShot plus (24) Super NightShot plus (43) Color Slow Shutter (43... page. Indicators displayed during recording/playback (continued) Indicators when you use [DISP GUIDE] (p. 16) to check the function of each indicator that appears on the LCD screen.
... changes You can use video flash light (optional). (42) Meaning A/VDV OUT (54) DV input (61) Zero set memory (32) Slide show (49) LCD backlight off (44) Tele macro (42) Flexible spot meter (40)/ EXPOSURE (41) 30 Meaning NightShot plus (24) Super NightShot plus (43) Color Slow Shutter (43... page. Indicators displayed during recording/playback (continued) Indicators when you use [DISP GUIDE] (p. 16) to check the function of each indicator that appears on the LCD screen.
Operating Guide
Page 36
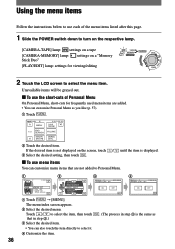
...-TAPE] lamp: settings on a tape [CAMERA-MEMORY] lamp: Stick Duo" settings on a "Memory [PLAY/EDIT] lamp: settings for viewing/editing 2 Touch the LCD screen to select the menu item. Touch / to select the item, then touch that are added. • You can also touch the item directly to Personal.... BURN DVD BURN VCD END SEARCH Touch [MENU]. If the desired item is not displayed on the screen, touch / until the item is the same as you like (p. 57). Touch . 6 0 min MENU 1/3 END SEARCH VAR. Using the menu items ...
...-TAPE] lamp: settings on a tape [CAMERA-MEMORY] lamp: Stick Duo" settings on a "Memory [PLAY/EDIT] lamp: settings for viewing/editing 2 Touch the LCD screen to select the menu item. Touch / to select the item, then touch that are added. • You can also touch the item directly to Personal.... BURN DVD BURN VCD END SEARCH Touch [MENU]. If the desired item is not displayed on the screen, touch / until the item is the same as you like (p. 57). Touch . 6 0 min MENU 1/3 END SEARCH VAR. Using the menu items ...
Operating Guide
Page 44
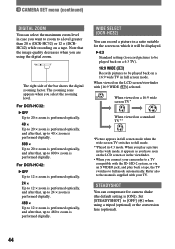
...digitally. When you play back a tape, the TV switches to be played back on a 4:3 TV). 16:9 WIDE ( ) Records pictures to full mode automatically. For DCR-HC42: OFF Up to 12 × zoom is performed optically. 24 × Up to 12 × zoom is performed optically, and after that, up to...that , up to a level greater than 20 × (DCR-HC32) or 12 × (DCRHC42) while recording on the LCD screen or in case you want to zoom to 480 × zoom is [ON]). When viewed on the LCD screen/viewfinder with your camcorder to a TV compatible with the ID-1/ID-2 system, or via...
...digitally. When you play back a tape, the TV switches to be played back on a 4:3 TV). 16:9 WIDE ( ) Records pictures to full mode automatically. For DCR-HC42: OFF Up to 12 × zoom is performed optically. 24 × Up to 12 × zoom is performed optically, and after that, up to...that , up to a level greater than 20 × (DCR-HC32) or 12 × (DCRHC42) while recording on the LCD screen or in case you want to zoom to 480 × zoom is [ON]). When viewed on the LCD screen/viewfinder with your camcorder to a TV compatible with the ID-1/ID-2 system, or via...
Operating Guide
Page 48
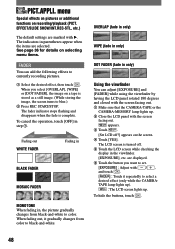
... To cancel the operation, touch [OFF] in parentheses appear when the items are selected. TAPE lamp lights up). : The LCD screen lights up . Close the LCD panel with the screen facing out. Make sure that the CAMERA-TAPE or the CAMERA-MEMORY lamp lights up . appears. Touch .... [Set LCD off . Touch the LCD screen while checking the display in the viewfinder. [EXPOSURE], etc. EFFECT/SLIDE SHOW/INT.REC-STL, etc.) The default ...
... To cancel the operation, touch [OFF] in parentheses appear when the items are selected. TAPE lamp lights up). : The LCD screen lights up . Close the LCD panel with the screen facing out. Make sure that the CAMERA-TAPE or the CAMERA-MEMORY lamp lights up . appears. Touch .... [Set LCD off . Touch the LCD screen while checking the display in the viewfinder. [EXPOSURE], etc. EFFECT/SLIDE SHOW/INT.REC-STL, etc.) The default ...
Operating Guide
Page 53
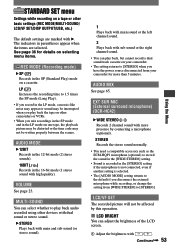
...). LCD/VF SET The recorded picture will not be affected by connecting a microphone (optional). AUDIO MIX See page 65. Continued 53 Using the Menu EXT SUR MIC (External surround microphone) (DCR-HC42) ...sound or the right channel sound. • You can adjust the brightness of the LCD screen. Adjust the brightness with more than 5 minutes. STANDARD SET menu Settings ... LP mode on a tape or other camcorders or VCRs. • When you disconnect the external microphone while recording, or change the setting from your camcorder. • The setting returns to ...
...). LCD/VF SET The recorded picture will not be affected by connecting a microphone (optional). AUDIO MIX See page 65. Continued 53 Using the Menu EXT SUR MIC (External surround microphone) (DCR-HC42) ...sound or the right channel sound. • You can adjust the brightness of the LCD screen. Adjust the brightness with more than 5 minutes. STANDARD SET menu Settings ... LP mode on a tape or other camcorders or VCRs. • When you disconnect the external microphone while recording, or change the setting from your camcorder. • The setting returns to ...
Operating Guide
Page 54
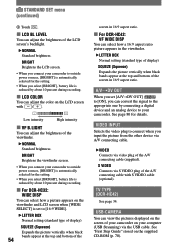
...the other device via A/V connecting cable. VIDEO Connects via S VIDEO plug of the screen in 16:9 aspect ratio. TV TYPE (DCR-HC42) See page 34. USB-CAMERA You can view the pictures displayed on the screen of the A/V connecting cable (supplied). See page 80 for the setting. • When ... by about 10 percent during recording. For DCR-HC32: WIDE DISP You can select how a picture appears on the viewfinder and LCD screen when [WIDE SELECT] is reduced by connecting a digital device and an analog device to your camcorder on the supplied CD-ROM (p. 70). See "First...
...the other device via A/V connecting cable. VIDEO Connects via S VIDEO plug of the screen in 16:9 aspect ratio. TV TYPE (DCR-HC42) See page 34. USB-CAMERA You can view the pictures displayed on the screen of the A/V connecting cable (supplied). See page 80 for the setting. • When ... by about 10 percent during recording. For DCR-HC32: WIDE DISP You can select how a picture appears on the viewfinder and LCD screen when [WIDE SELECT] is reduced by connecting a digital device and an analog device to your camcorder on the supplied CD-ROM (p. 70). See "First...

Operating Guide
Page 56
...the clock returns to the originally set time. A.SHUT OFF (Auto shut off) 5 min The camcorder is automatically set the time difference by touching / , the clock will be used on the LCD screen and in the viewfinder. STANDARD SET menu (continued) BEEP ON A melody sounds when... you do not operate your camcorder for more than approximately 5 minutes. MENU ROTATE NORMAL Scrolls the menu...
...the clock returns to the originally set time. A.SHUT OFF (Auto shut off) 5 min The camcorder is automatically set the time difference by touching / , the clock will be used on the LCD screen and in the viewfinder. STANDARD SET menu (continued) BEEP ON A melody sounds when... you do not operate your camcorder for more than approximately 5 minutes. MENU ROTATE NORMAL Scrolls the menu...
Operating Guide
Page 61
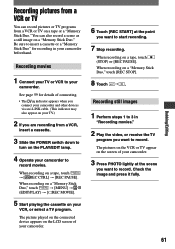
... . When recording on a tape, touch [ REC CTRL] [REC PAUSE]. The picture played on the connected device appears on the LCD screen of your camcorder. 3 Press PHOTO lightly at the point you want to start recording. 7 Stop recording. The pictures on the VCR or TV appear on the... screen of connecting. • The indicator appears when you connect your camcorder and other devices via an i.LINK cable. (This indicator may also appear on your TV.) 2 If you...
... . When recording on a tape, touch [ REC CTRL] [REC PAUSE]. The picture played on the connected device appears on the LCD screen of your camcorder. 3 Press PHOTO lightly at the point you want to start recording. 7 Stop recording. The pictures on the VCR or TV appear on the... screen of connecting. • The indicator appears when you connect your camcorder and other devices via an i.LINK cable. (This indicator may also appear on your TV.) 2 If you...
Operating Guide
Page 63
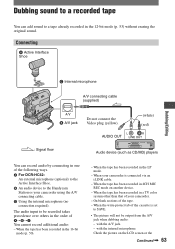
...MIC REC mode on the LCD screen or the Continued 63 When the tape has been recorded in the LP mode. - with the internal microphone. When the tape has been recorded in a TV color system other than that of your camcorder. - When the tape ... recorded tape You can record audio by connecting in one of the following ways. For DCR-HC42: An external microphone (optional) to the Active Interface Shoe. An audio device to the Handycam Station or your camcorder using the A/V connecting cable. Using the internal microphone (no connection required).
...MIC REC mode on the LCD screen or the Continued 63 When the tape has been recorded in the LP mode. - with the internal microphone. When the tape has been recorded in a TV color system other than that of your camcorder. - When the tape ... recorded tape You can record audio by connecting in one of the following ways. For DCR-HC42: An external microphone (optional) to the Active Interface Shoe. An audio device to the Handycam Station or your camcorder using the A/V connecting cable. Using the internal microphone (no connection required).
Operating Guide
Page 78
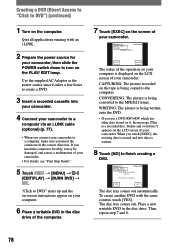
Quit all applications running with the same content, touch [YES]. EXEC CANCEL The status of the operation on your computer is displayed on the LCD screen of your camcorder. • For details, see "First Step Guide". 5 Touch [MENU] (EDIT/PLAY) [BURN DVD] . CAPTURING: ...CREATE DVD? To create another copy? If you insert the connector in the disc drive of the computer. 7 Touch [EXEC] on the LCD screen of your camcorder. Place a new writable DVD in the disc drive. Creating a DVD (Direct Access to "Click to finish creating a DVD. 60min...
Quit all applications running with the same content, touch [YES]. EXEC CANCEL The status of the operation on your computer is displayed on the LCD screen of your camcorder. • For details, see "First Step Guide". 5 Touch [MENU] (EDIT/PLAY) [BURN DVD] . CAPTURING: ...CREATE DVD? To create another copy? If you insert the connector in the disc drive of the computer. 7 Touch [EXEC] on the LCD screen of your camcorder. Place a new writable DVD in the disc drive. Creating a DVD (Direct Access to "Click to finish creating a DVD. 60min...

Operating Guide
Page 79
...the POWER switch to another mode on your camcorder until the picture is completely copied to the computer. • When [CONVERTING] or [WRITING] is canceled. Using a Computer To cancel the operation Touch [CANCEL] on the LCD screen on your camcorder. • You cannot cancel the operation... after [Finalizing DVD.] is displayed on the LCD screen of your camcorder. • Do not disconnect the i.LINK cable or set to [ON]. 79 While ...
...the POWER switch to another mode on your camcorder until the picture is completely copied to the computer. • When [CONVERTING] or [WRITING] is canceled. Using a Computer To cancel the operation Touch [CANCEL] on the LCD screen on your camcorder. • You cannot cancel the operation... after [Finalizing DVD.] is displayed on the LCD screen of your camcorder. • Do not disconnect the i.LINK cable or set to [ON]. 79 While ...
Operating Guide
Page 80
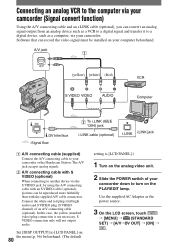
... via your camcorder (Signal convert function) Using the A/V connecting cable and an i.LINK cable (optional), you can convert an analog signal output from an analog device such as a VCR to a digital signal and transfer it to a digital device, such as the power source. 3 On the LCD screen, touch &#...[LCD PANEL].) 1 Turn on the menu (p. 56) beforehand. (The default 80 setting is not necessary. Set [DISP OUTPUT] to your computer beforehand. Connect the white and red plugs (left/right audio) and S VIDEO plug (S VIDEO channel) of your camcorder down to turn on your camcorder or the Handycam ...
... via your camcorder (Signal convert function) Using the A/V connecting cable and an i.LINK cable (optional), you can convert an analog signal output from an analog device such as a VCR to a digital signal and transfer it to a digital device, such as the power source. 3 On the LCD screen, touch &#...[LCD PANEL].) 1 Turn on the menu (p. 56) beforehand. (The default 80 setting is not necessary. Set [DISP OUTPUT] to your computer beforehand. Connect the white and red plugs (left/right audio) and S VIDEO plug (S VIDEO channel) of your camcorder down to turn on your camcorder or the Handycam ...


