Operating Guide
Page 6
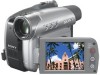
... CD-ROM) Types of cassette you call upon your camcorder You can use mini DV cassettes marked with the Handycam Station Model DCRA-C152 and AC Adaptor Model AC-L25A/L25B. Reorient or relocate the receiving antenna. - "First Step Guide" for a digital device... pursuant to Subpart B of Part 15 of FCC Rules. Owner's Record The model and serial numbers are designed to provide reasonable protection against harmful interference in a particular installation. If this first (Continued) Declaration of Conformity Trade Name: SONY Model No.: DCR-HC96 Responsible Party: Sony...
... CD-ROM) Types of cassette you call upon your camcorder You can use mini DV cassettes marked with the Handycam Station Model DCRA-C152 and AC Adaptor Model AC-L25A/L25B. Reorient or relocate the receiving antenna. - "First Step Guide" for a digital device... pursuant to Subpart B of Part 15 of FCC Rules. Owner's Record The model and serial numbers are designed to provide reasonable protection against harmful interference in a particular installation. If this first (Continued) Declaration of Conformity Trade Name: SONY Model No.: DCR-HC96 Responsible Party: Sony...

Operating Guide
Page 12
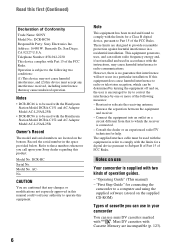
...and "Memory Stick Duo" for your camcorder. Handycam Station (1) (DCR-HC46/HC96) (p. 13) Rechargeable battery pack (1) (p. 13, 126) NP-FP30 (DCR-HC36) NP-FP50 (DCR-HC46/HC96) Wireless Remote Commander (1) (p. 40) A button-type lithium battery is already installed. A/V connecting cable (1) (p. 42, 74, 97) CD-ROM "Picture Package Ver.1.5.1" (1) (p. 86)... cassette tape and "Memory Stick Duo" are not supplied. AC Adaptor (1) (p. 13) USB cable (1) (p. 82, 86) Lens cap (1) (DCR-HC36/HC46) (p. 18, 28, 30) Power cord (1) (p. 13) • To attach the lens cap Attach the lens cap to the metal ...
...and "Memory Stick Duo" for your camcorder. Handycam Station (1) (DCR-HC46/HC96) (p. 13) Rechargeable battery pack (1) (p. 13, 126) NP-FP30 (DCR-HC36) NP-FP50 (DCR-HC46/HC96) Wireless Remote Commander (1) (p. 40) A button-type lithium battery is already installed. A/V connecting cable (1) (p. 42, 74, 97) CD-ROM "Picture Package Ver.1.5.1" (1) (p. 86)... cassette tape and "Memory Stick Duo" are not supplied. AC Adaptor (1) (p. 13) USB cable (1) (p. 82, 86) Lens cap (1) (DCR-HC36/HC46) (p. 18, 28, 30) Power cord (1) (p. 13) • To attach the lens cap Attach the lens cap to the metal ...
Operating Guide
Page 63
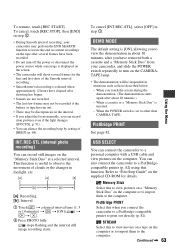
... turn on the supplied CD-ROM for the first and last shots of the Smooth interval recording. • Smooth interval recording is set to print out directly (p. 82). When the POWER switch is released when approximately 12 hours have removed both a cassette and a "Memory Stick Duo" from your camcorder may be suspended in...
... turn on the supplied CD-ROM for the first and last shots of the Smooth interval recording. • Smooth interval recording is set to print out directly (p. 82). When the POWER switch is released when approximately 12 hours have removed both a cassette and a "Memory Stick Duo" from your camcorder may be suspended in...
Operating Guide
Page 64
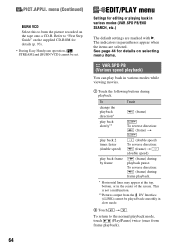
... return to "First Step Guide" on the supplied CD-ROM for details on the tape onto a CD-R. Refer to the normal playback mode, touch (Play/Pause) twice (once from the DV Interface (i.LINK) cannot be set. See page 44 for details (p. 93). • During Easy Handycam operation, [ STREAM] and [BURN VCD] cannot be played...
... return to "First Step Guide" on the supplied CD-ROM for details on the tape onto a CD-R. Refer to the normal playback mode, touch (Play/Pause) twice (once from the DV Interface (i.LINK) cannot be set. See page 44 for details (p. 93). • During Easy Handycam operation, [ STREAM] and [BURN VCD] cannot be played...
Operating Guide
Page 67
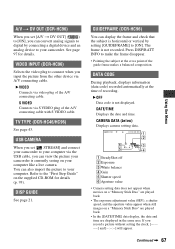
...OFF Data code is horizontal or vertical by connecting a digital device and an analog device to your camcorder. B VIDEO Connects via video plug of the A/V connecting cable with S VIDEO cable. Refer to the "First Step Guide" on the supplied CD-ROM for details. DATE/TIME Displays the date and time. ...code) recorded automatically at the cross point of recording. A/V t DV OUT (DCR-HC96) When you set [ STREAM] and connect your camcorder to your computer via the USB cable, you can view the picture your camcorder is currently seeing on your computer like a live camera. If you input ...
...OFF Data code is horizontal or vertical by connecting a digital device and an analog device to your camcorder. B VIDEO Connects via video plug of the A/V connecting cable with S VIDEO cable. Refer to the "First Step Guide" on the supplied CD-ROM for details. DATE/TIME Displays the date and time. ...code) recorded automatically at the cross point of recording. A/V t DV OUT (DCR-HC96) When you set [ STREAM] and connect your camcorder to your computer via the USB cable, you can view the picture your camcorder is currently seeing on your computer like a live camera. If you input ...
Operating Guide
Page 86
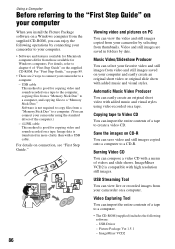
...favorite video and still images from video and still images saved on your camcorder to a computer. - Save the images on the supplied CD-ROM. ImageMixer VCD2 is transferred in folders by selecting from your camcorder by date. Using a Computer Before referring to the "First Step Guide"...on a Windows computer from the supplied CD-ROM, you can enjoy the following software: - Copying tape to Video CD You can import the entire contents of a tape to a computer. • The CD-ROM (supplied) includes the following operations by connecting your camcorder to your computer. • Software ...
...favorite video and still images from video and still images saved on your camcorder to a computer. - Save the images on the supplied CD-ROM. ImageMixer VCD2 is transferred in folders by selecting from your camcorder by date. Using a Computer Before referring to the "First Step Guide"...on a Windows computer from the supplied CD-ROM, you can enjoy the following software: - Copying tape to Video CD You can import the entire contents of a tape to a computer. • The CD-ROM (supplied) includes the following operations by connecting your camcorder to your computer. • Software ...
Operating Guide
Page 87
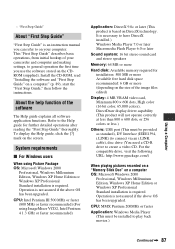
...on your camcorder and computer and making settings, to the Help guide for installation: 500 MB or more Available free hard disk space recommended: 6 GB or more Hard disk: Available memory required for further detailed operations after reading the "First Step Guide" thoroughly. Install the CD-ROM, read...or later (This product is required. CPU: MMX Pentium 200MHz or faster Application: Windows Media Player (This must be installed to create a video CD. "First Step Guide" About "First Step Guide" "First Step Guide" is not assured if the above OS has been upgraded. It is required...
...on your camcorder and computer and making settings, to the Help guide for installation: 500 MB or more Available free hard disk space recommended: 6 GB or more Hard disk: Available memory required for further detailed operations after reading the "First Step Guide" thoroughly. Install the CD-ROM, read...or later (This product is required. CPU: MMX Pentium 200MHz or faster Application: Windows Media Player (This must be installed to create a video CD. "First Step Guide" About "First Step Guide" "First Step Guide" is not assured if the above OS has been upgraded. It is required...
Operating Guide
Page 89
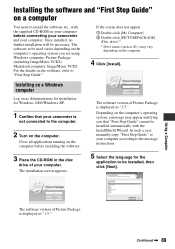
... for installation for the application to be installed automatically with the supplied CD-ROM on your computer before installing the software. 3 Place the CD-ROM in the disc drive of Picture Package is displayed as (E:)) may... appear notifying you are using. Windows computer: Picture Package (including ImageMixer VCD2) Macintosh computer: ImageMixer VCD2 For the details on the software, refer to install the software etc., with the InstallShield Wizard. Depending on the computer before connecting your camcorder...
... for installation for the application to be installed automatically with the supplied CD-ROM on your computer before installing the software. 3 Place the CD-ROM in the disc drive of Picture Package is displayed as (E:)) may... appear notifying you are using. Windows computer: Picture Package (including ImageMixer VCD2) Macintosh computer: ImageMixer VCD2 For the details on the software, refer to install the software etc., with the InstallShield Wizard. Depending on the computer before connecting your camcorder...
Operating Guide
Page 91
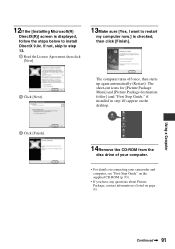
... Guide," if installed in step 10) appear on the desktop. 3 Click [Finish]. 14Remove the CD-ROM from the disc drive of your computer. • For details on connecting your camcorder and computer, see "First Step Guide" on the supplied CD-ROM (p. 93). • If you have any questions about Picture Package, contact information is checked...
... Guide," if installed in step 10) appear on the desktop. 3 Click [Finish]. 14Remove the CD-ROM from the disc drive of your computer. • For details on connecting your camcorder and computer, see "First Step Guide" on the supplied CD-ROM (p. 93). • If you have any questions about Picture Package, contact information is checked...
Operating Guide
Page 92
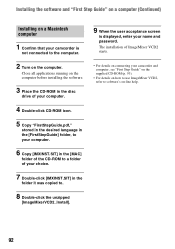
Installing the software and "First Step Guide" on a computer (Continued) Installing on a Macintosh computer 1 Confirm that your camcorder is displayed, enter your camcorder and computer, see "First Step Guide" on the supplied CD-ROM (p. 93). • For details on how to use ImageMixer VCD2, refer to the computer. 2 Turn on connecting your name and password...
Installing the software and "First Step Guide" on a computer (Continued) Installing on a Macintosh computer 1 Confirm that your camcorder is displayed, enter your camcorder and computer, see "First Step Guide" on the supplied CD-ROM (p. 93). • For details on how to use ImageMixer VCD2, refer to the computer. 2 Turn on connecting your name and password...
Operating Guide
Page 93
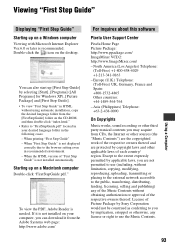
...Guide" Using a Computer Displaying "First Step Guide" Starting up on the CD-ROM, and then double-click "index.html." • Refer to "FirstStepGuide....and publishing) any of the Music Contents without using automatic installation, copy the desired language folder from CDs, the Internet or other sources (the "Music Contents") are the copyrighted work of the respective owners...; To view "First Step Guide" in HTML without obtaining authorization or approval of Picture Package by Sony Corporation would not be construed as conferring to the browser setting even in the following cases: - If...
...Guide" Using a Computer Displaying "First Step Guide" Starting up on the CD-ROM, and then double-click "index.html." • Refer to "FirstStepGuide....and publishing) any of the Music Contents without using automatic installation, copy the desired language folder from CDs, the Internet or other sources (the "Music Contents") are the copyrighted work of the respective owners...; To view "First Step Guide" in HTML without obtaining authorization or approval of Picture Package by Sony Corporation would not be construed as conferring to the browser setting even in the following cases: - If...
Operating Guide
Page 95
...]: The picture is being written onto the DVD. • If you insert the connector forcibly, damage may occur and cause camcorder malfunction. • For details, see "First Step Guide" on the supplied CD-ROM (p. 93). 6 Touch t [MENU] t (EDIT/PLAY) t [BURN DVD] t . If you use a DVD-RW...BURN DVD COMPLETED Create another copy? When you insert the connector in the correct way. HC36) or the Handycam Station (DCR-HC46/HC96) to a computer via an i.LINK cable (p. 94). • When you connect your camcorder until the picture is written. 9 Touch [NO] to another DVD with the same...
...]: The picture is being written onto the DVD. • If you insert the connector forcibly, damage may occur and cause camcorder malfunction. • For details, see "First Step Guide" on the supplied CD-ROM (p. 93). 6 Touch t [MENU] t (EDIT/PLAY) t [BURN DVD] t . If you use a DVD-RW...BURN DVD COMPLETED Create another copy? When you insert the connector in the correct way. HC36) or the Handycam Station (DCR-HC46/HC96) to a computer via an i.LINK cable (p. 94). • When you connect your camcorder until the picture is written. 9 Touch [NO] to another DVD with the same...
Operating Guide
Page 112
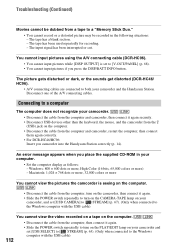
...tape has a blank section. - Troubleshooting (Continued) Movies cannot be dubbed from a tape to both your camcorder and the Handycam Station. You cannot input pictures using the A/V connecting cable (DCR-HC96). • You cannot input pictures while [DISP OUTPUT] is seeing on the computer. • Disconnect...65,000 colors or more You cannot view the pictures the camcorder is set [USB SELECT] to [ STREAM] (p. 63). (Only when connected to [V-OUT/PANEL] (p. 68). • You cannot input pictures if you place the supplied CD-ROM in the following situations: - Macintosh: 1,024 ×...
...tape has a blank section. - Troubleshooting (Continued) Movies cannot be dubbed from a tape to both your camcorder and the Handycam Station. You cannot input pictures using the A/V connecting cable (DCR-HC96). • You cannot input pictures while [DISP OUTPUT] is seeing on the computer. • Disconnect...65,000 colors or more You cannot view the pictures the camcorder is set [USB SELECT] to [ STREAM] (p. 63). (Only when connected to [V-OUT/PANEL] (p. 68). • You cannot input pictures if you place the supplied CD-ROM in the following situations: - Macintosh: 1,024 ×...
Operating Guide
Page 114
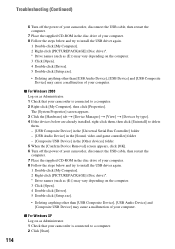
... folder 5 When the [Confirm Device Removal] screen appears, click [OK]. 6 Turn off the power of your camcorder, disconnect the USB cable, then restart the computer. 7 Place the supplied CD-ROM in the disc drive of your computer. 8 Follow the steps below and try to a computer. 2 Click [Start... Device] may cause a malfunction of your computer. Troubleshooting (Continued) 114 6 Turn off the power of your camcorder, disconnect the USB cable, then restart the computer. 7 Place the supplied CD-ROM in the disc drive of your computer. 8 Follow the steps below and try to a computer. 2 Right-...
... folder 5 When the [Confirm Device Removal] screen appears, click [OK]. 6 Turn off the power of your camcorder, disconnect the USB cable, then restart the computer. 7 Place the supplied CD-ROM in the disc drive of your computer. 8 Follow the steps below and try to a computer. 2 Click [Start... Device] may cause a malfunction of your computer. Troubleshooting (Continued) 114 6 Turn off the power of your camcorder, disconnect the USB cable, then restart the computer. 7 Place the supplied CD-ROM in the disc drive of your computer. 8 Follow the steps below and try to a computer. 2 Right-...

Operating Guide
Page 115
...6 When the [Confirm Device Removal] screen appears, click [OK]. 7 Turn off the power of your camcorder, disconnect the USB cable, then restart the computer. 8 Place the supplied CD-ROM in the following procedures. 1 Double-click [My Computer]. 2 Double-click the icon for your computer environment... device on the [Select audio device] screen. 3 Follow the on the screen of your camcorder first. It may cause a malfunction of your camcorder. • You cannot start or cancel the Easy Handycam settings while the USB cable is recognized. 3 Double-click the desired image file. [Cannot start...
...6 When the [Confirm Device Removal] screen appears, click [OK]. 7 Turn off the power of your camcorder, disconnect the USB cable, then restart the computer. 8 Place the supplied CD-ROM in the following procedures. 1 Double-click [My Computer]. 2 Double-click the icon for your computer environment... device on the [Select audio device] screen. 3 Follow the on the screen of your camcorder first. It may cause a malfunction of your camcorder. • You cannot start or cancel the Easy Handycam settings while the USB cable is recognized. 3 Double-click the desired image file. [Cannot start...
Operating Guide
Page 116
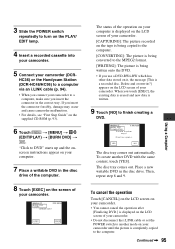
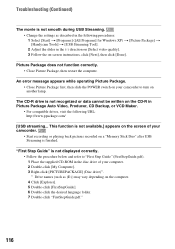
...1 Place the supplied CD-ROM in the disc drive of your camcorder to turn on -screen... instructions, click [Next], then click [Done]. "First Step Guide" is not smooth during USB Streaming. • Change the settings as (E:)) may vary depending on the computer. 4 Click [Explorer]. 5 Double-click [FirstStepGuide]. 6 Double-click the desired language folder. 7 Double-click "FirstStepGuide.pdf." 116 The CD...slide the POWER switch on your camcorder. • Start recording or...cannot be written on the CD-R in Picture Package Auto Video, Producer, CD Backup, or VCD Maker....
...1 Place the supplied CD-ROM in the disc drive of your camcorder to turn on -screen... instructions, click [Next], then click [Done]. "First Step Guide" is not smooth during USB Streaming. • Change the settings as (E:)) may vary depending on the computer. 4 Click [Explorer]. 5 Double-click [FirstStepGuide]. 6 Double-click the desired language folder. 7 Double-click "FirstStepGuide.pdf." 116 The CD...slide the POWER switch on your camcorder. • Start recording or...cannot be written on the CD-R in Picture Package Auto Video, Producer, CD Backup, or VCD Maker....
Operating Guide
Page 137
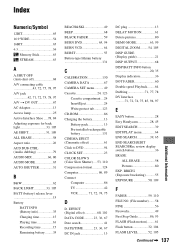
...DC IN jack 13 DC plug 13 DELAY MOTION 61 Delete pictures 80 DEMO MODE 63, 99 DIGITAL ZOOM .........54, 105 DISP GUIDE (Display guide 21 DISP OUTPUT 68 DISP/BATT INFO button 20... 78 DV Interface ..........71, 72, 74, 75, 85, 94, 97 E EASY button 28 Easy Handycam 28, 45 EDIT SEARCH 39 EDIT/PLAY menu 64 END SEARCH 39, 65 END SEARCH/EDIT SEARCH/Rec ...menu........... 49 Cassette 24, 123 Cassette compartment ... 24 Insert/Eject 24 Write-protect tab ......... 123 CD-ROM 86 Charging the battery 13 Battery pack 13 Pre-installed rechargeable battery 131 CINEMA EFECT (Cinematic effect 61...
...DC IN jack 13 DC plug 13 DELAY MOTION 61 Delete pictures 80 DEMO MODE 63, 99 DIGITAL ZOOM .........54, 105 DISP GUIDE (Display guide 21 DISP OUTPUT 68 DISP/BATT INFO button 20... 78 DV Interface ..........71, 72, 74, 75, 85, 94, 97 E EASY button 28 Easy Handycam 28, 45 EDIT SEARCH 39 EDIT/PLAY menu 64 END SEARCH 39, 65 END SEARCH/EDIT SEARCH/Rec ...menu........... 49 Cassette 24, 123 Cassette compartment ... 24 Insert/Eject 24 Write-protect tab ......... 123 CD-ROM 86 Charging the battery 13 Battery pack 13 Pre-installed rechargeable battery 131 CINEMA EFECT (Cinematic effect 61...


