Operating Guide
Page 4
... to lightning and power-line surges. Improper adjustment of any service or repairs to the set, as the service technician to perform routine safety checks (as opening or removing covers may expose you to qualified service personnel. Replacement parts When replacement parts are specified in performance - This will often require extensive work by the manufacturer that are required, be sure the service technician has used replacement parts specified by...
... to lightning and power-line surges. Improper adjustment of any service or repairs to the set, as the service technician to perform routine safety checks (as opening or removing covers may expose you to qualified service personnel. Replacement parts When replacement parts are specified in performance - This will often require extensive work by the manufacturer that are required, be sure the service technician has used replacement parts specified by...
Operating Guide
Page 9
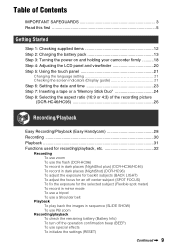
... panel 21 Changing the language setting 21 Checking the screen indicators (Display guide 21 Step 6: Setting the date and time 23 Step 7: Inserting a tape or a "Memory Stick Duo 24 Step 8: Selecting the aspect ratio (16:9 or 4:3) of the recording picture (DCR-HC46/HC96 26 Recording/Playback Easy Recording/Playback (Easy Handycam 28 Recording 30 Playback 31 Functions used for recording/playback, etc 32 Recording To use zoom To use the flash (DCR-HC96) To record in dark places (NightShot plus) (DCR-HC36/HC46) To record in dark...
... panel 21 Changing the language setting 21 Checking the screen indicators (Display guide 21 Step 6: Setting the date and time 23 Step 7: Inserting a tape or a "Memory Stick Duo 24 Step 8: Selecting the aspect ratio (16:9 or 4:3) of the recording picture (DCR-HC46/HC96 26 Recording/Playback Easy Recording/Playback (Easy Handycam 28 Recording 30 Playback 31 Functions used for recording/playback, etc 32 Recording To use zoom To use the flash (DCR-HC96) To record in dark places (NightShot plus) (DCR-HC36/HC46) To record in dark...

Operating Guide
Page 35
... remaining tape or battery power is displayed. Remaining battery (approx.) Other part names and functions I Remote sensor Point the Remote Commander (p. 40) towards the remote sensor to adjust the volume, see page 31. O Speaker Playback sound come out from the speaker. • For how to operate your camcorder. You can view the battery information for about 7 seconds. K Internal stereo microphone For DCR-HC96: An Active Interface Shoe compatible microphone will take precedence when connected...
... remaining tape or battery power is displayed. Remaining battery (approx.) Other part names and functions I Remote sensor Point the Remote Commander (p. 40) towards the remote sensor to adjust the volume, see page 31. O Speaker Playback sound come out from the speaker. • For how to operate your camcorder. You can view the battery information for about 7 seconds. K Internal stereo microphone For DCR-HC96: An Active Interface Shoe compatible microphone will take precedence when connected...

Operating Guide
Page 36
...display switch button (39) G Personal Menu button (44) In the CAMERA-MEMORY mode A B C D E P-MENU qs 7 H Recording folder (59) I Image size (26, 56) (DCR-HC46/HC96) J Quality ( or ) (56) K "Memory Stick Duo" indicator and the number of images that can check them as [DATA CODE] during recording and the camera setting data will be recorded automatically. They do not appear on the screen during recording, but you can be recorded (approx.) L Review button (30) Data code during recording The date/time during playback (p. 67). A Recording folder (59) B Estimated recordable time C Movie size...
...display switch button (39) G Personal Menu button (44) In the CAMERA-MEMORY mode A B C D E P-MENU qs 7 H Recording folder (59) I Image size (26, 56) (DCR-HC46/HC96) J Quality ( or ) (56) K "Memory Stick Duo" indicator and the number of images that can check them as [DATA CODE] during recording and the camera setting data will be recorded automatically. They do not appear on the screen during recording, but you can be recorded (approx.) L Review button (30) Data code during recording The date/time during playback (p. 67). A Recording folder (59) B Estimated recordable time C Movie size...

Operating Guide
Page 40
...buttons (Rewind, Playback, Fast-forward, Pause, Stop, Slow) (p. 31) E ZERO SET MEMORY*2 F Transmitter G REC START/STOP (p. 28, 30) H Power zoom (p. 32, 34) I DISPLAY (p. 21) J Memory control buttons (Index*2, -/+, Memory playback) (p. 31) *1 Not available during Easy Handycam operation with the POWER switch is not displayed, press DISPLAY 9. 2 Press STOP 4 when you press this button will be recorded onto the "Memory Stick Duo" as a still image. Searching quickly for a desired scene (Zero set memory display disappears. Remote Commander Remove the insulation sheet before using the Remote...
...buttons (Rewind, Playback, Fast-forward, Pause, Stop, Slow) (p. 31) E ZERO SET MEMORY*2 F Transmitter G REC START/STOP (p. 28, 30) H Power zoom (p. 32, 34) I DISPLAY (p. 21) J Memory control buttons (Index*2, -/+, Memory playback) (p. 31) *1 Not available during Easy Handycam operation with the POWER switch is not displayed, press DISPLAY 9. 2 Press STOP 4 when you press this button will be recorded onto the "Memory Stick Duo" as a still image. Searching quickly for a desired scene (Zero set memory display disappears. Remote Commander Remove the insulation sheet before using the Remote...
Operating Guide
Page 61
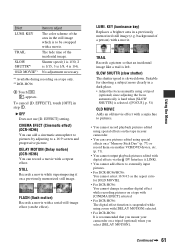
... image. B OFF Does not use [D. LUMI. FLASH (flash motion) Records a movie with a movie. KEY TRAIL SLOW SHUTTR*1 OLD MOVIE*1 Items to adjust The color scheme of the area in your camcorder on a tripod (optional) when you select [DELAY MOTION]. EFFECT] setting. To cancel [D. DELAY MOTION (Delay motion) (DCR-HC96) You can save pictures edited using special effects on a "Memory Stick Duo" (p. 77) or record them on another VCR/DVD device, etc. (p. 71). • You cannot output playback pictures edited with digital...
... image. B OFF Does not use [D. LUMI. FLASH (flash motion) Records a movie with a movie. KEY TRAIL SLOW SHUTTR*1 OLD MOVIE*1 Items to adjust The color scheme of the area in your camcorder on a tripod (optional) when you select [DELAY MOTION]. EFFECT] setting. To cancel [D. DELAY MOTION (Delay motion) (DCR-HC96) You can save pictures edited using special effects on a "Memory Stick Duo" (p. 77) or record them on another VCR/DVD device, etc. (p. 71). • You cannot output playback pictures edited with digital...

Operating Guide
Page 62
.... * Not available during recording or playback. Connect your camcorder to the wall outlet using special effects on a "Memory Stick Duo" (p. 77) or record them in black and white. PICT.APPLI. B OFF Does not use the Remote Commander to a picture during playback. • You can save pictures edited using the supplied AC Adaptor for this operation. [a]: Recording [b]: Interval 1 Touch t / to select a desired interval time (1 to externally input pictures. 62 FRAME REC (Frame recording) (DCR-HC96) You can...
.... * Not available during recording or playback. Connect your camcorder to the wall outlet using special effects on a "Memory Stick Duo" (p. 77) or record them in black and white. PICT.APPLI. B OFF Does not use the Remote Commander to a picture during playback. • You can save pictures edited using the supplied AC Adaptor for this operation. [a]: Recording [b]: Interval 1 Touch t / to select a desired interval time (1 to externally input pictures. 62 FRAME REC (Frame recording) (DCR-HC96) You can...
Operating Guide
Page 67
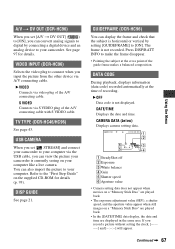
... VIDEO Connects via S VIDEO plug of the A/V connecting cable. CAMERA DATA (below) Displays camera setting data. 6 0 min 1 0 : 0 0 : 0 0 : 0 0 2 6 5 AUTO 100 AWB F1. 8 9 dB 3 4 A SteadyShot off B Exposure C White balance D Gain E Shutter speed F Aperture value • Camera setting data does not appear when movies on a "Memory Stick Duo" are played back. • The exposure adjustment value (0EV), a shutter speed, and the aperture value appear when still images on your computer like a live camera. USB CAMERA When you set [A/V t DV OUT] ( ) to [ON], you can view the picture...
... VIDEO Connects via S VIDEO plug of the A/V connecting cable. CAMERA DATA (below) Displays camera setting data. 6 0 min 1 0 : 0 0 : 0 0 : 0 0 2 6 5 AUTO 100 AWB F1. 8 9 dB 3 4 A SteadyShot off B Exposure C White balance D Gain E Shutter speed F Aperture value • Camera setting data does not appear when movies on a "Memory Stick Duo" are played back. • The exposure adjustment value (0EV), a shutter speed, and the aperture value appear when still images on your computer like a live camera. USB CAMERA When you set [A/V t DV OUT] ( ) to [ON], you can view the picture...
Operating Guide
Page 71
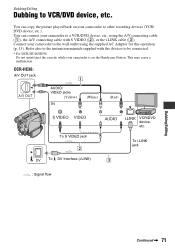
... i.LINK cable (3). You can copy the picture played back on the Handycam Station. DCR-HC36: A/V OUT jack 1 A/V OUT AUDIO/ VIDEO jacks (Yellow) (White) (Red) To S VIDEO jack 2 DV To DV Interface (i.LINK) 3 : Signal flow VCR/DVD device, etc. You can connect your camcorder to a VCR/DVD device, etc., using the A/V connecting cable (1), the A/V connecting cable with the devices to be connected. • For DCR-HC46/HC96: Do not insert/eject the cassette while your camcorder is on your camcorder to other recording devices (VCR/ DVD device, etc...
... i.LINK cable (3). You can copy the picture played back on the Handycam Station. DCR-HC36: A/V OUT jack 1 A/V OUT AUDIO/ VIDEO jacks (Yellow) (White) (Red) To S VIDEO jack 2 DV To DV Interface (i.LINK) 3 : Signal flow VCR/DVD device, etc. You can connect your camcorder to a VCR/DVD device, etc., using the A/V connecting cable (1), the A/V connecting cable with the devices to be connected. • For DCR-HC46/HC96: Do not insert/eject the cassette while your camcorder is on your camcorder to other recording devices (VCR/ DVD device, etc...

Operating Guide
Page 79
... PLAY/ EDIT lamp. 2 Touch (Play/Pause) to play back the tape, then touch it again at the selected scene. • You can check the picture and the sound by connecting your camcorder is set the end point for fixing the installed external microphone (optional) securely. appears while recording the new sound in HDV format. • The Active Interface Shoe has a safety device for audio dubbing, beforehand, press ZERO SET MEMORY on other DCR-HC36...
... PLAY/ EDIT lamp. 2 Touch (Play/Pause) to play back the tape, then touch it again at the selected scene. • You can check the picture and the sound by connecting your camcorder is set the end point for fixing the installed external microphone (optional) securely. appears while recording the new sound in HDV format. • The Active Interface Shoe has a safety device for audio dubbing, beforehand, press ZERO SET MEMORY on other DCR-HC36...
Operating Guide
Page 82
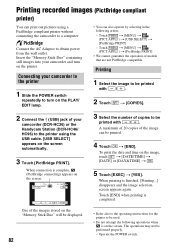
... t [COPIES]. 2 Connect the (USB) jack of models that are not PictBridge compatible. Touch t [MENU] t (PICT.APPLI.) t [PictBridge PRINT] • We cannot guarantee the operation of your camcorder (DCR-HC36) or the Handycam Station (DCR-HC46/ HC96) to the printer using a PictBridge compliant printer without connecting the camcorder to be printed with / . A maximum of 20 copies of the image can print out pictures using the USB cable. [USB SELECT] appears on the PLAY/ EDIT...
... t [COPIES]. 2 Connect the (USB) jack of models that are not PictBridge compatible. Touch t [MENU] t (PICT.APPLI.) t [PictBridge PRINT] • We cannot guarantee the operation of your camcorder (DCR-HC36) or the Handycam Station (DCR-HC46/ HC96) to the printer using a PictBridge compliant printer without connecting the camcorder to be printed with / . A maximum of 20 copies of the image can print out pictures using the USB cable. [USB SELECT] appears on the PLAY/ EDIT...
Operating Guide
Page 83
... connecting a printer directly to your camcorder. • If the printer stops working, disconnect the USB cable, turn the printer off and on again and restart the operation from your printer's operating instructions for details. • We cannot guarantee the printing of the image may not support the date and time printing function. You can print still images without using a computer by the Camera & Imaging Products Association (CIPA). Remove your camcorder (DCR-HC36) or the Handycam...
... connecting a printer directly to your camcorder. • If the printer stops working, disconnect the USB cable, turn the printer off and on again and restart the operation from your printer's operating instructions for details. • We cannot guarantee the printing of the image may not support the date and time printing function. You can print still images without using a computer by the Camera & Imaging Products Association (CIPA). Remove your camcorder (DCR-HC36) or the Handycam...
Operating Guide
Page 93
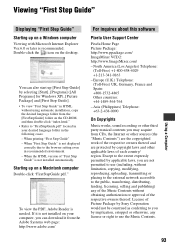
..., uploading, transmitting or placing to the external network accessible to the public, transferring, distributing, lending, licensing, selling and publishing) any of "First Step Guide" is needed. Viewing "First Step Guide" Using a Computer Displaying "First Step Guide" Starting up on a Macintosh computer Double-click "FirstStepGuide.pdf." If it from CDs, the Internet or other applicable laws of the respective owners thereof. You can download it...
..., uploading, transmitting or placing to the external network accessible to the public, transferring, distributing, lending, licensing, selling and publishing) any of "First Step Guide" is needed. Viewing "First Step Guide" Using a Computer Displaying "First Step Guide" Starting up on a Macintosh computer Double-click "FirstStepGuide.pdf." If it from CDs, the Internet or other applicable laws of the respective owners thereof. You can download it...
Operating Guide
Page 99
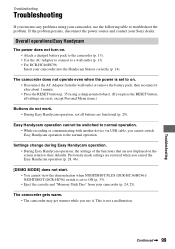
Troubleshooting Troubleshooting If you cannot switch Easy Handycam operation to the normal operation. If the problem persists, disconnect the power source and contact your camcorder, use it. Easy Handycam operation cannot be switched to normal operation. • While recording or communicating with another device via USB cable, you run into the Handycam Station correctly (p. 14). This is set to ON (p. 33). • Eject the cassette and "Memory Stick Duo" from the wall outlet or remove the...
Troubleshooting Troubleshooting If you cannot switch Easy Handycam operation to the normal operation. If the problem persists, disconnect the power source and contact your camcorder, use it. Easy Handycam operation cannot be switched to normal operation. • While recording or communicating with another device via USB cable, you run into the Handycam Station correctly (p. 14). This is set to ON (p. 33). • Eject the cassette and "Memory Stick Duo" from the wall outlet or remove the...

Operating Guide
Page 107
... volume (p. 31). • Adjust [AUDIO MIX] from the [ST2] (additional sound) side until the sound is displayed on the screen. • The tape you are playing was recorded on another device with 4ch microphone recording. "---" is heard appropriately (p. 80). • If you have modified file or folder names, or have edited the data on a computer (In this case, the file name flashes). Your camcorder is heard. • Set [MULTI-SOUND...
... volume (p. 31). • Adjust [AUDIO MIX] from the [ST2] (additional sound) side until the sound is displayed on the screen. • The tape you are playing was recorded on another device with 4ch microphone recording. "---" is heard appropriately (p. 80). • If you have modified file or folder names, or have edited the data on a computer (In this case, the file name flashes). Your camcorder is heard. • Set [MULTI-SOUND...
Operating Guide
Page 113
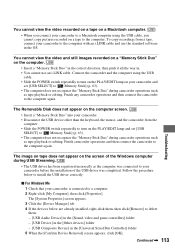
... software in the [Universal Serial Bus Controller] folder 5 When the [Confirm Device Removal] screen appears, click [OK]. x For Windows Me 1 Check that your camcorder to a Macintosh computer using the USB cable. • Slide the POWER switch repeatedly to turn on the PLAY/EDIT lamp and set [USB SELECT] to [ Memory Stick] (p. 63). • The computer does not recognize the "Memory Stick Duo" during camcorder operations such as tape playback or editing. You cannot view the video and still images recorded...
... software in the [Universal Serial Bus Controller] folder 5 When the [Confirm Device Removal] screen appears, click [OK]. x For Windows Me 1 Check that your camcorder to a Macintosh computer using the USB cable. • Slide the POWER switch repeatedly to turn on the PLAY/EDIT lamp and set [USB SELECT] to [ Memory Stick] (p. 63). • The computer does not recognize the "Memory Stick Duo" during camcorder operations such as tape playback or editing. You cannot view the video and still images recorded...
Operating Guide
Page 114
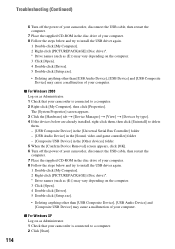
...] t [View] t [Devices by type]. 4 If the devices below are already installed, right-click them, then click [Uninstall] to delete them. - [USB Composite Device] in the [Universal Serial Bus Controller] folder - [USB Audio Device] in the [Sound, video and game controller] folder - [Composite USB Device] in the [Other devices] folder 5 When the [Confirm Device Removal] screen appears, click [OK]. 6 Turn off the power of your camcorder, disconnect the USB cable, then restart the computer. 7 Place the supplied CD-ROM...
...] t [View] t [Devices by type]. 4 If the devices below are already installed, right-click them, then click [Uninstall] to delete them. - [USB Composite Device] in the [Universal Serial Bus Controller] folder - [USB Audio Device] in the [Sound, video and game controller] folder - [Composite USB Device] in the [Other devices] folder 5 When the [Confirm Device Removal] screen appears, click [OK]. 6 Turn off the power of your camcorder, disconnect the USB cable, then restart the computer. 7 Place the supplied CD-ROM...

Operating Guide
Page 115
... connected to the Windows computer. • Display pictures recorded on a "Memory Stick Duo" with the following procedures: 1 Select [Start] t [Programs] ([All Programs] for your computer environment as (E:)) may vary depending on the computer. 3 Click [Open]. 4 Double-click [Driver]. 5 Double-click [Setup.exe]. • Deleting anything other than [USB Composite Device], [USB Audio Device] and [USB Device] may take some time until the drive is connected. Continued , 115 Disconnect the USB cable from your camcorder...
... connected to the Windows computer. • Display pictures recorded on a "Memory Stick Duo" with the following procedures: 1 Select [Start] t [Programs] ([All Programs] for your computer environment as (E:)) may vary depending on the computer. 3 Click [Open]. 4 Double-click [Driver]. 5 Double-click [Setup.exe]. • Deleting anything other than [USB Composite Device], [USB Audio Device] and [USB Device] may take some time until the drive is connected. Continued , 115 Disconnect the USB cable from your camcorder...
Operating Guide
Page 124
... played on the display of a computer. 124 • File names of data transfer varies depending on your camcorder. - x On handling a "Memory Stick" Keep the following in the following cases: • If you use . Types of a computer. • A "Memory Stick Duo" formatted by a computer (Windows OS/Mac OS) does not have guaranteed compatibility with your camcorder. a*2*3 *1 A "Memory Stick Duo" is about the half size of a standard "Memory Stick" in your camcorder. • Data read/write speed...
... played on the display of a computer. 124 • File names of data transfer varies depending on your camcorder. - x On handling a "Memory Stick" Keep the following in the following cases: • If you use . Types of a computer. • A "Memory Stick Duo" formatted by a computer (Windows OS/Mac OS) does not have guaranteed compatibility with your camcorder. a*2*3 *1 A "Memory Stick Duo" is about the half size of a standard "Memory Stick" in your camcorder. • Data read/write speed...
Operating Guide
Page 137
... (Audio dubbing 79 AUDIO MIX 66, 80 AUDIO MODE 65 AUTO SHUTTER 51 B B&W 62 BACK LIGHT 33, 105 BATT (battery) release lever 15 Battery BATT INFO (Battery info 35 Charging time 15 Playing time 16 Recording time 15 Remaining battery .........35 BEACH&SKI 49 BEEP 68 BLACK FADER 59 BURN DVD 65, 94 BURN VCD 64 BURST 55 Button-type lithium battery 131 C CALIBRATION 130 CAMERA DATA 67 CAMERA SET menu........... 49 Cassette 24, 123 Cassette compartment ... 24 Insert/Eject...
... (Audio dubbing 79 AUDIO MIX 66, 80 AUDIO MODE 65 AUTO SHUTTER 51 B B&W 62 BACK LIGHT 33, 105 BATT (battery) release lever 15 Battery BATT INFO (Battery info 35 Charging time 15 Playing time 16 Recording time 15 Remaining battery .........35 BEACH&SKI 49 BEEP 68 BLACK FADER 59 BURN DVD 65, 94 BURN VCD 64 BURST 55 Button-type lithium battery 131 C CALIBRATION 130 CAMERA DATA 67 CAMERA SET menu........... 49 Cassette 24, 123 Cassette compartment ... 24 Insert/Eject...


