
Camera Operations Guide
Page 31
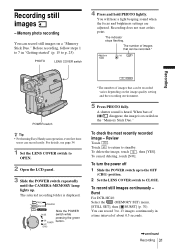
...to CLOSE. The number of images that can be recorded.* 60min 101 1152 FINE 30 Recording POWER switch z Tip • Performing Easy Handycam operation, even first time users can be recorded varies depending on the image quality setting and the recording environment. 5 Press PHOTO fully. ...most recently recorded image - To delete the image, touch , then [YES]. To cancel deleting, touch [NO]. Touch to return to p. 25). Burst For DCR-HC40: Select the (MEMORY SET) menu, [STILL SET], then [ BURST] (p. 70). For details, see page 34. 1 Set the LENS COVER switch to ...
...to CLOSE. The number of images that can be recorded.* 60min 101 1152 FINE 30 Recording POWER switch z Tip • Performing Easy Handycam operation, even first time users can be recorded varies depending on the image quality setting and the recording environment. 5 Press PHOTO fully. ...most recently recorded image - To delete the image, touch , then [YES]. To cancel deleting, touch [NO]. Touch to return to p. 25). Burst For DCR-HC40: Select the (MEMORY SET) menu, [STILL SET], then [ BURST] (p. 70). For details, see page 34. 1 Set the LENS COVER switch to ...
Camera Operations Guide
Page 34
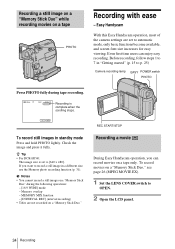
...," see page 26 (MPEG MOVIE EX). 1 Set the LENS COVER switch to OPEN. 2 Open the LCD panel. 34 Recording z Tip • For DCR-HC40: The image size is complete when the scrolling stops. Before recording, follow steps 1 to 7 in "Getting started" (p. 15 to record a still image in... standby mode Press and hold PHOTO lightly. Recording a movie During Easy Handycam operation, you want to p. 25) Camera recording lamp EASY POWER switch PHOTO Press PHOTO fully during the following operations: - [16:9 WIDE] mode - ...
...," see page 26 (MPEG MOVIE EX). 1 Set the LENS COVER switch to OPEN. 2 Open the LCD panel. 34 Recording z Tip • For DCR-HC40: The image size is complete when the scrolling stops. Before recording, follow steps 1 to 7 in "Getting started" (p. 15 to record a still image in... standby mode Press and hold PHOTO lightly. Recording a movie During Easy Handycam operation, you want to p. 25) Camera recording lamp EASY POWER switch PHOTO Press PHOTO fully during the following operations: - [16:9 WIDE] mode - ...
Camera Operations Guide
Page 137
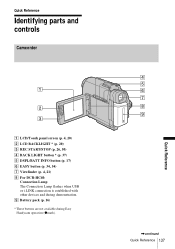
Quick Reference Identifying parts and controls Camcorder 1 2 3 A LCD/Touch panel screen (p. 4, 20) B LCD BACKLIGHT * (p. 20) C REC START/STOP (p. 26, 50) D BACK LIGHT button * (p. 37) E DSPL/BATT INFO button (p. 17) F EASY button (p. 34, 54) G Viewfinder (p. 4, 21) H For DCR-HC40: Connection Lamp The Connection Lamp flashes when USB or i.LINK connection is established with other devices and during Easy Handycam operation (zmark). 4 5 6 7 8 9 ,continued Quick Reference 137 Quick Reference I Battery pack (p. 16) * These buttons are not available during demonstration.
Quick Reference Identifying parts and controls Camcorder 1 2 3 A LCD/Touch panel screen (p. 4, 20) B LCD BACKLIGHT * (p. 20) C REC START/STOP (p. 26, 50) D BACK LIGHT button * (p. 37) E DSPL/BATT INFO button (p. 17) F EASY button (p. 34, 54) G Viewfinder (p. 4, 21) H For DCR-HC40: Connection Lamp The Connection Lamp flashes when USB or i.LINK connection is established with other devices and during Easy Handycam operation (zmark). 4 5 6 7 8 9 ,continued Quick Reference 137 Quick Reference I Battery pack (p. 16) * These buttons are not available during demonstration.


