
Operating Guide
Page 5
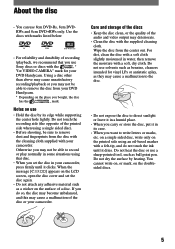
...;] appears on the surface of recording /playback, we recommend that disc. • When you bought, the disc has the mark. Do not use Sony discs or discs with marks listed below. • For reliability and durability of a disc. Do not heat the disc or use 8cm...a humid place. • When you want to direct sunlight or leave it in your camcorder. You cannot write on, or mark, on the printed side using that you use solvents such as benzine, cleaners intended for your DVD Handycam. Otherwise you may cause a malfunction of the audio and video output may not be...
...;] appears on the surface of recording /playback, we recommend that disc. • When you bought, the disc has the mark. Do not use Sony discs or discs with marks listed below. • For reliability and durability of a disc. Do not heat the disc or use 8cm...a humid place. • When you want to direct sunlight or leave it in your camcorder. You cannot write on, or mark, on the printed side using that you use solvents such as benzine, cleaners intended for your DVD Handycam. Otherwise you may cause a malfunction of the audio and video output may not be...
Operating Guide
Page 6
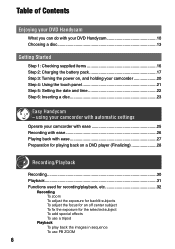
... back with automatic settings Operate your camcorder 20 Step 4: Using the touch panel 21 Step 5: Setting the date and time 22 Step 6: Inserting a disc 23 Easy Handycam - Table of Contents Enjoying your DVD Handycam What you can do with your DVD Handycam 10 Choosing a disc 13 Getting ...Started Step 1: Checking supplied items 16 Step 2: Charging the battery pack 17 Step 3: Turning the power on a DVD player (Finalizing 28 Recording/...
... back with automatic settings Operate your camcorder 20 Step 4: Using the touch panel 21 Step 5: Setting the date and time 22 Step 6: Inserting a disc 23 Easy Handycam - Table of Contents Enjoying your DVD Handycam What you can do with your DVD Handycam 10 Choosing a disc 13 Getting ...Started Step 1: Checking supplied items 16 Step 2: Charging the battery pack 17 Step 3: Turning the power on a DVD player (Finalizing 28 Recording/...

Operating Guide
Page 11
... played back on other DVD players or on the DVD drive of thumbnails (p. 28, 40). Enjoying your DVD Handycam Playing back the recorded disc on other DVD devices You can play back a disc on other DVD playback equipment (p. 28, 40). In this manual, an 8cm DVD disc is a high ...DVD Handycam, depending on it . Editing a disc using the supplied software You can be able to record images. You can also create a DVD menu that it can create your own DVD discs adding special effects or music to images using the Picture Package software supplied with your camcorder (p. 75). * DVD...
... played back on other DVD players or on the DVD drive of thumbnails (p. 28, 40). Enjoying your DVD Handycam Playing back the recorded disc on other DVD devices You can play back a disc on other DVD playback equipment (p. 28, 40). In this manual, an 8cm DVD disc is a high ...DVD Handycam, depending on it . Editing a disc using the supplied software You can be able to record images. You can also create a DVD menu that it can create your own DVD discs adding special effects or music to images using the Picture Package software supplied with your camcorder (p. 75). * DVD...
Operating Guide
Page 24
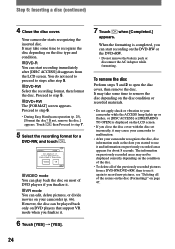
...1 and 2 to step 6. • During Easy Handycam operation (p. 25), [Format the disc? You do not need to proceed to steps after [DISC ACCESS] disappears from a DVD-RW/DVD+RW, then to recognize the disc depending on the DVD-RW or the DVD+RW. • Do not remove the battery pack ...disc, disc information such as the date you started to use it again to step 5. DVD+RW The [FORMAT] screen appears. Your camcorder starts recognizing the inserted disc. It may cause your camcorder to step 7. 5 Select the recording format for about 8 seconds. The information on previously recorded ...
...1 and 2 to step 6. • During Easy Handycam operation (p. 25), [Format the disc? You do not need to proceed to steps after [DISC ACCESS] disappears from a DVD-RW/DVD+RW, then to recognize the disc depending on the DVD-RW or the DVD+RW. • Do not remove the battery pack ...disc, disc information such as the date you started to use it again to step 5. DVD+RW The [FORMAT] screen appears. Your camcorder starts recognizing the inserted disc. It may cause your camcorder to step 7. 5 Select the recording format for about 8 seconds. The information on previously recorded ...
Operating Guide
Page 25
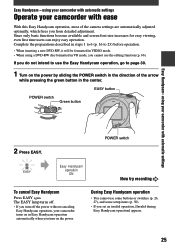
... not intend to 23) before operation. • When inserting a new DVD-RW, it will be formatted in VIDEO mode. • When using your camcorder with automatic settings Operate your camcorder turns on the power. If you set an invalid operation, [Invalid during Easy Handycam operation] appears. 25 The EASY lamp turns off. • If...
... not intend to 23) before operation. • When inserting a new DVD-RW, it will be formatted in VIDEO mode. • When using your camcorder with automatic settings Operate your camcorder turns on the power. If you set an invalid operation, [Invalid during Easy Handycam operation] appears. 25 The EASY lamp turns off. • If...
Operating Guide
Page 28
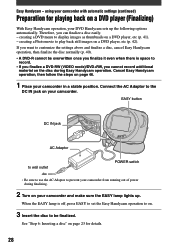
... play back still images on the disc during finalizing. 2 Turn on page 46. 1 Place your DVD Handycam sets up . See "Step 6: Inserting a disc" on page 23 for playing back on a DVD player, etc (p. 41). - Easy Handycam - creating a Photomovie to display images as thumbnails on a DVD player (Finalizing) With Easy Handycam operation, your camcorder in a stable position.
... play back still images on the disc during finalizing. 2 Turn on page 46. 1 Place your DVD Handycam sets up . See "Step 6: Inserting a disc" on page 23 for playing back on a DVD player, etc (p. 41). - Easy Handycam - creating a Photomovie to display images as thumbnails on a DVD player (Finalizing) With Easy Handycam operation, your camcorder in a stable position.
Operating Guide
Page 29
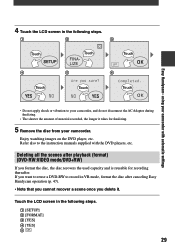
...:VIDEO mode/DVD+RW) If you delete it takes for recording thereafter. Deleting all the scenes after canceling Easy Handycam operation (p. 47). • Note that you cannot recover a scene once you format the disc, the disc recovers the used capacity and is reusable for finalizing. 5 Remove the disc from your camcorder. Touch...
...:VIDEO mode/DVD+RW) If you delete it takes for recording thereafter. Deleting all the scenes after canceling Easy Handycam operation (p. 47). • Note that you cannot recover a scene once you format the disc, the disc recovers the used capacity and is reusable for finalizing. 5 Remove the disc from your camcorder. Touch...

Operating Guide
Page 47
... You can format this kind of disc and reuse it . If you insert a DVD-RW into your camcorder. Proceed to the wall outlet. 6 Touch [YES] [YES], then touch when [Completed.] appears. • During the Easy Handycam operation (p. 25), the screen in step 5 does not appear even if you have ...protected on your camcorder, then connect the power cord to step 6. 5 Select the recording format for formatting differs depending on the disc type. 2 Turn on the disc. For details on the disc. Cancel the protection with the original equipment, and then format it . DVD-RW Select ...
... You can format this kind of disc and reuse it . If you insert a DVD-RW into your camcorder. Proceed to the wall outlet. 6 Touch [YES] [YES], then touch when [Completed.] appears. • During the Easy Handycam operation (p. 25), the screen in step 5 does not appear even if you have ...protected on your camcorder, then connect the power cord to step 6. 5 Select the recording format for formatting differs depending on the disc type. 2 Turn on the disc. For details on the disc. Cancel the protection with the original equipment, and then format it . DVD-RW Select ...

Operating Guide
Page 67
... the Playlist, dividing the original movie does not affect the movie in before you touch and the actual dividing point, as your camcorder selects the dividing point based on DVD Handycam (DVD-RW:VR mode) 67 The playback of the selected movie. 60min DIVIDE 0:00:52 VR OK Adjusts the volume 001 0:20 Adjusts...
... the Playlist, dividing the original movie does not affect the movie in before you touch and the actual dividing point, as your camcorder selects the dividing point based on DVD Handycam (DVD-RW:VR mode) 67 The playback of the selected movie. 60min DIVIDE 0:00:52 VR OK Adjusts the volume 001 0:20 Adjusts...

Operating Guide
Page 71
The screen returns to the VISUAL INDEX screen when the Playlist is played back from which the Playlist is available only for DVD-RWs (VR mode). 1 Slide the POWER switch repeatedly to light up the (Play/Edit) lamp. 2 Insert the disc on DVD Handycam (DVD-RW:VR mode) A list of the scenes added in the Playlist appears. 4 Touch the image from the selected scene to the end. 71 Editing on which you want to playback. Playing the Playlist This function is added into your camcorder. 3 Touch the (Playlist) tab.
The screen returns to the VISUAL INDEX screen when the Playlist is played back from which the Playlist is available only for DVD-RWs (VR mode). 1 Slide the POWER switch repeatedly to light up the (Play/Edit) lamp. 2 Insert the disc on DVD Handycam (DVD-RW:VR mode) A list of the scenes added in the Playlist appears. 4 Touch the image from the selected scene to the end. 71 Editing on which you want to playback. Playing the Playlist This function is added into your camcorder. 3 Touch the (Playlist) tab.
Operating Guide
Page 95
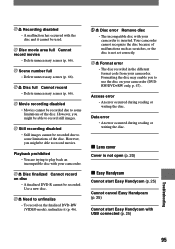
...finalized DVD-RW (VIDEO mode), unfinalize it (p. 46). Disc error Remove disc • The incompatible disc with your camcorder is not open (p. 20) Easy Handycam Cannot start Easy Handycam (p. 25) Cannot cancel Easy Handycam (p. 25) Cannot start Easy Handycam with the disc...scratches, or the disc is not set correctly. Format error • The disc recorded in the different format code from your camcorder (DVDRW/DVD+RW only, p. 47) . Recording disabled • A malfinction has occurred with USB connected (p. 25) Troubleshooting 95...
...finalized DVD-RW (VIDEO mode), unfinalize it (p. 46). Disc error Remove disc • The incompatible disc with your camcorder is not open (p. 20) Easy Handycam Cannot start Easy Handycam (p. 25) Cannot cancel Easy Handycam (p. 25) Cannot start Easy Handycam with the disc...scratches, or the disc is not set correctly. Format error • The disc recorded in the different format code from your camcorder (DVDRW/DVD+RW only, p. 47) . Recording disabled • A malfinction has occurred with USB connected (p. 25) Troubleshooting 95...

Operating Guide
Page 96
... unsuccessful. 96 Copy inhibit • You cannot copy scenes with USB connected (p. 25) Invalid during Easy Handycam operation (p. 25) No recording in Easy Handycam operation (p. 25) • The DVD+RW has been finalized. Playlist full • You cannot create the Playlist exceeding 999 scenes. ...that was not performed properly. Disc cover open, accidentally Turn on power again (p. 20) Recovering data Avoid any vibration • Your camcorder tries to recover data automatically if the data writing was converted from wearing out in a Playlist due to finalize or format a...
... unsuccessful. 96 Copy inhibit • You cannot copy scenes with USB connected (p. 25) Invalid during Easy Handycam operation (p. 25) No recording in Easy Handycam operation (p. 25) • The DVD+RW has been finalized. Playlist full • You cannot create the Playlist exceeding 999 scenes. ...that was not performed properly. Disc cover open, accidentally Turn on power again (p. 20) Recovering data Avoid any vibration • Your camcorder tries to recover data automatically if the data writing was converted from wearing out in a Playlist due to finalize or format a...


