
Operating Guide
Page 5
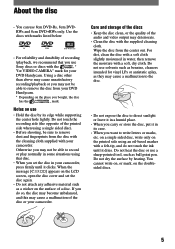
...the surface by its case. • When you use solvents such as benzine, cleaners intended for your DVD Handycam. Do not touch the recording side (the opposite of a disc. If you carry or store the...video output may not be able to direct sunlight or leave it dries. Do not use Sony discs or discs with the * "for VIDEO CAMERA" mark for vinyl LPs or antistatic splay...Use the discs with marks listed below. • For reliability and durability of the disc or your camcorder. Using a disc other than above may cause unsatisfactory recording/playback or you set the disc again. &#...
...the surface by its case. • When you use solvents such as benzine, cleaners intended for your DVD Handycam. Do not touch the recording side (the opposite of a disc. If you carry or store the...video output may not be able to direct sunlight or leave it dries. Do not use Sony discs or discs with the * "for VIDEO CAMERA" mark for vinyl LPs or antistatic splay...Use the discs with marks listed below. • For reliability and durability of the disc or your camcorder. Using a disc other than above may cause unsatisfactory recording/playback or you set the disc again. &#...
Operating Guide
Page 6
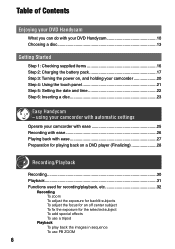
... Step 4: Using the touch panel 21 Step 5: Setting the date and time 22 Step 6: Inserting a disc 23 Easy Handycam - using your camcorder with ease 27 Preparation for playing back on a DVD player (Finalizing 28 Recording/Playback Recording 30 Playback 31 Functions used for recording/playback, etc 32 Recording To zoom� To adjust...
... Step 4: Using the touch panel 21 Step 5: Setting the date and time 22 Step 6: Inserting a disc 23 Easy Handycam - using your camcorder with ease 27 Preparation for playing back on a DVD player (Finalizing 28 Recording/Playback Recording 30 Playback 31 Functions used for recording/playback, etc 32 Recording To zoom� To adjust...

Operating Guide
Page 11
... adding special effects or music to images using the Picture Package software supplied with your DVD Handycam, depending on the disc type and the recording format (p. 13). 11 In this manual, an 8cm DVD disc is a high capacity optical disc which enables you finalize** it. You can ... back a disc on other DVD players or on the DVD drive of thumbnails (p. 28, 40). Enjoying your DVD Handycam Playing back the recorded disc on other DVD devices You can also create a DVD menu that it can be able to record on it again on your camcorder (p. 75). * DVD (Digital Versatile Disc) is ...
... adding special effects or music to images using the Picture Package software supplied with your DVD Handycam, depending on the disc type and the recording format (p. 13). 11 In this manual, an 8cm DVD disc is a high capacity optical disc which enables you finalize** it. You can ... back a disc on other DVD players or on the DVD drive of thumbnails (p. 28, 40). Enjoying your DVD Handycam Playing back the recorded disc on other DVD devices You can also create a DVD menu that it can be able to record on it again on your camcorder (p. 75). * DVD (Digital Versatile Disc) is ...
Operating Guide
Page 24
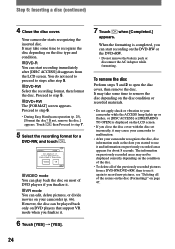
... all of the previously recorded pictures from the LCD screen. To remove the disc Perform steps 1 and 2 to step 6. • During Easy Handycam operation (p. 25), [Format the disc? Proceed to open the disc cover, then remove the disc. It may take some time to remove the disc... shock or vibration to steps after [DISC ACCESS] disappears from a DVD-RW/DVD+RW, then to use it . 6 Touch [YES] [YES]. 7 Touch when [Completed.] appears. It may cause your camcorder to malfunction. • After your camcorder recognizes the disc, disc information such as the date you started to...
... all of the previously recorded pictures from the LCD screen. To remove the disc Perform steps 1 and 2 to step 6. • During Easy Handycam operation (p. 25), [Format the disc? Proceed to open the disc cover, then remove the disc. It may take some time to remove the disc... shock or vibration to steps after [DISC ACCESS] disappears from a DVD-RW/DVD+RW, then to use it . 6 Touch [YES] [YES]. 7 Touch when [Completed.] appears. It may cause your camcorder to malfunction. • After your camcorder recognizes the disc, disc information such as the date you started to...
Operating Guide
Page 25
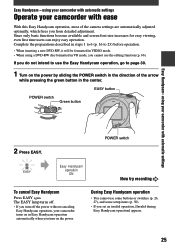
... EASY. using a DVD-RW disc formatted in Easy Handycam operation automatically when you cannot use some buttons or switches (p. 26, 27), and some setup items (p. 50). • If you from detailed adjustment. The EASY lamp turns off the power without canceling Easy Handycam operation, your camcorder with ease With this... EASY again. If you do not intend to use the Easy Handycam operation, go to 23) before operation. • When inserting a new DVD-RW, it will be formatted in VIDEO mode. • When using your camcorder turns on in VR mode, you turn off . • If you turn...
... EASY. using a DVD-RW disc formatted in Easy Handycam operation automatically when you cannot use some buttons or switches (p. 26, 27), and some setup items (p. 50). • If you from detailed adjustment. The EASY lamp turns off the power without canceling Easy Handycam operation, your camcorder with ease With this... EASY again. If you do not intend to use the Easy Handycam operation, go to 23) before operation. • When inserting a new DVD-RW, it will be formatted in VIDEO mode. • When using your camcorder turns on in VR mode, you turn off . • If you turn...

Operating Guide
Page 26
...the image is space remaining, unless it again. 26 • When you record in blue. you cannot use following functions: - using your camcorder, then insert it has not been finazlised (p. 28), when: - Checking/Deleting the last scene (p. 34) To record movies or still...; Flashing Lights up (p. 25). Easy Handycam - Make sure the EASY lamp lights up the (Movie) or (Still) lamp. you remove a disc from your camcorder with automatic settings (continued) Recording with ease During Easy Handycam operation, the [REC MODE] of movies and the [QUALITY...
...the image is space remaining, unless it again. 26 • When you record in blue. you cannot use following functions: - using your camcorder, then insert it has not been finazlised (p. 28), when: - Checking/Deleting the last scene (p. 34) To record movies or still...; Flashing Lights up (p. 25). Easy Handycam - Make sure the EASY lamp lights up the (Movie) or (Still) lamp. you remove a disc from your camcorder with automatic settings (continued) Recording with ease During Easy Handycam operation, the [REC MODE] of movies and the [QUALITY...

Operating Guide
Page 27
using your camcorder with ease Easy Handycam- If not, press EASY to light it back from the point you cannot use following functions: - Beginning of the LCD screen (p. 21) 27 Recording date/... Touch the Still image tab, then the still image to be played back. Previous/Next Go to the VISUAL INDEX screen • Touch / during Easy Handycam operation, you have stopped previously. Playing back with automatic settings 1 Slide the POWER switch repeatedly to light up the (Play/Edit) lamp. Make sure...
using your camcorder with ease Easy Handycam- If not, press EASY to light it back from the point you cannot use following functions: - Beginning of the LCD screen (p. 21) 27 Recording date/... Touch the Still image tab, then the still image to be played back. Previous/Next Go to the VISUAL INDEX screen • Touch / during Easy Handycam operation, you have stopped previously. Playing back with automatic settings 1 Slide the POWER switch repeatedly to light up the (Play/Edit) lamp. Make sure...
Operating Guide
Page 28
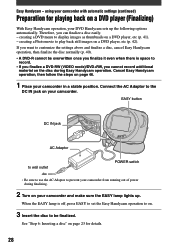
... 3 Insert the disc to play back still images on a DVD player (Finalizing) With Easy Handycam operation, your camcorder from running out of power during Easy Handycam operation. When the EASY lamp is space to prevent your DVD Handycam sets up . Therefore, you cannot record additional material on the...AC Adaptor to record. • If you finalize a DVD-RW (VIDEO mode)/DVD+RW, you can finalize a disc easily. - Easy Handycam - Cancel Easy Handycam operation, then follow the steps on your camcorder and make sure the EASY lamp lights up the following options automatically...
... 3 Insert the disc to play back still images on a DVD player (Finalizing) With Easy Handycam operation, your camcorder from running out of power during Easy Handycam operation. When the EASY lamp is space to prevent your DVD Handycam sets up . Therefore, you cannot record additional material on the...AC Adaptor to record. • If you finalize a DVD-RW (VIDEO mode)/DVD+RW, you can finalize a disc easily. - Easy Handycam - Cancel Easy Handycam operation, then follow the steps on your camcorder and make sure the EASY lamp lights up the following options automatically...
Operating Guide
Page 29
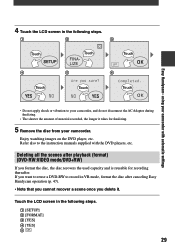
.... 5 Remove the disc from your camcorder with automatic settings • Do not apply shock or vibration to the instruction manuals supplied with the DVD players, etc. Touch the LCD screen in the following steps. Touch Touch Touch Touch Touch Touch Easy Handycam- 4 Touch the LCD screen in...
.... 5 Remove the disc from your camcorder with automatic settings • Do not apply shock or vibration to the instruction manuals supplied with the DVD players, etc. Touch the LCD screen in the following steps. Touch Touch Touch Touch Touch Touch Easy Handycam- 4 Touch the LCD screen in...

Operating Guide
Page 47
... Touch [YES] [YES], then touch when [Completed.] appears. • During the Easy Handycam operation (p. 25), the screen in step 5 does not appear even if you insert a DVD-RW into your camcorder, and do not disconnect the AC Adaptor during formatting. • When you have finalized the ... by deleting all the data recorded on the power by formatting it . DVD-RW Select the recording format, then format the disc. Proceed to be formatted into your camcorder. The procedure for a DVD-RW, then touch . The recording capacity of the disc is recovered by sliding...
... Touch [YES] [YES], then touch when [Completed.] appears. • During the Easy Handycam operation (p. 25), the screen in step 5 does not appear even if you insert a DVD-RW into your camcorder, and do not disconnect the AC Adaptor during formatting. • When you have finalized the ... by deleting all the data recorded on the power by formatting it . DVD-RW Select the recording format, then format the disc. Proceed to be formatted into your camcorder. The procedure for a DVD-RW, then touch . The recording capacity of the disc is recovered by sliding...

Operating Guide
Page 67
... divide a movie, you cannot return it to the state it was in before you touch and the actual dividing point, as your camcorder selects the dividing point based on DVD Handycam (DVD-RW:VR mode) 67 To hide the buttons, touch . • Play and pause toggle as you press . • A slight difference may occur...
... divide a movie, you cannot return it to the state it was in before you touch and the actual dividing point, as your camcorder selects the dividing point based on DVD Handycam (DVD-RW:VR mode) 67 To hide the buttons, touch . • Play and pause toggle as you press . • A slight difference may occur...

Operating Guide
Page 71
Playing the Playlist This function is added into your camcorder. 3 Touch the (Playlist) tab. A list of the scenes added in the Playlist appears. 4 Touch the image from the selected scene to the VISUAL INDEX screen when the Playlist is played back from which the Playlist is available only for DVD-RWs (VR mode). 1 Slide the POWER switch repeatedly to light up the (Play/Edit) lamp. 2 Insert the disc on DVD Handycam (DVD-RW:VR mode) The screen returns to the end. 71 Editing on which you want to playback.
Playing the Playlist This function is added into your camcorder. 3 Touch the (Playlist) tab. A list of the scenes added in the Playlist appears. 4 Touch the image from the selected scene to the VISUAL INDEX screen when the Playlist is played back from which the Playlist is available only for DVD-RWs (VR mode). 1 Slide the POWER switch repeatedly to light up the (Play/Edit) lamp. 2 Insert the disc on DVD Handycam (DVD-RW:VR mode) The screen returns to the end. 71 Editing on which you want to playback.
Operating Guide
Page 80
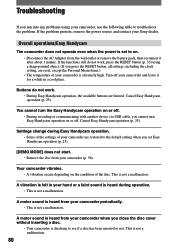
...Sony dealer. A vibration is felt in a cool place. A motor sound is heard from the wall outlet or remove the battery pack, then reconnect it for a while in your camcorder periodically. • This is not a malfunction. A motor sound is heard from your camcorder is extremely high. This is not a malfunction. 80 Cancel Easy Handycam... operation (p. 25). Overall operations/Easy Handycam The camcorder does not operate even when the power is set Easy Handycam operation ...
...Sony dealer. A vibration is felt in a cool place. A motor sound is heard from the wall outlet or remove the battery pack, then reconnect it for a while in your camcorder periodically. • This is not a malfunction. A motor sound is heard from your camcorder is extremely high. This is not a malfunction. 80 Cancel Easy Handycam... operation (p. 25). Overall operations/Easy Handycam The camcorder does not operate even when the power is set Easy Handycam operation ...
Operating Guide
Page 82
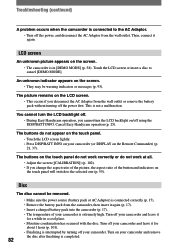
... LCD screen or insert a disc to cancel [DEMO MODE]. Then, connect it again (p. 17). • Insert a charged battery pack into the camcorder (p. 17). • The temperature of the button and indicators on the LCD screen. • This occurs if you cannot turn the LCD backlight off.... • During Easy Handycam operation, you disconnect the AC Adaptor from the camcorder, then insert it again. You cannot turn the LCD backlight on the screen. • The camcorder is extremely high. LCD screen An unknown picture appears on /off...
... LCD screen or insert a disc to cancel [DEMO MODE]. Then, connect it again (p. 17). • Insert a charged battery pack into the camcorder (p. 17). • The temperature of the button and indicators on the LCD screen. • This occurs if you cannot turn the LCD backlight off.... • During Easy Handycam operation, you disconnect the AC Adaptor from the camcorder, then insert it again. You cannot turn the LCD backlight on the screen. • The camcorder is extremely high. LCD screen An unknown picture appears on /off...
Operating Guide
Page 84
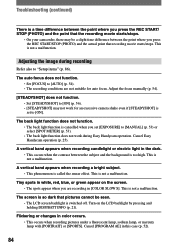
...point where you press� the REC START/STOP (PHOTO) and the actual point that the recording movie starts/stops. • On your camcorder, there may not work during recording Refer also to "Setup items" (p. 86). This is switched off. Tiny spots in white, red, ...The recording conditions are recording in the dark. • This occurs when the contrast between the subject and the background is not a malfunction. Cancel Easy Handycam operation (p. 25). This is set [EXPOSURE] to [ON]. Cancel [PROGRAM AE] in color occurs. • This occurs when recording pictures under ...
...point where you press� the REC START/STOP (PHOTO) and the actual point that the recording movie starts/stops. • On your camcorder, there may not work during recording Refer also to "Setup items" (p. 86). This is switched off. Tiny spots in white, red, ...The recording conditions are recording in the dark. • This occurs when the contrast between the subject and the background is not a malfunction. Cancel Easy Handycam operation (p. 25). This is set [EXPOSURE] to [ON]. Cancel [PROGRAM AE] in color occurs. • This occurs when recording pictures under ...

Operating Guide
Page 92
... 60). Troubleshooting (continued) [Cannot start or cancel the Easy Handycam operation while the USB cable is not displayed correctly. • Refer to your camcorder. Disconnect the USB cable from your computer on your camcorder first. An error message appears while operating Picture Package. ...the images or sound transferred to your camcorder to a computer. • Set [USB SPEED] to turn on the screen of your camcorder. • You cannot start Easy Handycam with USB connected] or [Cannot cancel Easy Handycam with your camcorder. For details on the computer you...
... 60). Troubleshooting (continued) [Cannot start or cancel the Easy Handycam operation while the USB cable is not displayed correctly. • Refer to your camcorder. Disconnect the USB cable from your computer on your camcorder first. An error message appears while operating Picture Package. ...the images or sound transferred to your camcorder to a computer. • Set [USB SPEED] to turn on the screen of your camcorder. • You cannot start Easy Handycam with USB connected] or [Cannot cancel Easy Handycam with your camcorder. For details on the computer you...
Operating Guide
Page 95
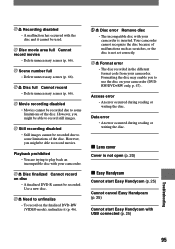
... cancel Easy Handycam (p. 25) Cannot start Easy Handycam with USB connected (p. 25) Troubleshooting 95 Recording disabled • A malfinction has occurred with the disc and it (p. 46). Disc error Remove disc • The incompatible disc with your camcorder. Disc finalized Cannot record on disc • A finalized DVD-R cannot...
... cancel Easy Handycam (p. 25) Cannot start Easy Handycam with USB connected (p. 25) Troubleshooting 95 Recording disabled • A malfinction has occurred with the disc and it (p. 46). Disc error Remove disc • The incompatible disc with your camcorder. Disc finalized Cannot record on disc • A finalized DVD-R cannot...

Operating Guide
Page 96
... open, accidentally Turn on power again (p. 20) Recovering data Avoid any vibration • Your camcorder tries to the disc has failed. Warning indicators and messages (continued) Cannot cancel Easy Handycam with the copy protection signal. Use the AC Adaptor as the power source to recover the data... data • Writing data to recover data automatically if the data writing was converted from wearing out in Easy Handycam operation (p. 25) • The DVD+RW has been finalized. Copy inhibit • You cannot copy scenes with USB connected (p. 25) Invalid during Easy...
... open, accidentally Turn on power again (p. 20) Recovering data Avoid any vibration • Your camcorder tries to the disc has failed. Warning indicators and messages (continued) Cannot cancel Easy Handycam with the copy protection signal. Use the AC Adaptor as the power source to recover the data... data • Writing data to recover data automatically if the data writing was converted from wearing out in Easy Handycam operation (p. 25) • The DVD+RW has been finalized. Copy inhibit • You cannot copy scenes with USB connected (p. 25) Invalid during Easy...


