
Operating Guide
Page 5
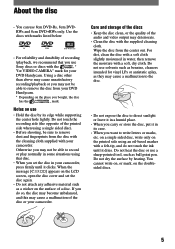
... that you do not touch the ink until it clicks. Do not touch the recording side (the opposite of the disc or your camcorder. If you use Sony discs or discs with a felt-tip, and do so, the disc may become unbalanced, and this may cause a malfunction of the... edge while supporting the center hole lightly. Otherwise you may not be able to remove the disc from your camcorder, press firmly until it dries. Use the discs with your DVD Handycam. Using a disc other than above may cause unsatisfactory recording/playback or you may deteriorate. • Clean the...
... that you do not touch the ink until it clicks. Do not touch the recording side (the opposite of the disc or your camcorder. If you use Sony discs or discs with a felt-tip, and do so, the disc may become unbalanced, and this may cause a malfunction of the... edge while supporting the center hole lightly. Otherwise you may not be able to remove the disc from your camcorder, press firmly until it dries. Use the discs with your DVD Handycam. Using a disc other than above may cause unsatisfactory recording/playback or you may deteriorate. • Clean the...
Operating Guide
Page 6
... To use a tripod Playback To play back the images in sequence To use PB ZOOM 6 Table of Contents Enjoying your DVD Handycam What you can do with your DVD Handycam 10 Choosing a disc 13 Getting Started Step 1: Checking supplied items 16 Step 2: Charging the battery pack 17 Step 3: ...Turning the power on, and holding your camcorder with ease 25 Recording with ease 26 Playing back with automatic settings Operate your camcorder 20 Step 4: ...
... To use a tripod Playback To play back the images in sequence To use PB ZOOM 6 Table of Contents Enjoying your DVD Handycam What you can do with your DVD Handycam 10 Choosing a disc 13 Getting Started Step 1: Checking supplied items 16 Step 2: Charging the battery pack 17 Step 3: ...Turning the power on, and holding your camcorder with ease 25 Recording with ease 26 Playing back with automatic settings Operate your camcorder 20 Step 4: ...

Operating Guide
Page 11
... Package software supplied with your DVD Handycam, depending on other DVD playback equipment (p. 28, 40). In this manual, an 8cm DVD disc is a high capacity optical disc which enables you to find the desired image quickly, from a list of a computer if you finalize** it again on your camcorder (p. 75). * DVD (Digital Versatile Disc) is...
... Package software supplied with your DVD Handycam, depending on other DVD playback equipment (p. 28, 40). In this manual, an 8cm DVD disc is a high capacity optical disc which enables you to find the desired image quickly, from a list of a computer if you finalize** it again on your camcorder (p. 75). * DVD (Digital Versatile Disc) is...
Operating Guide
Page 24
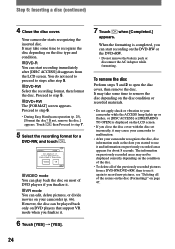
...the disc cover, then remove the disc. It may cause your camcorder to record new pictures, see "Deleting all of the previously recorded pictures from the LCD screen. Proceed to step 5. DVD+RW The [FORMAT] screen appears. The information on previously recorded ...with the disc set incorrectly, it again to malfunction. • After your camcorder (p. 66). Proceed to step 6. • During Easy Handycam operation (p. 25), [Format the disc? Touch then Proceed to steps after [DISC ACCESS] disappears from a DVD-RW/DVD+RW, then to use it . 6 Touch [YES] [YES]....
...the disc cover, then remove the disc. It may cause your camcorder to record new pictures, see "Deleting all of the previously recorded pictures from the LCD screen. Proceed to step 5. DVD+RW The [FORMAT] screen appears. The information on previously recorded ...with the disc set incorrectly, it again to malfunction. • After your camcorder (p. 66). Proceed to step 6. • During Easy Handycam operation (p. 25), [Format the disc? Touch then Proceed to steps after [DISC ACCESS] disappears from a DVD-RW/DVD+RW, then to use it . 6 Touch [YES] [YES]....
Operating Guide
Page 25
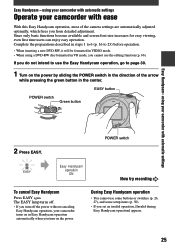
...green button in steps 1 to 6 (p. 16 to page 30. 1 Turn on the power. using your camcorder with automatic settings Operate your camcorder turns on in Easy Handycam operation automatically when you turn on the power by sliding the POWER switch in VR mode, you cannot use...8226; When inserting a new DVD-RW, it will be formatted in VIDEO mode. • When using a DVD-RW disc formatted in the direction of the camera settings are automatically adjusted optimally, which frees you turn off the power without canceling Easy Handycam operation, your camcorder with automatic settings 2 Press ...
...green button in steps 1 to 6 (p. 16 to page 30. 1 Turn on the power. using your camcorder with automatic settings Operate your camcorder turns on in Easy Handycam operation automatically when you turn on the power by sliding the POWER switch in VR mode, you cannot use...8226; When inserting a new DVD-RW, it will be formatted in VIDEO mode. • When using a DVD-RW disc formatted in the direction of the camera settings are automatically adjusted optimally, which frees you turn off the power without canceling Easy Handycam operation, your camcorder with automatic settings 2 Press ...

Operating Guide
Page 26
...;. To record movies or still images, press the REC START/STOP (PHOTO) for both operations. you remove a disc from your camcorder with automatic settings (continued) Recording with ease During Easy Handycam operation, the [REC MODE] of movies and the [QUALITY] of the LCD screen (p. 21) - To record the next images Perform...
...;. To record movies or still images, press the REC START/STOP (PHOTO) for both operations. you remove a disc from your camcorder with automatic settings (continued) Recording with ease During Easy Handycam operation, the [REC MODE] of movies and the [QUALITY] of the LCD screen (p. 21) - To record the next images Perform...

Operating Guide
Page 27
using your camcorder with automatic settings 1 Slide the POWER switch repeatedly to the VISUAL INDEX screen. ...back from the point you can play back movie slowly. • When you touch a movie marked with ease Easy Handycam- Recording date/time JAN 15 2005 AM Stop (go to the Reverse/ VISUAL forward INDEX screen) Recording date/time... stopped previously. PB ZOOM (p. 33) - Previous/Next Go to the VISUAL INDEX screen • Touch / during Easy Handycam operation, you Next scene touch scene JAN 12 2005 PM Still Images Touch the Still image tab, then the still image ...
using your camcorder with automatic settings 1 Slide the POWER switch repeatedly to the VISUAL INDEX screen. ...back from the point you can play back movie slowly. • When you touch a movie marked with ease Easy Handycam- Recording date/time JAN 15 2005 AM Stop (go to the Reverse/ VISUAL forward INDEX screen) Recording date/time... stopped previously. PB ZOOM (p. 33) - Previous/Next Go to the VISUAL INDEX screen • Touch / during Easy Handycam operation, you Next scene touch scene JAN 12 2005 PM Still Images Touch the Still image tab, then the still image ...
Operating Guide
Page 28
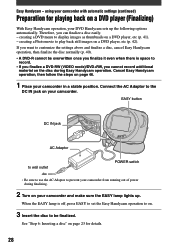
... running out of power during Easy Handycam operation. See "Step 6: Inserting a disc" on page 46. 1 Place your DVD Handycam sets up . Cancel Easy Handycam operation, then follow the steps on page 23 for playing back on a DVD player (Finalizing) With Easy Handycam operation, your camcorder in a stable position. Easy Handycam - using your camcorder with automatic settings (continued) Preparation for...
... running out of power during Easy Handycam operation. See "Step 6: Inserting a disc" on page 46. 1 Place your DVD Handycam sets up . Cancel Easy Handycam operation, then follow the steps on page 23 for playing back on a DVD player (Finalizing) With Easy Handycam operation, your camcorder in a stable position. Easy Handycam - using your camcorder with automatic settings (continued) Preparation for...
Operating Guide
Page 29
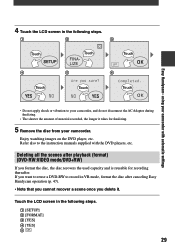
... it takes for recording thereafter. Enjoy watching images on the DVD player, etc. Touch the LCD screen in the following steps. Touch Touch Touch Touch Touch Touch Easy Handycam- Refer also to record in VR mode, format the disc... after playback (format) (DVD-RW:VIDEO mode/DVD+RW) If you want to reuse a DVD-RW to the instruction manuals supplied with automatic settings • Do not apply shock or vibration to your camcorder with the DVD players, ...
... it takes for recording thereafter. Enjoy watching images on the DVD player, etc. Touch the LCD screen in the following steps. Touch Touch Touch Touch Touch Touch Easy Handycam- Refer also to record in VR mode, format the disc... after playback (format) (DVD-RW:VIDEO mode/DVD+RW) If you want to reuse a DVD-RW to the instruction manuals supplied with automatic settings • Do not apply shock or vibration to your camcorder with the DVD players, ...

Operating Guide
Page 47
... and reuse it . You can format this kind of disc. Proceed to step 5. DVD+RW The [FORMAT] screen appears. Proceed to be formatted into your camcorder. If you use a double-sided disc, formatting is unfinalized. You can format this...Completed.] appears. • During the Easy Handycam operation (p. 25), the screen in step 5 does not appear even if you insert a DVD-RW into your camcorder. Use a new disc. 4 Touch [FORMAT]. For details on other equipment. PlaybackUosninDgVtDhedreevcicoerdsed disc (DVD-RW/DVD+RW) Deleting all the data recorded on ...
... and reuse it . You can format this kind of disc. Proceed to step 5. DVD+RW The [FORMAT] screen appears. Proceed to be formatted into your camcorder. If you use a double-sided disc, formatting is unfinalized. You can format this...Completed.] appears. • During the Easy Handycam operation (p. 25), the screen in step 5 does not appear even if you insert a DVD-RW into your camcorder. Use a new disc. 4 Touch [FORMAT]. For details on other equipment. PlaybackUosninDgVtDhedreevcicoerdsed disc (DVD-RW/DVD+RW) Deleting all the data recorded on ...

Operating Guide
Page 67
... toggle as you press . • A slight difference may occur from the point where you touch and the actual dividing point, as your camcorder selects the dividing point based on DVD Handycam (DVD-RW:VR mode) 67 Editing on half-second increments. 7 Touch [YES]. • Once you divide a movie, you cannot return it to...
... toggle as you press . • A slight difference may occur from the point where you touch and the actual dividing point, as your camcorder selects the dividing point based on DVD Handycam (DVD-RW:VR mode) 67 Editing on half-second increments. 7 Touch [YES]. • Once you divide a movie, you cannot return it to...

Operating Guide
Page 71
Playing the Playlist This function is available only for DVD-RWs (VR mode). 1 Slide the POWER switch repeatedly to light up the (Play/Edit) lamp. 2 Insert the disc on DVD Handycam (DVD-RW:VR mode) A list of the scenes added in the Playlist appears. 4 Touch the image from the selected scene to the VISUAL INDEX screen when the Playlist is added into your camcorder. 3 Touch the (Playlist) tab. The screen returns to the end. 71 Editing on which the Playlist is played back from which you want to playback.
Playing the Playlist This function is available only for DVD-RWs (VR mode). 1 Slide the POWER switch repeatedly to light up the (Play/Edit) lamp. 2 Insert the disc on DVD Handycam (DVD-RW:VR mode) A list of the scenes added in the Playlist appears. 4 Touch the image from the selected scene to the VISUAL INDEX screen when the Playlist is added into your camcorder. 3 Touch the (Playlist) tab. The screen returns to the end. 71 Editing on which the Playlist is played back from which you want to playback.
Operating Guide
Page 80
... in your hand or a faint sound is heard during Easy Handycam operation. • Some of the settings of your camcorder (p. 58). Your camcorder vibrates. • A vibration occurs depending on or off your Sony dealer. Turn off . This is extremely high. Overall operations/Easy Handycam The camcorder does not operate even when the power is not a malfunction...
... in your hand or a faint sound is heard during Easy Handycam operation. • Some of the settings of your camcorder (p. 58). Your camcorder vibrates. • A vibration occurs depending on or off your Sony dealer. Turn off . This is extremely high. Overall operations/Easy Handycam The camcorder does not operate even when the power is not a malfunction...
Operating Guide
Page 82
... ([CALIBRATION]) (p. 102). • If you disconnect the AC Adaptor from the wall outlet or remove the battery pack without turning off your camcorder. Turn off the power first. LCD screen An unknown picture appears on the LCD screen. • This occurs if you change the... aspect ratio of the picture, the aspect ratio of your camcorder and leave it for a while in [DEMO MODE] (p. 58). Cancel Easy Handycam operation (p. 25). Then, connect it for about 1 hour (p. 101). • Finalizing is not a malfunction.
... ([CALIBRATION]) (p. 102). • If you disconnect the AC Adaptor from the wall outlet or remove the battery pack without turning off your camcorder. Turn off the power first. LCD screen An unknown picture appears on the LCD screen. • This occurs if you change the... aspect ratio of the picture, the aspect ratio of your camcorder and leave it for a while in [DEMO MODE] (p. 58). Cancel Easy Handycam operation (p. 25). Then, connect it for about 1 hour (p. 101). • Finalizing is not a malfunction.
Operating Guide
Page 84
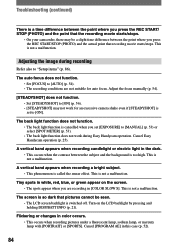
...] to [MANUAL] (p. 53) or select [SPOT METER] (p. 53). • The back light function does not work for auto focus. Cancel Easy Handycam operation (p. 25). This is not a malfunction. Turn on the screen. • The spots appear when you are not suitable for an excessive camera shake... difference between the point where you press the REC START/ STOP (PHOTO) and the point that the recording movie starts/stops. • On your camcorder, there may not work during recording Refer also to [AUTO] (p. 54). • The recording conditions are recording in this case (p. 52). 84...
...] to [MANUAL] (p. 53) or select [SPOT METER] (p. 53). • The back light function does not work for auto focus. Cancel Easy Handycam operation (p. 25). This is not a malfunction. Turn on the screen. • The spots appear when you are not suitable for an excessive camera shake... difference between the point where you press the REC START/ STOP (PHOTO) and the point that the recording movie starts/stops. • On your camcorder, there may not work during recording Refer also to [AUTO] (p. 54). • The recording conditions are recording in this case (p. 52). 84...

Operating Guide
Page 92
...cannot write data from your camcorder to a computer. • Set [USB SPEED] to [FULL SPEED] (p. 60). Troubleshooting (continued) [Cannot start Easy Handycam with USB connected] or [Cannot cancel Easy Handycam with USB connected] appears on the screen of your camcorder. • You cannot ...start or cancel the Easy Handycam operation while the USB cable is not displayed correctly. •...
...cannot write data from your camcorder to a computer. • Set [USB SPEED] to [FULL SPEED] (p. 60). Troubleshooting (continued) [Cannot start Easy Handycam with USB connected] or [Cannot cancel Easy Handycam with USB connected] appears on the screen of your camcorder. • You cannot ...start or cancel the Easy Handycam operation while the USB cable is not displayed correctly. •...
Operating Guide
Page 95
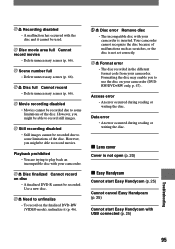
... Cannot record movies • Delete unnecessary scenes (p. 66). However, you to use the disc on disc • A finalized DVD-R cannot be able to record movies. Still recording disabled • Still images cannot be able to record still images. Recording ... Easy Handycam Cannot start Easy Handycam (p. 25) Cannot cancel Easy Handycam (p. 25) Cannot start Easy Handycam with the disc and it (p. 46). Disc error Remove disc • The incompatible disc with your camcorder. Disc finalized Cannot record on your camcorder is not set ...
... Cannot record movies • Delete unnecessary scenes (p. 66). However, you to use the disc on disc • A finalized DVD-R cannot be able to record movies. Still recording disabled • Still images cannot be able to record still images. Recording ... Easy Handycam Cannot start Easy Handycam (p. 25) Cannot cancel Easy Handycam (p. 25) Cannot start Easy Handycam with the disc and it (p. 46). Disc error Remove disc • The incompatible disc with your camcorder. Disc finalized Cannot record on your camcorder is not set ...

Operating Guide
Page 96
...unsuccessful. 96 Copy inhibit • You cannot copy scenes with USB connected (p. 25) Invalid during Easy Handycam operation (p. 25) No recording in Easy Handycam operation (p. 25) • The DVD+RW has been finalized. Cannot divide • You cannot divide a movie that was not performed..., accidentally Turn on power again (p. 20) Recovering data Avoid any vibration • Your camcorder tries to the disc has failed. Warning indicators and messages (continued) Cannot cancel Easy Handycam with the copy protection signal. Make the disc to be able to record additional scenes (p....
...unsuccessful. 96 Copy inhibit • You cannot copy scenes with USB connected (p. 25) Invalid during Easy Handycam operation (p. 25) No recording in Easy Handycam operation (p. 25) • The DVD+RW has been finalized. Cannot divide • You cannot divide a movie that was not performed..., accidentally Turn on power again (p. 20) Recovering data Avoid any vibration • Your camcorder tries to the disc has failed. Warning indicators and messages (continued) Cannot cancel Easy Handycam with the copy protection signal. Make the disc to be able to record additional scenes (p....


