Operating Guide
Page 6
...The supplied interface cable must be used with "Memory Stick PRO" compatible equipment. 6 Use the discs with two kinds of "Memory Stick" you can be used with the equipment in your camcorder.) • You cannot use 8cm DVD-Rs, 8cm DVD-RWs and 8cm DVD+RWs only. On the types of operations ...guides. - You can be used only with your camcorder) "Memory Stick" (You cannot use it in...
...The supplied interface cable must be used with "Memory Stick PRO" compatible equipment. 6 Use the discs with two kinds of "Memory Stick" you can be used with the equipment in your camcorder.) • You cannot use 8cm DVD-Rs, 8cm DVD-RWs and 8cm DVD+RWs only. On the types of operations ...guides. - You can be used only with your camcorder) "Memory Stick" (You cannot use it in...

Operating Guide
Page 7
... that appear constantly on : - These points are operational for long periods of time may cause a malfunction of your camcorder to another device with "Memory Stick" compatible equipment Be sure to insert the "Memory Stick Duo" into the Memory Stick Duo Adaptor. See "Maintenance and precautions" (p.136). • To prevent discs from being broken or recorded pictures from...
... that appear constantly on : - These points are operational for long periods of time may cause a malfunction of your camcorder to another device with "Memory Stick" compatible equipment Be sure to insert the "Memory Stick Duo" into the Memory Stick Duo Adaptor. See "Maintenance and precautions" (p.136). • To prevent discs from being broken or recorded pictures from...

Operating Guide
Page 10
... recording) To use zoom To record sound with your DVD Handycam 14 Choosing a disc 16 Using your camcorder 24 Step 4: Adjusting the LCD screen and viewfinder 25 Step 5: Using the touch panel 26 Step 6: Setting the date and time 27 Step 7: Inserting a disc or a "Memory Stick Duo 28 Step 8: Selecting the aspect ratio (16:9 or...
... recording) To use zoom To record sound with your DVD Handycam 14 Choosing a disc 16 Using your camcorder 24 Step 4: Adjusting the LCD screen and viewfinder 25 Step 5: Using the touch panel 26 Step 6: Setting the date and time 27 Step 7: Inserting a disc or a "Memory Stick Duo 28 Step 8: Selecting the aspect ratio (16:9 or...
Operating Guide
Page 12
...discs and "Memory Stick Duo" (FORMAT/FINALIZE/UNFINALIZE, etc.) STANDARD SET 77 Settings while recording on a disc or other basic settings (REC MODE/LCD/VF SET/USB SPEED, etc.) TIME/LANGU 81 (CLOCK SET/AREA SET/LANGUAGE, etc.) Customizing Personal Menu 82 Editing on DVD Handycam Copying the ...still images 84 Deleting still images from the "Memory Stick Duo 86 Editing the original data 87 Creating the Playlist 88 Playing the Playlist 91 Dubbing, Printing Dubbing ...
...discs and "Memory Stick Duo" (FORMAT/FINALIZE/UNFINALIZE, etc.) STANDARD SET 77 Settings while recording on a disc or other basic settings (REC MODE/LCD/VF SET/USB SPEED, etc.) TIME/LANGU 81 (CLOCK SET/AREA SET/LANGUAGE, etc.) Customizing Personal Menu 82 Editing on DVD Handycam Copying the ...still images 84 Deleting still images from the "Memory Stick Duo 86 Editing the original data 87 Creating the Playlist 88 Playing the Playlist 91 Dubbing, Printing Dubbing ...
Operating Guide
Page 13
Troubleshooting Troubleshooting 105 Warning indicators and messages 123 Additional Information Using your camcorder abroad 129 About the disc 131 About the "Memory Stick 132 About the "InfoLITHIUM" battery pack 134 Maintenance and precautions 136 Specifications 140 Glossary, Index Glossary 142 Index...144 13
Troubleshooting Troubleshooting 105 Warning indicators and messages 123 Additional Information Using your camcorder abroad 129 About the disc 131 About the "Memory Stick 132 About the "InfoLITHIUM" battery pack 134 Maintenance and precautions 136 Specifications 140 Glossary, Index Glossary 142 Index...144 13
Operating Guide
Page 14
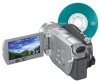
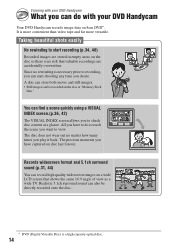
... high quality widescreen images on the disc so there is touch the scene you have to do with your DVD Handycam Your DVD Handycam records image data on the disc or "Memory Stick Duo." Records widescreen format and 5.1ch surround sound (p.31, 44) You can be directly recorded onto the... disc. * DVD (Digital Versatile Disc) is more convenient than video tape and far more versatile. The precious moments you want to...
... high quality widescreen images on the disc so there is touch the scene you have to do with your DVD Handycam Your DVD Handycam records image data on the disc or "Memory Stick Duo." Records widescreen format and 5.1ch surround sound (p.31, 44) You can be directly recorded onto the... disc. * DVD (Digital Versatile Disc) is more convenient than video tape and far more versatile. The precious moments you want to...
Operating Guide
Page 20
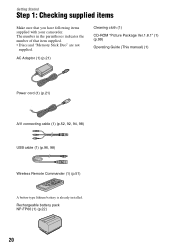
Rechargeable battery pack NP-FP60 (1) (p.22) 20 The number in the parentheses indicates the number of that you have following items supplied with your camcorder. AC Adaptor (1) (p.21) Cleaning cloth (1) CD-ROM "Picture Package Ver.1.8.1" (1) (p.99) Operating Guide (This manual) (1) Power cord (1) (p.21) A/V connecting cable (1) (p.52, 92, 94, 98) USB ...) Wireless Remote Commander (1) (p.51) A button-type lithium battery is already installed. Getting Started Step 1: Checking supplied items Make sure that item supplied. • Discs and "Memory Stick Duo" are not supplied.
Rechargeable battery pack NP-FP60 (1) (p.22) 20 The number in the parentheses indicates the number of that you have following items supplied with your camcorder. AC Adaptor (1) (p.21) Cleaning cloth (1) CD-ROM "Picture Package Ver.1.8.1" (1) (p.99) Operating Guide (This manual) (1) Power cord (1) (p.21) A/V connecting cable (1) (p.52, 92, 94, 98) USB ...) Wireless Remote Commander (1) (p.51) A button-type lithium battery is already installed. Getting Started Step 1: Checking supplied items Make sure that item supplied. • Discs and "Memory Stick Duo" are not supplied.
Operating Guide
Page 28
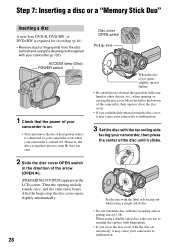
...; If you catch the belt when closing the disc cover. Step 7: Inserting a disc or a "Memory Stick Duo" Inserting a disc A new 8cm DVD-R, DVD-RW, or DVD+RW is required for recording (p.16). • Remove dust or fingerprints from the disc beforehand, using the cleaning cloth supplied with your camcorder is connected to your camcorder even when your...
...; If you catch the belt when closing the disc cover. Step 7: Inserting a disc or a "Memory Stick Duo" Inserting a disc A new 8cm DVD-R, DVD-RW, or DVD+RW is required for recording (p.16). • Remove dust or fingerprints from the disc beforehand, using the cleaning cloth supplied with your camcorder is connected to your camcorder even when your...

Operating Guide
Page 30
... previously recorded pictures from a DVD-RW/DVD+RW, then to use only a "Memory Stick Duo" marked with or (p.132). • The number of recordable pictures varies depending on previously recorded areas appears for about 8 seconds. ACCESS lamp ("Memory Stick Duo") • If you started to use it from your camcorder. 30 Inserting a "Memory Stick Duo" You can use it...
... previously recorded pictures from a DVD-RW/DVD+RW, then to use only a "Memory Stick Duo" marked with or (p.132). • The number of recordable pictures varies depending on previously recorded areas appears for about 8 seconds. ACCESS lamp ("Memory Stick Duo") • If you started to use it from your camcorder. 30 Inserting a "Memory Stick Duo" You can use it...

Operating Guide
Page 32
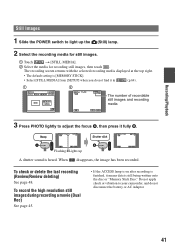
... to 4:3. 2 Select the recording media for still images. 1 Touch t [STILL MEDIA]. 2 Select the recording media for still images and touch . • The default setting is [MEMORY STICK]. 3 Press WIDE SELECT repeatedly to select the desired setting. • Still image size is [ 3.0M] ( ) when 16:9 (wide) is set and maximum [4.0M] ( ) when 4:3 is...
... to 4:3. 2 Select the recording media for still images. 1 Touch t [STILL MEDIA]. 2 Select the recording media for still images and touch . • The default setting is [MEMORY STICK]. 3 Press WIDE SELECT repeatedly to select the desired setting. • Still image size is [ 3.0M] ( ) when 16:9 (wide) is set and maximum [4.0M] ( ) when 4:3 is...

Operating Guide
Page 34
..., press START/STOP again. [REC] To record the next images Perform step 2. • You can be recorded on the "Memory Stick Duo" or disc. • For details on again. - you remove a disc from your camcorder, then insert it on Dual Rec, refer to 3 during recording a movie (Dual Rec) Press PHOTO D fully while recording...
..., press START/STOP again. [REC] To record the next images Perform step 2. • You can be recorded on the "Memory Stick Duo" or disc. • For details on again. - you remove a disc from your camcorder, then insert it on Dual Rec, refer to 3 during recording a movie (Dual Rec) Press PHOTO D fully while recording...
Operating Guide
Page 35
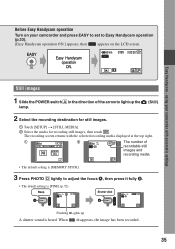
... the POWER switch A in the direction of recordable still images and recording media • The default setting is [MEMORY STICK]. 3 Press PHOTO D lightly to Easy Handycam operation (p.33). [Easy Handycam operation ON.] appears, then appears on your camcorder with the selected recording media displayed at the top right. 1 2 The number of the arrow to light...
... the POWER switch A in the direction of recordable still images and recording media • The default setting is [MEMORY STICK]. 3 Press PHOTO D lightly to Easy Handycam operation (p.33). [Easy Handycam operation ON.] appears, then appears on your camcorder with the selected recording media displayed at the top right. 1 2 The number of the arrow to light...
Operating Guide
Page 36
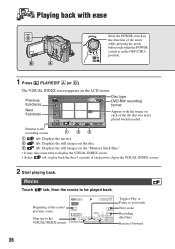
... recording screen 1 23 1 tab: Displays the movies. 2 tab: Displays the still images on the disc. 3 tab: Displays the still images on the "Memory Stick Duo." • It may take some time to display the VISUAL INDEX screen. • Select tab to play back the first 5 seconds of each movie...green button only when the POWER switch is in the VISUAL INDEX screen. 2 Start playing back. Previous 6 pictures Next 6 pictures Disc type DVD-RW recording format Appears with ease Slide the POWER switch in the direction of the tab that was lastly played back/recorded. Playing back with...
... recording screen 1 23 1 tab: Displays the movies. 2 tab: Displays the still images on the disc. 3 tab: Displays the still images on the "Memory Stick Duo." • It may take some time to display the VISUAL INDEX screen. • Select tab to play back the first 5 seconds of each movie...green button only when the POWER switch is in the VISUAL INDEX screen. 2 Start playing back. Previous 6 pictures Next 6 pictures Disc type DVD-RW recording format Appears with ease Slide the POWER switch in the direction of the tab that was lastly played back/recorded. Playing back with...
Operating Guide
Page 37
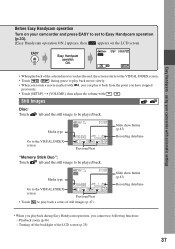
... Still Images Disc: Touch tab and the still image to be played back. Media type Go to the VISUAL INDEX screen Previous/Next "Memory Stick Duo": Touch tab and the still image to be played back. Turning off the backlight of the LCD screen (p.25) 37 Slide show...you playback during pause to play back movie slowly. • When you touch a movie marked with / . Easy Handycam - Playback zoom (p.46) - Before Easy Handycam operation Turn on your camcorder with automatic settings • When playback of the selected movie reaches the end, the screen returns to the VISUAL ...
... Still Images Disc: Touch tab and the still image to be played back. Media type Go to the VISUAL INDEX screen Previous/Next "Memory Stick Duo": Touch tab and the still image to be played back. Turning off the backlight of the LCD screen (p.25) 37 Slide show...you playback during pause to play back movie slowly. • When you touch a movie marked with / . Easy Handycam - Playback zoom (p.46) - Before Easy Handycam operation Turn on your camcorder with automatic settings • When playback of the selected movie reaches the end, the screen returns to the VISUAL ...
Operating Guide
Page 41
... A, then press it means data is still being written onto the disc or "Memory Stick Duo." The recording screen returns with the selected recording media displayed at the top right. • The default setting is [MEMORY STICK]. • Select [STILL MEDIA] from [SETUP] when you do not disconnect ...the battery or AC Adaptor. 41 When disappears, the image has been recorded. Do not apply shock or vibration to your camcorder, and do not find it in (p.64). 1...
... A, then press it means data is still being written onto the disc or "Memory Stick Duo." The recording screen returns with the selected recording media displayed at the top right. • The default setting is [MEMORY STICK]. • Select [STILL MEDIA] from [SETUP] when you do not disconnect ...the battery or AC Adaptor. 41 When disappears, the image has been recorded. Do not apply shock or vibration to your camcorder, and do not find it in (p.64). 1...
Operating Guide
Page 42
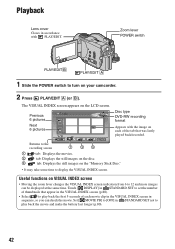
...to turn on your camcorder. 2 Press PLAY/EDIT A (or B). Useful functions on VISUAL INDEX screen • Moving the zoom lever changes the VISUAL INDEX screen indication from 6 to 12 and more images can check the movie. The VISUAL INDEX screen appears on the "Memory Stick Duo." •... It may take some time to display the VISUAL INDEX screen. Zoom lever POWER switch PLAY/EDITB PLAY/EDIT A 1 Slide the POWER switch to play back the first 5 seconds of thumbnails that was lastly played back/recorded. Previous 6 pictures Next 6 pictures Disc type DVD...
...to turn on your camcorder. 2 Press PLAY/EDIT A (or B). Useful functions on VISUAL INDEX screen • Moving the zoom lever changes the VISUAL INDEX screen indication from 6 to 12 and more images can check the movie. The VISUAL INDEX screen appears on the "Memory Stick Duo." •... It may take some time to display the VISUAL INDEX screen. Zoom lever POWER switch PLAY/EDITB PLAY/EDIT A 1 Slide the POWER switch to play back the first 5 seconds of thumbnails that was lastly played back/recorded. Previous 6 pictures Next 6 pictures Disc type DVD...
Operating Guide
Page 43
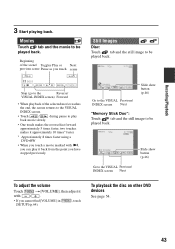
... Previous/ INDEX screen Next Slide show button (p.46) "Memory Stick Duo": Touch tab and the still image to play back movie slowly. • One touch makes the reverse/fast forward approximately 5 times faster, two touches makes it approximately 10 times* faster. * Approximately 8 times faster using a DVD+RW • When you touch a movie marked...
... Previous/ INDEX screen Next Slide show button (p.46) "Memory Stick Duo": Touch tab and the still image to play back movie slowly. • One touch makes the reverse/fast forward approximately 5 times faster, two touches makes it approximately 10 times* faster. * Approximately 8 times faster using a DVD+RW • When you touch a movie marked...
Operating Guide
Page 45
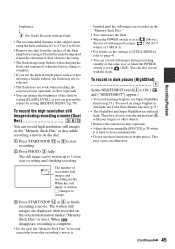
... on the disc. 1 Press START/STOP qs or 8to start recording until the still images are displayed, then recorded on the selected destination media ("Memory Stick Duo" or disc). r (No flash): Records without flash. • The recommended distance to the subject when using it is hard to focus ... charge is complete. • If you can record still images during recording a movie (Dual Rec 38qs You can also record with your camcorder from after recording a movie is finished until finishing recording. To record in dim light, use Color Slow Shutter function (p.71). • ...
... on the disc. 1 Press START/STOP qs or 8to start recording until the still images are displayed, then recorded on the selected destination media ("Memory Stick Duo" or disc). r (No flash): Records without flash. • The recommended distance to the subject when using it is hard to focus ... charge is complete. • If you can record still images during recording a movie (Dual Rec 38qs You can also record with your camcorder from after recording a movie is finished until finishing recording. To record in dim light, use Color Slow Shutter function (p.71). • ...

Operating Guide
Page 48
...the new movies or still images. you delete it. • You can only delete the last recorded scene. Data once recorded on the "Memory Stick Duo" until turning off the power after the scene being played back. 48 You cannot delete it on the spot. The last recorded scene... has been already deleted. - Use the same procedure to delete still images recorded on DVD-Rs cannot be deleted. 1 Press during the review. Deleting the last scene (Review deleting) DVD +RW If the checked scene is not displayed. 2 Touch [YES]. • You cannot recover a scene...
...the new movies or still images. you delete it. • You can only delete the last recorded scene. Data once recorded on the "Memory Stick Duo" until turning off the power after the scene being played back. 48 You cannot delete it on the spot. The last recorded scene... has been already deleted. - Use the same procedure to delete still images recorded on DVD-Rs cannot be deleted. 1 Press during the review. Deleting the last scene (Review deleting) DVD +RW If the checked scene is not displayed. 2 Touch [YES]. • You cannot recover a scene...

Operating Guide
Page 49
...hour: minute: second) 5 Disc type (16) 6 Recording format of a DVD-RW(16) 7 Dual Rec (45) 8 Remaining recordable time of recorded still images wa Play back folder (only for "Memory Stick Duo")* * As the number of still images recorded in "Memory Stick Duo" increases, new folders are automatically created to store them. • ... (72) qd Quality ([FINE] / [STD]) (72) qf The number of recordable still images and recording media qg Recording folder (only for "Memory Stick Duo") ws Data file name wd VISUAL INDEX button (37, 43) wf Slide show button (46) wg Previous/Next button (37, 43) 49...
...hour: minute: second) 5 Disc type (16) 6 Recording format of a DVD-RW(16) 7 Dual Rec (45) 8 Remaining recordable time of recorded still images wa Play back folder (only for "Memory Stick Duo")* * As the number of still images recorded in "Memory Stick Duo" increases, new folders are automatically created to store them. • ... (72) qd Quality ([FINE] / [STD]) (72) qf The number of recordable still images and recording media qg Recording folder (only for "Memory Stick Duo") ws Data file name wd VISUAL INDEX button (37, 43) wf Slide show button (46) wg Previous/Next button (37, 43) 49...


