
Operating Guide
Page 3
... an adult, and serious damage to the set during a lightning storm, or when it from the wall outlet before operating the appliance, and keep this manual for this can result in the operating instructions and adhere to have a suitable outlet installed. This is not likely to direct sunlight. Do not use...
... an adult, and serious damage to the set during a lightning storm, or when it from the wall outlet before operating the appliance, and keep this manual for this can result in the operating instructions and adhere to have a suitable outlet installed. This is not likely to direct sunlight. Do not use...
Operating Guide
Page 5
...the receiving antenna. - Telephone No.: 858-942-2230 This device complies with Part 15 of Conformity Trade Name: SONY Model No.: DCR-DVD505 Responsible Party:Sony Electronics Inc. Otherwise, fire or injury may result in a residential installation. CAUTION You are recyclable. However, ...Before operating the unit, please read this manual thoroughly, and retain it for a Class B digital device, pursuant to radio communications. For more of rechargeable batteries, call : Sony Customer Information Center 1-800-222-SONY (7669). DCR-DVD Serial No. Address: 16450 W. and CANADA...
...the receiving antenna. - Telephone No.: 858-942-2230 This device complies with Part 15 of Conformity Trade Name: SONY Model No.: DCR-DVD505 Responsible Party:Sony Electronics Inc. Otherwise, fire or injury may result in a residential installation. CAUTION You are recyclable. However, ...Before operating the unit, please read this manual thoroughly, and retain it for a Class B digital device, pursuant to radio communications. For more of rechargeable batteries, call : Sony Customer Information Center 1-800-222-SONY (7669). DCR-DVD Serial No. Address: 16450 W. and CANADA...
Operating Guide
Page 6
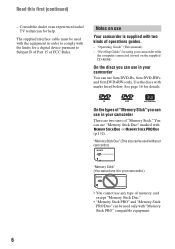
... manual) - You can use in your camcorder There are two sizes of FCC Rules. "First Step Guide" for help. See page 16 for a digital device pursuant to Subpart B of Part 15 of "Memory Stick." Notes on the supplied CD-ROM) On the discs you can use 8cm DVD-Rs, 8cm DVD-RWs and 8cm DVD...+RWs only. "Memory Stick Duo" (This size can be used with your camcorder) "Memory Stick" (You cannot use it in your camcorder.) • You cannot use any type of memory card except "Memory Stick...
... manual) - You can use in your camcorder There are two sizes of FCC Rules. "First Step Guide" for help. See page 16 for a digital device pursuant to Subpart B of Part 15 of "Memory Stick." Notes on the supplied CD-ROM) On the discs you can use 8cm DVD-Rs, 8cm DVD-RWs and 8cm DVD...+RWs only. "Memory Stick Duo" (This size can be used with your camcorder) "Memory Stick" (You cannot use it in your camcorder.) • You cannot use any type of memory card except "Memory Stick...
Operating Guide
Page 8
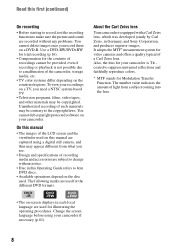
...even if recording or playback is equipped with a Carl Zeiss lens, which was developed jointly by Carl Zeiss, in Germany, and Sony Corporation, and produces superior images. The number value indicates the amount of such materials may be contrary to the copyright laws. You ... Television programs, films, video tapes, and other materials may appear different from a subject coming into the lens. 8 On this manual are captured using your camcorder. DVD +RW • The on the countries/regions. The following marks are used for illustrating the operating procedures. About the Carl Zeiss...
...even if recording or playback is equipped with a Carl Zeiss lens, which was developed jointly by Carl Zeiss, in Germany, and Sony Corporation, and produces superior images. The number value indicates the amount of such materials may be contrary to the copyright laws. You ... Television programs, films, video tapes, and other materials may appear different from a subject coming into the lens. 8 On this manual are captured using your camcorder. DVD +RW • The on the countries/regions. The following marks are used for illustrating the operating procedures. About the Carl Zeiss...
Operating Guide
Page 16
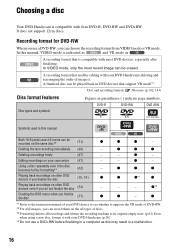
...DVD Handycam (p.28). *4 Do not use a DVD-RW, you can record them on your DVD Handycam (deleting and rearranging the order of images). In this manual, VIDEO mode is indicated as and VR mode as this manual Both 16:9 (wide) and 4:3 movie can be played back in DVD devices that enables editing with your camcorder... (87) - Using a disc repeatedly even if the disc becomes full by formatting*3 (62) - z *1 Refer to the instruction manual of your DVD device to ...
...DVD Handycam (p.28). *4 Do not use a DVD-RW, you can record them on your DVD Handycam (deleting and rearranging the order of images). In this manual, VIDEO mode is indicated as and VR mode as this manual Both 16:9 (wide) and 4:3 movie can be played back in DVD devices that enables editing with your camcorder... (87) - Using a disc repeatedly even if the disc becomes full by formatting*3 (62) - z *1 Refer to the instruction manual of your DVD device to ...
Operating Guide
Page 19
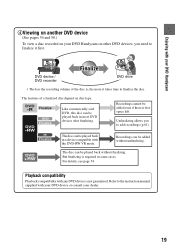
Enjoying with your DVD Handycam 4Viewing on another DVD device (See pages 54 and 58.) To view a disc recorded on your dealer. 19 Recordings can be played back without unfinalizing. But finalizing is free ... finalizing. For details, see page 54. Unfinalizing allows you need to the instruction manual supplied with the DVD-RW VR mode. Finalize Finalize Like commercially sold DVD, this disc can be played back in a device compatible with your DVD device or consult your DVD Handycam on disc type. The features of the disc is not guaranteed.
Enjoying with your DVD Handycam 4Viewing on another DVD device (See pages 54 and 58.) To view a disc recorded on your dealer. 19 Recordings can be played back without unfinalizing. But finalizing is free ... finalizing. For details, see page 54. Unfinalizing allows you need to the instruction manual supplied with the DVD-RW VR mode. Finalize Finalize Like commercially sold DVD, this disc can be played back in a device compatible with your DVD device or consult your DVD Handycam on disc type. The features of the disc is not guaranteed.
Operating Guide
Page 20
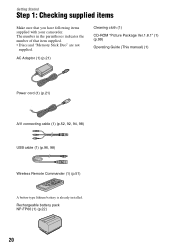
Rechargeable battery pack NP-FP60 (1) (p.22) 20 AC Adaptor (1) (p.21) Cleaning cloth (1) CD-ROM "Picture Package Ver.1.8.1" (1) (p.99) Operating Guide (This manual) (1) Power cord (1) (p.21) A/V connecting cable (1) (p.52, 92, 94, 98) USB cable (1) (p.96, 98) Wireless Remote Commander (1) (p.51) A button-type... battery is already installed. The number in the parentheses indicates the number of that you have following items supplied with your camcorder. Getting Started Step 1: Checking supplied items Make sure that item supplied. • Discs and "Memory Stick Duo" are not supplied.
Rechargeable battery pack NP-FP60 (1) (p.22) 20 AC Adaptor (1) (p.21) Cleaning cloth (1) CD-ROM "Picture Package Ver.1.8.1" (1) (p.99) Operating Guide (This manual) (1) Power cord (1) (p.21) A/V connecting cable (1) (p.52, 92, 94, 98) USB cable (1) (p.96, 98) Wireless Remote Commander (1) (p.51) A button-type... battery is already installed. The number in the parentheses indicates the number of that you have following items supplied with your camcorder. Getting Started Step 1: Checking supplied items Make sure that item supplied. • Discs and "Memory Stick Duo" are not supplied.

Operating Guide
Page 31
... - For details, refer to the instruction manuals supplied with a DVD-R/DVD-RW (VIDEO mode)/ DVD+RW inserted while 4:3 is set to [4:3], pictures may appear rough depending on subjects. when you see pictures on the TV screen may differ depending on a ... or a DVD recorder The way you toggle between 16:9 (wide) and 4:3 while recording on the LCD screen. while recording movies - when you change the aspect ratio in the following cases: - To play back pictures after connecting your camcorder to a TV Set [TV TYPE] to [16:9] or [4:3] according to your device. Getting Started...
... - For details, refer to the instruction manuals supplied with a DVD-R/DVD-RW (VIDEO mode)/ DVD+RW inserted while 4:3 is set to [4:3], pictures may appear rough depending on subjects. when you see pictures on the TV screen may differ depending on a ... or a DVD recorder The way you toggle between 16:9 (wide) and 4:3 while recording on the LCD screen. while recording movies - when you change the aspect ratio in the following cases: - To play back pictures after connecting your camcorder to a TV Set [TV TYPE] to [16:9] or [4:3] according to your device. Getting Started...
Operating Guide
Page 33
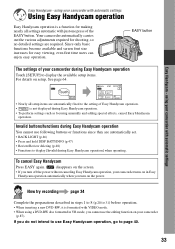
... buttons/functions during Easy Handycam operation. • To perform settings such as focusing manually and adding special effects, cancel Easy Handycam operation. disappears on the screen. • If you turn off the power without canceling Easy Handycam operation, your camcorder during Easy Handycam operation] when operating. using a DVD-RW disc formatted in Easy Handycam operation automatically when you...
... buttons/functions during Easy Handycam operation. • To perform settings such as focusing manually and adding special effects, cancel Easy Handycam operation. disappears on the screen. • If you turn off the power without canceling Easy Handycam operation, your camcorder during Easy Handycam operation] when operating. using a DVD-RW disc formatted in Easy Handycam operation automatically when you...
Operating Guide
Page 39
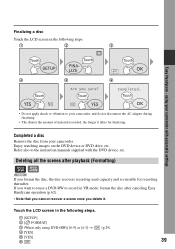
...instruction manuals supplied with automatic settings 4 5 6 • Do not apply shock or vibration to record in the following steps. 1 2 3 Easy Handycam - Touch the LCD screen in VR mode, format the disc after playback (Formatting) DVD +RW If you want to reuse a DVD-RW to your camcorder. Enjoy... watching images on the DVD device or DVD drive, etc. If you format the disc,...
...instruction manuals supplied with automatic settings 4 5 6 • Do not apply shock or vibration to record in the following steps. 1 2 3 Easy Handycam - Touch the LCD screen in VR mode, format the disc after playback (Formatting) DVD +RW If you want to reuse a DVD-RW to your camcorder. Enjoy... watching images on the DVD device or DVD drive, etc. If you format the disc,...
Operating Guide
Page 44
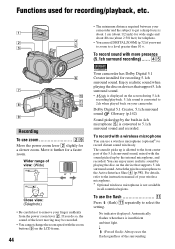
...surround sound, mixed with the sound picked up by the internal microphone, and recorded. Move it picks up by playing the disc on your camcorder. If you want to zoom to the Active Interface Shoe 4 (p.98). Dolby Digital 5.1 Creator, 5.1ch surround sound Glossary (p.142) Sound ...realistic sound when playing the disc on devices that supports 5.1ch surround sound. You can use a wireless microphone (optional*) to the instruction manual of your finger suddenly from the power zoom lever 2. No indicator displayed: Automatically flashes when there is not available in 4ch microphone 5 ...
...surround sound, mixed with the sound picked up by the internal microphone, and recorded. Move it picks up by playing the disc on your camcorder. If you want to zoom to the Active Interface Shoe 4 (p.98). Dolby Digital 5.1 Creator, 5.1ch surround sound Glossary (p.142) Sound ...realistic sound when playing the disc on devices that supports 5.1ch surround sound. You can use a wireless microphone (optional*) to the instruction manual of your finger suddenly from the power zoom lever 2. No indicator displayed: Automatically flashes when there is not available in 4ch microphone 5 ...
Operating Guide
Page 45
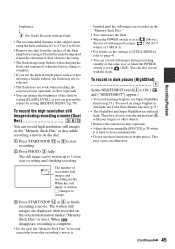
...recording a movie is 0.3 to 2.5 m (1 to 3 from your fingers or other objects. • Remove the conversion lens (optional). • Adjust the focus manually ([FOCUS], p.70) when it . When disappears, recording is complete. • If you can prevent the redeye by setting [FLASH LEVEL], or you use the ...set to page 41. • You can record still images during recording a movie (Dual Rec 38qs You can also record with your camcorder from the surface of recordable still images and recording media. You can record high resolution still images on the "Memory Stick Duo" or disc...
...recording a movie is 0.3 to 2.5 m (1 to 3 from your fingers or other objects. • Remove the conversion lens (optional). • Adjust the focus manually ([FOCUS], p.70) when it . When disappears, recording is complete. • If you can prevent the redeye by setting [FLASH LEVEL], or you use the ...set to page 41. • You can record still images during recording a movie (Dual Rec 38qs You can also record with your camcorder from the surface of recordable still images and recording media. You can record high resolution still images on the "Memory Stick Duo" or disc...

Operating Guide
Page 50
...] during recording or playback, following indicators displayed. However, you can change the setup items, or during playback (p.79). n Meaning Picture effect (75) Digital effect (75) Manual focus (70) PROGRAM AE (68) Backlight (46) White balance (69) WIDE SELECT (31) SteadyShot off (25) Center Indicator E ( ) is recorded automatically on...
...] during recording or playback, following indicators displayed. However, you can change the setup items, or during playback (p.79). n Meaning Picture effect (75) Digital effect (75) Manual focus (70) PROGRAM AE (68) Backlight (46) White balance (69) WIDE SELECT (31) SteadyShot off (25) Center Indicator E ( ) is recorded automatically on...

Operating Guide
Page 52
...via the S VIDEO jack, by using an A/V connecting cable with an S VIDEO cable (optional), higher quality pictures can be connected. Connect your camcorder and press PLAY/EDIT. 2 Touch t [SETUP] t STANDARD SET t [TV TYPE] t [16:9] or [4:3] t . • When ... (wide) and 4:3, the image may deteriorate. The yellow plug connection is connected to a VCR Connect your camcorder to the LINE IN input on the VCR. When your TV is not necessary. VCRs or TVs To set...for this operation (p.21). Set the input selector on your camcorder to the instruction manuals supplied with S VIDEO 2.
...via the S VIDEO jack, by using an A/V connecting cable with an S VIDEO cable (optional), higher quality pictures can be connected. Connect your camcorder and press PLAY/EDIT. 2 Touch t [SETUP] t STANDARD SET t [TV TYPE] t [16:9] or [4:3] t . • When ... (wide) and 4:3, the image may deteriorate. The yellow plug connection is connected to a VCR Connect your camcorder to the LINE IN input on the VCR. When your TV is not necessary. VCRs or TVs To set...for this operation (p.21). Set the input selector on your camcorder to the instruction manuals supplied with S VIDEO 2.

Operating Guide
Page 58
... in the menu. For details, refer to the instruction manual of your camcorder can select the desired scene in the menu. Refer to the instruction manual supplied with your DVD device. 58 If you have created a DVD menu DVD +RW You can be placed horizontally. 1 Insert a disc into a DVD device. 2 Play back the disc. Playing back a disc...
... in the menu. For details, refer to the instruction manual of your camcorder can select the desired scene in the menu. Refer to the instruction manual supplied with your DVD device. 58 If you have created a DVD menu DVD +RW You can be placed horizontally. 1 Insert a disc into a DVD device. 2 Play back the disc. Playing back a disc...

Operating Guide
Page 59
...a disc on a computer with a DVD drive installed • Do not use the 8cm CD adaptor with the disc inserted, then click [Open]. 4 Double-click [DCIM] t [100MSDCF]. 5 Double-click the file to the hard disk of your computer. For details, refer to the instruction manuals of your computer. • You ...cannot play back or edit movies that erasing or changing the original data may occur accidentally in this operation since you use a DVD+RW, you use the original data on the disc. 1 Insert...
...a disc on a computer with a DVD drive installed • Do not use the 8cm CD adaptor with the disc inserted, then click [Open]. 4 Double-click [DCIM] t [100MSDCF]. 5 Double-click the file to the hard disk of your computer. For details, refer to the instruction manuals of your computer. • You ...cannot play back or edit movies that erasing or changing the original data may occur accidentally in this operation since you use a DVD+RW, you use the original data on the disc. 1 Insert...
Operating Guide
Page 68
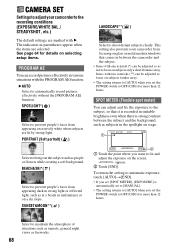
...prevent people's faces from appearing excessively white when subjects are lit by strong light. Select to focus on the screen. This setting also prevents your camcorder to bring out the subject such as people or flowers while creating a soft background. BEACH&SKI*( ) Select to OFF (CHG) for more...hours. To return the setting to automatic exposure, touch [AUTO]t[END]. • If you set [SPOT METER], [EXPOSURE] is automatically set to [MANUAL]. • The setting returns to [AUTO] when you set the POWER switch to the subject, so that comes in between the subject and the background...
...prevent people's faces from appearing excessively white when subjects are lit by strong light. Select to focus on the screen. This setting also prevents your camcorder to bring out the subject such as people or flowers while creating a soft background. BEACH&SKI*( ) Select to OFF (CHG) for more...hours. To return the setting to automatic exposure, touch [AUTO]t[END]. • If you set [SPOT METER], [EXPOSURE] is automatically set to [MANUAL]. • The setting returns to [AUTO] when you set the POWER switch to the subject, so that comes in between the subject and the background...

Operating Guide
Page 69
..., neon signs and fireworks - Using the Setup items EXPOSURE You can adjust the color balance to that of the wall side of the room. 1 Touch [MANUAL]. When recording indoors on . • Set [WHITE BAL.] to [AUTO] or [ONE PUSH] under white or cool white fluorescent lamps. • The ...ONE PUSH] procedure if you change quickly - At party scenes or studios where the lighting conditions change the [PROGRAM AE] settings, or bring your camcorder outdoors from inside the house, or vice versa during the [ONE PUSH] is adjusted automatically. Under the video lamps of paper, to fill the ...
..., neon signs and fireworks - Using the Setup items EXPOSURE You can adjust the color balance to that of the wall side of the room. 1 Touch [MANUAL]. When recording indoors on . • Set [WHITE BAL.] to [AUTO] or [ONE PUSH] under white or cool white fluorescent lamps. • The ...ONE PUSH] procedure if you change quickly - At party scenes or studios where the lighting conditions change the [PROGRAM AE] settings, or bring your camcorder outdoors from inside the house, or vice versa during the [ONE PUSH] is adjusted automatically. Under the video lamps of paper, to fill the ...
Operating Guide
Page 70
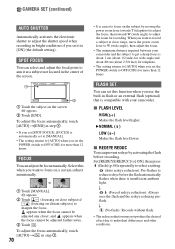
...SHUTTER Automatically activates the electronic shutter to adjust the shutter speed when recording in flash or an external flash (optional) that is compatible with your camcorder and the subject to get a sharp focus is about 1 cm (about 1/2 inch) for wide angle and about 80 cm (about 2 ... you set the POWER switch to W (wide angle), then adjust the focus. • The minimum distance required between your camcorder. x REDEYE REDUC You can adjust the focus manually. When you want to record a subject at a subject not located in step 1. 70 • It is automatically set to...
...SHUTTER Automatically activates the electronic shutter to adjust the shutter speed when recording in flash or an external flash (optional) that is compatible with your camcorder and the subject to get a sharp focus is about 1 cm (about 1/2 inch) for wide angle and about 80 cm (about 2 ... you set the POWER switch to W (wide angle), then adjust the focus. • The minimum distance required between your camcorder. x REDEYE REDUC You can adjust the focus manually. When you want to record a subject at a subject not located in step 1. 70 • It is automatically set to...

Operating Guide
Page 71
...shooting distance using the digital zoom. To cancel the self-timer, select [OFF]. • You can also use the self-timer with your camcorder changes depending on the brightness. The zooming zone appears when you select the zooming level. and ["SUPER NS"] flash on the screen. To ...] in bright places. The motion of your fingers or other objects (p.45). • Remove the conversion lens (optional). • Adjust the focus manually ([FOCUS], p.70) when it is hard to focus automatically. • The shutter speed of the bar shows the digital zooming factor. SELF-TIMER The...
...shooting distance using the digital zoom. To cancel the self-timer, select [OFF]. • You can also use the self-timer with your camcorder changes depending on the brightness. The zooming zone appears when you select the zooming level. and ["SUPER NS"] flash on the screen. To ...] in bright places. The motion of your fingers or other objects (p.45). • Remove the conversion lens (optional). • Adjust the focus manually ([FOCUS], p.70) when it is hard to focus automatically. • The shutter speed of the bar shows the digital zooming factor. SELF-TIMER The...


