
Operating Guide
Page 7
...connector plug in low light conditions, such as at the sun. Viewfinder LCD screen Battery • The camcorder is on: - When using the camcorder • Do not hold the camcorder by the following when either of the respective lamps of the POWER switch (p.24) or the ACCESS .... Notes on the LCD screen and the viewfinder. to apply mechanical shock or vibration to the camcorder. • Before connecting your camcorder to another device with "Memory Stick" compatible equipment Be sure to remove the battery pack or AC Adaptor from being broken or recorded pictures from the...
...connector plug in low light conditions, such as at the sun. Viewfinder LCD screen Battery • The camcorder is on: - When using the camcorder • Do not hold the camcorder by the following when either of the respective lamps of the POWER switch (p.24) or the ACCESS .... Notes on the LCD screen and the viewfinder. to apply mechanical shock or vibration to the camcorder. • Before connecting your camcorder to another device with "Memory Stick" compatible equipment Be sure to remove the battery pack or AC Adaptor from being broken or recorded pictures from the...
Operating Guide
Page 20
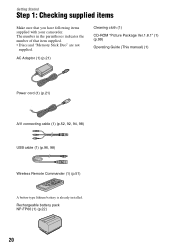
Rechargeable battery pack NP-FP60 (1) (p.22) 20 AC Adaptor (1) (p.21) Cleaning cloth (1) CD-ROM "Picture Package Ver.1.8.1" (1) (p.99) Operating Guide (This manual) (1) Power cord (1) (p.21) A/V connecting cable (1) (p.52, 92, 94, 98) USB cable (1) (p.96, ... (1) (p.51) A button-type lithium battery is already installed. The number in the parentheses indicates the number of that you have following items supplied with your camcorder. Getting Started Step 1: Checking supplied items Make sure that item supplied. • Discs and "Memory Stick Duo" are not supplied.
Rechargeable battery pack NP-FP60 (1) (p.22) 20 AC Adaptor (1) (p.21) Cleaning cloth (1) CD-ROM "Picture Package Ver.1.8.1" (1) (p.99) Operating Guide (This manual) (1) Power cord (1) (p.21) A/V connecting cable (1) (p.52, 92, 94, 98) USB cable (1) (p.96, ... (1) (p.51) A button-type lithium battery is already installed. The number in the parentheses indicates the number of that you have following items supplied with your camcorder. Getting Started Step 1: Checking supplied items Make sure that item supplied. • Discs and "Memory Stick Duo" are not supplied.

Operating Guide
Page 21
... starts. 21 Jack cover 4 Connect the power cord to connect the AC Adaptor. Open the jack cover to the AC Adaptor and the wall outlet. Match the v mark on the DC plug with excess force may lead to camcorder malfunction such as deterioration in battery pack performance or difficulty in the direction... battery after attaching the "InfoLITHIUM" battery pack (P series) (p.134) to your camcorder. • You cannot use an NP-FP30 battery pack with your camcorder. (See the reverse side of the arrow to set it to OFF (CHG) (The default setting). 3 Connect the AC Adaptor to the DC IN jack on your...
... starts. 21 Jack cover 4 Connect the power cord to connect the AC Adaptor. Open the jack cover to the AC Adaptor and the wall outlet. Match the v mark on the DC plug with excess force may lead to camcorder malfunction such as deterioration in battery pack performance or difficulty in the direction... battery after attaching the "InfoLITHIUM" battery pack (P series) (p.134) to your camcorder. • You cannot use an NP-FP30 battery pack with your camcorder. (See the reverse side of the arrow to set it to OFF (CHG) (The default setting). 3 Connect the AC Adaptor to the DC IN jack on your...

Operating Guide
Page 22
...FP90 Charging time 125 135 155 170 220 22 Recording time Approximate time (min.) available when you use a fully charged battery pack. Disconnect the AC Adaptor from the DC IN jack on . - Slide the BATT (battery) release lever and remove the battery pack. Battery pack Continuous Typical recording ...pack. The battery pack will not lose its charge in this case. Top: When the LCD backlight turns on your camcorder. • Disconnect the AC Adaptor holding both your camcorder and the DC plug. Middle: When the LCD backlight turns off when the battery is closed NP-FP50 60 65 NP...
...FP90 Charging time 125 135 155 170 220 22 Recording time Approximate time (min.) available when you use a fully charged battery pack. Disconnect the AC Adaptor from the DC IN jack on . - Slide the BATT (battery) release lever and remove the battery pack. Battery pack Continuous Typical recording ...pack. The battery pack will not lose its charge in this case. Top: When the LCD backlight turns on your camcorder. • Disconnect the AC Adaptor holding both your camcorder and the DC plug. Middle: When the LCD backlight turns off when the battery is closed NP-FP50 60 65 NP...

Operating Guide
Page 23
.... (For BATTERY INFO only.) • The power will not be supplied from the battery as long as the AC Adaptor is connected to the DC IN jack of the AC Adaptor or battery terminal with the camcorder at 25 °C (77°F). (10-30°C (50-86°F) is not attached correctly. - This ... long as between a wall and furniture. • Do not short-circuit the DC plug of your camcorder, even when the power cord is disconnected from the wall outlet. • Do not use the AC Adaptor placed in low temperatures. • The available recording and playback time will be shorter depending on the...
.... (For BATTERY INFO only.) • The power will not be supplied from the battery as long as the AC Adaptor is connected to the DC IN jack of the AC Adaptor or battery terminal with the camcorder at 25 °C (77°F). (10-30°C (50-86°F) is not attached correctly. - This ... long as between a wall and furniture. • Do not short-circuit the DC plug of your camcorder, even when the power cord is disconnected from the wall outlet. • Do not use the AC Adaptor placed in low temperatures. • The available recording and playback time will be shorter depending on the...
Operating Guide
Page 29
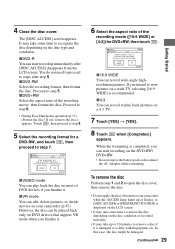
..., delete pictures, or divide movies on your camcorder while the ACCESS lamp lights up or flashes, or [DISC ACCESS] or [PREPARING TO OPEN] is displayed on the DVD-RW/ DVD+RW. • Do not remove the battery pack or disconnect the AC Adaptor while formatting. xDVD-RW Select the recording format... pictures on the disc type and condition. If you can play back pictures on various DVD devices. When the formatting is completed, you intend to step 7. Proceed to step 6. • During Easy Handycam operation (p.33), [Format the disc? In that support VR mode when you finalize it...
..., delete pictures, or divide movies on your camcorder while the ACCESS lamp lights up or flashes, or [DISC ACCESS] or [PREPARING TO OPEN] is displayed on the DVD-RW/ DVD+RW. • Do not remove the battery pack or disconnect the AC Adaptor while formatting. xDVD-RW Select the recording format... pictures on the disc type and condition. If you can play back pictures on various DVD devices. When the formatting is completed, you intend to step 7. Proceed to step 6. • During Easy Handycam operation (p.33), [Format the disc? In that support VR mode when you finalize it...
Operating Guide
Page 38
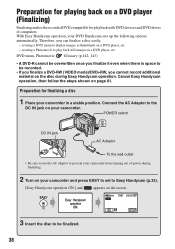
... for playback with DVD devices and DVD drives of power during Easy Handycam operation. Connect the AC Adaptor to the DC IN jack on the screen. 3 Insert the disc to prevent your camcorder from running out of computers. With Easy Handycam operation, your DVD Handycam sets up the following options automatically. POWER switch DC IN jack AC Adaptor To the wall...
... for playback with DVD devices and DVD drives of power during Easy Handycam operation. Connect the AC Adaptor to the DC IN jack on the screen. 3 Insert the disc to prevent your camcorder from running out of computers. With Easy Handycam operation, your DVD Handycam sets up the following options automatically. POWER switch DC IN jack AC Adaptor To the wall...
Operating Guide
Page 39
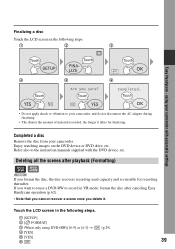
... manuals supplied with automatic settings 4 5 6 • Do not apply shock or vibration to record in the following steps. 1 2 3 Easy Handycam - If you want to reuse a DVD-RW to your camcorder, and do not disconnect the AC adaptor during finalizing. • The shorter the amount of material recorded, the longer it . Enjoy watching images on the...
... manuals supplied with automatic settings 4 5 6 • Do not apply shock or vibration to record in the following steps. 1 2 3 Easy Handycam - If you want to reuse a DVD-RW to your camcorder, and do not disconnect the AC adaptor during finalizing. • The shorter the amount of material recorded, the longer it . Enjoy watching images on the...
Operating Guide
Page 41
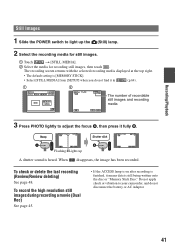
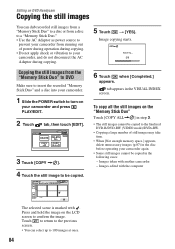
...at the top right. • The default setting is [MEMORY STICK]. • Select [STILL MEDIA] from [SETUP] when you do not disconnect the battery or AC Adaptor. 41 Flashing bLights up the (Still) lamp. 2 Select the recording media for still images. 1 Touch t [STILL MEDIA]. 2 Select the media for recording still... images, then touch . When disappears, the image has been recorded. Do not apply shock or vibration to your camcorder, and do not find it means data is heard. To check or delete the last recording (Review/Review deleting) See page 48.
...at the top right. • The default setting is [MEMORY STICK]. • Select [STILL MEDIA] from [SETUP] when you do not disconnect the battery or AC Adaptor. 41 Flashing bLights up the (Still) lamp. 2 Select the recording media for still images. 1 Touch t [STILL MEDIA]. 2 Select the media for recording still... images, then touch . When disappears, the image has been recorded. Do not apply shock or vibration to your camcorder, and do not find it means data is heard. To check or delete the last recording (Review/Review deleting) See page 48.

Operating Guide
Page 52
...] to [4:3], the image quality may jitter. 52 S VIDEO connection only will view pictures on. 1 Slide the POWER switch to turn on a TV Connect your camcorder to the input jack of TV or VCR using A/V connecting cable 1 or A/V connecting cable with S VIDEO 2. A/V jack (Yellow) (White) (Red) IN... A/V connecting cable with an S VIDEO cable (optional). When your TV is not necessary. The TV switches to the wall outlet using the supplied AC Adaptor for this operation (p.21). Connect the white and red plug (left/right audio) and the S VIDEO plug (S VIDEO channel) of the other device...
...] to [4:3], the image quality may jitter. 52 S VIDEO connection only will view pictures on. 1 Slide the POWER switch to turn on a TV Connect your camcorder to the input jack of TV or VCR using A/V connecting cable 1 or A/V connecting cable with S VIDEO 2. A/V jack (Yellow) (White) (Red) IN... A/V connecting cable with an S VIDEO cable (optional). When your TV is not necessary. The TV switches to the wall outlet using the supplied AC Adaptor for this operation (p.21). Connect the white and red plug (left/right audio) and the S VIDEO plug (S VIDEO channel) of the other device...
Operating Guide
Page 56
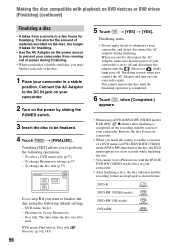
... the disc from running out of the disc. 1 Place your camcorder. 2 Turn on your camcorder in your camcorder. • After finalizing a disc, the disc indicator and the recording format are displayed as shown below: DVD-R DVD-RW (VIDEO mode) DVD-RW (VR mode) DVD+RW Connect the AC Adaptor to the DC IN jack on the power by sliding...
... the disc from running out of the disc. 1 Place your camcorder. 2 Turn on your camcorder in your camcorder. • After finalizing a disc, the disc indicator and the recording format are displayed as shown below: DVD-R DVD-RW (VIDEO mode) DVD-RW (VR mode) DVD+RW Connect the AC Adaptor to the DC IN jack on the power by sliding...
Operating Guide
Page 61
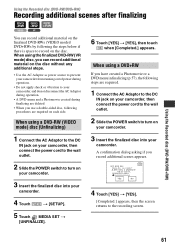
... on the disc without any additional steps. • Use the AC Adaptor as power source to prevent your camcorder from running out of power during operation. • Do not apply shock or vibration to your camcorder, and do not disconnect the AC Adaptor during operation. • A DVD menu and a Photomovie created during finalizing are deleted. • When...
... on the disc without any additional steps. • Use the AC Adaptor as power source to prevent your camcorder from running out of power during operation. • Do not apply shock or vibration to your camcorder, and do not disconnect the AC Adaptor during operation. • A DVD menu and a Photomovie created during finalizing are deleted. • When...

Operating Guide
Page 62
... apply shock or vibration to change the movie aspect ratio which you use a DVD menu or a Photomovie on various DVD devices. Format the disc again to your camcorder, and do not disconnect the AC Adaptor during formatting. • When you set in a DVD device. The recording capacity of the disc is unfinalized and it with a new...
... apply shock or vibration to change the movie aspect ratio which you use a DVD menu or a Photomovie on various DVD devices. Format the disc again to your camcorder, and do not disconnect the AC Adaptor during formatting. • When you set in a DVD device. The recording capacity of the disc is unfinalized and it with a new...

Operating Guide
Page 78
... adjust the brightness of the LCD screen. 1 Adjust the brightness with / . B NORMAL Standard brightness. Select [LOW] when you want to the AC Adaptor, [BRIGHT] is automatically selected for more than 12 hours. B NORMAL Records various surround sounds, converting them into the same level. Low intensity High ...; When you connect your camcorder to record exciting and powerful sound in 5.1ch mode. 78 LCD/VF SET The recorded picture will not be affected even when you change the setting. BRIGHT Brightens the LCD screen. • When you use the AC Adaptor as the power source, ...
... adjust the brightness of the LCD screen. 1 Adjust the brightness with / . B NORMAL Standard brightness. Select [LOW] when you want to the AC Adaptor, [BRIGHT] is automatically selected for more than 12 hours. B NORMAL Records various surround sounds, converting them into the same level. Low intensity High ...; When you connect your camcorder to record exciting and powerful sound in 5.1ch mode. 78 LCD/VF SET The recorded picture will not be affected even when you change the setting. BRIGHT Brightens the LCD screen. • When you use the AC Adaptor as the power source, ...
Operating Guide
Page 84
...• The still images cannot be copied to the finalized DVD-R/DVD-RW (VIDEO mode)/DVD+RW. • Copying a large number of power during operation during copying. • Do not apply shock or vibration to your camcorder, and do not disconnect the AC Adaptor during copying. 5 Touch t [YES]. tab appears in ...is marked with another camcorder - To copy all the still images on your camcorder again. • Some still images cannot be copied. 6 Touch when [Completed.] appears. Editing on the LCD screen to confirm the image. Press and hold the image on DVD Handycam Copying the still ...
...• The still images cannot be copied to the finalized DVD-R/DVD-RW (VIDEO mode)/DVD+RW. • Copying a large number of power during operation during copying. • Do not apply shock or vibration to your camcorder, and do not disconnect the AC Adaptor during copying. 5 Touch t [YES]. tab appears in ...is marked with another camcorder - To copy all the still images on your camcorder again. • Some still images cannot be copied. 6 Touch when [Completed.] appears. Editing on the LCD screen to confirm the image. Press and hold the image on DVD Handycam Copying the still ...

Operating Guide
Page 88
... return to the Playlist. Press and hold the image on the LCD screen to insert the recorded disc into your camcorder. • Do not remove the battery pack or the AC Adaptor from the point where you touch and the actual dividing point, as you press . • A slight difference... touch , it changes to and the operational buttons below appear. To hide the buttons, touch . • Play and pause toggles as your camcorder while editing the Playlist. Editing the original data (continued) Creating the Playlist When you cannot return it to the beginning of the still images and...
... return to the Playlist. Press and hold the image on the LCD screen to insert the recorded disc into your camcorder. • Do not remove the battery pack or the AC Adaptor from the point where you touch and the actual dividing point, as you press . • A slight difference... touch , it changes to and the operational buttons below appear. To hide the buttons, touch . • Play and pause toggles as your camcorder while editing the Playlist. Editing the original data (continued) Creating the Playlist When you cannot return it to the beginning of the still images and...
Operating Guide
Page 92
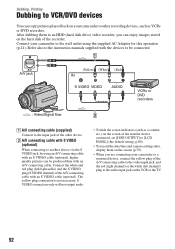
...yellow plug connection is not necessary. After dubbing them on the screen (p.79). • When you can be connected. Connect your camcorder to the wall outlet using an A/V connecting cable with an S VIDEO cable (optional), higher quality pictures can enjoy images stored on...(such as VCRs or DVD recorders. Dubbing, Printing Dubbing to VCR/DVD devices You can copy pictures played back on your camcorder to other device. 2 A/V connecting cable with S VIDEO (optional) When connecting to another device via the S VIDEO jack, by using the supplied AC Adaptor for this operation (p.21...
...yellow plug connection is not necessary. After dubbing them on the screen (p.79). • When you can be connected. Connect your camcorder to the wall outlet using an A/V connecting cable with an S VIDEO cable (optional), higher quality pictures can enjoy images stored on...(such as VCRs or DVD recorders. Dubbing, Printing Dubbing to VCR/DVD devices You can copy pictures played back on your camcorder to other device. 2 A/V connecting cable with S VIDEO (optional) When connecting to another device via the S VIDEO jack, by using the supplied AC Adaptor for this operation (p.21...

Operating Guide
Page 94
...camcorder to the audio output jack on the VCR or the TV. 94 Connect the white and red plug (left channel) plug to the wall outlet using the supplied AC Adaptor for this operation (p.21). S VIDEO connection only will not output audio. • You cannot record images from a VCR, TV or DVD... cable. Refer also to the instruction manuals supplied with the devices to another device via the S VIDEO jack, by using your camcorder. Recording images from a TV or VCR/DVD device You can be connected. A/V jack (Yellow) (White) OUT (Red) S VIDEO VIDEO AUDIO : Video/Signal flow VCRs...
...camcorder to the audio output jack on the VCR or the TV. 94 Connect the white and red plug (left channel) plug to the wall outlet using the supplied AC Adaptor for this operation (p.21). S VIDEO connection only will not output audio. • You cannot record images from a VCR, TV or DVD... cable. Refer also to the instruction manuals supplied with the devices to another device via the S VIDEO jack, by using your camcorder. Recording images from a TV or VCR/DVD device You can be connected. A/V jack (Yellow) (White) OUT (Red) S VIDEO VIDEO AUDIO : Video/Signal flow VCRs...

Operating Guide
Page 96
... be printed with /. 2 Touch t [COPIES]. 3 Select the number of models that are stored into your camcorder and turn on the power of your camcorder to the wall outlet using the supplied AC Adaptor for the printer to a computer. The [USB SELECT] screen appears on the LCD screen. 3 Touch [ PRINT...] to print still images from a disc or [ PRINT] to the printer." Connect your camcorder to the printer 1 ...
... be printed with /. 2 Touch t [COPIES]. 3 Select the number of models that are stored into your camcorder and turn on the power of your camcorder to the wall outlet using the supplied AC Adaptor for the printer to a computer. The [USB SELECT] screen appears on the LCD screen. 3 Touch [ PRINT...] to print still images from a disc or [ PRINT] to the printer." Connect your camcorder to the printer 1 ...
Operating Guide
Page 105
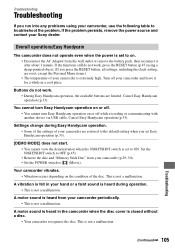
... the disc. You cannot turn Easy Handycam operation on or off. • You cannot turn Easy Handycam operation on . • Disconnect the AC Adaptor from your camcorder periodically. • This is not a malfunction. If the functions still do not work , press the RESET button (p.47) using your Sony dealer. Turn off while recording or communicating with...
... the disc. You cannot turn Easy Handycam operation on or off. • You cannot turn Easy Handycam operation on . • Disconnect the AC Adaptor from your camcorder periodically. • This is not a malfunction. If the functions still do not work , press the RESET button (p.47) using your Sony dealer. Turn off while recording or communicating with...


