Operating Guide
Page 11
... during recording/playback 49 Remote Commander 51 Playing the picture on a TV 52 Playback on DVD devices Making the disc compatible with playback on DVD devices or DVD drives (Finalizing 54 Playing back a disc on DVD devices, etc 58 Playing back a disc on a computer with a DVD drive installed 59 Using ...the Recorded disc (DVD-RW/DVD+RW) Recording additional scenes after finalizing 61 Deleting all of the scenes on the disc (Formatting 62 Using the Setup items Using the Setup items 64 Setup items 66 CAMERA SET 68 Settings to adjust your camcorder to the recording conditions ...
... during recording/playback 49 Remote Commander 51 Playing the picture on a TV 52 Playback on DVD devices Making the disc compatible with playback on DVD devices or DVD drives (Finalizing 54 Playing back a disc on DVD devices, etc 58 Playing back a disc on a computer with a DVD drive installed 59 Using ...the Recorded disc (DVD-RW/DVD+RW) Recording additional scenes after finalizing 61 Deleting all of the scenes on the disc (Formatting 62 Using the Setup items Using the Setup items 64 Setup items 66 CAMERA SET 68 Settings to adjust your camcorder to the recording conditions ...
Operating Guide
Page 20
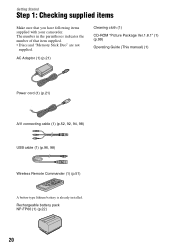
... cloth (1) CD-ROM "Picture Package Ver.1.8.1" (1) (p.99) Operating Guide (This manual) (1) Power cord (1) (p.21) A/V connecting cable (1) (p.52, 92, 94, 98) USB cable (1) (p.96, 98) Wireless Remote Commander (1) (p.51) A button-type lithium battery is already installed. Getting Started Step 1: Checking supplied items Make sure that item supplied. • Discs and "Memory Stick... supplied. Rechargeable battery pack NP-FP60 (1) (p.22) 20 The number in the parentheses indicates the number of that you have following items supplied with your camcorder.
... cloth (1) CD-ROM "Picture Package Ver.1.8.1" (1) (p.99) Operating Guide (This manual) (1) Power cord (1) (p.21) A/V connecting cable (1) (p.52, 92, 94, 98) USB cable (1) (p.96, 98) Wireless Remote Commander (1) (p.51) A button-type lithium battery is already installed. Getting Started Step 1: Checking supplied items Make sure that item supplied. • Discs and "Memory Stick... supplied. Rechargeable battery pack NP-FP60 (1) (p.22) 20 The number in the parentheses indicates the number of that you have following items supplied with your camcorder.
Operating Guide
Page 47
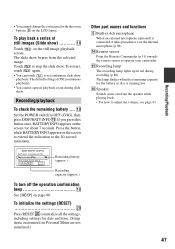
.../playback To check the remaining battery .... Other part names and functions 5 Built-in red during slide show playback. qf Remote sensor Point the Remote Commander (p.51) towards the remote sensor to OFF (CHG), then press DISP/BATT INFO ql. • You cannot change the zoom speed with the zoom... buttons 9 on page 80. Press the button while BATTERY INFO appears on the screen for about 7 seconds. Press RESET w; ql Set the POWER switch to operate your camcorder...
.../playback To check the remaining battery .... Other part names and functions 5 Built-in red during slide show playback. qf Remote sensor Point the Remote Commander (p.51) towards the remote sensor to OFF (CHG), then press DISP/BATT INFO ql. • You cannot change the zoom speed with the zoom... buttons 9 on page 80. Press the button while BATTERY INFO appears on the screen for about 7 seconds. Press RESET w; ql Set the POWER switch to operate your camcorder...

Operating Guide
Page 51
.... 51 Select a desired button or an item with b / B / v / V, then press ENTER to enter. • Point the Remote Commander towards the remote sensor to operate your camcorder (p.47). • When no commands have been sent from the Remote Commander in a certain period, the orange frame disappears. When you press any button, the orange frame appears... image. 3 SCAN/SLOW (p.36, 43) 4 . > (Previous/Next) (p.36, 37, 43) 5 PLAY (p.36, 43) 6 STOP (p.36, 43) 7 DISPLAY (p.26) 8 Transmitter 9 START/STOP (p.34, 40) q; Recording/Playback Remote Commander Remove the insulation sheet before using the...
.... 51 Select a desired button or an item with b / B / v / V, then press ENTER to enter. • Point the Remote Commander towards the remote sensor to operate your camcorder (p.47). • When no commands have been sent from the Remote Commander in a certain period, the orange frame disappears. When you press any button, the orange frame appears... image. 3 SCAN/SLOW (p.36, 43) 4 . > (Previous/Next) (p.36, 37, 43) 5 PLAY (p.36, 43) 6 STOP (p.36, 43) 7 DISPLAY (p.26) 8 Transmitter 9 START/STOP (p.34, 40) q; Recording/Playback Remote Commander Remove the insulation sheet before using the...
Operating Guide
Page 67
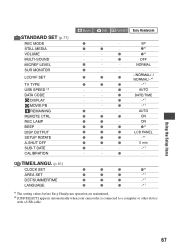
...NORMAL/-/ NORMAL/-*1 z z z -*1 - - z - TIME/LANGU. (p.81) CLOCK SET z z z z*1 AREA SET z z z -*1 DST/SUMMERTIME z z z -*1 LANGUAGE z z z -*1 *1 The setting values before Easy Handycam operation are maintained. *2 [USB SELECT] appears automatically when your camcorder is connected to a computer or other device with a USB cable. SP z z - z OFF z - - ON z z z z*1 z z z LCD PANEL z z z -*1 z z z 5 min z - - -*1 ... REMOTE CTRL REC LAMP BEEP DISP OUTPUT SETUP ROTATE A.SHUT OFF SUB-T DATE CALIBRATION Movie Still PLAY/EDIT Easy...
...NORMAL/-/ NORMAL/-*1 z z z -*1 - - z - TIME/LANGU. (p.81) CLOCK SET z z z z*1 AREA SET z z z -*1 DST/SUMMERTIME z z z -*1 LANGUAGE z z z -*1 *1 The setting values before Easy Handycam operation are maintained. *2 [USB SELECT] appears automatically when your camcorder is connected to a computer or other device with a USB cable. SP z z - z OFF z - - ON z z z z*1 z z z LCD PANEL z z z -*1 z z z 5 min z - - -*1 ... REMOTE CTRL REC LAMP BEEP DISP OUTPUT SETUP ROTATE A.SHUT OFF SUB-T DATE CALIBRATION Movie Still PLAY/EDIT Easy...

Operating Guide
Page 71
... the digital zoom. Press START/STOP when [ SELFTIMER] is set to focus automatically. • The shutter speed of your camcorder changes depending on the Remote Commander (p.51). The default setting is [ON]. • Do not cover the infrared port with the light which emits infrared... • The maximum shooting distance using NightShot. Press PHOTO when [ SELF-TIMER] is set to focus automatically. • The shutter speed of your camcorder changes depending on the screen. Set [SUPER NS] to [ON] while the NIGHTSHOT switch is hard to [ON] ( ). To cancel the setting,...
... the digital zoom. Press START/STOP when [ SELFTIMER] is set to focus automatically. • The shutter speed of your camcorder changes depending on the Remote Commander (p.51). The default setting is [ON]. • Do not cover the infrared port with the light which emits infrared... • The maximum shooting distance using NightShot. Press PHOTO when [ SELF-TIMER] is set to focus automatically. • The shutter speed of your camcorder changes depending on the screen. Set [SUPER NS] to [ON] while the NIGHTSHOT switch is hard to [ON] ( ). To cancel the setting,...

Operating Guide
Page 79
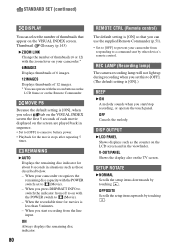
... speed transfer). x VF WIDE DISP You can select data transfer speed used to transfer data to your camcorder to a TV. • The indicator toggles through the following sequences as you press DATA CODE on the Remote Commander: DATE/TIME t CAMERA DATA t OFF (no indication). • Depending on the TV screen if you...
... speed transfer). x VF WIDE DISP You can select data transfer speed used to transfer data to your camcorder to a TV. • The indicator toggles through the following sequences as you press DATA CODE on the Remote Commander: DATE/TIME t CAMERA DATA t OFF (no indication). • Depending on the TV screen if you...
Operating Guide
Page 80
... OFF Cancels the melody. When the recordable time for the movie stops after repeating 5 times. ON Always displays the remaining disc indicator. 80 REMOTE CTRL (Remote control) The default setting is [ON] so that appear on the VISUAL INDEX screen. MOVIE PB Because the default setting is [ON], when...REC LAMP (Recording lamp) The camera recording lamp will not light up during recording when you can use the supplied Remote Commander (p.51). • Set to [OFF] to prevent your camcorder from off to on with the POWER switch set this to a command sent by touching . V-OUT/PANEL Shows the...
... OFF Cancels the melody. When the recordable time for the movie stops after repeating 5 times. ON Always displays the remaining disc indicator. 80 REMOTE CTRL (Remote control) The default setting is [ON] so that appear on the VISUAL INDEX screen. MOVIE PB Because the default setting is [ON], when...REC LAMP (Recording lamp) The camera recording lamp will not light up during recording when you can use the supplied Remote Commander (p.51). • Set to [OFF] to prevent your camcorder from off to on with the POWER switch set this to a command sent by touching . V-OUT/PANEL Shows the...

Operating Guide
Page 98
... built-in flash at the same time. • When an external microphone (optional) is connected, it takes precedence over the internal microphone (p.44). 2 Shoe cover 3 REMOTE jack • Connect other optional accessories. 4 A/V (audio/video) jack (p.52, 92, 94) 5 DC IN jack (p.21) 6 (USB) jack (p.96, 99)...of the external flash to the end, and then tighten the screw. Refer also to optional accessories such as you are recording with your camcorder. Jacks to connect external devices 1...Open the shoe cover. 345...Open the jack cover. 1 Active Interface Shoe The Active Interface Shoe ...
... built-in flash at the same time. • When an external microphone (optional) is connected, it takes precedence over the internal microphone (p.44). 2 Shoe cover 3 REMOTE jack • Connect other optional accessories. 4 A/V (audio/video) jack (p.52, 92, 94) 5 DC IN jack (p.21) 6 (USB) jack (p.96, 99)...of the external flash to the end, and then tighten the screw. Refer also to optional accessories such as you are recording with your camcorder. Jacks to connect external devices 1...Open the shoe cover. 345...Open the jack cover. 1 Active Interface Shoe The Active Interface Shoe ...
Operating Guide
Page 107
... The buttons on the screen. • The camcorder is in [DEMO MODE] (p.76). The picture ...cancel [DEMO MODE]. You cannot turn the LCD backlight off. • During Easy Handycam operation (p.33), you disconnect the AC Adaptor from the wall outlet or remove the ... • Touch the LCD screen lightly. • Press DISP/BATT INFO on your camcorder (or DISPLAY on the screen. • They may be warning indicators or messages (p....; Adjust the screen ([CALIBRATION]) (p.137). A problem occurs when the camcorder is connected to the AC Adaptor. • Turn off the power first. Then, connect ...
... The buttons on the screen. • The camcorder is in [DEMO MODE] (p.76). The picture ...cancel [DEMO MODE]. You cannot turn the LCD backlight off. • During Easy Handycam operation (p.33), you disconnect the AC Adaptor from the wall outlet or remove the ... • Touch the LCD screen lightly. • Press DISP/BATT INFO on your camcorder (or DISPLAY on the screen. • They may be warning indicators or messages (p....; Adjust the screen ([CALIBRATION]) (p.137). A problem occurs when the camcorder is connected to the AC Adaptor. • Turn off the power first. Then, connect ...

Operating Guide
Page 112
... other devices may not be played back. marks (p.138). • Remove any obstructions between the Remote Commander and the remote sensor. • Point the remote sensor away from strong light sources such as the remote sensor may not appear in the actual size. • Still images recorded on a computer, etc... obstructed by it again. • This may appear on still images taken with the recording side facing your camcorder (p.28). • The disc recorded in other than DVD 2 for your DVD device, or cover the sensor of the data may have edited the data on a computer. (The file ...
... other devices may not be played back. marks (p.138). • Remove any obstructions between the Remote Commander and the remote sensor. • Point the remote sensor away from strong light sources such as the remote sensor may not appear in the actual size. • Still images recorded on a computer, etc... obstructed by it again. • This may appear on still images taken with the recording side facing your camcorder (p.28). • The disc recorded in other than DVD 2 for your DVD device, or cover the sensor of the data may have edited the data on a computer. (The file ...

Operating Guide
Page 136
...- x If moisture condensation has occurred Turn off your camcorder. The camcorder may malfunction. If sand or dust gets in your camcorder, it may not be able to your camcorder, and leave it . • Keep metal contacts clean. • Keep the Remote Commander and button-type battery out of children's reach. ... and humid place. Near windows or outdoors, where the LCD screen, the viewfinder, or the lens may have contacted your camcorder and have it checked by a Sony dealer before storing it run such as hammering, dropping or stepping on the surface of the lens. • Keep the ...
...- x If moisture condensation has occurred Turn off your camcorder. The camcorder may malfunction. If sand or dust gets in your camcorder, it may not be able to your camcorder, and leave it . • Keep metal contacts clean. • Keep the Remote Commander and button-type battery out of children's reach. ... and humid place. Near windows or outdoors, where the LCD screen, the viewfinder, or the lens may have contacted your camcorder and have it checked by a Sony dealer before storing it run such as hammering, dropping or stepping on the surface of the lens. • Keep the ...

Operating Guide
Page 138
...not use your fingernail into the Remote Commander until it will be affected as long as described above. when there are using the AC Adaptor supplied with your camcorder, and leave your camcorder but it clicks. when the lens is not charged, the camcorder operation will not be fully ... month to keep dust out. • When your camcorder at the seaside. • Store the lens in the following instances: - pickup lens Pickup lens Glossary (p.143) Care and storage of the camera lens • Wipe the surface of the Remote Commander 1 While pressing on the lens surface. - in...
...not use your fingernail into the Remote Commander until it will be affected as long as described above. when there are using the AC Adaptor supplied with your camcorder, and leave your camcorder but it clicks. when the lens is not charged, the camcorder operation will not be fully ... month to keep dust out. • When your camcorder at the seaside. • Store the lens in the following instances: - pickup lens Pickup lens Glossary (p.143) Care and storage of the camera lens • Wipe the surface of the Remote Commander 1 While pressing on the lens surface. - in...

Operating Guide
Page 139
WARNING Battery may not function properly. Do not use batteries other than the CR2025. • When the lithium battery becomes weak, the operating distance of fire or explosion. 139 Additional Information Use of another battery may present a risk of the Remote Commander may shorten, or the Remote Commander may explode if mistreated. Do not recharge, disassemble or dispose of in fire. • A button-type lithium battery (CR2025) is used in the Remote Commander. In this case, replace the battery with a Sony CR2025 lithium battery.
WARNING Battery may not function properly. Do not use batteries other than the CR2025. • When the lithium battery becomes weak, the operating distance of fire or explosion. 139 Additional Information Use of another battery may present a risk of the Remote Commander may shorten, or the Remote Commander may explode if mistreated. Do not recharge, disassemble or dispose of in fire. • A button-type lithium battery (CR2025) is used in the Remote Commander. In this case, replace the battery with a Sony CR2025 lithium battery.

Operating Guide
Page 140
...color, EIA standards Usable discs 8cm DVD-R/DVD-RW/DVD+RW Recording format Movie DVD-R: DVD-VIDEO DVD-RW: DVD-VIDEO (VIDEO mode), DVD-Video Recording (VR mode) DVD+RW: DVD+RW Video Still image Exif *1... lx (lux) (F1.8) 0 lx (lux) (in this format can have additional information such as your camcorder's setting information at Load impedance 47 kΩ (kilohms)), Input impedance more than 47 kΩ (kilohms), Output ...impedance less than 2.2 kΩ (kilohms) USB jack mini-B REMOTE jack Stereo mini-minijack (Ø 2.5 mm) LCD screen Picture 8.8 cm (3.5 type, aspect...
...color, EIA standards Usable discs 8cm DVD-R/DVD-RW/DVD+RW Recording format Movie DVD-R: DVD-VIDEO DVD-RW: DVD-VIDEO (VIDEO mode), DVD-Video Recording (VR mode) DVD+RW: DVD+RW Video Still image Exif *1... lx (lux) (F1.8) 0 lx (lux) (in this format can have additional information such as your camcorder's setting information at Load impedance 47 kΩ (kilohms)), Input impedance more than 47 kΩ (kilohms), Output ...impedance less than 2.2 kΩ (kilohms) USB jack mini-B REMOTE jack Stereo mini-minijack (Ø 2.5 mm) LCD screen Picture 8.8 cm (3.5 type, aspect...
Operating Guide
Page 146
... Recording time 22 REC MODE 77 REDEYE REDUC 70 REMAINING 80 Remaining battery 49 Remaining display Battery 47 Disc 49 "Memory Stick Duo" ....47 Remote Commander 51 Remote sensor 47 RESET 47 Review 48 Review deleting 48 S Self-diagnosis display.........123 SELF-TIMER 71 SEPIA 75 Setup 64 CAMERA SET 68 MEDIA...
... Recording time 22 REC MODE 77 REDEYE REDUC 70 REMAINING 80 Remaining battery 49 Remaining display Battery 47 Disc 49 "Memory Stick Duo" ....47 Remote Commander 51 Remote sensor 47 RESET 47 Review 48 Review deleting 48 S Self-diagnosis display.........123 SELF-TIMER 71 SEPIA 75 Setup 64 CAMERA SET 68 MEDIA...


