
Operating Guide
Page 52
... the image quality may jitter. 52 Refer also to the instruction manuals supplied with an S VIDEO cable (optional). The yellow plug connection is connected to a VCR Connect your camcorder to the wall outlet using the supplied AC Adaptor for this operation (p.21). VCRs or TVs... or via the S VIDEO jack, by using an A/V connecting cable with an S VIDEO cable (optional), higher quality pictures can be connected. Connect your camcorder to the LINE IN input on the VCR to LINE (VIDEO 1, VIDEO 2, etc.), if the VCR has an input selector. S VIDEO connection only will view ...
... the image quality may jitter. 52 Refer also to the instruction manuals supplied with an S VIDEO cable (optional). The yellow plug connection is connected to a VCR Connect your camcorder to the wall outlet using the supplied AC Adaptor for this operation (p.21). VCRs or TVs... or via the S VIDEO jack, by using an A/V connecting cable with an S VIDEO cable (optional), higher quality pictures can be connected. Connect your camcorder to the LINE IN input on the VCR to LINE (VIDEO 1, VIDEO 2, etc.), if the VCR has an input selector. S VIDEO connection only will view ...

Operating Guide
Page 53
When your TV is monaural (When your TV has only one audio input jack) Connect the yellow plug of the A/V connecting cable to the video input jack and connect the white (left channel) or the red (right channel) plug to the audio input jack of your TV or VCR. • You can display the counter on a 4:3 TV not compatible with the 16:9 (wide) signal, set [TV TYPE] to [V-OUT/PANEL] (p.80). 53 Recording/Playback • When you play back a picture recorded in 16:9 (wide) aspect ratio on the TV screen by setting [DISP OUTPUT] to [4:3].
When your TV is monaural (When your TV has only one audio input jack) Connect the yellow plug of the A/V connecting cable to the video input jack and connect the white (left channel) or the red (right channel) plug to the audio input jack of your TV or VCR. • You can display the counter on a 4:3 TV not compatible with the 16:9 (wide) signal, set [TV TYPE] to [V-OUT/PANEL] (p.80). 53 Recording/Playback • When you play back a picture recorded in 16:9 (wide) aspect ratio on the TV screen by setting [DISP OUTPUT] to [4:3].
Operating Guide
Page 92
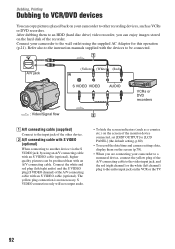
... screen indicators (such as VCRs or DVD recorders. Connect your camcorder to the wall outlet using an A/V connecting cable with an S VIDEO cable (optional), higher quality pictures can enjoy images stored on the hard disk of the recorder. A/V jack (Yellow) (White) (Red) S VIDEO VIDEO AUDIO : Video/Signal flow VCRs or DVD recorders 1 A/V connecting cable (supplied) Connect to the input jack...
... screen indicators (such as VCRs or DVD recorders. Connect your camcorder to the wall outlet using an A/V connecting cable with an S VIDEO cable (optional), higher quality pictures can enjoy images stored on the hard disk of the recorder. A/V jack (Yellow) (White) (Red) S VIDEO VIDEO AUDIO : Video/Signal flow VCRs or DVD recorders 1 A/V connecting cable (supplied) Connect to the input jack...

Operating Guide
Page 93
... your VCR or DVD recorder. Refer to the instruction manuals supplied with S VIDEO (optional) 2. • Connect your camcorder to the input jacks of a VCR or DVD device. 5 Start the playback on your camcorder, and record it to the input mode. 4 Connect your camcorder to the playback device... (p.52). 3 Insert the recording media for details. 6 When dubbing is finished, stop your camcorder and the recording device. 93 Dubbing, Printing Set [TV TYPE] according to the VCR/DVD device with the A/V connecting cable (supplied) 1 or the A/V connecting cable ...
... your VCR or DVD recorder. Refer to the instruction manuals supplied with S VIDEO (optional) 2. • Connect your camcorder to the input jacks of a VCR or DVD device. 5 Start the playback on your camcorder, and record it to the input mode. 4 Connect your camcorder to the playback device... (p.52). 3 Insert the recording media for details. 6 When dubbing is finished, stop your camcorder and the recording device. 93 Dubbing, Printing Set [TV TYPE] according to the VCR/DVD device with the A/V connecting cable (supplied) 1 or the A/V connecting cable ...

Operating Guide
Page 94
... channel) plug to another device via the S VIDEO jack, by using an A/V connecting cable with an S VIDEO cable (optional), higher quality pictures can record pictures or TV programs from a VCR, TV or DVD device onto a disc using the supplied AC Adaptor for this operation (p.21). Connect your camcorder. The yellow plug connection is not necessary. Refer...
... channel) plug to another device via the S VIDEO jack, by using an A/V connecting cable with an S VIDEO cable (optional), higher quality pictures can record pictures or TV programs from a VCR, TV or DVD device onto a disc using the supplied AC Adaptor for this operation (p.21). Connect your camcorder. The yellow plug connection is not necessary. Refer...

Operating Guide
Page 95
... image even if you press PHOTO during recording. 95 Dubbing, Printing 1 Connect your camcorder to the TV or VCR/DVD device with the A/V connecting cable (supplied) 1 or the A/V connecting cable with S VIDEO (optional) 2. • Connect your camcorder to the output jacks of your camcorder. 7 Touch [REC] at the point you want to start recording. 8 Touch at the...
... image even if you press PHOTO during recording. 95 Dubbing, Printing 1 Connect your camcorder to the TV or VCR/DVD device with the A/V connecting cable (supplied) 1 or the A/V connecting cable with S VIDEO (optional) 2. • Connect your camcorder to the output jacks of your camcorder. 7 Touch [REC] at the point you want to start recording. 8 Touch at the...
Operating Guide
Page 97
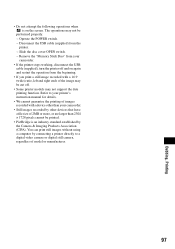
...when is on again and restart the operation from the beginning. • If you print a still image recorded with a device other than your camcorder. • Still images recorded by other devices that have a file size of 2MB or more, or are larger than 2304 × 1728 ...8226; PictBridge is an industry standard established by connecting a printer directly to your camcorder. • If the printer stops working, disconnect the USB cable (supplied), turn the printer off and on the screen. Refer to a digital video camera or digital still camera, regardless of the image may be cut off. &#...
...when is on again and restart the operation from the beginning. • If you print a still image recorded with a device other than your camcorder. • Still images recorded by other devices that have a file size of 2MB or more, or are larger than 2304 × 1728 ...8226; PictBridge is an industry standard established by connecting a printer directly to your camcorder. • If the printer stops working, disconnect the USB cable (supplied), turn the printer off and on the screen. Refer to a digital video camera or digital still camera, regardless of the image may be cut off. &#...
Operating Guide
Page 99
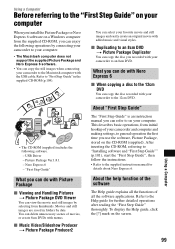
...and Nero Express 6 software. • You can copy the still images when connecting your camcorder to the Macintosh computer with menus. Movies and still images are saved in the supplied CD-ROM (p.104). x Music Video/Slideshow Producer t Picture Package Producer2 About "First Step Guide" The "First Step Guide" ... the help function of the software The Help guide explains all the functions of movies, or create 8cm DVDs with the USB cable. What you can do with your camcorder to the 12cm DVD. To display the Help guide, click the [?] mark on the screen. 99 Refer to the supplied ...
...and Nero Express 6 software. • You can copy the still images when connecting your camcorder to the Macintosh computer with menus. Movies and still images are saved in the supplied CD-ROM (p.104). x Music Video/Slideshow Producer t Picture Package Producer2 About "First Step Guide" The "First Step Guide" ... the help function of the software The Help guide explains all the functions of movies, or create 8cm DVDs with the USB cable. What you can do with your camcorder to the 12cm DVD. To display the Help guide, click the [?] mark on the screen. 99 Refer to the supplied ...
Operating Guide
Page 100
... computer When using a computer compatible with Hi-Speed USB (USB 2.0). Before referring to the "First Step Guide" on your camcorder with the USB cable instead of the image files edited) Display: 4 MB VRAM video card, Minimum 800 × 600 dots, High color (16 bit color, 65 000 colors), DirectDraw display driver capability (this...
... computer When using a computer compatible with Hi-Speed USB (USB 2.0). Before referring to the "First Step Guide" on your camcorder with the USB cable instead of the image files edited) Display: 4 MB VRAM video card, Minimum 800 × 600 dots, High color (16 bit color, 65 000 colors), DirectDraw display driver capability (this...

Operating Guide
Page 116
...:VR mode) You cannot edit a DVD-R/DVD-RW (VIDEO mode)/DVD+RW with your TV (p.52). You cannot copy the disc to a movie (Photomovie, p.90). Dubbing/Connecting to the TV. • Set [TV TYPE] depending on your camcorder (p.92, 94). Pictures from the other devices The aspect ratio of the A/V connecting cable, too (p.94). You cannot...
...:VR mode) You cannot edit a DVD-R/DVD-RW (VIDEO mode)/DVD+RW with your TV (p.52). You cannot copy the disc to a movie (Photomovie, p.90). Dubbing/Connecting to the TV. • Set [TV TYPE] depending on your camcorder (p.92, 94). Pictures from the other devices The aspect ratio of the A/V connecting cable, too (p.94). You cannot...
Operating Guide
Page 145
...SUB-T DATE 79 SUMMERTIME 27, 81 SUNSET&MOON 68 SUPER NS (Super NightShot).........71, 114 SUR MONITOR 77 System requirements ..........100 S VIDEO cable 52, 92 S VIDEO jack 52, 92 T Telephoto 44 Thumbnail 79 TIME/LANGU. (Language 81 Touch panel 26 Transmitter 51 Tripod 46 TV 52 TV color... U Unfinalizing 61 USB1.1 100 USB2.0 100 USB cable 20 USB driver 99 USB jack 98 Using abroad 128 V VBR 17, 77 VF B.LIGHT (Viewfinder back light) ........ 78 VF WIDE DISP (View finder wide display 78 VIDEO mode 16 Video operation buttons ....... 49 Viewfinder 25 Brightness 78 Viewfinder ...
...SUB-T DATE 79 SUMMERTIME 27, 81 SUNSET&MOON 68 SUPER NS (Super NightShot).........71, 114 SUR MONITOR 77 System requirements ..........100 S VIDEO cable 52, 92 S VIDEO jack 52, 92 T Telephoto 44 Thumbnail 79 TIME/LANGU. (Language 81 Touch panel 26 Transmitter 51 Tripod 46 TV 52 TV color... U Unfinalizing 61 USB1.1 100 USB2.0 100 USB cable 20 USB driver 99 USB jack 98 Using abroad 128 V VBR 17, 77 VF B.LIGHT (Viewfinder back light) ........ 78 VF WIDE DISP (View finder wide display 78 VIDEO mode 16 Video operation buttons ....... 49 Viewfinder 25 Brightness 78 Viewfinder ...

