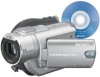
Operating Guide
Page 2
This symbol is intended to alert the user to the presence of electric shock to rain or moisture. This symbol is intended to alert the user to the presence of uninsulated "dangerous voltage" within the product's enclosure that may be of sufficient magnitude to constitute a risk of important operating and maintenance (servicing) instructions in the literature accompanying the appliance. 2 WARNING power cord To reduce fire or shock hazard, do not expose the unit to persons.
This symbol is intended to alert the user to the presence of electric shock to rain or moisture. This symbol is intended to alert the user to the presence of uninsulated "dangerous voltage" within the product's enclosure that may be of sufficient magnitude to constitute a risk of important operating and maintenance (servicing) instructions in the literature accompanying the appliance. 2 WARNING power cord To reduce fire or shock hazard, do not expose the unit to persons.
Operating Guide
Page 3
... a fire or electric shock. Cleaning Unplug the set , and to direct sunlight. 3 Power-Cord Protection Route the power cord so that could result in fire or electric shock. Never cover the slots and openings with a polarized ac power cord plug (a plug having one way. Never place the set on a bed, sofa, rug...an adult, and serious damage to the plugs, receptacles, and the point where the cord exits from the type of the polarized plug by placing the set should still fail to operate from battery power, or other materials. - The set may touch dangerous voltage points or short out parts...
... a fire or electric shock. Cleaning Unplug the set , and to direct sunlight. 3 Power-Cord Protection Route the power cord so that could result in fire or electric shock. Never cover the slots and openings with a polarized ac power cord plug (a plug having one way. Never place the set on a bed, sofa, rug...an adult, and serious damage to the plugs, receptacles, and the point where the cord exits from the type of the polarized plug by placing the set should still fail to operate from battery power, or other materials. - The set may touch dangerous voltage points or short out parts...
Operating Guide
Page 4
... following conditions: - If the set has been subject to qualified service personnel. this set . - When the set has been exposed to lightning and power-line surges. When the power cord or plug is in damage and will prevent damage to the set from the wall outlet and disconnect the antenna or cable system...
... following conditions: - If the set has been subject to qualified service personnel. this set . - When the set has been exposed to lightning and power-line surges. When the power cord or plug is in damage and will prevent damage to the set from the wall outlet and disconnect the antenna or cable system...
Operating Guide
Page 20
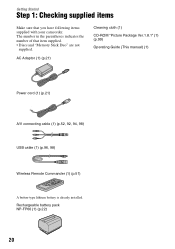
... the parentheses indicates the number of that you have following items supplied with your camcorder. Rechargeable battery pack NP-FP60 (1) (p.22) 20 AC Adaptor (1) (p.21) Cleaning cloth (1) CD-ROM "Picture Package Ver.1.8.1" (1) (p.99) Operating Guide (This manual) (1) Power cord (1) (p.21) A/V connecting cable (1) (p.52, 92, 94, 98) USB cable (1) (p.96, 98) Wireless Remote Commander...
... the parentheses indicates the number of that you have following items supplied with your camcorder. Rechargeable battery pack NP-FP60 (1) (p.22) 20 AC Adaptor (1) (p.21) Cleaning cloth (1) CD-ROM "Picture Package Ver.1.8.1" (1) (p.99) Operating Guide (This manual) (1) Power cord (1) (p.21) A/V connecting cable (1) (p.52, 92, 94, 98) USB cable (1) (p.96, 98) Wireless Remote Commander...
Operating Guide
Page 21
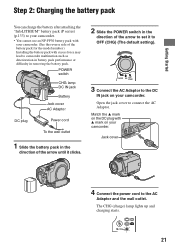
...the AC Adaptor to the DC IN jack on your camcorder. (See the reverse side of the battery pack for the model number.) Installing the battery pack with your camcorder. Jack cover 4 Connect the power cord to connect the AC Adaptor. POWER switch CHG lamp DC IN jack Battery Jack cover AC ...Adaptor DC plug Power cord To the wall outlet 1 Slide the battery pack in the direction of...
...the AC Adaptor to the DC IN jack on your camcorder. (See the reverse side of the battery pack for the model number.) Installing the battery pack with your camcorder. Jack cover 4 Connect the power cord to connect the AC Adaptor. POWER switch CHG lamp DC IN jack Battery Jack cover AC ...Adaptor DC plug Power cord To the wall outlet 1 Slide the battery pack in the direction of...
Operating Guide
Page 23
... Started On the battery pack • Before changing the battery pack, slide the POWER switch to the DC IN jack of your camcorder, even when the power cord is disconnected from the wall outlet. • We recommend that you use your camcorder in a narrow space, such as between a wall and furniture. • Do not short...
... Started On the battery pack • Before changing the battery pack, slide the POWER switch to the DC IN jack of your camcorder, even when the power cord is disconnected from the wall outlet. • We recommend that you use your camcorder in a narrow space, such as between a wall and furniture. • Do not short...
Operating Guide
Page 61
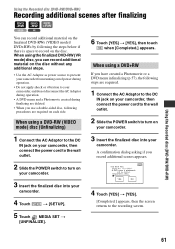
.... 1 Connect the AC Adaptor to the DC IN jack on your camcorder, then connect the power cord to the wall outlet. 2 Slide the POWER switch to record on your camcorder. 3 Insert the finalized disc into your camcorder. When using a DVD+RW If you have created a Photomovie or a DVD menu in finalizing (p.57), the following the steps below if...
.... 1 Connect the AC Adaptor to the DC IN jack on your camcorder, then connect the power cord to the wall outlet. 2 Slide the POWER switch to record on your camcorder. 3 Insert the finalized disc into your camcorder. When using a DVD+RW If you have created a Photomovie or a DVD menu in finalizing (p.57), the following the steps below if...

Operating Guide
Page 62
..., then touch . • For details on a finalized disc. xDVD+RW Select the aspect ratio of the recording picture for the DVD+RW. Formatting deletes all images on the movie aspect ratio, see page 16. 6 Select the aspect ratio ([16:9 WIDE] or [4:3]) of the recording picture, then .... The icon or appears in the screen, but there is required on each side. 1 Connect the AC Adaptor to the DC IN jack on your camcorder, then connect the power cord to the wall outlet. 2 Slide the POWER switch to turn on your camcorder. 3 Insert the disc to be finalized again to step 7.
..., then touch . • For details on a finalized disc. xDVD+RW Select the aspect ratio of the recording picture for the DVD+RW. Formatting deletes all images on the movie aspect ratio, see page 16. 6 Select the aspect ratio ([16:9 WIDE] or [4:3]) of the recording picture, then .... The icon or appears in the screen, but there is required on each side. 1 Connect the AC Adaptor to the DC IN jack on your camcorder, then connect the power cord to the wall outlet. 2 Slide the POWER switch to turn on your camcorder. 3 Insert the disc to be finalized again to step 7.
Operating Guide
Page 106
...21). Attach a charged battery pack to the camcorder. The power turns off (A.SHUT OFF). When you do not operate your Sony dealer. Batteries/Power sources The power does not turn on . • The battery pack is not attached to the camcorder (p.21). • The battery pack is ... lamp flashes while the battery pack is being charged. • Slide the POWER switch to OFF (CHG) (p.21). • Attach the battery pack to the camcorder correctly (p.21). • Connect the power cord to correct the indication (p.21). The remaining battery time indicator does not indicate ...
...21). Attach a charged battery pack to the camcorder. The power turns off (A.SHUT OFF). When you do not operate your Sony dealer. Batteries/Power sources The power does not turn on . • The battery pack is not attached to the camcorder (p.21). • The battery pack is ... lamp flashes while the battery pack is being charged. • Slide the POWER switch to OFF (CHG) (p.21). • Attach the battery pack to the camcorder correctly (p.21). • Connect the power cord to correct the indication (p.21). The remaining battery time indicator does not indicate ...
Operating Guide
Page 135
... this malfunction cannot be exposed to direct sunlight. The indication will not appear when the moisture condenses on it . The camcorder may have it checked by a Sony dealer before storing it . • Keep metal contacts clean. • Keep the Remote Commander and button-type battery ...placing anything heavy on the camera lens. Turn off your camcorder gets wet, it for 1H.] or [% Condensation. This damages the inside . • When disconnecting the power cord, pull it any solid object or liquid gets inside your camcorder, it run such as hammering, dropping or stepping on ...
... this malfunction cannot be exposed to direct sunlight. The indication will not appear when the moisture condenses on it . The camcorder may have it checked by a Sony dealer before storing it . • Keep metal contacts clean. • Keep the Remote Commander and button-type battery ...placing anything heavy on the camera lens. Turn off your camcorder gets wet, it for 1H.] or [% Condensation. This damages the inside . • When disconnecting the power cord, pull it any solid object or liquid gets inside your camcorder, it run such as hammering, dropping or stepping on ...

Operating Guide
Page 140
...× 143mm (2 5/8 × 3 5/8 × 5 3/4 in .) (w×h×d) excluding the projecting parts Mass (Approx.) 170 g (6 oz) excluding the power cord * See at the label of AC Adaptor for other specifications. Specifications (continued) Operating temperature 0°C to + 40°C (32°F to 104°F) Storage temperature... -20°C to + 60°C (-4°F to change without notice. AC Adaptor AC-L200 Power requirements AC 100 - 240 V, 50/60 Hz Current consumption 0.35 - 0.18 A Power consumption 18W Output voltage DC 8.4V* Operating temperature 0°C to + 40°C (32°F...
...× 143mm (2 5/8 × 3 5/8 × 5 3/4 in .) (w×h×d) excluding the projecting parts Mass (Approx.) 170 g (6 oz) excluding the power cord * See at the label of AC Adaptor for other specifications. Specifications (continued) Operating temperature 0°C to + 40°C (32°F to 104°F) Storage temperature... -20°C to + 60°C (-4°F to change without notice. AC Adaptor AC-L200 Power requirements AC 100 - 240 V, 50/60 Hz Current consumption 0.35 - 0.18 A Power consumption 18W Output voltage DC 8.4V* Operating temperature 0°C to + 40°C (32°F...

Operating Guide
Page 144
Index (continued) H Help 99 High-speed transfer ......15, 100 Holding the camcorder .........24 HQ 77 I Icon.......See Display indicators ID1/ID2 52 IMAGE SIZE 73 Index DISPLAY 79 MOVIE PB 79 Index screen display button 49 INDOOR .... EFFECT (Picture effect 75 Pixela User Support Center 104 Playback 36, 42 Playlist ADD 88 DIVIDE 90 ERASE 89 MOVE 89 PORTRAIT (Soft portrait)... 68 Power cord 20 POWER switch 21 Pre-installed rechargeable battery 137 Preparation Camcorder 20
Index (continued) H Help 99 High-speed transfer ......15, 100 Holding the camcorder .........24 HQ 77 I Icon.......See Display indicators ID1/ID2 52 IMAGE SIZE 73 Index DISPLAY 79 MOVIE PB 79 Index screen display button 49 INDOOR .... EFFECT (Picture effect 75 Pixela User Support Center 104 Playback 36, 42 Playlist ADD 88 DIVIDE 90 ERASE 89 MOVE 89 PORTRAIT (Soft portrait)... 68 Power cord 20 POWER switch 21 Pre-installed rechargeable battery 137 Preparation Camcorder 20


