Operating Guide
Page 3
... installed. This plug will fit into the outlet, try reversing the plug. Never spill liquid of the set near a swimming pool, etc. The set from battery power, or other ). Never cover the slots and openings with water for necessary ventilation. Cleaning Unplug the set may cause hazards. Installation Water and Moisture...
... installed. This plug will fit into the outlet, try reversing the plug. Never spill liquid of the set near a swimming pool, etc. The set from battery power, or other ). Never cover the slots and openings with water for necessary ventilation. Cleaning Unplug the set may cause hazards. Installation Water and Moisture...
Operating Guide
Page 5
....: DCR-DVD405 Responsible Party:Sony Electronics Inc. Record the serial number in hazardous radiation exposure. Model No. CAUTION You are recyclable. However, there is for a Class B digital device, pursuant to radio or 5 CAUTION The use of optical instruments with Part 15 of rechargeable batteries, call upon your Sony dealer regarding recycling of the FCC Rules. DCR-DVD...
....: DCR-DVD405 Responsible Party:Sony Electronics Inc. Record the serial number in hazardous radiation exposure. Model No. CAUTION You are recyclable. However, there is for a Class B digital device, pursuant to radio or 5 CAUTION The use of optical instruments with Part 15 of rechargeable batteries, call upon your Sony dealer regarding recycling of the FCC Rules. DCR-DVD...
Operating Guide
Page 7
.... Be careful when placing the camera near a window or outdoors. • Do not aim at dusk. 7 Take pictures of your camcorder to remove the battery pack or AC Adaptor from being lost, do not do the following parts. Black point White, red, blue or green point •... when either of the respective lamps of the pixels are normal. Viewfinder LCD screen Battery • The camcorder is on: - to apply mechanical shock or vibration to the camcorder. • Before connecting your camcorder to another device with "Memory Stick" compatible equipment Be sure to direct sunlight for...
.... Be careful when placing the camera near a window or outdoors. • Do not aim at dusk. 7 Take pictures of your camcorder to remove the battery pack or AC Adaptor from being lost, do not do the following parts. Black point White, red, blue or green point •... when either of the respective lamps of the pixels are normal. Viewfinder LCD screen Battery • The camcorder is on: - to apply mechanical shock or vibration to the camcorder. • Before connecting your camcorder to another device with "Memory Stick" compatible equipment Be sure to direct sunlight for...

Operating Guide
Page 10
... supplied items 20 Step 2: Charging the battery pack 21 Step 3: Turning the power on a DVD player (Finalizing 38 Recording/Playback Recording 40 Playback 42 Functions used for recording/playback, etc 44 Recording To use zoom To record sound with your DVD Handycam 14 Choosing a disc 16 Using your camcorder 24 Step 4: Adjusting the LCD screen...
... supplied items 20 Step 2: Charging the battery pack 21 Step 3: Turning the power on a DVD player (Finalizing 38 Recording/Playback Recording 40 Playback 42 Functions used for recording/playback, etc 44 Recording To use zoom To record sound with your DVD Handycam 14 Choosing a disc 16 Using your camcorder 24 Step 4: Adjusting the LCD screen...

Operating Guide
Page 11
...the shoulder belt Playback To use Playback zoom To play back a series of still images (Slide show) Recording/playback To check the remaining battery To turn off the operation confirmation beep To initialize the settings (RESET) Other part names and functions Checking/Deleting the last scene (Review/...59 Using the Recorded disc (DVD-RW/DVD+RW) Recording additional scenes after finalizing 61 Deleting all of the scenes on the disc (Formatting 62 Using the Setup items Using the Setup items 64 Setup items 66 CAMERA SET 68 Settings to adjust your camcorder to the recording conditions (EXPOSURE...
...the shoulder belt Playback To use Playback zoom To play back a series of still images (Slide show) Recording/playback To check the remaining battery To turn off the operation confirmation beep To initialize the settings (RESET) Other part names and functions Checking/Deleting the last scene (Review/...59 Using the Recorded disc (DVD-RW/DVD+RW) Recording additional scenes after finalizing 61 Deleting all of the scenes on the disc (Formatting 62 Using the Setup items Using the Setup items 64 Setup items 66 CAMERA SET 68 Settings to adjust your camcorder to the recording conditions (EXPOSURE...
Operating Guide
Page 13
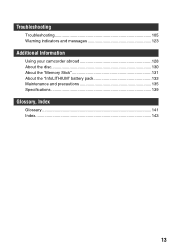
Troubleshooting Troubleshooting 105 Warning indicators and messages 123 Additional Information Using your camcorder abroad 128 About the disc 130 About the "Memory Stick 131 About the "InfoLITHIUM" battery pack 133 Maintenance and precautions 135 Specifications 139 Glossary, Index Glossary 141 Index...143 13
Troubleshooting Troubleshooting 105 Warning indicators and messages 123 Additional Information Using your camcorder abroad 128 About the disc 130 About the "Memory Stick 131 About the "InfoLITHIUM" battery pack 133 Maintenance and precautions 135 Specifications 139 Glossary, Index Glossary 141 Index...143 13
Operating Guide
Page 20
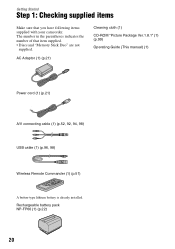
..., 92, 94, 98) USB cable (1) (p.96, 98) Wireless Remote Commander (1) (p.51) A button-type lithium battery is already installed. The number in the parentheses indicates the number of that you have following items supplied with your camcorder. Rechargeable battery pack NP-FP60 (1) (p.22) 20 Getting Started Step 1: Checking supplied items Make sure that item...
..., 92, 94, 98) USB cable (1) (p.96, 98) Wireless Remote Commander (1) (p.51) A button-type lithium battery is already installed. The number in the parentheses indicates the number of that you have following items supplied with your camcorder. Rechargeable battery pack NP-FP60 (1) (p.22) 20 Getting Started Step 1: Checking supplied items Make sure that item...
Operating Guide
Page 21
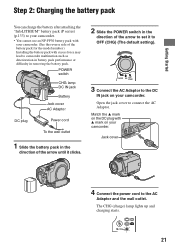
...the POWER switch in removing the battery pack. Getting Started Step 2: Charging the battery pack You can charge the battery after attaching the "InfoLITHIUM" battery pack (P series) (p.133) to your camcorder. • You cannot use an NP-FP30 battery pack with your camcorder. (See the reverse side of ... default setting). 3 Connect the AC Adaptor to camcorder malfunction such as deterioration in battery pack performance or difficulty in the direction of the battery pack for the model number.) Installing the battery pack with v mark on your camcorder. Match the v mark on the DC plug ...
...the POWER switch in removing the battery pack. Getting Started Step 2: Charging the battery pack You can charge the battery after attaching the "InfoLITHIUM" battery pack (P series) (p.133) to your camcorder. • You cannot use an NP-FP30 battery pack with your camcorder. (See the reverse side of ... default setting). 3 Connect the AC Adaptor to camcorder malfunction such as deterioration in battery pack performance or difficulty in the direction of the battery pack for the model number.) Installing the battery pack with v mark on your camcorder. Match the v mark on the DC plug ...
Operating Guide
Page 22
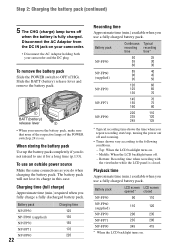
...Top: When the LCD backlight turns on your camcorder. • Disconnect the AC Adaptor holding both your camcorder and the DC plug. Middle: When the LCD backlight turns off and zooming. • Times shown vary according to the following conditions. - Battery pack LCD screen LCD screen opened* closed .... To remove the battery pack Slide the POWER switch to use...
...Top: When the LCD backlight turns on your camcorder. • Disconnect the AC Adaptor holding both your camcorder and the DC plug. Middle: When the LCD backlight turns off and zooming. • Times shown vary according to the following conditions. - Battery pack LCD screen LCD screen opened* closed .... To remove the battery pack Slide the POWER switch to use...
Operating Guide
Page 23
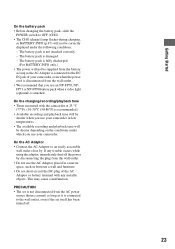
...available recording and playback time will be correctly displayed under which you use your camcorder. The battery pack is damaged. - The battery pack is not attached correctly. - On the charging/recording/playback time • Times measured with the camcorder at 25 °C (77°F). (10-30°C (50-86°..., immediately shut off . 23 PRECAUTION • The set is not disconnected from the battery as long as between a wall and furniture. • Do not short-circuit the DC plug of your camcorder, even when the power cord is disconnected from the wall outlet. • We recommend...
...available recording and playback time will be correctly displayed under which you use your camcorder. The battery pack is damaged. - The battery pack is not attached correctly. - On the charging/recording/playback time • Times measured with the camcorder at 25 °C (77°F). (10-30°C (50-86°..., immediately shut off . 23 PRECAUTION • The set is not disconnected from the battery as long as between a wall and furniture. • Do not short-circuit the DC plug of your camcorder, even when the power cord is disconnected from the wall outlet. • We recommend...
Operating Guide
Page 24
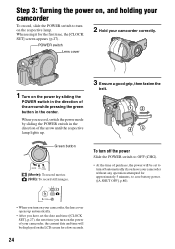
... POWER switch to OFF (CHG). • At the time of purchase, the power will be set to turn off automatically if you leave your camcorder without any operation attempted for approximately 5 minutes, to turn on the power of the arrow while pressing the green button in the direction of your... and time will be displayed on the LCD screen for the first time, the [CLOCK SET] screen appears (p.27). 2 Hold your camcorder To record, slide the POWER switch to save battery power. ([A.SHUT OFF], p.80). • When you record, switch the power mode by sliding the POWER switch in the center.
... POWER switch to OFF (CHG). • At the time of purchase, the power will be set to turn off automatically if you leave your camcorder without any operation attempted for approximately 5 minutes, to turn on the power of the arrow while pressing the green button in the direction of your... and time will be displayed on the LCD screen for the first time, the [CLOCK SET] screen appears (p.27). 2 Hold your camcorder To record, slide the POWER switch to save battery power. ([A.SHUT OFF], p.80). • When you record, switch the power mode by sliding the POWER switch in the center.
Operating Guide
Page 25
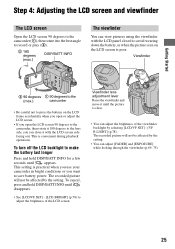
...] (p.78). To cancel, press and hold DISP/BATT INFO for a few seconds until the picture is practical when you use your camcorder in bright conditions or you want to make the battery last longer Press and hold DISP/BATT INFO until disappears. • See [LCD/VF SET] - [LCD BRIGHT] (p.78) to ...the lens side, you open the LCD screen 90 degrees to the camcorder, then rotate it 180 degrees to adjust the brightness of...
...] (p.78). To cancel, press and hold DISP/BATT INFO for a few seconds until the picture is practical when you use your camcorder in bright conditions or you want to make the battery last longer Press and hold DISP/BATT INFO until disappears. • See [LCD/VF SET] - [LCD BRIGHT] (p.78) to ...the lens side, you open the LCD screen 90 degrees to the camcorder, then rotate it 180 degrees to adjust the brightness of...
Operating Guide
Page 27
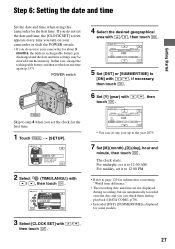
... with / , then touch . 27 In that case, charge the rechargeable battery and then set the date and time, the [CLOCK SET] screen appears every time you turn on your camcorder or slide the POWER switch. • If you do not use your camcorder for the first time. Step 6: Setting the date and time... Getting Started Set the date and time when using this camcorder for about 3 months, the built-in rechargeable battery gets discharged and the date and time settings may be cleared from the memory. POWER switch Skip to 12:00 AM. If you ...
... with / , then touch . 27 In that case, charge the rechargeable battery and then set the date and time, the [CLOCK SET] screen appears every time you turn on your camcorder or slide the POWER switch. • If you do not use your camcorder for the first time. Step 6: Setting the date and time... Getting Started Set the date and time when using this camcorder for about 3 months, the built-in rechargeable battery gets discharged and the date and time settings may be cleared from the memory. POWER switch Skip to 12:00 AM. If you ...
Operating Guide
Page 29
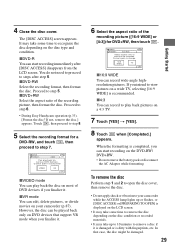
...8226; It may take some time to remove the disc depending on DVD devices that case, the disc might be recorded. To remove the ...DVD devices if you can play back pictures on the DVD-RW/ DVD+RW. • Do not remove the battery pack or disconnect the AC Adaptor while formatting. FORMAT : VIDEO Can playback on your camcorder... proceed to step 8. 5 Select the recording format for DVD+RW, then touch . Cannot edit in Camcorder VIDEO VR OK xVIDEO mode You can start recording immediately ...or divide movies on various DVD devices. If you finalize it . In that support VR mode when...
...8226; It may take some time to remove the disc depending on DVD devices that case, the disc might be recorded. To remove the ...DVD devices if you can play back pictures on the DVD-RW/ DVD+RW. • Do not remove the battery pack or disconnect the AC Adaptor while formatting. FORMAT : VIDEO Can playback on your camcorder... proceed to step 8. 5 Select the recording format for DVD+RW, then touch . Cannot edit in Camcorder VIDEO VR OK xVIDEO mode You can start recording immediately ...or divide movies on various DVD devices. If you finalize it . In that support VR mode when...
Operating Guide
Page 30
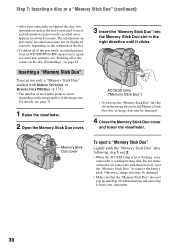
... the "Memory Stick Duo" does not pop up and drop off , eject the "Memory Stick Duo," or remove the battery pack. Do not shake or knock your camcorder. 30 The information on previously recorded areas may be displayed correctly depending on the condition of the disc. • To ...delete all of the previously recorded pictures from a DVD-RW/DVD+RW, then to use it from your camcorder, turn the power off when inserting and removing it and information on previously recorded areas appears for about 8 seconds. Memory...
... the "Memory Stick Duo" does not pop up and drop off , eject the "Memory Stick Duo," or remove the battery pack. Do not shake or knock your camcorder. 30 The information on previously recorded areas may be displayed correctly depending on the condition of the disc. • To ...delete all of the previously recorded pictures from a DVD-RW/DVD+RW, then to use it from your camcorder, turn the power off when inserting and removing it and information on previously recorded areas appears for about 8 seconds. Memory...
Operating Guide
Page 41
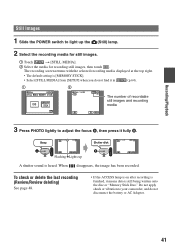
...on after recording is finished, it in (p.64). 1 2 The number of recordable still images and recording media 3 Press PHOTO lightly to your camcorder, and do not find it means data is heard. The recording screen returns with the selected recording media displayed at the top right. •...; The default setting is [MEMORY STICK]. • Select [STILL MEDIA] from [SETUP] when you do not disconnect the battery or AC Adaptor. 41 Flashing bLights up the (Still) lamp. 2 Select the recording media for still images. 1 Touch t [STILL MEDIA]. 2 Select ...
...on after recording is finished, it in (p.64). 1 2 The number of recordable still images and recording media 3 Press PHOTO lightly to your camcorder, and do not find it means data is heard. The recording screen returns with the selected recording media displayed at the top right. •...; The default setting is [MEMORY STICK]. • Select [STILL MEDIA] from [SETUP] when you do not disconnect the battery or AC Adaptor. 41 Flashing bLights up the (Still) lamp. 2 Select the recording media for still images. 1 Touch t [STILL MEDIA]. 2 Select ...

Operating Guide
Page 42
Previous 6 pictures Next 6 pictures Disc type DVD-RW recording format Appears with PLAY/EDIT. Useful functions on VISUAL INDEX screen • Moving the zoom lever changes the VISUAL INDEX screen indication from 6 to display the VISUAL INDEX screen. The VISUAL INDEX screen appears on your camcorder. 2 Press PLAY/EDIT A (or B). ...to set the number of the tab that appear in the VISUAL INDEX screen (p.79). • Select to play back the movie and make the battery last longer (p.79). 42 Set [ MOVIE PB] to [OFF] in STANDARD SET not to play back the first 5 seconds of each of ...
Previous 6 pictures Next 6 pictures Disc type DVD-RW recording format Appears with PLAY/EDIT. Useful functions on VISUAL INDEX screen • Moving the zoom lever changes the VISUAL INDEX screen indication from 6 to display the VISUAL INDEX screen. The VISUAL INDEX screen appears on your camcorder. 2 Press PLAY/EDIT A (or B). ...to set the number of the tab that appear in the VISUAL INDEX screen (p.79). • Select to play back the movie and make the battery last longer (p.79). 42 Set [ MOVIE PB] to [OFF] in STANDARD SET not to play back the first 5 seconds of each of ...
Operating Guide
Page 45
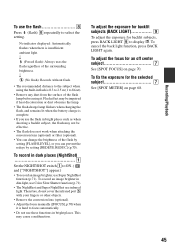
... be impaired if heat discoloration or dust obscures the lamp. • The flash charge lamp flickers when charging the flash, and remains lit when the battery charge is insufficient ambient light.
... be impaired if heat discoloration or dust obscures the lamp. • The flash charge lamp flickers when charging the flash, and remains lit when the battery charge is insufficient ambient light.
Operating Guide
Page 47
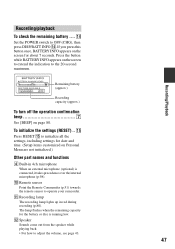
...q; qa Recording lamp The recording lamp lights up in 4ch microphone When an external microphone (optional) is running low. Press the button while BATTERY INFO appears on page 80. Remote sensor Point the Remote Commander (p.51) towards the remote sensor to adjust the volume, see page 43.... 47 qs Speaker Sounds come out from the speaker while playing back. • For how to operate your camcorder. Remaining battery (approx.) Recording capacity (approx.) To turn off the operation confirmation beep 7 See [BEEP] on the screen to extend the indication to the 20...
...q; qa Recording lamp The recording lamp lights up in 4ch microphone When an external microphone (optional) is running low. Press the button while BATTERY INFO appears on page 80. Remote sensor Point the Remote Commander (p.51) towards the remote sensor to adjust the volume, see page 43.... 47 qs Speaker Sounds come out from the speaker while playing back. • For how to operate your camcorder. Remaining battery (approx.) Recording capacity (approx.) To turn off the operation confirmation beep 7 See [BEEP] on the screen to extend the indication to the 20...
Operating Guide
Page 49
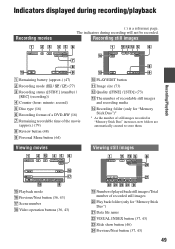
... /Total number of still images recorded in "Memory Stick Duo" increases, new folders are automatically created to store them. Recording still images Recording/Playback 1 Remaining battery (approx.) (47) 2 Recording mode (HQ / SP / LP) (77) 3 Recording status ([STBY] (standby) / [REC] (recording)) 4 Counter (hour: minute: second) 5 Disc type (16) 6 Recording format of...
... /Total number of still images recorded in "Memory Stick Duo" increases, new folders are automatically created to store them. Recording still images Recording/Playback 1 Remaining battery (approx.) (47) 2 Recording mode (HQ / SP / LP) (77) 3 Recording status ([STBY] (standby) / [REC] (recording)) 4 Counter (hour: minute: second) 5 Disc type (16) 6 Recording format of...


