Operating Guide
Page 11
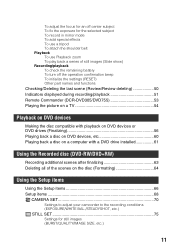
...the exposure for the selected subject To record in mirror mode To add special effects To use a tripod To attach the shoulder belt Playback To use Playback zoom To play back a series of still images (Slide show) Recording/playback To check the remaining battery To turn off the ... Checking/Deleting the last scene (Review/Review deleting 50 Indicators displayed during recording/playback 51 Remote Commander (DCR-DVD305/DVD755 53 Playing the picture on a TV 54 Playback on DVD devices Making the disc compatible with playback on DVD devices or DVD drives (Finalizing 56 Playing back a disc on DVD...
...the exposure for the selected subject To record in mirror mode To add special effects To use a tripod To attach the shoulder belt Playback To use Playback zoom To play back a series of still images (Slide show) Recording/playback To check the remaining battery To turn off the ... Checking/Deleting the last scene (Review/Review deleting 50 Indicators displayed during recording/playback 51 Remote Commander (DCR-DVD305/DVD755 53 Playing the picture on a TV 54 Playback on DVD devices Making the disc compatible with playback on DVD devices or DVD drives (Finalizing 56 Playing back a disc on DVD...
Operating Guide
Page 12
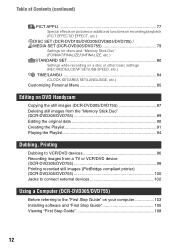
... on recording/playback (PICT.EFFECT/D.EFFECT, etc.) DISC SET (DCR-DVD105/DVD205/DVD605/DVD705) / MEDIA SET (DCR-DVD305/DVD755 79 Settings for discs and "Memory Stick Duo" (FORMAT/FINALIZE/UNFINALIZE, etc.) STANDARD SET 80 Settings while recording on a disc or other basic settings (REC MODE/LCD/VF SET.../USB SPEED, etc.) TIME/LANGU 84 (CLOCK SET/AREA SET/LANGUAGE, etc.) Customizing Personal Menu 85 Editing on DVD Handycam Copying the still images (DCR-DVD305/DVD755 87 Deleting still images from the "Memory Stick Duo" (DCR-DVD305/DVD755 89 Editing the...
... on recording/playback (PICT.EFFECT/D.EFFECT, etc.) DISC SET (DCR-DVD105/DVD205/DVD605/DVD705) / MEDIA SET (DCR-DVD305/DVD755 79 Settings for discs and "Memory Stick Duo" (FORMAT/FINALIZE/UNFINALIZE, etc.) STANDARD SET 80 Settings while recording on a disc or other basic settings (REC MODE/LCD/VF SET.../USB SPEED, etc.) TIME/LANGU 84 (CLOCK SET/AREA SET/LANGUAGE, etc.) Customizing Personal Menu 85 Editing on DVD Handycam Copying the still images (DCR-DVD305/DVD755 87 Deleting still images from the "Memory Stick Duo" (DCR-DVD305/DVD755 89 Editing the...
Operating Guide
Page 17
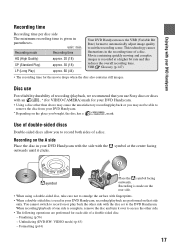
...with the disc set to access the other than above may cause the unsatisfactory recording/playback or you bought, the disc has a mark. Use of double-sided discs Double...that you use For reliability durability of a double-sided disc. - Formatting (p.64) 17 Disc use Sony discs or discs with fingerprints. • When a double-sided disc is made on the A side... Place the symbol facing outwards. Unfinalizing (DVD-RW: VIDEO mode) (p.63) - unit: min. Recording is used in the recording time of a disc. Recording mode Recording time HQ (High Quality) approx. 20 (18) SP...
...with the disc set to access the other than above may cause the unsatisfactory recording/playback or you bought, the disc has a mark. Use of double-sided discs Double...that you use For reliability durability of a double-sided disc. - Formatting (p.64) 17 Disc use Sony discs or discs with fingerprints. • When a double-sided disc is made on the A side... Place the symbol facing outwards. Unfinalizing (DVD-RW: VIDEO mode) (p.63) - unit: min. Recording is used in the recording time of a disc. Recording mode Recording time HQ (High Quality) approx. 20 (18) SP...
Operating Guide
Page 19
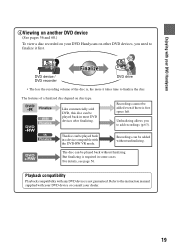
Playback compatibility Playback compatibility with the DVD-RW VR mode. Unfinalizing allows you need to finalize it takes time to finalize the disc. But finalizing is free space left. Finalize Finalize Like commercially sold DVD, ...
Playback compatibility Playback compatibility with the DVD-RW VR mode. Unfinalizing allows you need to finalize it takes time to finalize the disc. But finalizing is free space left. Finalize Finalize Like commercially sold DVD, ...
Operating Guide
Page 30
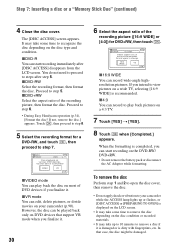
...When the formatting is dirty with fingerprints, etc. xDVD-R You can record wide-angle highresolution pictures. Cannot edit in Camcorder VIDEO VR OK xVIDEO mode You can play back pictures on your camcorder while the ACCESS lamp lights up to 10 minutes to remove a disc if it . 30 6...the recording format, then format the disc. If not, remove the disc.] appears. In that support VR mode when you finalize it is damaged or is completed, you finalize it. FORMAT : VIDEO Can playback on a wide TV, selecting [16:9 WIDE] is displayed on the LCD screen. • It ...
...When the formatting is dirty with fingerprints, etc. xDVD-R You can record wide-angle highresolution pictures. Cannot edit in Camcorder VIDEO VR OK xVIDEO mode You can play back pictures on your camcorder while the ACCESS lamp lights up to 10 minutes to remove a disc if it . 30 6...the recording format, then format the disc. If not, remove the disc.] appears. In that support VR mode when you finalize it is damaged or is completed, you finalize it. FORMAT : VIDEO Can playback on a wide TV, selecting [16:9 WIDE] is displayed on the LCD screen. • It ...
Operating Guide
Page 40
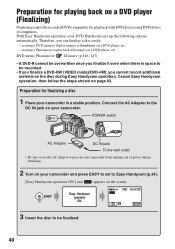
Preparation for playback with DVD devices and DVD drives of power during Easy Handycam operation. With Easy Handycam operation, your DVD Handycam sets up the following options automatically. ... DC IN jack To the wall outlet • Be sure to use the AC adaptor to be recorded. • If you finalize a DVD-RW (VIDEO mode)/DVD+RW, you can finalize a disc easily. - creating a DVD menu to display images as thumbnails on the screen. 3 Insert the disc to prevent your camcorder...
Preparation for playback with DVD devices and DVD drives of power during Easy Handycam operation. With Easy Handycam operation, your DVD Handycam sets up the following options automatically. ... DC IN jack To the wall outlet • Be sure to use the AC adaptor to be recorded. • If you finalize a DVD-RW (VIDEO mode)/DVD+RW, you can finalize a disc easily. - creating a DVD menu to display images as thumbnails on the screen. 3 Insert the disc to prevent your camcorder...
Operating Guide
Page 41
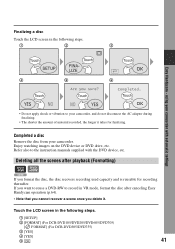
... to the instruction manuals supplied with automatic settings 4 5 6 • Do not apply shock or vibration to record in VR mode, format the disc after playback (Formatting) DVD +RW If you delete it takes for recording thereafter. If you want to reuse a DVD-RW to your ... DVD device or DVD drive, etc. Finalizing a disc Touch the LCD screen in the following steps. 1 [SETUP] 2 [FORMAT] (For DCR-DVD105/DVD205/DVD605/DVD705) [ FORMAT] (For DCR-DVD305/DVD755) 3 [YES] 4 [YES] 5 41 using your camcorder. Touch the LCD screen in the following steps. 1 2 3 Easy Handycam -
... to the instruction manuals supplied with automatic settings 4 5 6 • Do not apply shock or vibration to record in VR mode, format the disc after playback (Formatting) DVD +RW If you delete it takes for recording thereafter. If you want to reuse a DVD-RW to your ... DVD device or DVD drive, etc. Finalizing a disc Touch the LCD screen in the following steps. 1 [SETUP] 2 [FORMAT] (For DCR-DVD105/DVD205/DVD605/DVD705) [ FORMAT] (For DCR-DVD305/DVD755) 3 [YES] 4 [YES] 5 41 using your camcorder. Touch the LCD screen in the following steps. 1 2 3 Easy Handycam -

Operating Guide
Page 48
... To attach the shoulder belt ......... Magnification can magnify pictures from about 1.1 to the hook for recording/playback, etc. (continued) DCR-DVD305/DVD755: DCR-DVD205/DVD705: DCR-DVD105/DVD605: 48 To record in the viewfinder. qf Attach the shoulder belt (optional) with the ...power zoom lever 1 or the zoom buttons 5 on the LCD frame. To use Playback zoom 15 You can be normal when recorded. • When recording in mirror mode...
... To attach the shoulder belt ......... Magnification can magnify pictures from about 1.1 to the hook for recording/playback, etc. (continued) DCR-DVD305/DVD755: DCR-DVD205/DVD705: DCR-DVD105/DVD605: 48 To record in the viewfinder. qf Attach the shoulder belt (optional) with the ...power zoom lever 1 or the zoom buttons 5 on the LCD frame. To use Playback zoom 15 You can be normal when recorded. • When recording in mirror mode...
Operating Guide
Page 50
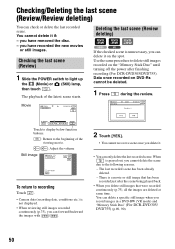
The playback of the viewing movie. / : Adjust the volume Still image To return to the following reasons. - The last recorded scene has been already deleted. - You cannot ... last scene (Review/Review deleting) You can delete a specific still image when you delete still images that has been recorded just after finishing recording (For DCR-DVD305/DVD755). You can check or delete the last recorded scene. Data once recorded on the "Memory Stick Duo" until turning off the power after the...
The playback of the viewing movie. / : Adjust the volume Still image To return to the following reasons. - The last recorded scene has been already deleted. - You cannot ... last scene (Review/Review deleting) You can delete a specific still image when you delete still images that has been recorded just after finishing recording (For DCR-DVD305/DVD755). You can check or delete the last recorded scene. Data once recorded on the "Memory Stick Duo" until turning off the power after the...
Operating Guide
Page 51
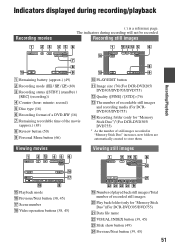
... back folder (only for "Memory Stick Duo")*(For DCR-DVD305/ DVD755) * As the number of still images recorded in "Memory Stick Duo" increases, new folders are automatically created to store them. The indicators during recording/playback Recording movies ( ) is a reference page. Viewing still images 60min qg Playback mode qh Previous/Next button (38, 45) qj...
... back folder (only for "Memory Stick Duo")*(For DCR-DVD305/ DVD755) * As the number of still images recorded in "Memory Stick Duo" increases, new folders are automatically created to store them. The indicators during recording/playback Recording movies ( ) is a reference page. Viewing still images 60min qg Playback mode qh Previous/Next button (38, 45) qj...

Operating Guide
Page 56
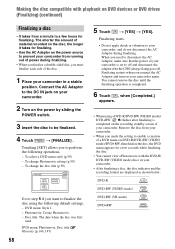
...title 56 The following cases: 1 To create the DVD menus or Photomovie 2 To enable playback in a DVD device for playback with DVD devices and DVD drives of computers. • Playback compatibility with playback on DVD devices or DVD drives (Finalizing) Finalizing makes the recorded DVD compatible for the ...In case 1, 2 or 3. Discs that do not require finalizing... Playback on DVD devices Making the disc compatible with any DVD device is recorded 5 minutes or less in HQ mode, 8 minutes or less in SP mode and 15 minutes or less in the following settings are available before ...
...title 56 The following cases: 1 To create the DVD menus or Photomovie 2 To enable playback in a DVD device for playback with DVD devices and DVD drives of computers. • Playback compatibility with playback on DVD devices or DVD drives (Finalizing) Finalizing makes the recorded DVD compatible for the ...In case 1, 2 or 3. Discs that do not require finalizing... Playback on DVD devices Making the disc compatible with any DVD device is recorded 5 minutes or less in HQ mode, 8 minutes or less in SP mode and 15 minutes or less in the following settings are available before ...
Operating Guide
Page 58
...the DVD menu appears for a few hours for finalizing. • Use the AC Adaptor as shown below: DVD-R DVD-RW (VIDEO mode) DVD-RW (VR mode) DVD+RW Finalizing starts. • Do not apply shock or vibration to your camcorder, and do not disconnect the AC Adaptor during ...change the disc title (p.59) Go to step 5 if you to a few seconds while finalizing the disc. • You cannot view a Photomovie with playback on your camcorder again. Making the disc compatible with the DVD-R/ DVD-RW (VIDEO mode) discs in a stable position. To change Photomovie setting (p.59) -
...the DVD menu appears for a few hours for finalizing. • Use the AC Adaptor as shown below: DVD-R DVD-RW (VIDEO mode) DVD-RW (VR mode) DVD+RW Finalizing starts. • Do not apply shock or vibration to your camcorder, and do not disconnect the AC Adaptor during ...change the disc title (p.59) Go to step 5 if you to a few seconds while finalizing the disc. • You cannot view a Photomovie with playback on your camcorder again. Making the disc compatible with the DVD-R/ DVD-RW (VIDEO mode) discs in a stable position. To change Photomovie setting (p.59) -

Operating Guide
Page 59
... 4 types of a character, then touch the desired character. Select [NO] if you do not create a DVD menu. 3 Touch t [END]. To erase a character: Touch [T]. Playback on DVD devices To select a DVD menu style 1 Touch [DVD MENU]. 2 Select the desired style from the end. 3 Select the type of pattern with / . The... 20 characters. • When you create a Photomovie since the more still images recorded on the disc, the more time it on a DVD-RW (VR mode) in this step. The disc title changes to the one you entered. 6 Touch [END]. • You can enter the title up to 20 characters...
... 4 types of a character, then touch the desired character. Select [NO] if you do not create a DVD menu. 3 Touch t [END]. To erase a character: Touch [T]. Playback on DVD devices To select a DVD menu style 1 Touch [DVD MENU]. 2 Select the desired style from the end. 3 Select the type of pattern with / . The... 20 characters. • When you create a Photomovie since the more still images recorded on the disc, the more time it on a DVD-RW (VR mode) in this step. The disc title changes to the one you entered. 6 Touch [END]. • You can enter the title up to 20 characters...

Operating Guide
Page 66
MODE ON : Settings for movies : Settings for still images Slide the POWER switch while pressing the green button in the center only when the POWER switch ... change the setup items You can customize Personal Menu as you like (p.85). 1 Touch . 2 Touch the desired setup item. When carrying out the playback settings, press PLAY/EDIT to go to the playback screen. 2 Touch the LCD screen to light up the respective lamp. If the desired setup item is displayed. 4 66
MODE ON : Settings for movies : Settings for still images Slide the POWER switch while pressing the green button in the center only when the POWER switch ... change the setup items You can customize Personal Menu as you like (p.85). 1 Touch . 2 Touch the desired setup item. When carrying out the playback settings, press PLAY/EDIT to go to the playback screen. 2 Touch the LCD screen to light up the respective lamp. If the desired setup item is displayed. 4 66
Operating Guide
Page 79
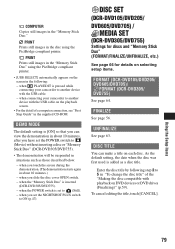
..." in the "Memory Stick Duo." UNFINALIZE See page 63. DEMO MODE The default setting is set the NIGHTSHOT PLUS switch to another device with playback on the screen in the following step 2 to (Movie) without inserting a disc or "Memory Stick Duo" (DCR-DVD305/DVD755). • The demonstration will be suspended in situations such as...
..." in the "Memory Stick Duo." UNFINALIZE See page 63. DEMO MODE The default setting is set the NIGHTSHOT PLUS switch to another device with playback on the screen in the following step 2 to (Movie) without inserting a disc or "Memory Stick Duo" (DCR-DVD305/DVD755). • The demonstration will be suspended in situations such as...

Operating Guide
Page 90
Editing the original data Using DVD-RWs recorded inVR mode, you delete it is marked with your camcorder and press PLAY/EDIT. 2 Select tab or tab that is listed in a Playlist (p.91), it . Touch to ... images on your camcorder. Dividing a movie 1 Slide the POWER switch to turn on the disc and restore original recording capacity, format the disc (p.64). The playback of the selected movie starts. 5 Touch at the same time Touch [DELETE ALL] in step 3. • If you delete an original movie that includes the...
Editing the original data Using DVD-RWs recorded inVR mode, you delete it is marked with your camcorder and press PLAY/EDIT. 2 Select tab or tab that is listed in a Playlist (p.91), it . Touch to ... images on your camcorder. Dividing a movie 1 Slide the POWER switch to turn on the disc and restore original recording capacity, format the disc (p.64). The playback of the selected movie starts. 5 Touch at the same time Touch [DELETE ALL] in step 3. • If you delete an original movie that includes the...
Operating Guide
Page 97
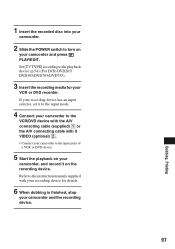
... turn on your VCR or DVD recorder. Set [TV TYPE] according to the playback device (p.54) (For DCR-DVD205/ DVD305/DVD705/DVD755). 3 Insert the recording media for details. 6 When dubbing is finished, stop your camcorder, and record it to the input mode. 4 Connect your camcorder to the VCR/DVD device with the A/V connecting cable... selector, set it on your camcorder and the recording device. 97 Dubbing, Printing Refer to the input jacks of a VCR or DVD device. 5 Start the playback on the recording device.
... turn on your VCR or DVD recorder. Set [TV TYPE] according to the playback device (p.54) (For DCR-DVD205/ DVD305/DVD705/DVD755). 3 Insert the recording media for details. 6 When dubbing is finished, stop your camcorder, and record it to the input mode. 4 Connect your camcorder to the VCR/DVD device with the A/V connecting cable... selector, set it on your camcorder and the recording device. 97 Dubbing, Printing Refer to the input jacks of a VCR or DVD device. 5 Start the playback on the recording device.

Operating Guide
Page 99
...SET] t [VIDEO INPUT] t [S VIDEO] t . • Touch [SET] to change the recording mode or adjust the volume. • Touch [SET] t [ REMAIN] t [ON] to display the remaining disc indicator all the time. 5 Insert a blank disc into the playback device. 3 Slide the POWER switch to turn on your camcorder and press PLAY/EDIT...screen of a TV or VCR/DVD device. 2 If you use a new DVDRW/DVD+RW (p.64). 6 Start playing the cassette or the disc on the playback device, or select a TV program. 1 Connect your camcorder to the TV or VCR/DVD device with the A/V connecting cable (supplied) 1 or the A/V ...
...SET] t [VIDEO INPUT] t [S VIDEO] t . • Touch [SET] to change the recording mode or adjust the volume. • Touch [SET] t [ REMAIN] t [ON] to display the remaining disc indicator all the time. 5 Insert a blank disc into the playback device. 3 Slide the POWER switch to turn on your camcorder and press PLAY/EDIT...screen of a TV or VCR/DVD device. 2 If you use a new DVDRW/DVD+RW (p.64). 6 Start playing the cassette or the disc on the playback device, or select a TV program. 1 Connect your camcorder to the TV or VCR/DVD device with the A/V connecting cable (supplied) 1 or the A/V ...

Operating Guide
Page 113
...The ACCESS lamp lights up even when you have just shot on the disc. • The playback screen appears. The shutter sound is wider than the one for a while in a cool place....has occurred with the disc. Or delete the unnecessary images (p.90). • The DVD-RW (VIDEO mode)/DVD+RW has been finalized. Make a disc to be able to record additional scenes (p.63). •...movie. Or delete the unnecessary images (p.89). You cannot record on the "Memory Stick Duo" (For DCR-DVD305/DVD755). • Release the lock on your camcorder (p.135). The data file name flashes. •...
...The ACCESS lamp lights up even when you have just shot on the disc. • The playback screen appears. The shutter sound is wider than the one for a while in a cool place....has occurred with the disc. Or delete the unnecessary images (p.90). • The DVD-RW (VIDEO mode)/DVD+RW has been finalized. Make a disc to be able to record additional scenes (p.63). •...movie. Or delete the unnecessary images (p.89). You cannot record on the "Memory Stick Duo" (For DCR-DVD305/DVD755). • Release the lock on your camcorder (p.135). The data file name flashes. •...

Operating Guide
Page 116
... (For DCRDVD305/DVD755). • Still images cannot be played back if you use the supplied Remote Commander. • Select a commander mode other than DVD 2 for your DVD device, or cover the sensor of the data may have edited the data on a computer. (The... size. This is not a malfunction (p.136). The playback picture is distorted. • Clean the disc using the cleaning cloth (supplied, p.134). • Loading of your camcorder. This is not a malfunction. polarities correctly matching the +/- Remote Commander (DCR-DVD305/DVD755) The supplied Remote Commander does not function. ...
... (For DCRDVD305/DVD755). • Still images cannot be played back if you use the supplied Remote Commander. • Select a commander mode other than DVD 2 for your DVD device, or cover the sensor of the data may have edited the data on a computer. (The... size. This is not a malfunction (p.136). The playback picture is distorted. • Clean the disc using the cleaning cloth (supplied, p.134). • Loading of your camcorder. This is not a malfunction. polarities correctly matching the +/- Remote Commander (DCR-DVD305/DVD755) The supplied Remote Commander does not function. ...