
Operating Guide
Page 37
...76). When disappears, the image has been recorded. 37 Flashing bLights up the lamp. (Still) 2 Select the recording destination for still images (For DCR-DVD305/DVD755). 1 Touch [SETUP] t [STILL MEDIA]. 2 Select the media for recording still images, then touch . Easy Handycam - The recording screen ...the POWER switch A in the direction of recordable still images and recording media • The default setting is [MEMORY STICK]. 3 Press PHOTO D lightly to adjust the focus A, then press it fully B. • The default setting is heard. Before Easy Handycam operation Turn on...
...76). When disappears, the image has been recorded. 37 Flashing bLights up the lamp. (Still) 2 Select the recording destination for still images (For DCR-DVD305/DVD755). 1 Touch [SETUP] t [STILL MEDIA]. 2 Select the media for recording still images, then touch . Easy Handycam - The recording screen ...the POWER switch A in the direction of recordable still images and recording media • The default setting is [MEMORY STICK]. 3 Press PHOTO D lightly to adjust the focus A, then press it fully B. • The default setting is heard. Before Easy Handycam operation Turn on...

Operating Guide
Page 42
Recording/Playback Recording Remove the lens cap. PHOTO POWER switch START/STOP A Slide the POWER switch in the OFF (CHG) position. 2 Press START/STOP A (or B). 60min [STBY] To stop recording, press START/STOP again. DCR-DVD105/DVD605: START/STOP B Movies 1 Slide the POWER switch in the direction of the arrow while pressing the green button only when the POWER switch is in the direction of the arrow to light up the (Movie) lamp. REC [REC] 42
Recording/Playback Recording Remove the lens cap. PHOTO POWER switch START/STOP A Slide the POWER switch in the OFF (CHG) position. 2 Press START/STOP A (or B). 60min [STBY] To stop recording, press START/STOP again. DCR-DVD105/DVD605: START/STOP B Movies 1 Slide the POWER switch in the direction of the arrow while pressing the green button only when the POWER switch is in the direction of the arrow to light up the (Movie) lamp. REC [REC] 42
Operating Guide
Page 43
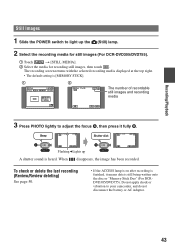
...at the top right. • The default setting is [MEMORY STICK]. 1 2 The number of recordable still images and recording media 3 Press PHOTO lightly to adjust the focus A, then press it means data is still being written onto the disc or "Memory Stick Duo" (For DCRDVD305/DVD755)...., and do not disconnect the battery or AC Adaptor. 43 Flashing bLights up the (Still) lamp. 2 Select the recording media for still images (For DCR-DVD305/DVD755). 1 Touch t [STILL MEDIA]. 2 Select the media for recording still images, then touch . Recording/Playback Still Images 1 Slide the POWER switch ...
...at the top right. • The default setting is [MEMORY STICK]. 1 2 The number of recordable still images and recording media 3 Press PHOTO lightly to adjust the focus A, then press it means data is still being written onto the disc or "Memory Stick Duo" (For DCRDVD305/DVD755)...., and do not disconnect the battery or AC Adaptor. 43 Flashing bLights up the (Still) lamp. 2 Select the recording media for still images (For DCR-DVD305/DVD755). 1 Touch t [STILL MEDIA]. 2 Select the media for recording still images, then touch . Recording/Playback Still Images 1 Slide the POWER switch ...

Operating Guide
Page 52
Upper left Upper Center Upper right Bottom Center Upper left Indicator Meaning 5.1ch surround recording/ playback (46) Self-timer recording (73) Continuous photo recording /Bracket recording (75) Flash light (72) MICREF LEVEL low (81) LCD panel off (78) Upper center Indicator Meaning Repeat of Slide show (49) Upper ... (70) Backlight (47) White balance (71) WIDE SELECT (32,74) SteadyShot off (26) Center Indicator E ( ) is recorded automatically on the disc and "Memory Stick Duo" (DCR-DVD305/DVD755).
Upper left Upper Center Upper right Bottom Center Upper left Indicator Meaning 5.1ch surround recording/ playback (46) Self-timer recording (73) Continuous photo recording /Bracket recording (75) Flash light (72) MICREF LEVEL low (81) LCD panel off (78) Upper center Indicator Meaning Repeat of Slide show (49) Upper ... (70) Backlight (47) White balance (71) WIDE SELECT (32,74) SteadyShot off (26) Center Indicator E ( ) is recorded automatically on the disc and "Memory Stick Duo" (DCR-DVD305/DVD755).

Operating Guide
Page 53
Recording/Playback Remote Commander (DCR-DVD305/DVD755) Remove the insulation sheet before using the Remote Commander. When you press any of the recorded images (p.82) when you press this while playing back. 2 PHOTO (p.37, 42) The on the LCD screen. qd b / B / v / V / ENTER When you press any button, the orange frame appears on -screen image...
Recording/Playback Remote Commander (DCR-DVD305/DVD755) Remove the insulation sheet before using the Remote Commander. When you press any of the recorded images (p.82) when you press this while playing back. 2 PHOTO (p.37, 42) The on the LCD screen. qd b / B / v / V / ENTER When you press any button, the orange frame appears on -screen image...

Operating Guide
Page 73
...the focus manually ([FOCUS], p.72) when it is about 10 seconds. Press PHOTO when [ SELF-TIMER] is hard to focus automatically. • The shutter speed of your camcorder changes depending on the Remote Commander (p.53) (For DCR-DVD305/DVD755). Set [SUPER NSPLUS] to [ON] while the NIGHTSHOT PLUS switch is... set to [OFF]. • Do not use the self-timer with PHOTO on the screen. To cancel the count down at this time. To...
...the focus manually ([FOCUS], p.72) when it is about 10 seconds. Press PHOTO when [ SELF-TIMER] is hard to focus automatically. • The shutter speed of your camcorder changes depending on the Remote Commander (p.53) (For DCR-DVD305/DVD755). Set [SUPER NSPLUS] to [ON] while the NIGHTSHOT PLUS switch is... set to [OFF]. • Do not use the self-timer with PHOTO on the screen. To cancel the count down at this time. To...
Operating Guide
Page 75
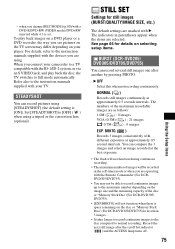
...you are operating with the Remote Commander (For DCRDVD305/DVD755). • You may differ depending on the disc or "Memory Stick Duo" (For DCR-DVD305/DVD755)for less than 3 images. • It takes longer to record continuous images to the disc compared to the instruction manuals supplied with ...B. Record the next still image after another by pressing PHOTO. B OFF Select this when not recording continuously. Refer also to the instruction manuals supplied with the ID-1/ID-2 system, or via an...
...you are operating with the Remote Commander (For DCRDVD305/DVD755). • You may differ depending on the disc or "Memory Stick Duo" (For DCR-DVD305/DVD755)for less than 3 images. • It takes longer to record continuous images to the disc compared to the instruction manuals supplied with ...B. Record the next still image after another by pressing PHOTO. B OFF Select this when not recording continuously. Refer also to the instruction manuals supplied with the ID-1/ID-2 system, or via an...

Operating Guide
Page 99
... where you press [REC] and the actual point that the recording starts/stops. • You cannot record a picture as a still image even if you press PHOTO during recording. 99 Dubbing, Printing The picture played on the connected device appears on the playback device, or select a TV program. 1 Connect your camcorder to...
... where you press [REC] and the actual point that the recording starts/stops. • You cannot record a picture as a still image even if you press PHOTO during recording. 99 Dubbing, Printing The picture played on the connected device appears on the playback device, or select a TV program. 1 Connect your camcorder to...

Operating Guide
Page 113
... file format is wider than the one for the movie. You cannot press PHOTO while [CAPTURE] or appears on your camcorder and leave it for about 1 hour (p.139). You cannot record on the "Memory Stick Duo" (For DCR-DVD305/DVD755). • Release the lock on the disc. The ACCESS lamp lights..., p.64). Make a disc to be able to record additional scenes (p.63). • The temperature of your camcorder (p.135). Pressing START/STOP or PHOTO does not record movies/still images on the LCD screen to "Adjusting the image during recording" (p.115). Press PLAY/EDIT or touch on the disc...
... file format is wider than the one for the movie. You cannot press PHOTO while [CAPTURE] or appears on your camcorder and leave it for about 1 hour (p.139). You cannot record on the "Memory Stick Duo" (For DCR-DVD305/DVD755). • Release the lock on the disc. The ACCESS lamp lights..., p.64). Make a disc to be able to record additional scenes (p.63). • The temperature of your camcorder (p.135). Pressing START/STOP or PHOTO does not record movies/still images on the LCD screen to "Adjusting the image during recording" (p.115). Press PLAY/EDIT or touch on the disc...
Operating Guide
Page 147
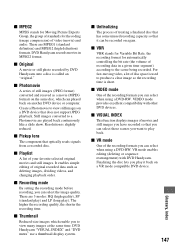
... image quality. Still images converted to view many images at the same time. x VIDEO mode One of video (movie) and audio. x Original A movie or still photo recorded by DVD Handycam onto a disc is slightly reduced. x Photomovie A series of treating a finalized disc that has some unused recording capacity so that it back...
... image quality. Still images converted to view many images at the same time. x VIDEO mode One of video (movie) and audio. x Original A movie or still photo recorded by DVD Handycam onto a disc is slightly reduced. x Photomovie A series of treating a finalized disc that has some unused recording capacity so that it back...
Operating Guide
Page 149
... P PAL 132 PASTEL 78 PB zoom 48 Personal Menu 66, 85 Add 85 Arrange the order.......... 86 Delete 85 Reset 86 Personal Menu button .......... 51 PHOTO button ......... 37, 43, 53 Photomovie 59, 94 Pickup lens 141 PictBridge 100 Picture Package 20, 103 PICT.APPLI. (Picture Application 77 PICT.
... P PAL 132 PASTEL 78 PB zoom 48 Personal Menu 66, 85 Add 85 Arrange the order.......... 86 Delete 85 Reset 86 Personal Menu button .......... 51 PHOTO button ......... 37, 43, 53 Photomovie 59, 94 Pickup lens 141 PictBridge 100 Picture Package 20, 103 PICT.APPLI. (Picture Application 77 PICT.