Operating Guide
Page 6
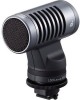
... with the limits for using your camcorder.) • You cannot use "Memory Stick Duo" marked with marks listed below. On the discs you can use 8cm DVD-Rs, 8cm DVD-RWs and 8cm DVD+RWs only. Notes on the supplied CD-ROM)* * The DCR-DVD105/DVD205/DVD605/ DVD705 do not...use it in CANADA "Battery pack" THIS CLASS B DIGITAL APPARATUS COMPLIES WITH CANADIAN ICES-003. "Operating Guide" (This manual) - For customers in your camcorder with "Memory Stick PRO" compatible equipment. 6 "Memory Stick Duo" (This size can use in order to Subpart B of Part 15 of FCC Rules. ...
... with the limits for using your camcorder.) • You cannot use "Memory Stick Duo" marked with marks listed below. On the discs you can use 8cm DVD-Rs, 8cm DVD-RWs and 8cm DVD+RWs only. Notes on the supplied CD-ROM)* * The DCR-DVD105/DVD205/DVD605/ DVD705 do not...use it in CANADA "Battery pack" THIS CLASS B DIGITAL APPARATUS COMPLIES WITH CANADIAN ICES-003. "Operating Guide" (This manual) - For customers in your camcorder with "Memory Stick PRO" compatible equipment. 6 "Memory Stick Duo" (This size can use in order to Subpart B of Part 15 of FCC Rules. ...
Operating Guide
Page 8
... used on this manual are based on the model DCR-DVD305. • Disc in this first (continued) On recording • Before starting to record, test the recording function to make sure the picture and sound are captured using your camcorder if necessary (p.84). 8 About the Carl Zeiss lens... procedures. You cannot dub copyright protected software on your recordings on a TV, you record them on a DVD-R. DVD +RW • The on-screen displays in Germany, and Sony Corporation, and produces superior images. The number value indicates the amount of recording media and accessories are subject ...
... used on this manual are based on the model DCR-DVD305. • Disc in this first (continued) On recording • Before starting to record, test the recording function to make sure the picture and sound are captured using your camcorder if necessary (p.84). 8 About the Carl Zeiss lens... procedures. You cannot dub copyright protected software on your recordings on a TV, you record them on a DVD-R. DVD +RW • The on-screen displays in Germany, and Sony Corporation, and produces superior images. The number value indicates the amount of recording media and accessories are subject ...
Operating Guide
Page 10
... pack 21 Step 3: Turning the power on, and holding your camcorder with automatic settings Using Easy Handycam operation 34 Recording with ease 36 Playing back with ease 38 Preparation for playing back on a DVD player (Finalizing 40 Recording/Playback Recording 42 Playback 44 Functions used... for recording/playback, etc 46 Recording To use zoom To record sound with more presence (5.1ch surround recording) (For DCR-DVD305/DVD755) To record in dark places (NightShot...
... pack 21 Step 3: Turning the power on, and holding your camcorder with automatic settings Using Easy Handycam operation 34 Recording with ease 36 Playing back with ease 38 Preparation for playing back on a DVD player (Finalizing 40 Recording/Playback Recording 42 Playback 44 Functions used... for recording/playback, etc 46 Recording To use zoom To record sound with more presence (5.1ch surround recording) (For DCR-DVD305/DVD755) To record in dark places (NightShot...
Operating Guide
Page 11
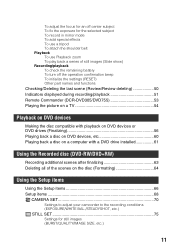
... (DCR-DVD305/DVD755 53 Playing the picture on a TV 54 Playback on DVD devices Making the disc compatible with playback on DVD devices or DVD drives (Finalizing 56 Playing back a disc on DVD devices, etc 60 Playing back a disc on a computer with a DVD drive installed 61 Using the Recorded disc (DVD-RW/DVD+RW...) Recording additional scenes after finalizing 63 Deleting all of the scenes on the disc (Formatting 64 Using the Setup items Using the Setup items 66 Setup items 68 CAMERA SET 70 Settings to adjust your camcorder to the recording conditions ...
... (DCR-DVD305/DVD755 53 Playing the picture on a TV 54 Playback on DVD devices Making the disc compatible with playback on DVD devices or DVD drives (Finalizing 56 Playing back a disc on DVD devices, etc 60 Playing back a disc on a computer with a DVD drive installed 61 Using the Recorded disc (DVD-RW/DVD+RW...) Recording additional scenes after finalizing 63 Deleting all of the scenes on the disc (Formatting 64 Using the Setup items Using the Setup items 66 Setup items 68 CAMERA SET 70 Settings to adjust your camcorder to the recording conditions ...
Operating Guide
Page 16
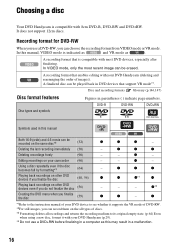
...camcorder (90) - z *1Refer to the instruction manual of your DVD device to see whether it with your DVD Handycam (p.29). *4 Do not use a DVD-RW, you finalize the disc (40, 56) z - Recording format for DVD-RW When you use a DVD+RW before finalizing in DVD devices that is compatible with 8cm DVD-R, DVD-RW and DVD...format features Disc types and symbols Figures in a malfunction. 16 A finalized disc can be played back in a computer as . DVD-R DVD-RW DVD+RW Symbols used in this manual, VIDEO mode is indicated as and VR mode as this may result in parentheses ( ) ...
...camcorder (90) - z *1Refer to the instruction manual of your DVD device to see whether it with your DVD Handycam (p.29). *4 Do not use a DVD-RW, you finalize the disc (40, 56) z - Recording format for DVD-RW When you use a DVD+RW before finalizing in DVD devices that is compatible with 8cm DVD-R, DVD-RW and DVD...format features Disc types and symbols Figures in a malfunction. 16 A finalized disc can be played back in a computer as . DVD-R DVD-RW DVD+RW Symbols used in this manual, VIDEO mode is indicated as and VR mode as this may result in parentheses ( ) ...
Operating Guide
Page 20
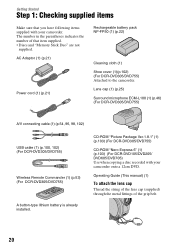
Lens cap (1) (p.25) Surround microphone ECM-L100 (1) (p.46) (For DCR-DVD305/DVD755) A/V connecting cable (1) (p.54, 96, 98, 102) USB cable (1) (p.100, 102) (For DCR-DVD305/DVD755) Wireless Remote Commander (1) (p.53) (For DCR-DVD305/DVD755) A button-type lithium battery is already installed. Operating ... 20 CD-ROM "Picture Package Ver.1.8.1" (1) (p.103) (For DCR-DVD305/DVD755) CD-ROM "Nero Express 6" (1) (p.103) (For DCR-DVD105/DVD205/ DVD605/DVD705) Use when copying a disc recorded with your camcorder onto a 12cm DVD. AC Adaptor (1) (p.21) Power cord (1) (p.21) Rechargeable battery...
Lens cap (1) (p.25) Surround microphone ECM-L100 (1) (p.46) (For DCR-DVD305/DVD755) A/V connecting cable (1) (p.54, 96, 98, 102) USB cable (1) (p.100, 102) (For DCR-DVD305/DVD755) Wireless Remote Commander (1) (p.53) (For DCR-DVD305/DVD755) A button-type lithium battery is already installed. Operating ... 20 CD-ROM "Picture Package Ver.1.8.1" (1) (p.103) (For DCR-DVD305/DVD755) CD-ROM "Nero Express 6" (1) (p.103) (For DCR-DVD105/DVD205/ DVD605/DVD705) Use when copying a disc recorded with your camcorder onto a 12cm DVD. AC Adaptor (1) (p.21) Power cord (1) (p.21) Rechargeable battery...
Operating Guide
Page 29
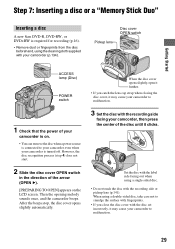
... a "Memory Stick Duo" Inserting a disc A new 8cm DVD-R, DVD-RW, or DVD+RW is required for recording (p.16). • Remove dust or fingerprints from the disc beforehand, using the cleaning cloth supplied with your camcorder to your camcorder even when your camcorder is turned off. However, the disc recognition process (step 4).... • If you catch the lens cap strap when closing the disc cover, it may cause your camcorder to malfunction. 3 Set the disc with the recording side facing your camcorder, then press the center of the arrow (OPEN B). [PREPARING TO OPEN] appears on . • ...
... a "Memory Stick Duo" Inserting a disc A new 8cm DVD-R, DVD-RW, or DVD+RW is required for recording (p.16). • Remove dust or fingerprints from the disc beforehand, using the cleaning cloth supplied with your camcorder to your camcorder even when your camcorder is turned off. However, the disc recognition process (step 4).... • If you catch the lens cap strap when closing the disc cover, it may cause your camcorder to malfunction. 3 Set the disc with the recording side facing your camcorder, then press the center of the arrow (OPEN B). [PREPARING TO OPEN] appears on . • ...
Operating Guide
Page 30
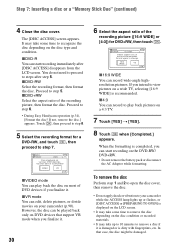
... "Memory Stick Duo" (continued) 4 Close the disc cover. xDVD-R You can start recording on DVD devices that support VR mode when you can edit, delete pictures, or divide movies on your camcorder while the ACCESS lamp lights up to 10 minutes to step 7. Proceed to step 6. •...16:9 WIDE 4:3 OK x16:9 WIDE You can play back pictures on various DVD devices. FORMAT : VIDEO Can playback on a 4:3 TV. 7 Touch [YES] t [YES]. 8 Touch when [Completed.] appears. Cannot edit in Camcorder VIDEO VR OK xVIDEO mode You can record wide-angle highresolution pictures. Format again...
... "Memory Stick Duo" (continued) 4 Close the disc cover. xDVD-R You can start recording on DVD devices that support VR mode when you can edit, delete pictures, or divide movies on your camcorder while the ACCESS lamp lights up to 10 minutes to step 7. Proceed to step 6. •...16:9 WIDE 4:3 OK x16:9 WIDE You can play back pictures on various DVD devices. FORMAT : VIDEO Can playback on a 4:3 TV. 7 Touch [YES] t [YES]. 8 Touch when [Completed.] appears. Cannot edit in Camcorder VIDEO VR OK xVIDEO mode You can record wide-angle highresolution pictures. Format again...
Operating Guide
Page 31
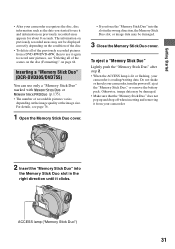
...details, see "Deleting all of the scenes on the disc (Formatting)" on page 64. ACCESS lamp ("Memory Stick Duo") 31 Inserting a "Memory Stick Duo" (DCR-DVD305/DVD755) You can use it again to record new pictures, see page 76. 1 Open the Memory Stick Duo cover. • If you started to use... Duo" into the slot in the right direction until it clicks. Do not shake or knock your camcorder is lit or flashing, your camcorder, turn the power off when inserting and removing it from a DVD-RW/DVD+RW, then to use only a "Memory Stick Duo" marked with or (p.135). • The ...
...details, see "Deleting all of the scenes on the disc (Formatting)" on page 64. ACCESS lamp ("Memory Stick Duo") 31 Inserting a "Memory Stick Duo" (DCR-DVD305/DVD755) You can use it again to record new pictures, see page 76. 1 Open the Memory Stick Duo cover. • If you started to use... Duo" into the slot in the right direction until it clicks. Do not shake or knock your camcorder is lit or flashing, your camcorder, turn the power off when inserting and removing it from a DVD-RW/DVD+RW, then to use only a "Memory Stick Duo" marked with or (p.135). • The ...

Operating Guide
Page 32
... while recording movies - Step 8: Selecting the aspect ratio (16:9 or 4:3) of the recording picture (DCR-DVD205/DVD305/ DVD705/DVD755) By recording in the 16:9 (wide) mode, you can enjoy wide-angle, high-resolution...MOVIE] (p.78) • Differences in the following cases: - To play back pictures after connecting your camcorder to a TV Set [TV TYPE] to [16:9] or [4:3] according to your device. when you see...(wide) and 4:3 while recording on the LCD screen. To play back images on a DVD device or a DVD recorder The way you toggle between 16:9 (wide) and 4:3 vary depending on the zoom...
... while recording movies - Step 8: Selecting the aspect ratio (16:9 or 4:3) of the recording picture (DCR-DVD205/DVD305/ DVD705/DVD755) By recording in the 16:9 (wide) mode, you can enjoy wide-angle, high-resolution...MOVIE] (p.78) • Differences in the following cases: - To play back pictures after connecting your camcorder to a TV Set [TV TYPE] to [16:9] or [4:3] according to your device. when you see...(wide) and 4:3 while recording on the LCD screen. To play back images on a DVD device or a DVD recorder The way you toggle between 16:9 (wide) and 4:3 vary depending on the zoom...
Operating Guide
Page 34
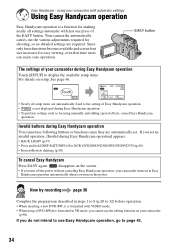
... settings automatic with just one press of the EASY button. If you set . If you cannot use the editing function on your camcorder with automatic settings Using Easy Handycam operation Easy Handycam operation is a function for easy viewing, even first time users can enjoy easy operation....Touch [SETUP] to 32) before operation. • When inserting a new DVD-RW, it is not displayed during Easy Handycam operation] appears. • BACK LIGHT (p.47) • Press and hold DISP BATT/INFO (For DCR-DVD205/DVD305/DVD705/DVD755)(p.49) • Review/Review deleting (p.50) To cancel Easy ...
... settings automatic with just one press of the EASY button. If you set . If you cannot use the editing function on your camcorder with automatic settings Using Easy Handycam operation Easy Handycam operation is a function for easy viewing, even first time users can enjoy easy operation....Touch [SETUP] to 32) before operation. • When inserting a new DVD-RW, it is not displayed during Easy Handycam operation] appears. • BACK LIGHT (p.47) • Press and hold DISP BATT/INFO (For DCR-DVD205/DVD305/DVD705/DVD755)(p.49) • Review/Review deleting (p.50) To cancel Easy ...
Operating Guide
Page 40
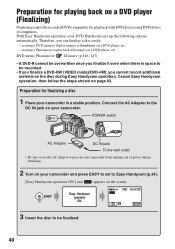
... out of computers. Connect the AC Adaptor to the DC IN jack on your camcorder and press EASY to set to Easy Handycam (p.34). [Easy Handycam operation ON.] and appears on a DVD player, etc. creating a DVD menu to play back still images on the screen. 3 Insert the disc to ...be finalized. 40 Cancel Easy Handycam operation, then follow the steps shown on your camcorder. DVD menu, Photomovie Glossary (p.146, 147) • A DVD-R cannot be overwritten once you finalize it even when there is space to be recorded. • If you finalize...
... out of computers. Connect the AC Adaptor to the DC IN jack on your camcorder and press EASY to set to Easy Handycam (p.34). [Easy Handycam operation ON.] and appears on a DVD player, etc. creating a DVD menu to play back still images on the screen. 3 Insert the disc to ...be finalized. 40 Cancel Easy Handycam operation, then follow the steps shown on your camcorder. DVD menu, Photomovie Glossary (p.146, 147) • A DVD-R cannot be overwritten once you finalize it even when there is space to be recorded. • If you finalize...
Operating Guide
Page 41
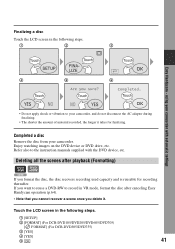
Enjoy watching images on the DVD device or DVD drive, etc. using your camcorder with the DVD device, etc. If you want to reuse a DVD-RW to your camcorder. Deleting all the scenes after canceling Easy Handycam operation (p.64). • Note that you cannot ... disc Touch the LCD screen in the following steps. 1 [SETUP] 2 [FORMAT] (For DCR-DVD105/DVD205/DVD605/DVD705) [ FORMAT] (For DCR-DVD305/DVD755) 3 [YES] 4 [YES] 5 41 Completed a disc Remove the disc from your camcorder, and do not disconnect the AC adaptor during finalizing. • The shorter the amount of ...
Enjoy watching images on the DVD device or DVD drive, etc. using your camcorder with the DVD device, etc. If you want to reuse a DVD-RW to your camcorder. Deleting all the scenes after canceling Easy Handycam operation (p.64). • Note that you cannot ... disc Touch the LCD screen in the following steps. 1 [SETUP] 2 [FORMAT] (For DCR-DVD105/DVD205/DVD605/DVD705) [ FORMAT] (For DCR-DVD305/DVD755) 3 [YES] 4 [YES] 5 41 Completed a disc Remove the disc from your camcorder, and do not disconnect the AC adaptor during finalizing. • The shorter the amount of ...
Operating Guide
Page 44
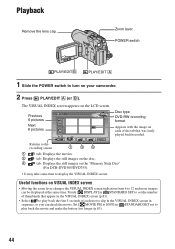
... 1 23 1 tab: Displays the movies. 2 tab: Displays the still images on the disc. 3 tab: Displays the still images on the "Memory Stick Duo" (For DCR-DVD305/DVD755). • It may take some time to turn on each movie clip in the VISUAL INDEX screen in STANDARD SET not to 12 and... INDEX screen indication from 6 to play back the first 5 seconds of thumbnails that was lastly played back/recorded. Previous 6 pictures Next 6 pictures Disc type DVD-RW recording format Appears with the image on your camcorder. 2 Press PLAY/EDIT A (or B). Useful functions on the LCD screen.
... 1 23 1 tab: Displays the movies. 2 tab: Displays the still images on the disc. 3 tab: Displays the still images on the "Memory Stick Duo" (For DCR-DVD305/DVD755). • It may take some time to turn on each movie clip in the VISUAL INDEX screen in STANDARD SET not to 12 and... INDEX screen indication from 6 to play back the first 5 seconds of thumbnails that was lastly played back/recorded. Previous 6 pictures Next 6 pictures Disc type DVD-RW recording format Appears with the image on your camcorder. 2 Press PLAY/EDIT A (or B). Useful functions on the LCD screen.
Operating Guide
Page 58
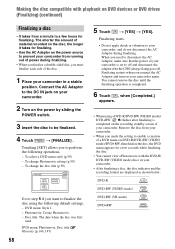
... - When you need to disconnect the AC Adaptor, make sure that the power of your camcorder is completed on your camcorder. • When you to finalize the disc using a DVD-R/DVD-RW (VIDEO mode)/ DVD+RW, Z flashes after the CHG (charge) lamp goes off and disconnect the adaptor after ...enable a creation of a DVD menu on DVD-R/DVD-RW (VIDEO mode)/DVD+RW, then finalize the disc, the DVD menu appears for a few hours for finalizing. • Use the AC Adaptor as shown below: DVD-R DVD-RW (VIDEO mode) DVD-RW (VR mode) DVD+RW Remove the disc from your camcorder again. Touching [SET] ...
... - When you need to disconnect the AC Adaptor, make sure that the power of your camcorder is completed on your camcorder. • When you to finalize the disc using a DVD-R/DVD-RW (VIDEO mode)/ DVD+RW, Z flashes after the CHG (charge) lamp goes off and disconnect the adaptor after ...enable a creation of a DVD menu on DVD-R/DVD-RW (VIDEO mode)/DVD+RW, then finalize the disc, the DVD menu appears for a few hours for finalizing. • Use the AC Adaptor as shown below: DVD-R DVD-RW (VIDEO mode) DVD-RW (VR mode) DVD+RW Remove the disc from your camcorder again. Touching [SET] ...
Operating Guide
Page 60
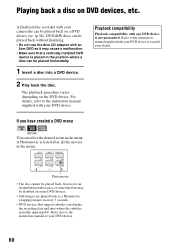
...dealer. Refer to the instruction manual of your camcorder can be played back on some DVD devices. • Still images are played back as it may be played back without finalizing. • Do not use the 8cm CD adaptor with your DVD device. 60 Refer also to the instruction ...display the recording date and time where the subtitles normally appear(p.84). A finalized disc recorded with an 8cm DVD as a Photomovie swapping images in the menu. Playing back a disc on the DVD device. Photomovie • The disc cannot be played back, freezes for an instant between the scenes, ...
...dealer. Refer to the instruction manual of your camcorder can be played back on some DVD devices. • Still images are played back as it may be played back without finalizing. • Do not use the 8cm CD adaptor with your DVD device. 60 Refer also to the instruction ...display the recording date and time where the subtitles normally appear(p.84). A finalized disc recorded with an 8cm DVD as a Photomovie swapping images in the menu. Playing back a disc on the DVD device. Photomovie • The disc cannot be played back, freezes for an instant between the scenes, ...
Operating Guide
Page 63
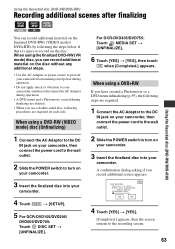
... power cord to the wall outlet. 2 Slide the POWER switch to turn on your camcorder. 3 Insert the finalized disc into your camcorder. For DCR-DVD305/DVD755: Touch MEDIA SET t [UNFINALIZE]. 6 Touch [YES] t [YES], then touch when [Completed.] appears. When using a DVD+RW If you use a double-sided disc, following the steps below if there is...
... power cord to the wall outlet. 2 Slide the POWER switch to turn on your camcorder. 3 Insert the finalized disc into your camcorder. For DCR-DVD305/DVD755: Touch MEDIA SET t [UNFINALIZE]. 6 Touch [YES] t [YES], then touch when [Completed.] appears. When using a DVD+RW If you use a double-sided disc, following the steps below if there is...
Operating Guide
Page 64
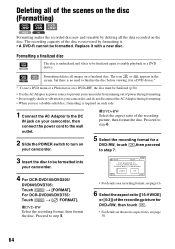
...; Use the AC Adaptor as power source to prevent your camcorder. 4 For DCR-DVD105/DVD205/ DVD605/DVD705: Touch t [FORMAT]. Formatting deletes all the data recorded on the disc. For DCR-DVD305/DVD755: Touch t [ FORMAT]. FORMAT : VIDEO Can playback on a finalized disc. Cannot edit in a DVD device.* * To use a double-sided disc, formatting is recovered by...
...; Use the AC Adaptor as power source to prevent your camcorder. 4 For DCR-DVD105/DVD205/ DVD605/DVD705: Touch t [FORMAT]. Formatting deletes all the data recorded on the disc. For DCR-DVD305/DVD755: Touch t [ FORMAT]. FORMAT : VIDEO Can playback on a finalized disc. Cannot edit in a DVD device.* * To use a double-sided disc, formatting is recovered by...
Operating Guide
Page 65
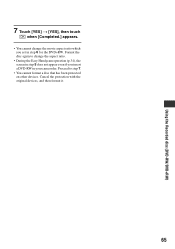
Format the disc again to step 7. • You cannot format a disc that has been protected on other devices. Using the Recorded disc (DVD-RW/DVD+RW) 7 Touch [YES] t [YES], then touch when [Completed.] appears. • You cannot change the aspect ratio. • During the Easy Handycam operation (p.34), the screen in step 5 does not appear even if you set in your camcorder. Proceed to change the movie aspect ratio which you insert a DVD-RW in step 6 for the DVD+RW. Cancel the protection with the original devices, and then format it. 65
Format the disc again to step 7. • You cannot format a disc that has been protected on other devices. Using the Recorded disc (DVD-RW/DVD+RW) 7 Touch [YES] t [YES], then touch when [Completed.] appears. • You cannot change the aspect ratio. • During the Easy Handycam operation (p.34), the screen in step 5 does not appear even if you set in your camcorder. Proceed to change the movie aspect ratio which you insert a DVD-RW in step 6 for the DVD+RW. Cancel the protection with the original devices, and then format it. 65
Operating Guide
Page 75
.../IMAGE SIZE, etc.) The default settings are marked with different exposures at approximately 0.5 second intervals. The numbers of the disc or "Memory Stick Duo"(For DCR-DVD305/ DVD755). • [EXP.BRKTG] will be recorded in parentheses appear when the items are as follows: 1.0M ( ) : 8 images VGA (0.3M) (...the Remote Commander (For DCRDVD305/DVD755). • You may differ depending on a DVD player or a DVD recorder, the way you connect your camcorder to a TV compatible with a DVD-R/DVD-RW (VIDEO mode)/DVD+RW inserted while 4:3 is set. Refer also to full mode automatically. B OFF...
.../IMAGE SIZE, etc.) The default settings are marked with different exposures at approximately 0.5 second intervals. The numbers of the disc or "Memory Stick Duo"(For DCR-DVD305/ DVD755). • [EXP.BRKTG] will be recorded in parentheses appear when the items are as follows: 1.0M ( ) : 8 images VGA (0.3M) (...the Remote Commander (For DCRDVD305/DVD755). • You may differ depending on a DVD player or a DVD recorder, the way you connect your camcorder to a TV compatible with a DVD-R/DVD-RW (VIDEO mode)/DVD+RW inserted while 4:3 is set. Refer also to full mode automatically. B OFF...
